
React梳理归纳
React是什么?
官方解释:用于构建用户界面的Javascript库
为什么要学React?
优势
- 采用组件化模式、声明式编码,提高开发效率及组件复用率。
- 在React Native中可以使用Reacti吾法进行移动端开发。
- 使用虚拟DOM+优秀的Diffing算法,尽量减少与真实DOM的交互。
和声明式编程相对应的是命令式编程(Imperative Programming),大部分语言的hello world都是从命令式编程开始的。
声明式编程不用告诉电脑问题领域,从而避免随之而来的副作用。而指令式编程则需要用算法来明确的指出每一步该怎么做
虚拟DOM放到电脑内存里
原生JS三大痛点
1.操作DOM繁琐、效率低。
2.直接操作DOM浏览器会进行大量的重绘重排。
3.没有组件化编码方案,代码复用率低。
基础
创建虚拟DOM (如果要嵌套的话,太过麻烦)
const VDOM = React.createElement('h1',{id:'title'},'Hello,React')
JSX的出现,解决了这个问题,可以向写HTML一样来创建虚拟DOM
const VDOM = (
 <div>
    <span>蓝刀是我</span>
</div>
)
使用debugger对比虚拟DOM和真实DOM
虚拟DOM(非常的轻便)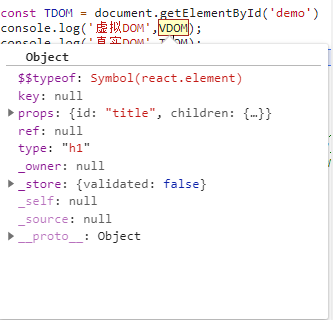 真实DOM(非常的笨重)
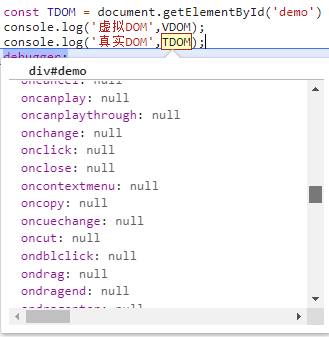
XML: 早期用于存储和传输数据
<student>
    <name>Jack</name>
    <age>18</age>
</student>
后来一般用JSON代替 XML的内容比数据还多
{"name":"Jack","age":18}
花括号{} 只能插入JS表达式
                    (1). a
                    (2). a+b
                    (3). demo(1)
                    (4). arr.map()
                    (5). function test () {}
                    (1).if(){}
                    (2).for(){}
                    (3).switch(){case:xxxx}
render中的this是组件实例对象,因为他是实例对象.render出来的
state 存放着数据,数据改变=> 驱动着页面的展示。
changeWeather(){
  //changeWeather放在哪里? ———— Weather的原型对象上,供实例使用
  //由于changeWeather是作为onClick的回调,所以不是通过实例调用的,是直接调用
  //类中的方法默认开启了局部的严格模式,所以changeWeather中的this为undefined
//严重注意:状态必须通过setState进行更新,且更新是一种合并,不是替换。
  this.setState({isHot:!isHot})
}
赋值语句,相当于给实例自己加,而方法是在原型上加
//自定义方法————要用赋值语句的形式+箭头函数
  changeWeather = ()=>{
   const isHot = this.state.isHot
   this.setState({isHot:!isHot})
  }
赋值语句,一定要写成高阶函数才不会出现一渲染就调用的情况
handleMouse = (flag) => {
    return (event) => {
        console.log(flag,event.target.checked )
    }
}

<input  type="checked " onMouseEnter={this.handleMouse(true)} >
state 简写方法
state = {isHot:false,wind:'微风'}
ref 写法
官方建议,尽量少用
1.字符串(快废弃)
2.回调
ref={(c)=>{this.input1 = c;}}
3.createRef(官方推荐)
myRef = React.createRef();
ref={this.myRef};
事件处理
/*
  (1).通过onXxx属性指定事件处理函数(注意大小写)
         a.React使用的是自定义(合成)事件, 而不是使用的原生DOM事件 —————— 为了更好的兼容性
         b.React中的事件是通过事件委托方式处理的(委托给组件最外层的元素最终绑定到了document这个DOM节点上) ————————为了高效
  (2).通过event.target得到发生事件的DOM元素对象 ——————————不要过度使用ref
 */
合成事件 https://zhuanlan.zhihu.com/p/25883536
如果DOM上绑定了过多的事件处理函数,整个页面响应以及内存占用可能都会受到影响。React为了避免这类DOM事件滥用,同时屏蔽底层不同浏览器之间的事件系统差异,实现了一个中间层——SyntheticEvent。
- 当用户在为onClick添加函数时,React并没有将Click时间绑定在DOM上面。
- 而是在document处监听所有支持的事件,当事件发生并冒泡至document处时,React将事件内容封装交给中间层SyntheticEvent(负责所有事件合成)
- 所以当事件触发的时候,对使用统一的分发函数dispatchEvent将指定函数执行。
高阶函数、函数的柯里化
saveFormData = (dataType)=>{
  return (event)=>{
    this.setState({[dataType]:event.target.value})
  }
}
<input onChange={this.saveFormData('username')} type="text" name="username"/>
/*
  高阶函数:如果一个函数符合下面2个规范中的任何一个,那该函数就是高阶函数。
          1.若A函数,接收的参数是一个函数,那么A就可以称之为高阶函数。
          2.若A函数,调用的返回值依然是一个函数,那么A就可以称之为高阶函数。
          常见的高阶函数有:Promise、setTimeout、arr.map()等等

  函数的柯里化:通过函数调用继续返回函数的方式,实现多次接收参数最后统一处理的函数编码形式。
    function sum(a){
      return(b)=>{
        return (c)=>{
          return a+b+c
        }
      }
    }
*/
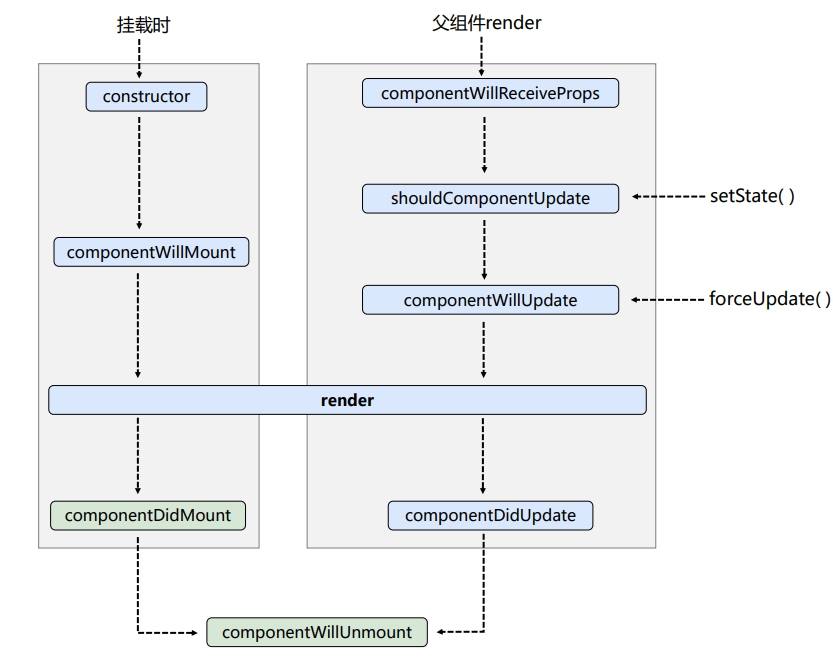
新旧生命周期
旧
新
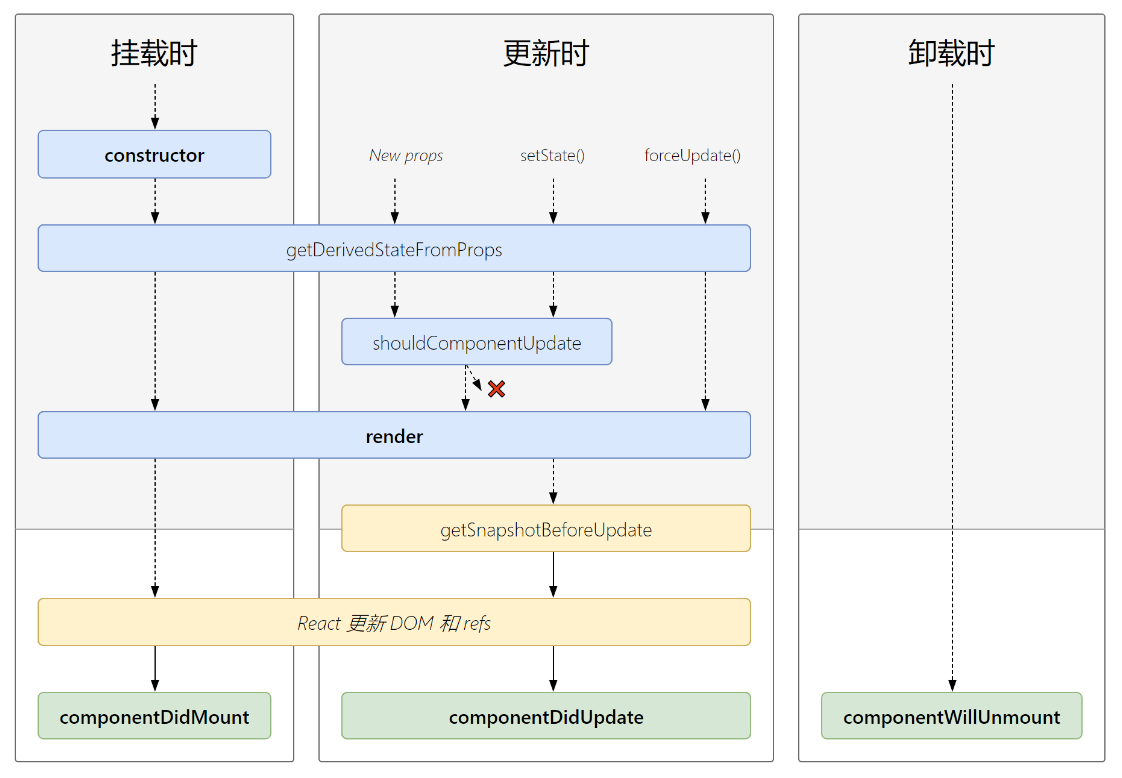
react17开始,废弃componentWillReceiveProps 用 getDerivedStateFromProps 来代替
罕见案例, state的值只取决props
react脚手架 create-react-app
index.html 文件
<!DOCTYPE html>
<html lang="en">
  <head>
        <meta charset="utf-8" />
        <!-- %PUBLIC_URL%代表public文件夹的路径 -->
        <link rel="icon" href="%PUBLIC_URL%/favicon.ico" />
        <!-- 开启理想视口,用于做移动端网页的适配 -->
        <meta name="viewport" content="width=device-width, initial-scale=1" />
        <!-- 用于配置浏览器页签+地址栏的颜色(仅支持安卓手机浏览器) -->
    <meta name="theme-color" content="red" />
    <meta
      name="description"
      content="Web site created using create-react-app"
        />
        <!-- 用于指定网页添加到手机主屏幕后的图标 -->
        <link rel="apple-touch-icon" href="%PUBLIC_URL%/logo192.png" />
        <!-- 应用加壳时的配置文件 -->
        <link rel="manifest" href="%PUBLIC_URL%/manifest.json" />
    <title>React App</title>
  </head>
  <body>
        <!-- 若llq不支持js则展示标签中的内容 -->
    <noscript>You need to enable JavaScript to run this app.</noscript>
    <div id="root"></div>
  </body>
</html>
引入的原则:
第三方往上靠,自己的放中间,样式放最后
css 模块化
import hello from './index.module.css';

className = {hello.xxx}
anfn anonymous(匿名函数)
强制更新(不更改任何state中的数据)
force = ()=>{
   this.forceUpdate()
}
卸载组件
death = ()=>{
  ReactDOM.unmountComponentAtNode(document.getElementById('test'))
}
前端路由
withRouter
把不是通过路由切换过来的组件中,将react-router 的 history、location、match 三个对象传入props对象上
默认情况下必须是经过路由匹配渲染的组件才存在this.props,才拥有路由参数,才能使用编程式导航的写法,执行this.props.history.push('/detail')跳转到对应路由的页面然而不是所有组件都直接与路由相连(通过路由跳转到此组件)的,当这些组件需要路由参数时,使用withRouter就可以给此组件传入路由参数,此时就可以使用this.props
设置withRouter很简单只需要两步:(1)引入 (2)将App组件 withRouter() 一下
import React,{Component} from 'react'
import {Switch,Route,NavLink,Redirect,withRouter} from 'react-router-dom' //引入withRouter
class App extends Component{
//此时才能获取this.props,包含(history, match, location)三个对象
console.log(this.props); //输出{match: {…}, location: {…}, history: {…}, 等}
render(){return (<div className='app'>
<NavLink to='/abc'>用户列表</NavLink>
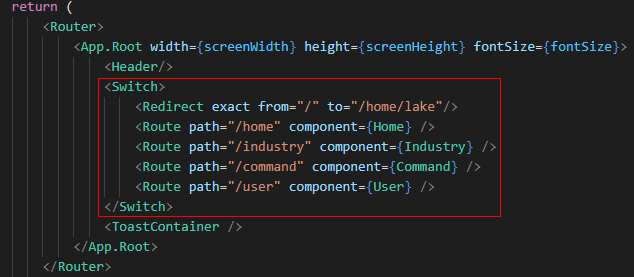
<Switch>
<Redirect from='/' to='/one' exact />
</Switch>
</div>)
}
}
export default withRouter(App); //这里要执行一下WithRouter
使用Router包裹包裹后的路由,打包后缺失路由那段代码?
要改为hash模式才能使用
// 设置路由模式
mirror.defaults({
    historyMode: 'hash'
});
history有两种使用方法
- 直接使用H5推出的history身上的API History.createBrowserHistory()
- hash值 History.createHashHistory()(锚点)看起来不好看,但是兼容性极强
react-router的理解
- 包含三种类型 1 Web (react-router-dom)2.react-native (react navigation)3.any
withRouter 使普通组件变为路由组件 location history match 属性 (location是history的一个属性)
ajax有三种携带请求参数的形式
1.query

2.params

3.body(请求体)  =>  1.urlencode 2.json
路由携带参数的三种方法
1.传递参数
<li key={msgObj.id}>

  {/* 向路由组件传递params参数 */}
  {/* <Link to={`/home/message/detail/${msgObj.id}/${msgObj.title}`}>{msgObj.title}</Link> */}

  {/* 向路由组件传递search参数 */}
  {/* <Link to={`/home/message/detail/?id=${msgObj.id}&title=${msgObj.title}`}>{msgObj.title}</Link> */}

  {/* 向路由组件传递state参数 */}
  <Link to={{pathname:'/home/message/detail',state:{id:msgObj.id,title:msgObj.title}}}>{msgObj.title}</Link>

</li>
2.注册时声明参数
{/* 声明接收params参数 */}
{/* <Route path="/home/message/detail/:id/:title" component={Detail}/> */}

{/* search参数无需声明接收,正常注册路由即可 */}
{/* <Route path="/home/message/detail" component={Detail}/> */}

{/* state参数无需声明接收,正常注册路由即可 */}
<Route path="/home/message/detail" component={Detail}/>
3.接收参数 (querystring是nodejs原生模块,也是raeact的内置库)
// 接收params参数
// const {id,title} = this.props.match.params

// 接收search参数
// const {search} = this.props.location
// const {id,title} = qs.parse(search.slice(1))

// 接收state参数
const {id,title} = this.props.location.state || {}  // 有值就用,没值就空对象
刷新后state还在,是因为使用的是 BrowserHistory 它一直操控history 帮你存着state,清除缓存才会消失
向路由组件传递参数
1.params参数
      路由链接(携带参数):<Link to='/demo/test/tom/18'}>详情</Link>
      注册路由(声明接收):<Route path="/demo/test/:name/:age" component={Test}/>
      接收参数:this.props.match.params
2.search参数
      路由链接(携带参数):<Link to='/demo/test?name=tom&age=18'}>详情</Link>
      注册路由(无需声明,正常注册即可):<Route path="/demo/test" component={Test}/>
      接收参数:this.props.location.search
      备注:获取到的search是urlencoded编码字符串,需要借助querystring解析
3.state参数
      路由链接(携带参数):<Link to={{pathname:'/demo/test',state:{name:'tom',age:18}}}>详情</Link>
      注册路由(无需声明,正常注册即可):<Route path="/demo/test" component={Test}/>
      接收参数:this.props.location.state
      备注:刷新也可以保留住参数
解决多级路径刷新页面样式丢失的问题
devServer内置3000端口服务器,请求不存在的文件,会展示public的index.html
1.public/index.html 中 引入样式时不写 ./ 写 / 直接访问根路径(常用)
2.public/index.html 中 引入样式时不写 ./ 写 %PUBLIC_URL% (常用)  react特有
3.使用HashRouter // 带了#后
路由的严格匹配与模糊匹配
1.默认使用的是模糊匹配(简单记:【输入的路径】必须包含要【匹配的路径】,且顺序要一致)
2.开启严格匹配:<Route exact={true} path="/about" component={About}/>
3.严格匹配不要随便开启,需要再开,有些时候开启会导致无法继续匹配二级路由
连续解构赋值
const a = {b:{c:{d:6}}};
const {b:{c:{d}}} = a;
console.log(d);

//连续解构赋值别名
const a = {b:{c:{d:6}}};
const {b:{c:{d:alias}}} = a;
console.log(alias);
数组解构赋值
let day, month ,year;

const [year, month, day] = '2021/10/25';

[year,month,day] = '2021/10/25'.split('/');
代理
产生跨域的本质是ajax引起把服务器返回的响应拦住了,而中间人是通过请求转发的模式,同源策略不限制他,拿到数据后,因为他是相同的端口,所以客户端可以拿到数据。

setupProxy.js
// package.json中的proxy就是这个配置文件的简写
const proxy = require('http-proxy-middleware');

module.exports = function(app){
  app.use(
    proxy('/api1',{ // 遇见/api1前缀的请求,就会触发该代理配置
      target: 'http://localhost:5000', // 请求转发给谁
      changeOrigin: true,// 控制服务器收到的请求头中Host的值
      pathRewrite: {'^api1':''} //重写请求路径(必须)
    })
  )
}
组件交互/传值
消息订阅与发布
pubsub-js
发送fetch请求 (fetch和XMLHttpRequest同级,XMLHttpRequest是ajax的基础,axios和ajax都基于XMLHttpRequest,fetch是浏览器原生方法)
search = ()=>{
   //获取用户的输入(连续解构赋值+重命名)
   const {keyWordElement:{value:keyWord}} = this
   //发送请求前通知List更新状态
   PubSub.publish('atguigu',{isFirst:false,isLoading:true})
   //发送网络请求
   axios.get(`/api1/search/users?q=${keyWord}`).then(
       response => {
           //请求成功后通知List更新状态
           PubSub.publish('atguigu',{isLoading:false,users:response.data.items})
       },
       error => {
           //请求失败后通知App更新状态
           PubSub.publish('atguigu',{isLoading:false,err:error.message})
       }
    )
}
//发送网络请求---使用fetch发送(未优化)
fetch(`/api1/search/users2?q=${keyWord}`).then(
  response => {
    console.log('联系服务器成功了');
    return response.json()
  },
  error => {
    console.log('联系服务器失败了',error);
    return new Promise(()=>{})
  }
).then(
  response => {console.log('获取数据成功了',response);},
  error => {console.log('获取数据失败了',error);}
)
//发送网络请求---使用fetch发送(优化)
try {
   const response= await fetch(`/api1/search/users2?q=${keyWord}`)
   const data = await response.json()
   console.log(data);
   PubSub.publish('atguigu',{isLoading:false,users:data.items})
 } catch (error) {
   console.log('请求出错',error);
   PubSub.publish('atguigu',{isLoading:false,err:error.message})
 }
接受请求
componentDidMount(){
  this.token = PubSub.subscribe('atguigu',(_,stateObj)=>{
    this.setState(stateObj)
  })
}

componentWillUnmount(){
  PubSub.unsubscribe(this.token)
}
1. 事件监听
handleChange(e){ this.setState({ name:e.target.value }) }
 <input type="text" value={this.state.name} onChange={(e)=>this.handleChange(e)} />
2. PureComponent Vs Component https://www.jianshu.com/p/c41bbbc20e65
3. React.memo
const withKaikeba = (Component) => { const NewComponent = (props) => { return <Component {...props} name="开课吧高阶组件" />; };return NewComponent; };
import React, {Component} from 'react'
import {Button} from 'antd'
const withKaikeba = (Component) => {
    const NewComponent = (props) => {
        return <Component { ...props } name = "开课吧高阶组件" / > ;
    };
    return NewComponent;
};
const withLog = Component => {
    class NewComponent extends React.Component {
        render() {
            return <Component { ...this.props }  />;
        }
        componentDidMount() {
            console.log('didMount', this.props)
        }
    } return NewComponent
}
class App extends Component {
    render() {
        return (
            <div className="App">
                <h2>hi,{this.props.name}</h2 >
                < Button type="primary" > Button < /Button>
                </div >
             )
   }
   }
export default withKaikeba(withLog(App))
npm install --save-dev babel-plugin-transform-decorators-legacy
const { injectBabelPlugin } = require("react-app-rewired");
module.exports = function override(config) {
  config = injectBabelPlugin(
    [
      "import",
      {
        libraryName: "antd",
        libraryDirectory: "es",
        style: "css"
      }
    ],
    config
  );
  config = injectBabelPlugin(
    [
      "@babel/plugin-proposal-decorators",
      {
        legacy: true
      }
    ],
    config
  );
  return config;
};
使用装饰器
import React, { Component } from 'react'
import { Button } from 'antd'
const withKaikeba = (Component) => {
    const NewComponent = (props) => {
        return <Component { ...props } name="开课吧高阶组件" />;
    };
    return NewComponent;
};
const withLog = Component => {
    class NewComponent extends React.Component {
        render() {
            return <Component {  ...this.props } />;
        }
        componentDidMount() {
            console.log(Component.name, 'didMount', this.props)
        }
    } return NewComponent
}
@withKaikeba
@withLog
class App extends Component {
    render() {
        return (
            <div className="App">
                <h2>hi,{this.props.name}</h2 >
                < Button type="primary" > Button < /Button>
                </div >
            )
        }
}
export default App
7. 按需加载
npm install react-app-rewired@2.0.2-next.0 babel-plugin-import --save
2.根目录创建config-overrides.js 文件
const {injectBabelPlugin} = require('react-app-rewired');

module.exports = function override(config, env) {

    config = injectBabelPlugin(
        ['import', {libraryName: 'antd', libraryDirectory: 'es', style: 'css'}],
        config
    );

    config = injectBabelPlugin([
        "@babel/plugin-proposal-decorators",
        {
            "legacy": true
        }
    ], config);

    return config;

};
3.把package.json的react-script 替换为 react-app-rewired
  "scripts": {
    "start": "react-app-rewired start",
    "build": "react-app-rewired build && mkdir ./build/views/ && mv ./build/index.html ./build/views/",
    "test": "react-app-rewired test --env=jsdom"
  }
8. 阻止事件冒泡
 onClick={e=>{
         e.nativeEvent.stopImmediatePropagation(); //PC
         e.stopPropagation(); // 移动
}}
9.webpack配置路径别名alias
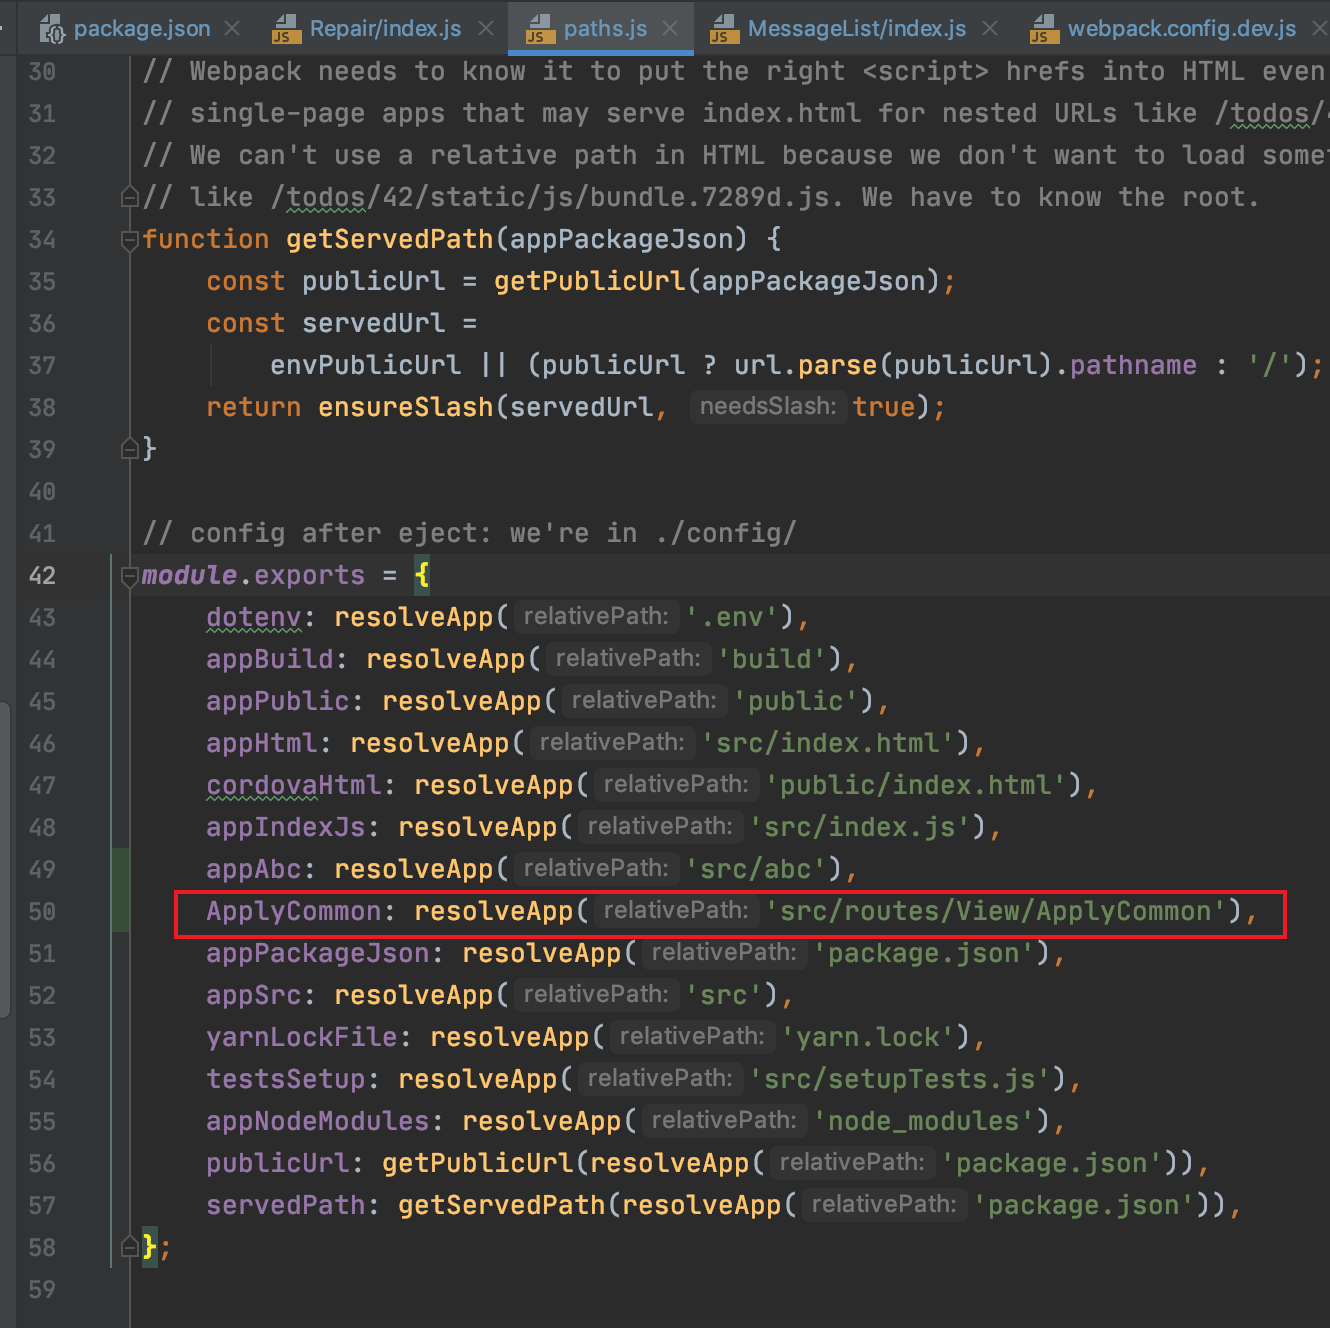
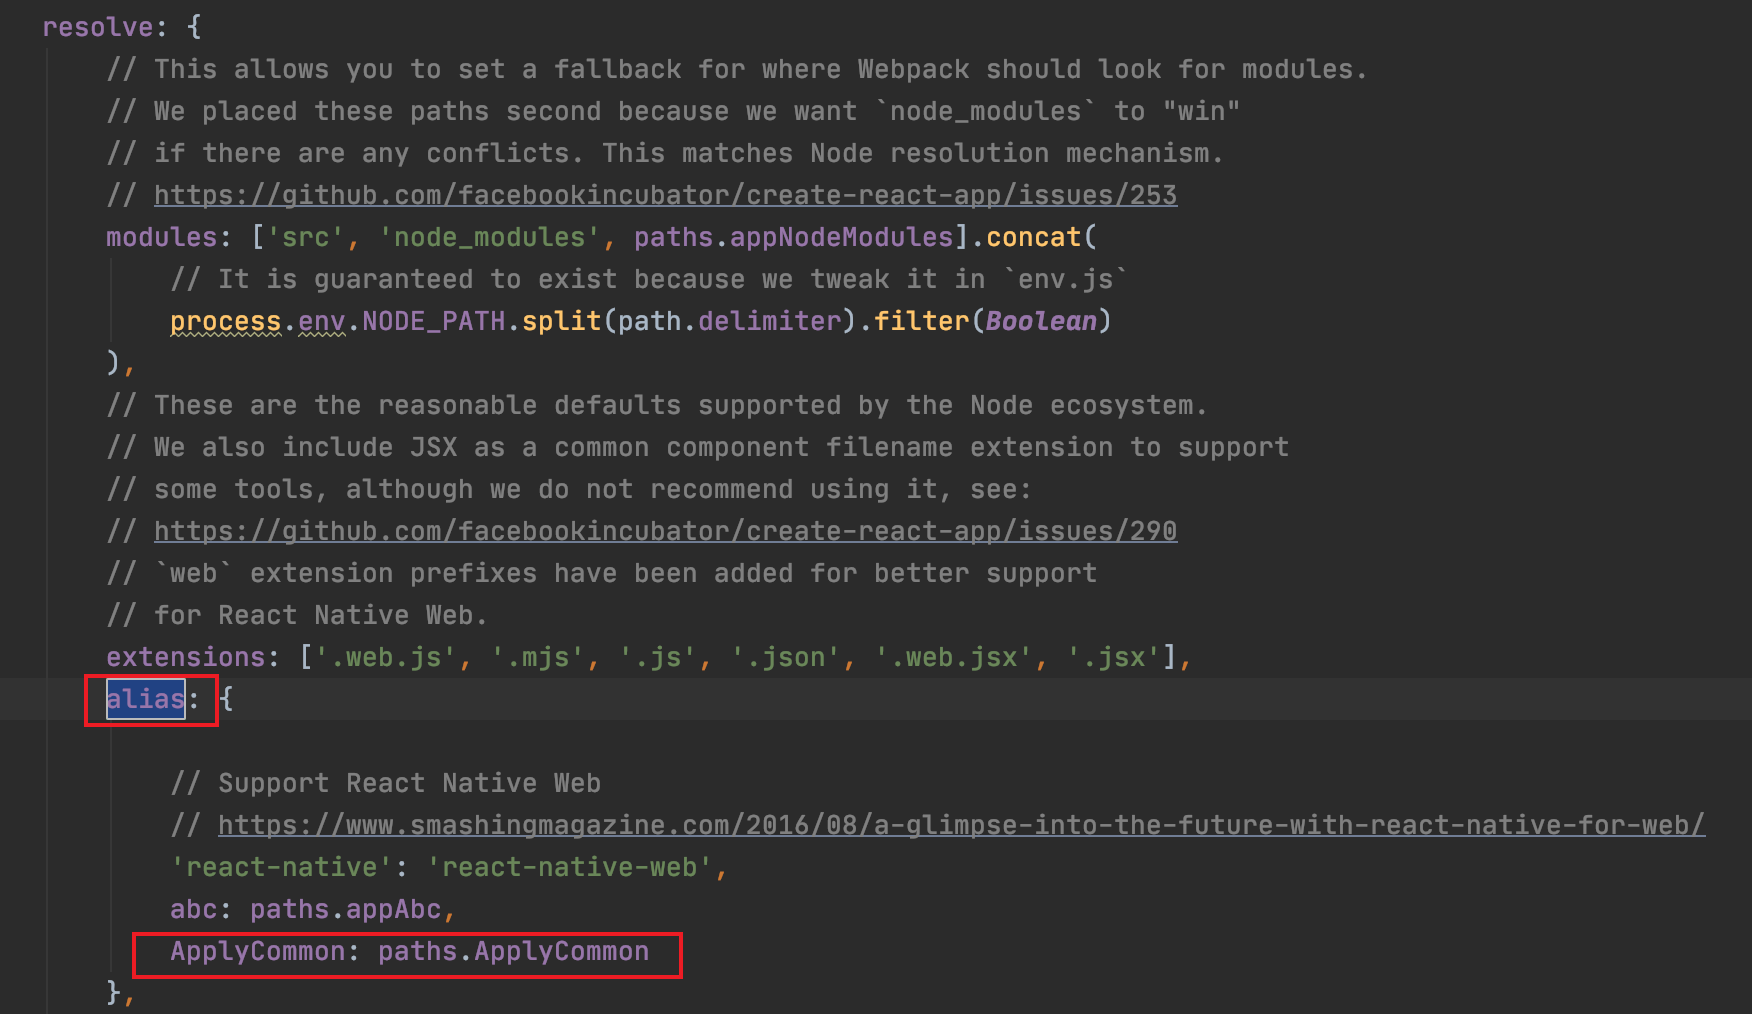

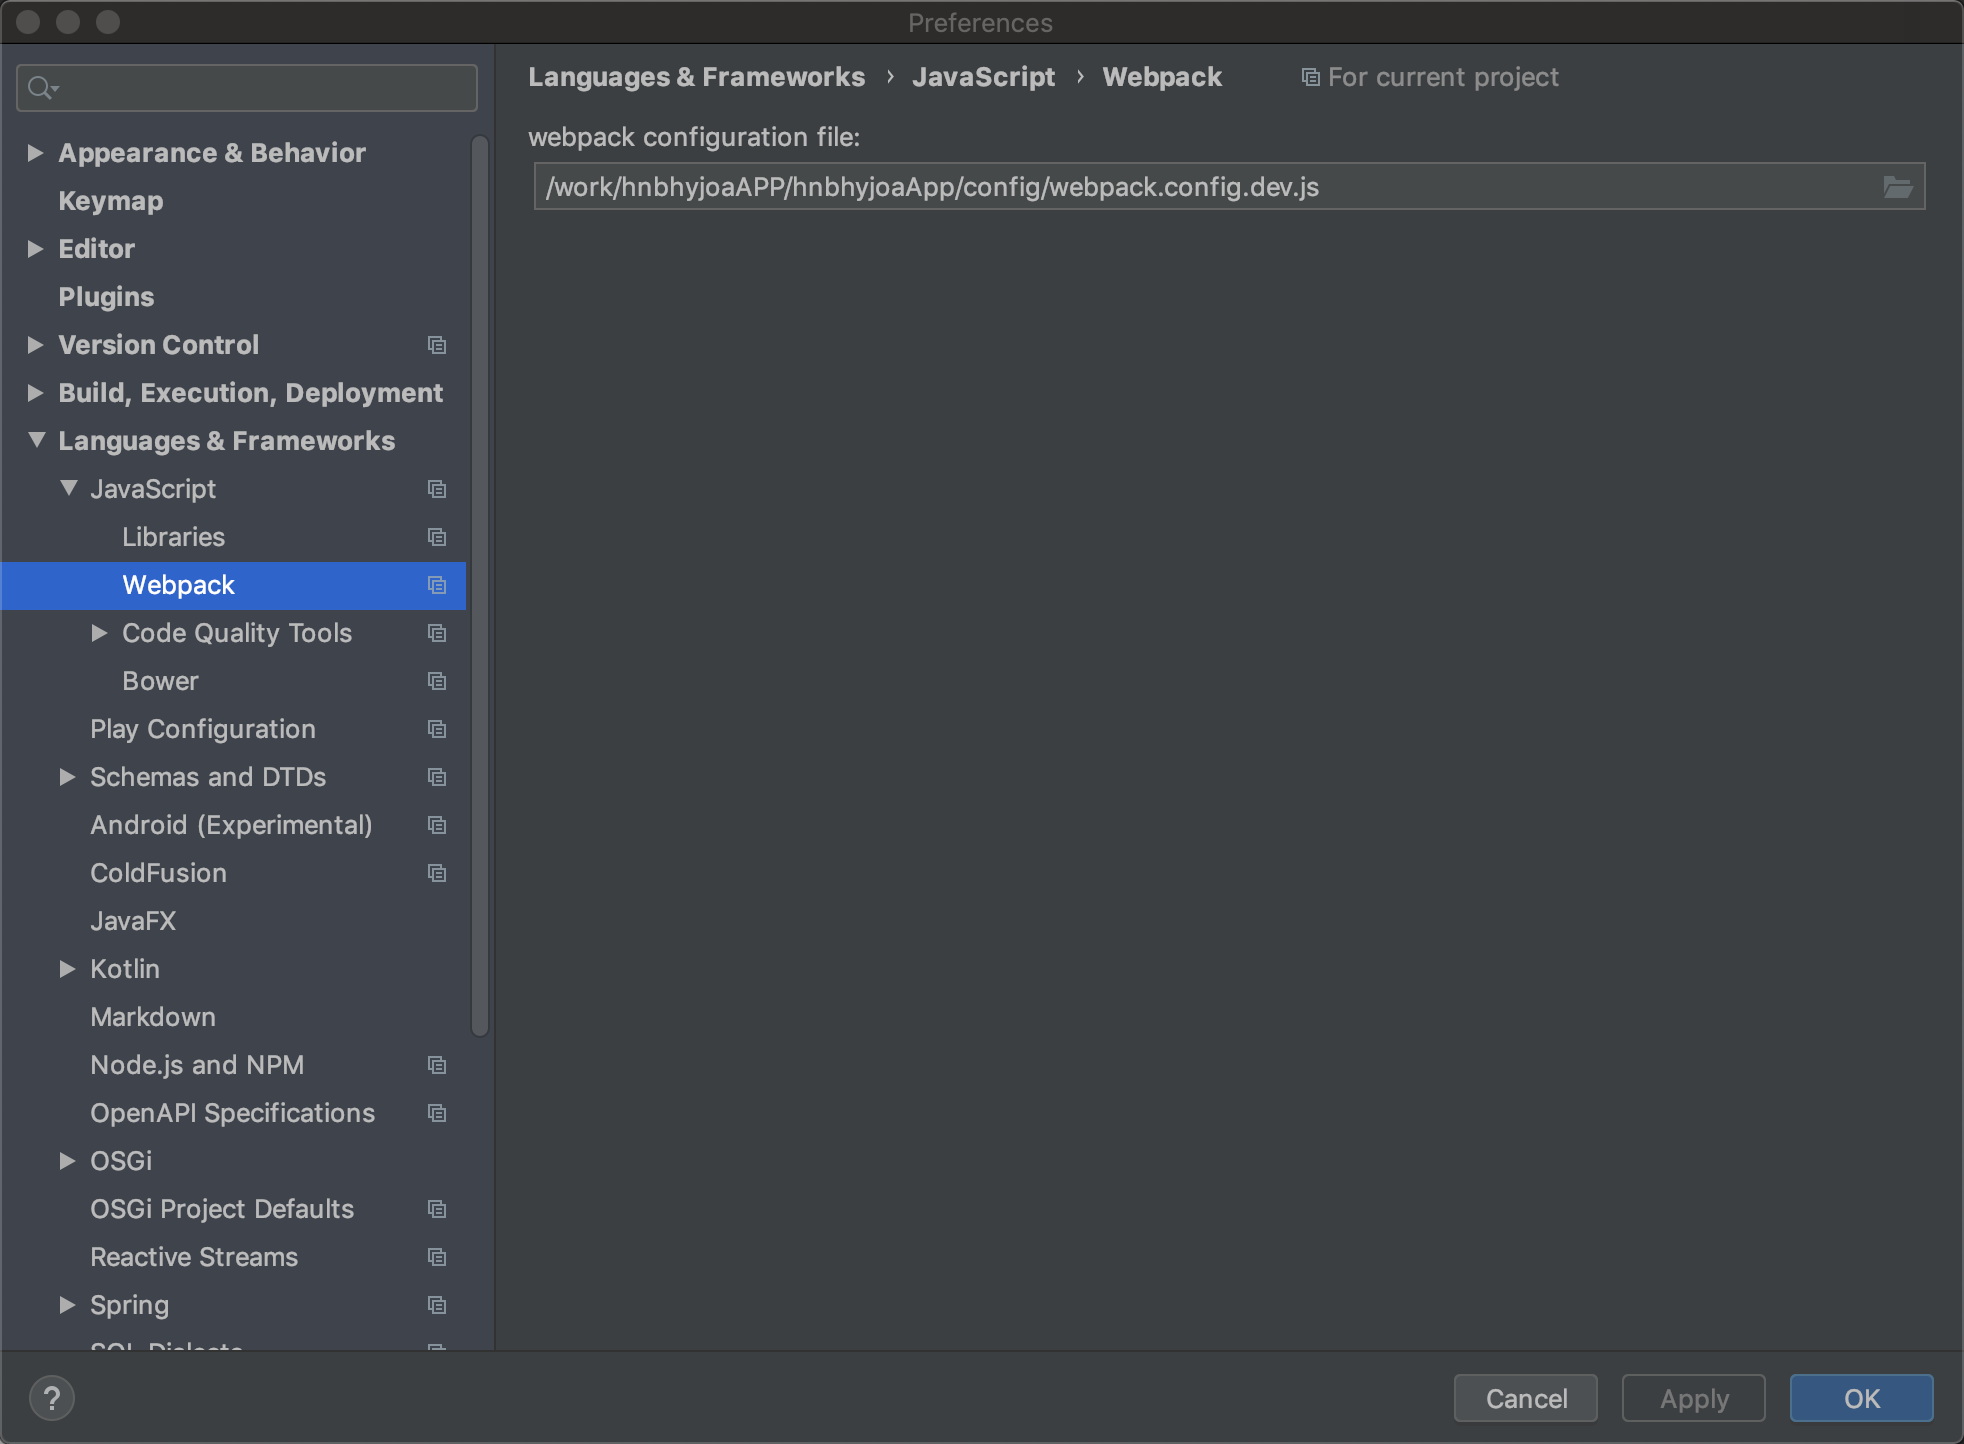
导入组件时 提示 Module is not installed
解决方法:配置idea的js下面的webpack设置
修复后
并且可以跳转
create-react-app 项目中,没有暴露webpack配置的情况下有两种修改别名方案:
1.根目录添加 jsconfig.json文件
{
    "compilerOptions": {
        "baseUrl": "./src"
    }
}
现在 src就是根目录了, src下的路径文件夹都可以alias
1, 安装 react-app-rewired customize-cra
npm install react-app-rewired customize-cra --save-dev
2,在项目根目录也就是package.json平级目录,新建一个config-overrides.js文件
并在js文件中, 书写以下代码(为@根路径配置代码)
const { override, addWebpackAlias } = require("customize-cra")

const path = require("path");

module.exports=override(

    //引入插件写相关配置

  addWebpackAlias({

    "@" : path.resolve(__dirname, "src")

  })

)
3,在package.json更改 命令
"scripts": {

    "dev": "react-app-rewired start",

    "build": "react-app-rewired build",

    "test": "react-app-rewired test",

    "eject": "react-scripts eject"

  },
4,js中使用

这样通过yarn dev 重启项目就可以了
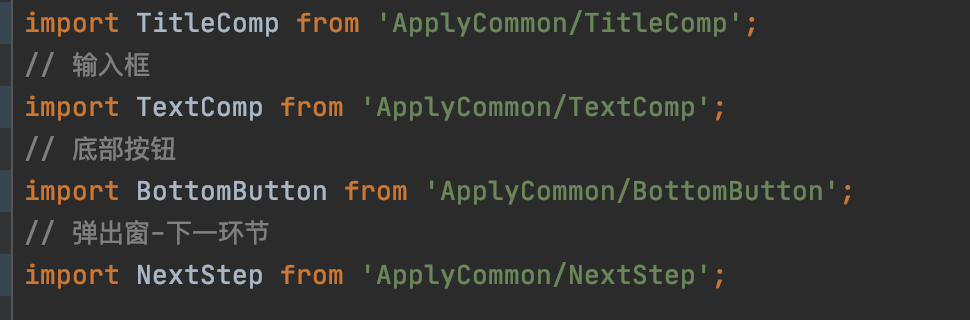
10.react-loadable 组件切割/组件按需加载 避免打包后js文件都混在一个文件内,导致客户加载时间过长,影响体验。
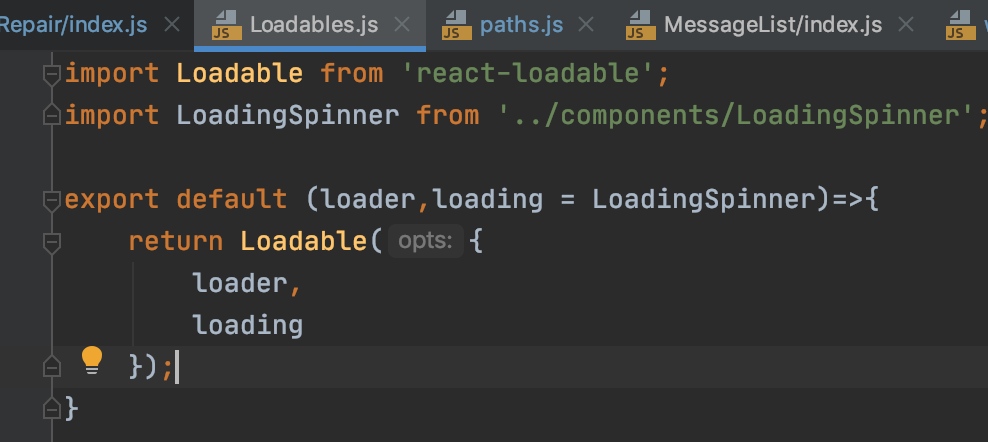
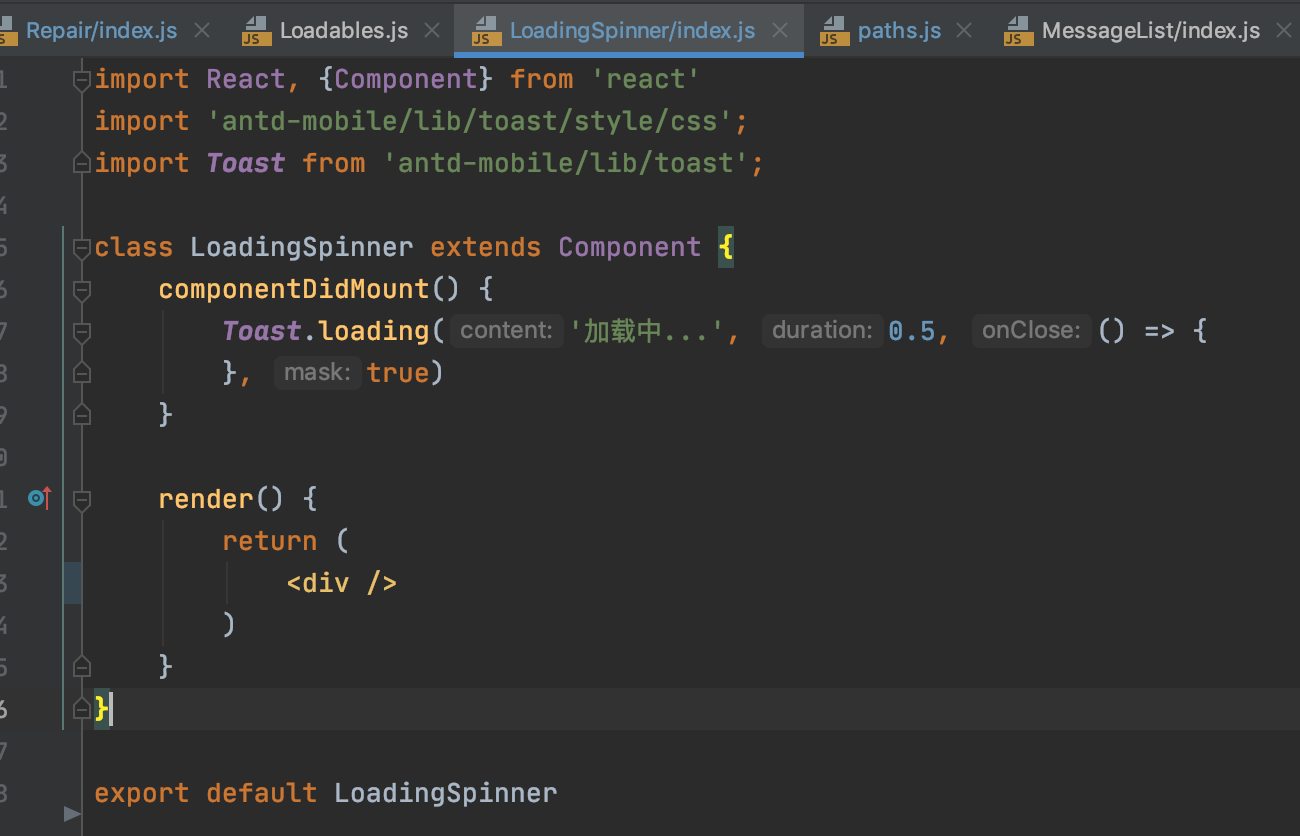
使用 :


 浙公网安备 33010602011771号