


Vue基本知识点
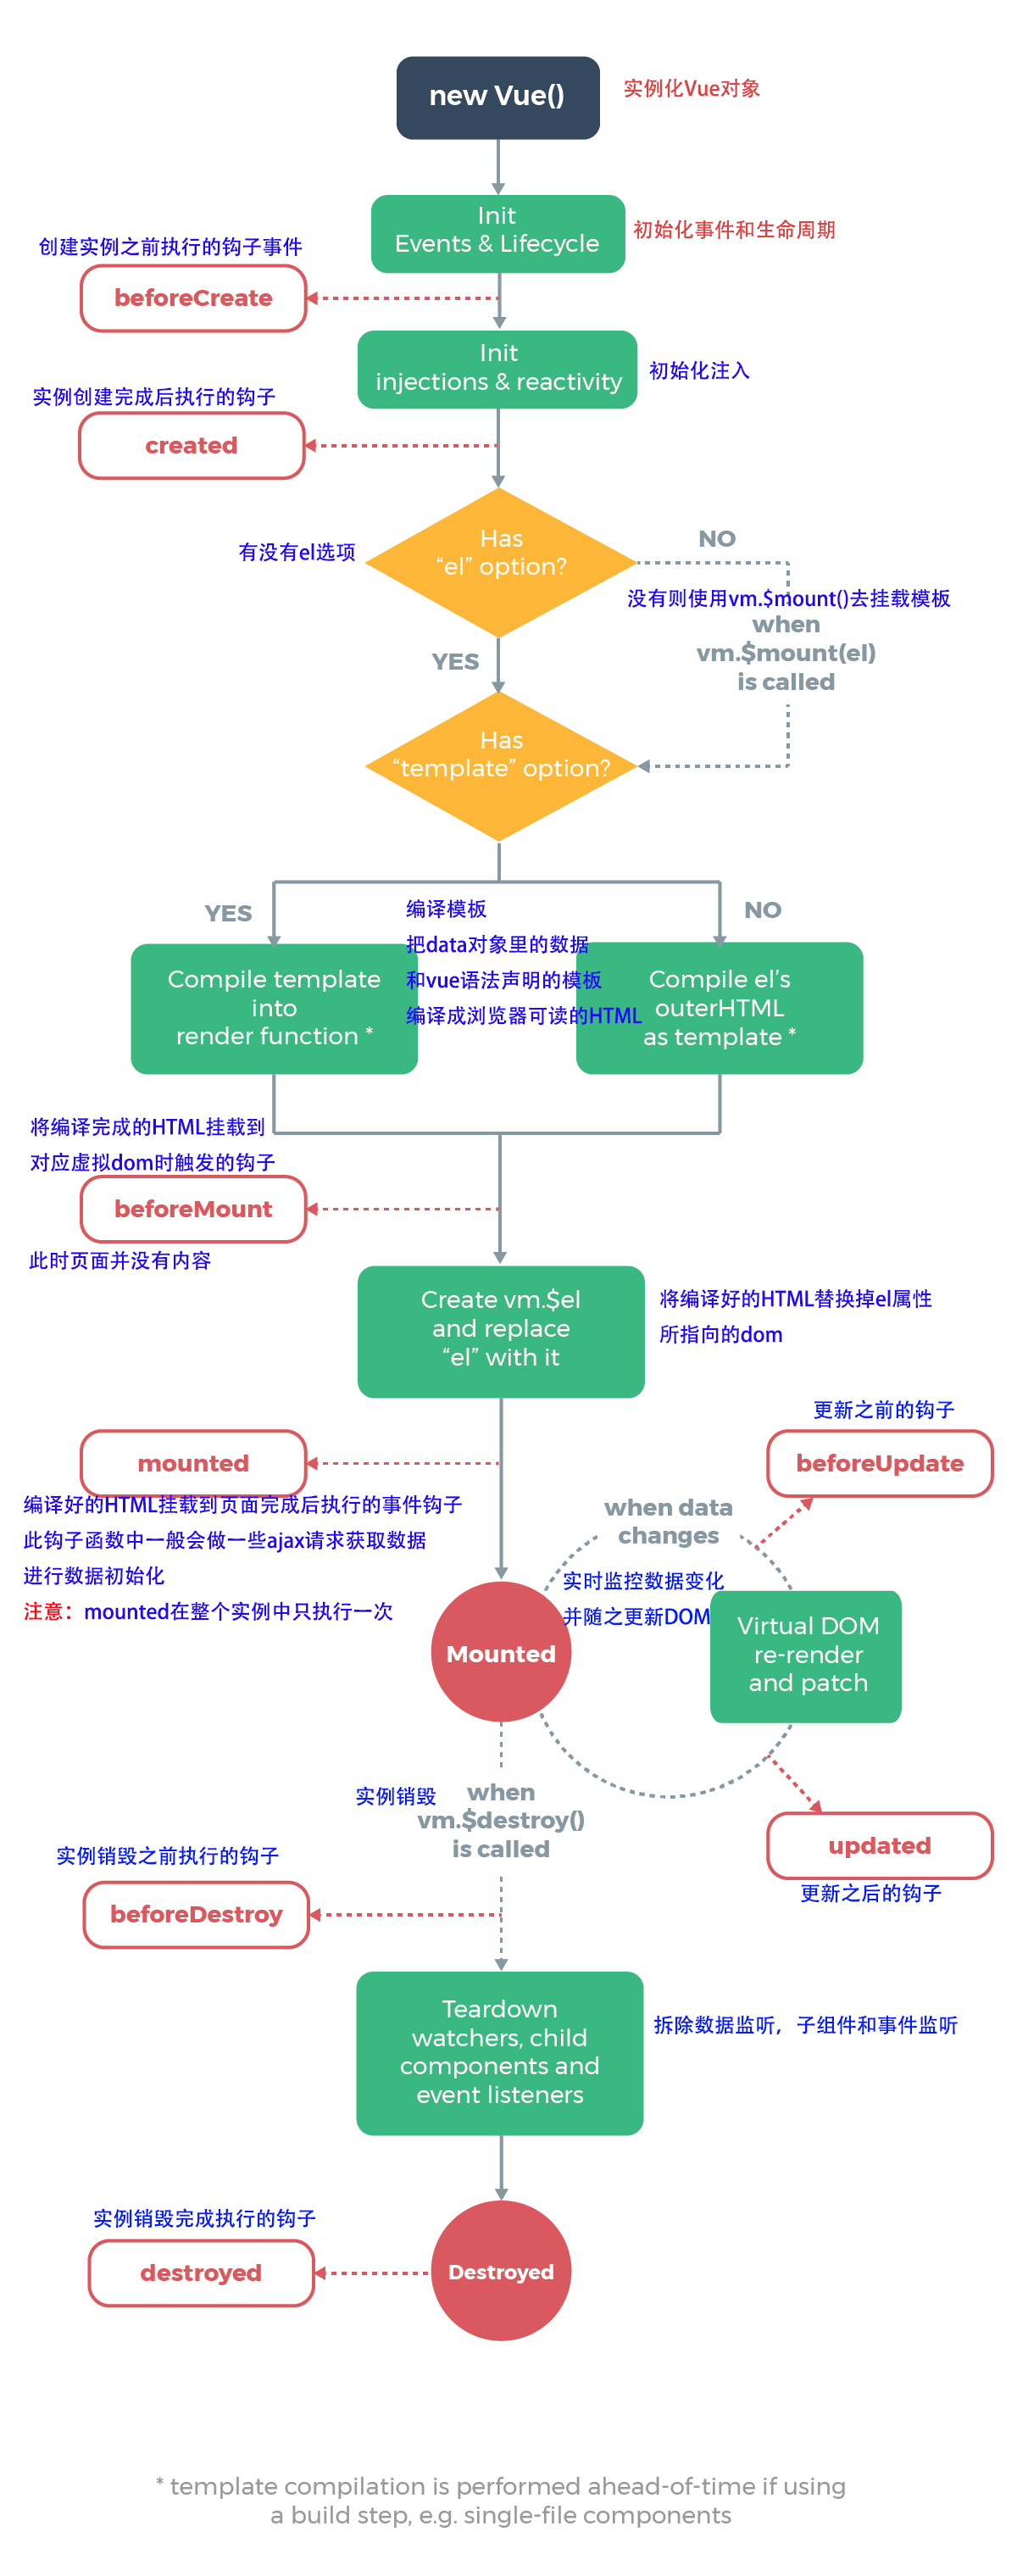
生命周期钩子
beforeCreate 在挂载开始之前被调用:相关的 render 函数首次被调用。
created 在实例创建完成后被立即调用。
beforeMount 在挂载开始之前被调用。
mounted 挂载完成后调用。
beforeUpdate 数据改变,未渲染之前。
Updated 数据渲染完成之后。
beforeDestroy 实例销毁之前调用,在这一步,实例仍然可用。
destroyed 实例销毁后调用。
计算属性,方法与监听
computed: 有缓存 只监听所依赖的数据,其他不相关的数据发生改变并不会影响到computed里的方法,只有所依赖的数据发生改变才会触发computed里相应的方法
methods:数据发生变化就会执行methods里的方法,无论发生变化的是不是其所依赖的数据
watch:跟computed类似,但代码比起computed来说不够简洁
样式绑定
1、v-bind:class和对象(通过true或false)
2、v-bind:class和数组(可设置多个值,数组内的每一项都是对象)
3、v-bind:style="一个对象"
4、v-bind:style="数组"(数组内的每一项都是对象)
组件参数校验
Vue.component('child',{
            // props:['content'], 如果子组件要约束父组件传过来的参数
            props:{
                content:{
                    type:[String,Number,Boolean]//约束数据类型
                    required:true,//是否必填(true or false)
                    default:'aaa'//设置默认值,父组件未传值时生效
                    validator(value){
                        return (value.length>5)//自定义校验器,value为父传子的值
                    }
                }
            },
            template:'<div>{{content}}</div>'
        })
组件绑定原生事件
1、在组件模板中绑定的事件是组件的原生事件
2、在使用组件时,绑定的事件是自定义事件
3、如果想通过自定义事件直接绑定原生事件可以有两种实现方式
3.1、一种方式是先在模板中定义原生事件,并通过this.$emit触发一个自定义事件,再在使用组件的地方监听这个自定义事件,并在根组件中实现对应的函数。
3.2、另一种则省去了上面的传递事件的麻烦,只需要在组件使用时,在自定义事件上增加一个.native即可。这样就表示了自定义事件是一个原生事件。
非父子组件间的通信
<div id="root">
        <child content='Dell'></child>
        <child content='Lee'></child>
    </div>

    <script>
        Vue.prototype.bus = new Vue()

        Vue.component('child',{
            props:{
                content:String
            },
            data(){
                return{
                    selfContent:this.content
                }
            },
            template:'<div @click="handleClick">{{selfContent}}</div>',
            methods:{
                handleClick(){
                    this.bus.$emit('change',this.selfContent)
                }
            },
            mounted(){
                var this_=this;
                this.bus.$on('change',msg=>{
                    this_.selfContent = msg
                })
            }
        })

        var vm = new Vue({
            el:'#root'
        })
动态组件与v-once指令
<component :is="type"></component> Vue自带的动态组件,用is绑定data的数据,动态切换组件。
v-once:只渲染一次组件,将数据保存在内存中,优化性能。
Vue动画原理
transition的一些属性
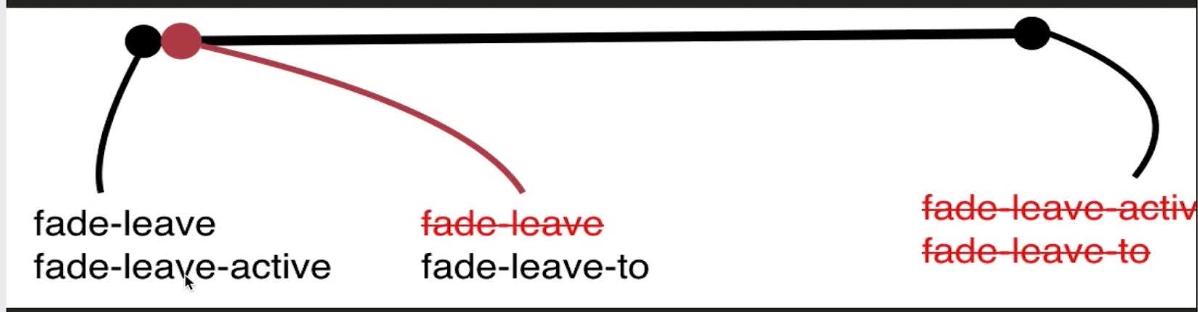
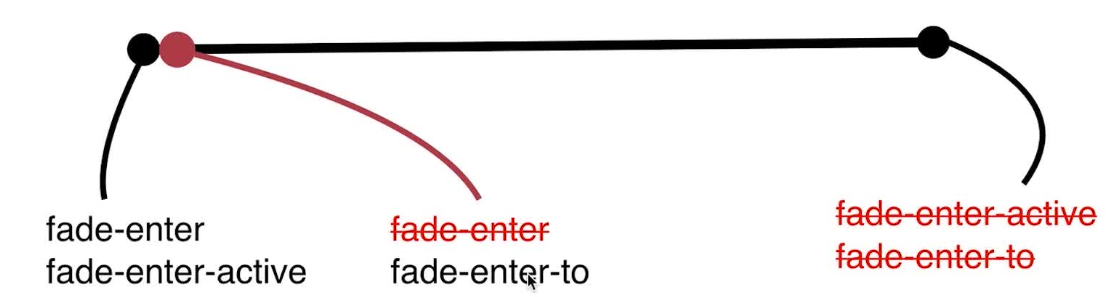
<transition
            :duration="{enter: 5000,leave:10000}"
            type="transition"
            appear
            name="fade"
            enter-active-class="animated swing fade-enter-active"
            leave-active-class="animated shake fade-leave-active"
            appear-active-class="animated swing"
        >
            <div v-if="show">hello world</div>
        </transition>
Vue中的js动画与Velocity.js库
动画勾子:
@before-enter 动画开始之前
@enter 动画开始
@after-enter 动画结束
<div id="root">
        <transition
            name='fade'
            @before-enter='handleBeforeEnter'
            @enter='handleEnter'
            @after-enter='handleAfterEnter'
        >
            <div v-show="show">hello world</div>
        </transition>
        <button @click="handleClick">切换</button>
    </div>

    <script>
        var vm = new Vue({
            el:'#root',
            data:{
                show:true
            },
            methods:{
                handleClick(){
                    this.show = !this.show
                },
                // el参数代表当前动画的dom元素
                handleBeforeEnter(el){
                    el.style.opacity = 0;
                },
                //done代表回调函数,表示动画结束
                handleEnter(el,done){
                    //Velocity库的用法
                    Velocity(el,{opacity:1},{duration:2000,complate:done})
                },
                handleAfterEnter(el){
                   console.log('game over')
                }
            }
        })
    </script>
Vue列表过渡
<style>
        .v-enter {
            opacity: 0;
        }
        .v-enter-active{
            transition: opacity 1s;
        }
    </style>
</head>
<body>
     <div id="root">
        <transition-group>
            <div v-for="(item,index) of list" :key="item.id">
                {{item.title}}
            </div>
        </transition-group>
        <button @click='handleBtnClick'>Add</button>
    </div>

    <script>
        var count = 0 ;

        var vm = new Vue({
            el:'#root',
            data:{
                list:[]
            },
            methods:{
                handleBtnClick(){
                    this.list.push({
                        id: count++,
                        title:'hello world'
                    })
                }
            }
        })
    </script>
