ios 利用UIScrollView实现图片缩放
前言:我们希望做出的效果是,实现图片的分页滑动,且每张图片都可以双击或用手指捏合来缩放大小。上一篇讲解UIGestureRecognizer的中,我们介绍的UIPinchGestureRecognizer也可以实现用手指捏合来缩放大小这个功能,这里介绍另外一种方法,直接使用UIScrollView自带的功能实现同样的效果。
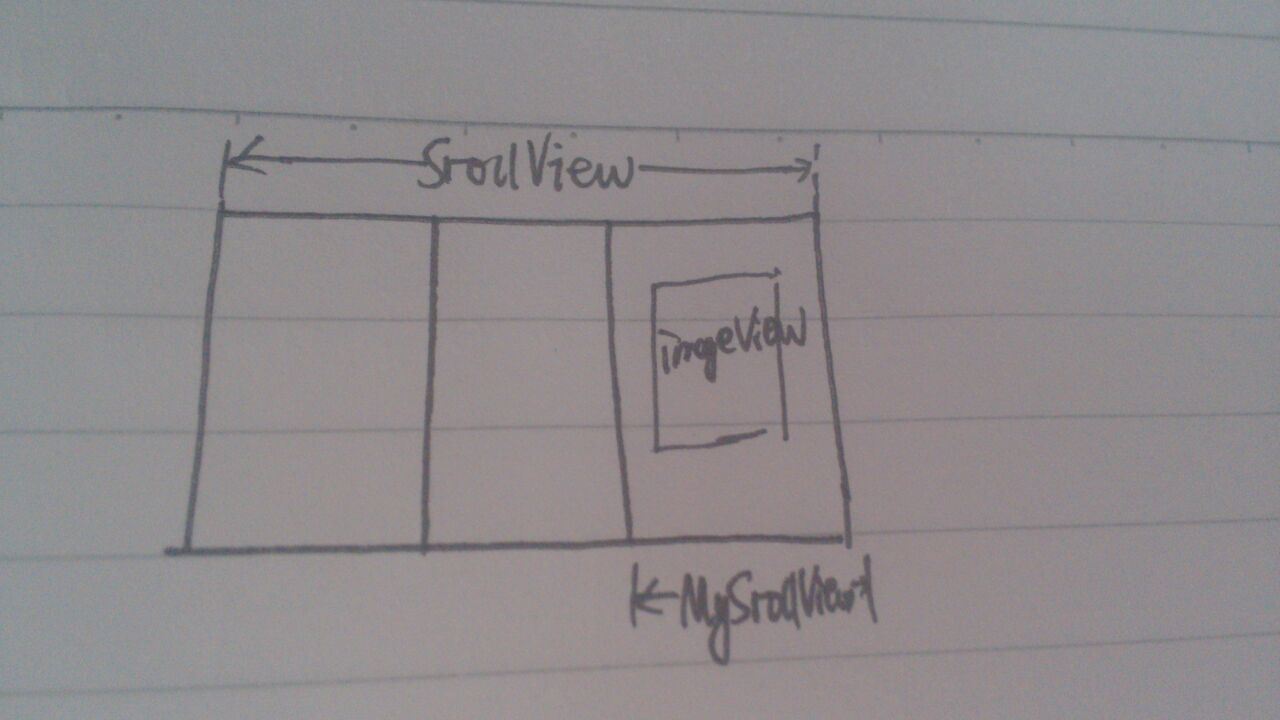
实现的大体思路:要实现图片的分页滑动,那么肯定是一个大的ScrollView,而每一张图片都可以放大缩小,那么每张图片imageView必定也在一个scrollView上。
在讲解图片缩放的具体实现之前,我们先来区分几个概念:contentSize、contentOffset 、frame
举个例子:一个ScrollView的frame是(0,0,320,480),contentSize是(960,480)
contentSize 代表scrollview中的全部内容区域,
frame代表scrollview在屏幕中显示的区域,
contentOffset 是scrollview当前显示区域顶点相对于frame顶点的偏移量,如当前显示的是第二幅图,那么它的contentOffset.x就是320;
1、取得屏幕宽高
#define MRScreenWidth CGRectGetWidth([UIScreen mainScreen].applicationFrame)
[[UIScreenmainScreen]bounds].size.width 区别?
2、直接上代码吧
#import "MyZoomViewController.h"
#define MRScreenWidth      CGRectGetWidth([UIScreen mainScreen].applicationFrame)
#define MRScreenHeight     CGRectGetHeight([UIScreen mainScreen].applicationFrame)

@interface MyZoomViewController ()

@end

@implementation MyZoomViewController
@synthesize srcollView = _srcollView;
@synthesize imageView = _imageView;

- (void)viewDidLoad
{
    [super viewDidLoad];
    _srcollView = [[UIScrollView alloc]init];
    _srcollView.delegate = self;

    _srcollView.userInteractionEnabled = YES;
    _srcollView.showsHorizontalScrollIndicator = YES;//是否显示侧边的滚动栏
    _srcollView.showsVerticalScrollIndicator = NO;
    _srcollView.scrollsToTop = NO;
    _srcollView.scrollEnabled = YES;
    _srcollView.frame = CGRectMake(0, 0, MRScreenWidth, MRScreenHeight);

    UIImage *img = [UIImage imageNamed:@"image1.png"];
    _imageView = [[UIImageView alloc]initWithImage:img];
    //设置这个_imageView能被缩放的最大尺寸,这句话很重要,一定不能少,如果没有这句话,图片不能缩放
    _imageView.frame = CGRectMake(0, 0, MRScreenWidth * 2.5, MRScreenHeight * 2.5);

    [self.view addSubview:_srcollView];
    [_srcollView addSubview:_imageView];
    [_imageView release];
    [_srcollView release];

    // Add gesture,double tap zoom imageView.
    UITapGestureRecognizer *doubleTapGesture = [[UITapGestureRecognizer alloc] initWithTarget:self
                              action:@selector(handleDoubleTap:)];
    [doubleTapGesture setNumberOfTapsRequired:2];
    [_srcollView addGestureRecognizer:doubleTapGesture];
    [doubleTapGesture release];

//    float minimumScale = _srcollView.frame.size.width / _imageView.frame.size.width;//最小缩放倍数
//    [_srcollView setMinimumZoomScale:minimumScale];
//    [_srcollView setZoomScale:0.5f];

    [_srcollView setMinimumZoomScale:0.25f];
    [_srcollView setMaximumZoomScale:3.0f];
    [_srcollView setZoomScale:0.5f animated:NO];

}

- (void)didReceiveMemoryWarning
{
    [super didReceiveMemoryWarning];
}
#pragma mark - Zoom methods

- (void)handleDoubleTap:(UIGestureRecognizer *)gesture
{
    NSLog(@"handleDoubleTap");
    float newScale = _srcollView.zoomScale * 1.5;//zoomScale这个值决定了contents当前扩展的比例
    CGRect zoomRect = [self zoomRectForScale:newScale withCenter:[gesture locationInView:gesture.view]];
    [_srcollView zoomToRect:zoomRect animated:YES];
}

- (CGRect)zoomRectForScale:(float)scale withCenter:(CGPoint)center
{
    CGRect zoomRect;
    zoomRect.size.height = _srcollView.frame.size.height / scale;
    NSLog(@"zoomRect.size.height is %f",zoomRect.size.height);
    NSLog(@"self.frame.size.height is %f",_srcollView.frame.size.height);
    zoomRect.size.width  = _srcollView.frame.size.width  / scale;
    zoomRect.origin.x = center.x - (zoomRect.size.width  / 2.0);
    zoomRect.origin.y = center.y - (zoomRect.size.height / 2.0);
    return zoomRect;
}


#pragma mark - UIScrollViewDelegate

- (UIView *)viewForZoomingInScrollView:(UIScrollView *)scrollView
{
    return _imageView;
}
//当滑动结束时
- (void)scrollViewDidEndZooming:(UIScrollView *)scrollView withView:(UIView *)view atScale:(float)scale
{
    //把当前的缩放比例设进ZoomScale,以便下次缩放时实在现有的比例的基础上
    NSLog(@"scale is %f",scale);
    [_srcollView setZoomScale:scale animated:NO];
}

#pragma mark - View cycle
- (void)dealloc
{
    [super dealloc];
}


@end
这个只是实现了单张图片的缩放,但多张图片的也是这个原理。多张图片缩放要注意的是,每张图片frame的设置,一般起点为width * i
总结:
1、图片缩放必须实现UIScrollViewDelegate的这两个方法:viewForZoomingInScrollView和 scrollViewDidEndZooming:withView:atScale:。
2、设置最大、最小缩放比,maxinumZoomScale、mininumZoomScale。不要忘记,设置imageview的最大缩放长宽,不然不能实现正常的缩放。
二、实现简单的单张大图片的滚动显示

http://www.cnblogs.com/wyqfighting/p/3194364.html 是原文链接
posted on 2017-01-08 23:26 🌞Bob 阅读(654) 评论(0) 编辑 收藏 举报


