Windows7下caffe-ssd-microsoft下编译
整个编译可谓漫长 编译了两天 网上教程也很多 但是也很杂 遇到各种错误 总归是编完了
1、下载Windows版本的Caffe-SSD源码
下载链接:https://github.com/conner99/caffe,选择ssd-microsoft 分支;
2、编译caffe
1)、打开caffe-ssd-microsoft文件夹,然后看到一个windows文件夹,然后继续打开windows文件夹,看到里面一个CommonSettings.props.example文件,复制出来一份,并改名字为CommonSettings.props;
2)、修改CommonSettings.props文件,选择gpu或是cpu以及cuda版本,这里选择的是GPU编译和Cuda7.5;
3、编译问题解决
1)、设置libcaffe为启动项,进行编译,报错:与boost相关的regex正则表达式库出现问题,在项目中我们不需要正则表达式,所以将相关语句注释掉即可;
解决方法:
进入项libcaffe中,进入detection_output_layer.hpp中,将与regex相关头文件注释掉;
进入detection_output_layer.cpp文件,将所有出现regex和rv的语句注释掉;
进入detection_output_layer.cu文件,将所有出现regex和rv的语句注释掉;
2)、编译工程,报错:expected an identifier in caffe.pb.h;
解决方法:修改bbox_util.cu,注释掉所有带thrust的语句;
3)、编译工程,报错:找不到”.\caffe\3rdparty\hungarian.h”文件;
编译工程,报错:找不到”.\src\caffe\3rdparty\hungarian.cpp”文件;
解决方法:
在路径.\caffe-master\include\caffe\3rdparty\下添加hungarian.h文件;
在路径.\caffe-master\src\caffe\3rdparty\下添加hungarian.cpp文件;
在这里找这个文件,链接:http://pan.baidu.com/s/1mhYuf7y 密码:3jp2;
接下來這個一定要改,不改的話會反覆出現類似於:error MSB3721: 命令“"C:\Program Files\NVIDIA GPU Computing Toolkit\CUDA\v7.5\bin\nvcc.exe" ....等錯誤。我本人在此被坑幾天,頭髮都掉了一地,哎。這裏的解決辦法是在detection_output_layer.cu,detection_output_layer.cpp兩個文檔中註釋掉所有出現的regex和rv的語句;然後再detection_output_layer.hpp中將語句#include <boost/regex.hpp>註釋掉。
此外,在libcaffe項目下的bbox_util.cu文檔,註釋掉thrust相關的內容,如下所示: //#include "thrust/functional.h" //#include "thrust/sort.h"
.....
//thrust::sort_by_key(&confidence[0],&confidence[0]+num_remain,&idx[0],
//thrurst::greater<Dtype>());*/
5 上面的執行完畢之後,恭喜你基本上可以生成libcaffe、caffe.exe文檔,先編譯libcaffe,再caffe(一般都是Release下)。
另外我还遇到了
protobuf版本冲突的问题,如下:
- In file included from .build_release/src/caffe/proto/caffe.pb.cc:5:0:
- .build_release/src/caffe/proto/caffe.pb.h:12:2: error: #error This file was generated by a newer version of protoc which is
- #error This file was generated by a newer version of protoc which is
- ^
- .build_release/src/caffe/proto/caffe.pb.h:13:2: error: #error incompatible with your Protocol Buffer headers. Please update
- #error incompatible with your Protocol Buffer headers. Please update
- ^
- .build_release/src/caffe/proto/caffe.pb.h:14:2: error: #error your headers.
- #error your headers.
- ^
- ...
这个问题的出现是因为我们在安装caffe之前,安装Anaconda或tensorflow时都已经安装过libprotobuf,所以解决冲突的方法是使用以下命令
即可解决。
该解决方案来源于https://stackoverflow.com/questions/36678292/caffe-error-with-protobuf-version
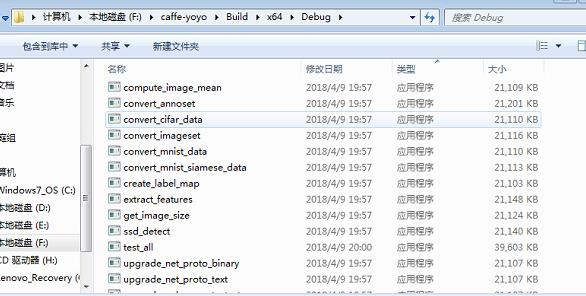
全都编译完了 可以看下目录应该有这些 exe

SSD测试:
新建ssd_detect.bat文件,运行;
ssd_detect.bat文件内容:
(1)ssd_detect.exe路径;
(2)model_file路径,即deploy.prototxt;
(3)weights_file路径,即XXX.caffemodel;
(4)test.txt图片路径,将图片的绝对路径写入test.txt中;
(5)–file_type image,此处还可以进行video检测,可自行看源码修改;
(6)–confidence_threshold 0.5;
注意release和X64等配置,接下来是pycaffe的编译,步骤也同上,
我遇到了错误 no module named _caffe
先把 F:\caffe-ssd\Build\x64\Release\pycaffe里的caffe复制到F:\caffe-ssd\python里 替代原有的caffe
再把F:caffe-ssd\Build\x64\Release\pycaffe下的caffe文件夹复制到Anaconda2\Lib\site-packages文件夹下
类似下图
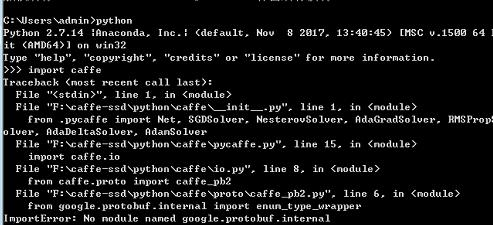
6.在pycharm中测试一下,可能会出现No module named google.protobuf.internal的问题。

解决方法:下载protobuf的两个文件(地址:https://github.com/google/protobuf/releases/tag/v3.0.0),一个是protoc-3.0.0-win32.zip,一个是Source code (zip)
解压缩,将protoc-3.0.0-win32\bin\protoc.exe 拷贝进入protobuf-3.0.0源代码文件夹下src文件夹里,进入protobuf-3.0.0源代码文件夹下python文件夹,按住shift右击选择“在此处打开命令窗口”,执行 python setup.py build 、执行 python setup.py install
这时caffe已经在pycharm里配置成功了,赶快试一下吧。


 浙公网安备 33010602011771号