图片裁剪-文本识别-文本添加
前言
对象接到朋友的委托将几十张截图的鞋子图片进行裁剪,再贴上鞋子的款式。想着这不是可以使用脚本来完成吗,人工多累呀。
图片裁剪
使用 Image库中的crop函数,传入的参数是一个坐标元组,左上角的坐标和右下角的坐标。(x1,y1,x2,y2),裁剪好之后使用save保存。
def crop_img(img_path,save_name):
    img = Image.open(img_path)
    filename = img.filename[:-4]
# 获取鞋子的位置(根据实际情况调整)
    shoes_box = (0, 400, 1080, 1250)  # 左上X,左上Y,右下X,右下Y
    shoes_img = img.crop(shoes_box)
    shoes_img.save(save_name)
    print('crop save ok')
    return save_name
文本识别
使用pytesseract来实现,使用其中的函数image_to_string()来识别。需要先安装tesseract。安装地址https://digi.bib.uni-mannheim.de/tesseract/?C=M;O=D
效果还不错。
库安装
pip install pytesseract安装库,
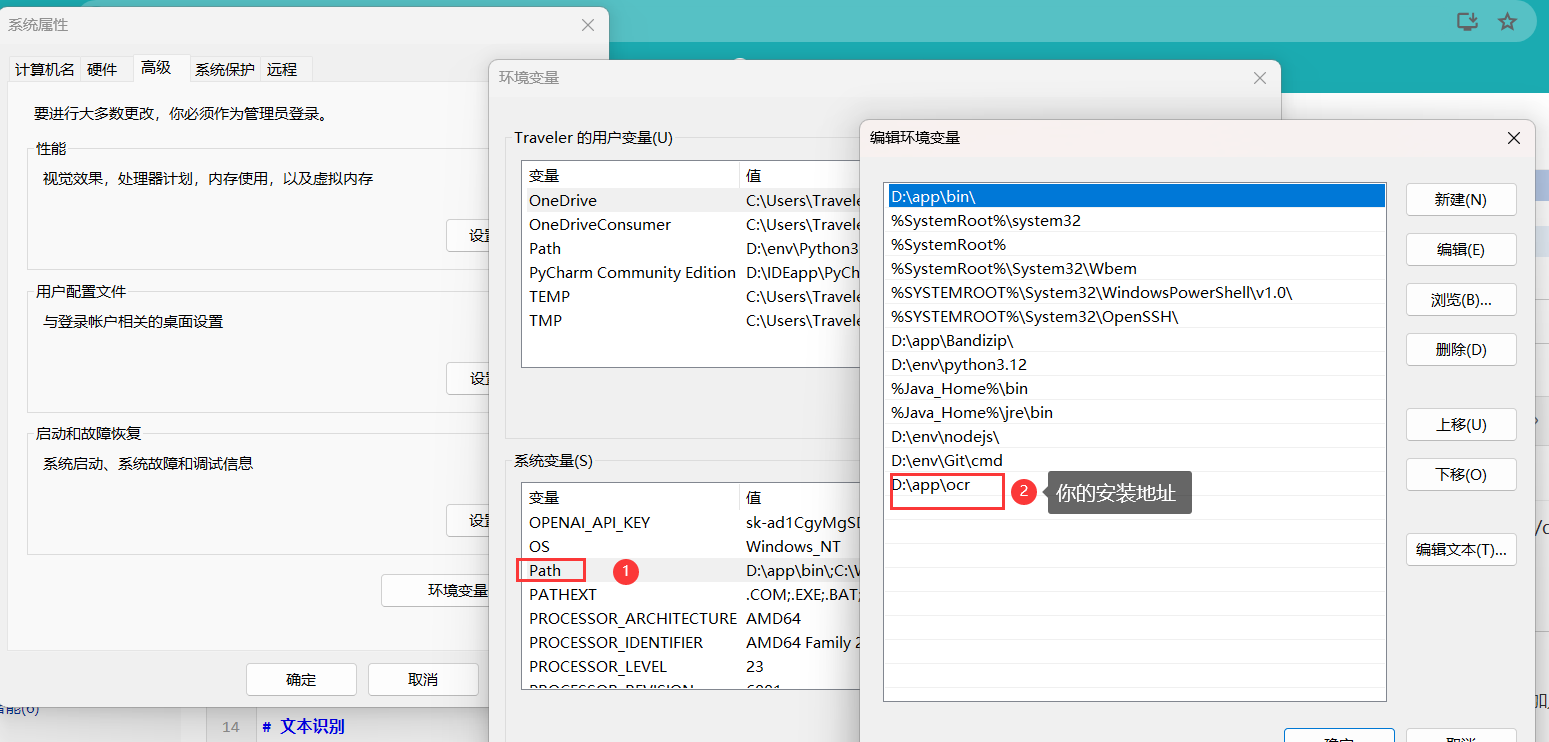
再安装tesseract,上面链接地址,然后安装好后将软件的安装地址加入环境变量。
使用tesseract --version可以检测安装是否成功。
如果不配置环境变量就不会使用默认路径来执行tesseract。
中文识别
使用官方默认不支持识别中文,需要下载中文包。地址https://github.com/tesseract-ocr/tessdata/tree/main 中的chi_sim.traineddata。为中文简体包。下载下来之后放入tesseract的tessdata目录下。
就可以使用pytesseract.image_to_string(img,lang='chi_sim')来识别中文了。
def ocr_text(img_path):
    img = Image.open(img_path).convert('L') #L表示以灰度模式打开,可提高检测效果

    text = pytesseract.image_to_string(img,lang='chi_sim1')
    part = r'鞋.*款'
    match_ = re.search(part, text).group()[1::].replace(' ', '')
    # print(text)
    return match_
文本添加
def cv2_img_add_text_with_bg(img_path,
                            result_img_path,
                             text: str,
                             left: int,
                             top: int,
                             textColor=(255, 0, 0),
                             textSize=20,
                             bgColor=(0, 0, 0),  # 新增:文本背景颜色,默认为黑色
                             bgPadding=(5, 5),     # 新增:文本背景边缘 padding,默认各方向5像素
                             filepath="D:\\app\\ocr\\tessdata\\simsun.ttc",

                             ):
    """
    在图片上写中文文字,并带有指定颜色的背景
    """


    img = cv2.imread(img_path)
    if isinstance(img, np.ndarray):  # 确保是OpenCV图像格式
        img_pil = Image.fromarray(cv2.cvtColor(img, cv2.COLOR_BGR2RGB))
    else:
        raise TypeError("img must be a numpy ndarray")

    draw = ImageDraw.Draw(img_pil)
    fontStyle = ImageFont.truetype(filepath, textSize, encoding="utf-8")

    # 计算文本框的尺寸以确定背景矩形的大小
    # 使用getbbox()方法间接获取文本尺寸,注意getbbox返回的是一个包含左上角和右下角坐标的元组
    text_bbox = draw.textbbox((0, 0), text, font=fontStyle)
    textWidth = text_bbox[2] - text_bbox[0]
    textHeight = text_bbox[3] - text_bbox[1]

    # 绘制背景矩形
    bgLeft = left - bgPadding[0]
    bgTop = top - bgPadding[1]
    draw.rectangle([(bgLeft, bgTop), (bgLeft + textWidth, bgTop + textHeight)], fill=bgColor)

    # 绘制文本
    draw.text((left, top), text, textColor, font=fontStyle)

    # 转换回OpenCV格式并返回
    img_text = cv2.cvtColor(np.array(img_pil), cv2.COLOR_RGB2BGR)

    cv2.imwrite(result_img_path,img_text)

    print('put ok')
中文字体下载http://xiazaiziti.com/category/zhongwenziti
实例代码和效果
import pytesseract
import re

import numpy as np
from PIL import Image, ImageDraw, ImageFont
import cv2
import os

# 读取图片

num = 1
def crop_img(img_path,save_name):
    img = Image.open(img_path)
    filename = img.filename[:-4]
# 获取鞋子的位置(根据实际情况调整)
    shoes_box = (0, 400, 1080, 1250)  # 左上X,左上Y,右下X,右下Y
    shoes_img = img.crop(shoes_box)
    shoes_img.save(save_name)
    print('crop save ok')
    return save_name

img_path = "D:\\Desktop\\1.jpg"
img_crop_path = "D:\\Desktop\\1_crop.jpg"
# crop_img(img_path)
def ocr_text(img_path):
    img = Image.open(img_path).convert('L') #L表示灰度模式,可提高检测效果

    text = pytesseract.image_to_string(img,lang='chi_sim1')
    part = r'鞋.*款'
    match_ = re.search(part, text).group()[1::].replace(' ', '')
    # print(text)
    return match_

def cv2_img_add_text_with_bg(img_path,
                            result_img_path,
                             text: str,
                             left: int,
                             top: int,
                             textColor=(255, 0, 0),
                             textSize=20,
                             bgColor=(0, 0, 0),  # 新增:文本背景颜色,默认为黑色
                             bgPadding=(5, 5),     # 新增:文本背景边缘 padding,默认各方向5像素
                             filepath="D:\\app\\ocr\\tessdata\\simsun.ttc",

                             ):
    """
    在图片上写中文文字,并带有指定颜色的背景
    """


    img = cv2.imread(img_path)
    if isinstance(img, np.ndarray):  # 确保是OpenCV图像格式
        img_pil = Image.fromarray(cv2.cvtColor(img, cv2.COLOR_BGR2RGB))
    else:
        raise TypeError("img must be a numpy ndarray")

    draw = ImageDraw.Draw(img_pil)
    fontStyle = ImageFont.truetype(filepath, textSize, encoding="utf-8")

    # 计算文本框的尺寸以确定背景矩形的大小
    # 使用getbbox()方法间接获取文本尺寸,注意getbbox返回的是一个包含左上角和右下角坐标的元组
    text_bbox = draw.textbbox((0, 0), text, font=fontStyle)
    textWidth = text_bbox[2] - text_bbox[0]
    textHeight = text_bbox[3] - text_bbox[1]

    # 绘制背景矩形
    bgLeft = left - bgPadding[0]
    bgTop = top - bgPadding[1]
    draw.rectangle([(bgLeft, bgTop), (bgLeft + textWidth, bgTop + textHeight)], fill=bgColor)

    # 绘制文本
    draw.text((left, top), text, textColor, font=fontStyle)

    # 转换回OpenCV格式并返回
    img_text = cv2.cvtColor(np.array(img_pil), cv2.COLOR_RGB2BGR)

    cv2.imwrite(result_img_path,img_text)

    print('put ok')


def get_file_names(directory):
    """
    返回指定目录下所有文件的名称列表(不包括子目录中的文件)。

    :param directory: 要读取的目录路径
    :return: 文件名列表
    """
    # 确保给定的路径是绝对路径,以避免相对路径可能引起的错误
    abs_directory = os.path.abspath(directory)

    # 使用listdir()获取目录中的所有条目
    entries = os.listdir(abs_directory)

    # 过滤出文件(而非子目录)
    file_names = [entry for entry in entries if os.path.isfile(os.path.join(abs_directory, entry))]

    return file_names

if __name__ == "__main__":
    num =1
    save_directory = 'D:\\Desktop\\save\\crop\\'
    file_ = 'D:\\app\\QQ\\Filerev\\'
    filelist = get_file_names(file_)
    for file in filelist:
        file_path = file_ +file

        text = ocr_text(file_path)
        print(text)
        cro_save_file_name = save_directory + file
        crop_img(file_path,cro_save_file_name)
        result_img = 'D:\\Desktop\\save\\result\\'+file
        cv2_img_add_text_with_bg(cro_save_file_name, result_img,text, 800, 750, textColor=(255, 255, 255), textSize=70)
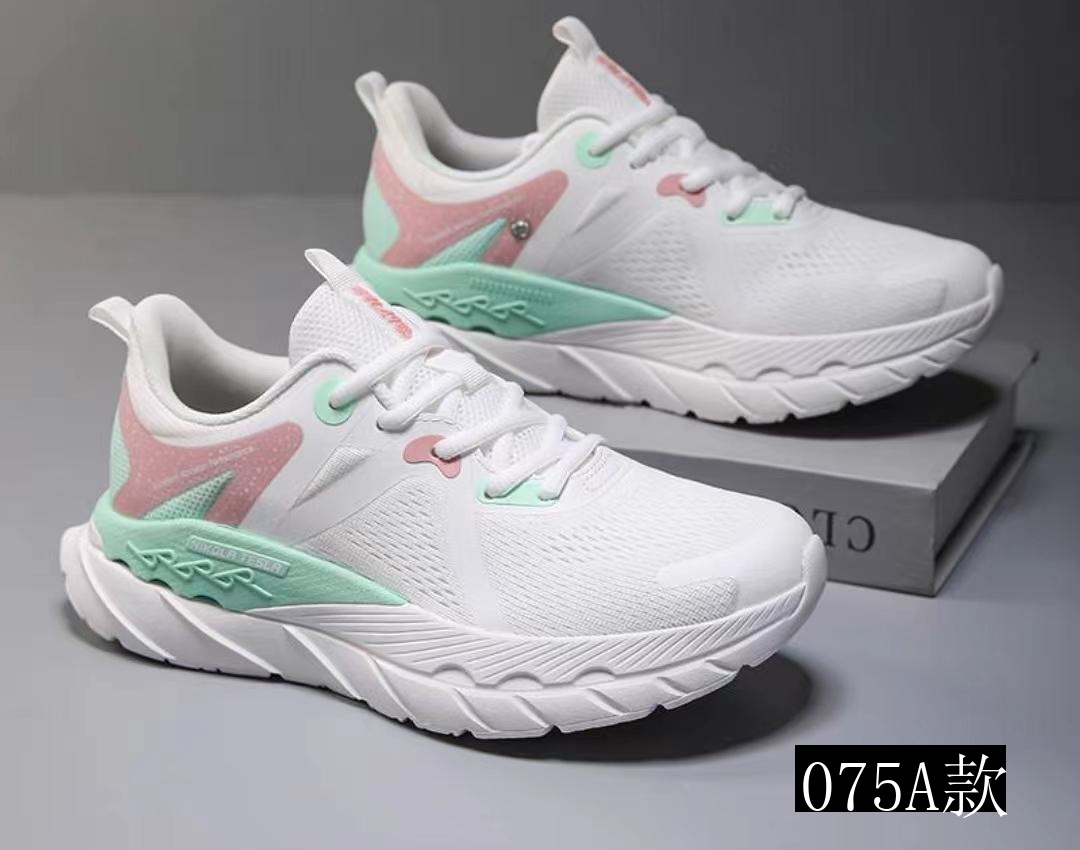
将下面这张图片

转成:

 浙公网安备 33010602011771号