OpenWRT安装
1.修改IMG镜像分区大小
1-1.首先准备一个Linux系统,我是用workstation装的一个虚拟机来弄的,把要修改的IMG镜像用winscp或者其它工具上传到这个系统里,注意一下Ubuntu系统不要把镜像放到/tmp里面,会提示没有权限。

1-2.ssh登陆Linux系统,在/media下新建一个文件夹,名字随意,并给这个文件夹足够的权限,将需要修改的IMG放到这里
![]()

mkdir /media/1
chmod 777 /media/1/
1-3.CD进入这个目录后使用DD命令为IMG镜像增加可用空间,这也会让IMG镜像变大,根据自己的硬盘大小来决定
root@xzd-virtual-machine:/media/1# dd if=/dev/zero bs=1M count=7168 >> openwrt-22.03.3-x86-64-generic-squashfs-combined.img    #count=7168为增加空间的大小,单位是MB,我是8G的盘,在系统里显示只有7G多,所以我设定的7G
7168+0 records in
7168+0 records out
7516192768 bytes (7.5 GB, 7.0 GiB) copied, 4.38872 s, 1.7 GB/s

1-4.输入命令sudo fdisk openwrt-22.03.3-x86-64-generic-squashfs-combined.img并按回车进入分区状态
root@xzd-virtual-machine:/media/1# sudo fdisk openwrt-22.03.3-x86-64-generic-squashfs-combined.img

Welcome to fdisk (util-linux 2.38).
Changes will remain in memory only, until you decide to write them.
Be careful before using the write command.

Command (m for help):

1-5.输入p并按回车,显示当前分区表,并记下第二个分区的起始值:33792
Command (m for help): p
Disk openwrt-22.03.3-x86-64-generic-squashfs-combined.img: 7.12 GiB, 7642546176 bytes, 14926848 sectors
Units: sectors of 1 * 512 = 512 bytes
Sector size (logical/physical): 512 bytes / 512 bytes
I/O size (minimum/optimal): 512 bytes / 512 bytes
Disklabel type: dos
Disk identifier: 0xabeae232

Device                                                Boot Start    End Sectors  Size Id Type
openwrt-22.03.3-x86-64-generic-squashfs-combined.img1 *      512  33279   32768   16M 83 Linux
openwrt-22.03.3-x86-64-generic-squashfs-combined.img2      33792 246783  212992  104M 83 Linux

Command (m for help):

1-6.输入d并按2次回车删除第二分区
Command (m for help): d
Partition number (1,2, default 2):

Partition 2 has been deleted.

Command (m for help):

1-7.输入n并按3次回车,在First sector (33280-14926847, default 34816):处输入刚才记下的起始值33792,后面再直接按一次回车,使用所有未使用的33792空间
Command (m for help): n
Partition type
   p   primary (1 primary, 0 extended, 3 free)
   e   extended (container for logical partitions)
Select (default p):

Using default response p.
Partition number (2-4, default 2):
First sector (33280-14926847, default 34816): 33792
Last sector, +/-sectors or +/-size{K,M,G,T,P} (33792-14926847, default 14926847):

1-8.完成创建完新分区后会提示是否移除squashfs分区签名,此时输入n保留分区签名
Partition #2 contains a squashfs signature.

Do you want to remove the signature? [Y]es/[N]o: n
Command (m for help):

1-9.再次输入p并按回车确认分区是否正确,如果不正确输入q并按回车退出重新开始分区
Command (m for help): p

Disk openwrt-22.03.3-x86-64-generic-squashfs-combined.img: 7.12 GiB, 7642546176 bytes, 14926848 sectors
Units: sectors of 1 * 512 = 512 bytes
Sector size (logical/physical): 512 bytes / 512 bytes
I/O size (minimum/optimal): 512 bytes / 512 bytes
Disklabel type: dos
Disk identifier: 0xabeae232

Device                                                Boot Start      End  Sectors  Size Id Type
openwrt-22.03.3-x86-64-generic-squashfs-combined.img1 *      512    33279    32768   16M 83 Linux
openwrt-22.03.3-x86-64-generic-squashfs-combined.img2      33792 14926847 14893056  7.1G 83 Linux

Command (m for help):

1-10.输入w并按回车保存更改
Command (m for help): w
The partition table has been altered.
Syncing disks.

root@xzd-virtual-machine:/media/1#

至此IMG修改完成,可以用来安装使用了
2.将修改完的IMG镜像安装到本地硬盘,准备好写盘软件physdiskwrite
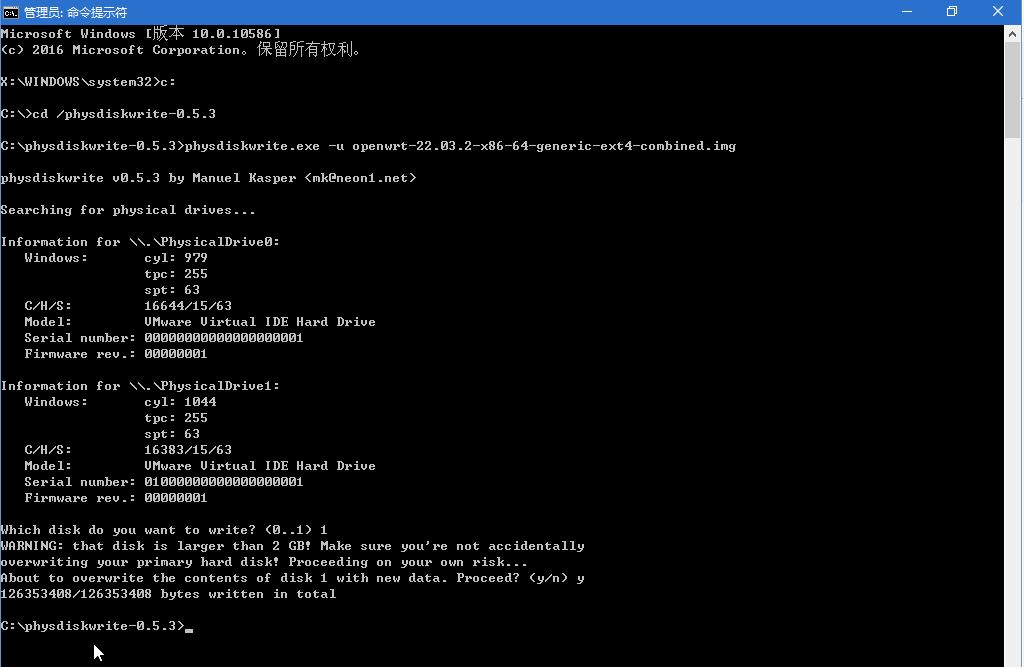
1.安装物理机:
1-1.将修改好的IMG镜像和physdiskwrite.exe放到PE里的在同一目录后用PE启动,并打开CMD,输入盘符打开存放镜像和physdiskwrite的分区,我这里是C盘,不清楚在哪里的可以在PE中此电脑中查看,每个人可能不一样。
1-2.进入physdiskwrite目录,openwrt的img镜像需要放在这里

1-3.输入命令 physdiskwrite.exe -u openwrt镜像名,回车会提示选择需要写入的磁盘,我这里是第二个,所以填1,根据自己实际情况来选,等待完成后就可以重启并拔掉U盘,就可以从本地硬盘启动openwrt了
3.修改openwrt的管理地址
3-1.启动完成后按回车进入命令行界面,使用命令修改初始IP
vi /etc/config/network
    按insert键进行编辑,修改br-lan的地址,默认为192.168.1.1,修改成自己的地址和子网掩码
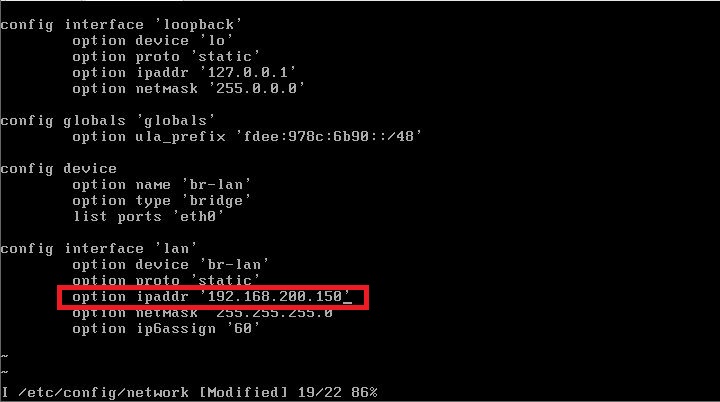
修改完成后按esc退出编辑,然后按shift+:,输入wq保存退出

 浙公网安备 33010602011771号