Vue 中 props配置项
Vue 中 props配置项
1: props配置项说明
<!--
## props配置项

1. 功能:让组件接收外部传过来的数据

2. 传递数据:```<Demo name="xxx"/>```

3. 接收数据:

    1. 第一种方式(只接收):```props:['name'] ```

    2. 第二种方式(限制类型):```props:{name:String}```

    3. 第三种方式(限制类型、限制必要性、指定默认值):

        ```js
        props:{
        	name:{
        	type:String, //类型
        	required:true, //必要性
        	default:'老王' //默认值
        	}
        }
        ```

    > 备注:props是只读的,Vue底层会监测你对props的修改,如果进行了修改,就会发出警告,若业务需求确实需要修改,那么请复制props的内容到data中一份,然后去修改data中的数据。

 -->
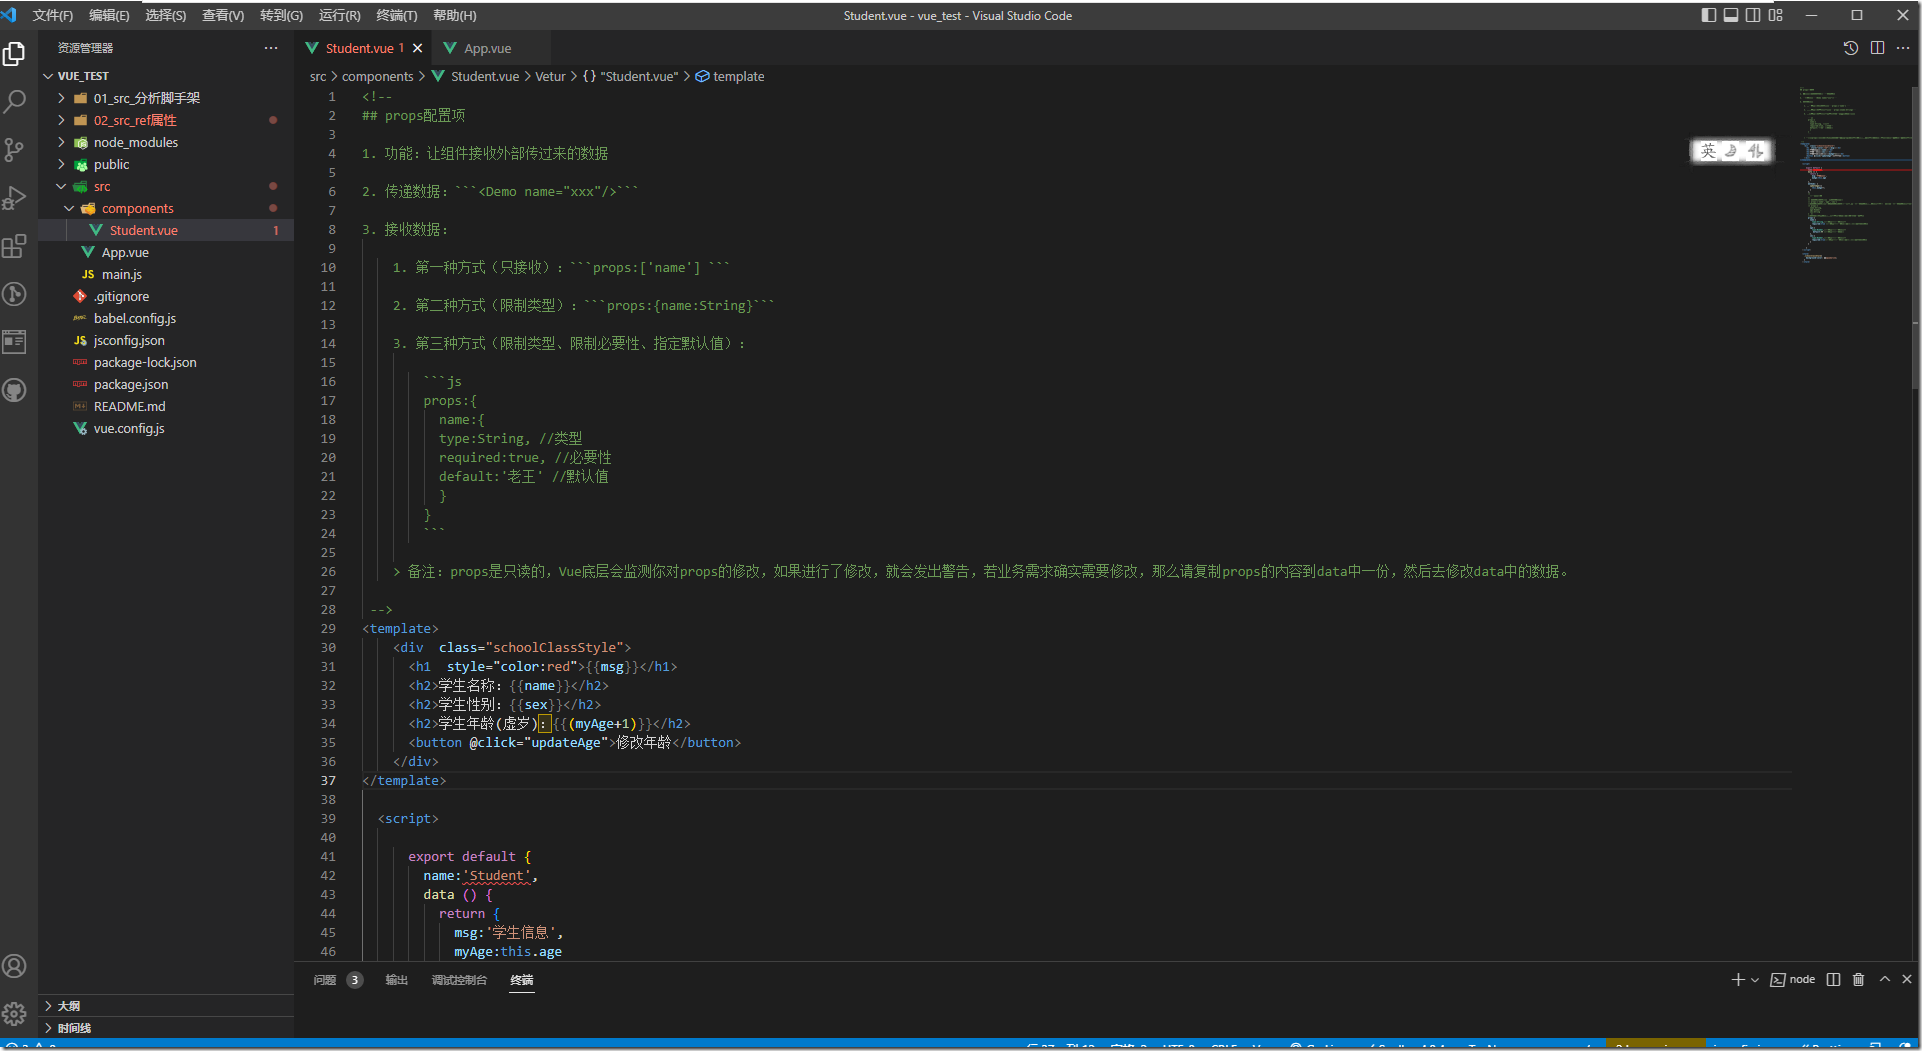
2:代码结构
3:代码内容
vue.config.js
const { defineConfig } = require('@vue/cli-service')
module.exports = defineConfig({
  transpileDependencies: true,
  lintOnSave:false /*关闭语法检查*/
})
main.js
//引入Vue
import Vue from 'vue'
 //引入App
import App from './App.vue'
 //关闭Vue生产提示
Vue.config.productionTip=false;
 // 创建Vm
const vm = new Vue(  {
         el:'#app',
         render: (h) => h(App)
    });
index.html
<!DOCTYPE html>
 <html lang="">
   <head>
     <meta charset="utf-8">
     <!-- 针对ie浏览器的一个特殊配置,含义是让ie浏览器以最高的渲染级别进行渲染界面 -->
     <meta http-equiv="X-UA-Compatible" content="IE=edge">
     <!-- 开启移动端理想视口 -->
     <meta name="viewport" content="width=device-width,initial-scale=1.0">
     <!-- 配置页签的图标 -->
     <link rel="icon" href="<%= BASE_URL %>favicon.ico">
     <!-- 配置网页的标题:找 package.json文件里的 "name": "vue_test" 值 -->
     <title><%= htmlWebpackPlugin.options.title %></title>
   </head>
   <body>
     <!-- 如果浏览器不支持js,则该标签的元素里的内容将会被渲染 -->
     <noscript>
       <strong>We're sorry but <%= htmlWebpackPlugin.options.title %> doesn't work properly without JavaScript enabled. Please enable it to continue.</strong>
     </noscript>
     <!-- 容器 -->
     <div id="app"></div>
     <!-- built files will be auto injected -->
   </body>
 </html>
App.vue
<!-- --> <template> <div> <hr/> <div class="divCss"> <h1 class="h1Css"></h1> <hr/> <!-- 调用组件,传递数据 --> <Student name="华南" sex="男" :age="18"/><!-- :age="18" 处理字符串数字 传递到组件里为 数字值 --> <hr/> <Student /> <hr/> </div> </div> </template><script> import Student from './components/Student.vue'; export default { name:'App', components:{ Student }, } </script><style> .divCss{ background-color: chocolate; margin: auto; padding: 20px; } .h1Css{ font-size: 36px; color: white; } </style>
Student.vue
<!-- ## props配置项 1. 功能:让组件接收外部传过来的数据 2. 传递数据:```<Demo name="xxx"/>``` 3. 接收数据: 1. 第一种方式(只接收):```props:['name'] ``` 2. 第二种方式(限制类型):```props:{name:String}``` 3. 第三种方式(限制类型、限制必要性、指定默认值): ```js props:{ name:{ type:String, //类型 required:true, //必要性 default:'老王' //默认值 } } ``` > 备注:props是只读的,Vue底层会监测你对props的修改,如果进行了修改,就会发出警告,若业务需求确实需要修改,那么请复制props的内容到data中一份,然后去修改data中的数据。 --> <template> <div class="schoolClassStyle"> <h1 style="color:red">{{msg}}</h1> <h2>学生名称:{{name}}</h2> <h2>学生性别:{{sex}}</h2> <h2>学生年龄(虚岁):{{(myAge+1)}}</h2> <button @click="updateAge">修改年龄</button> </div> </template>
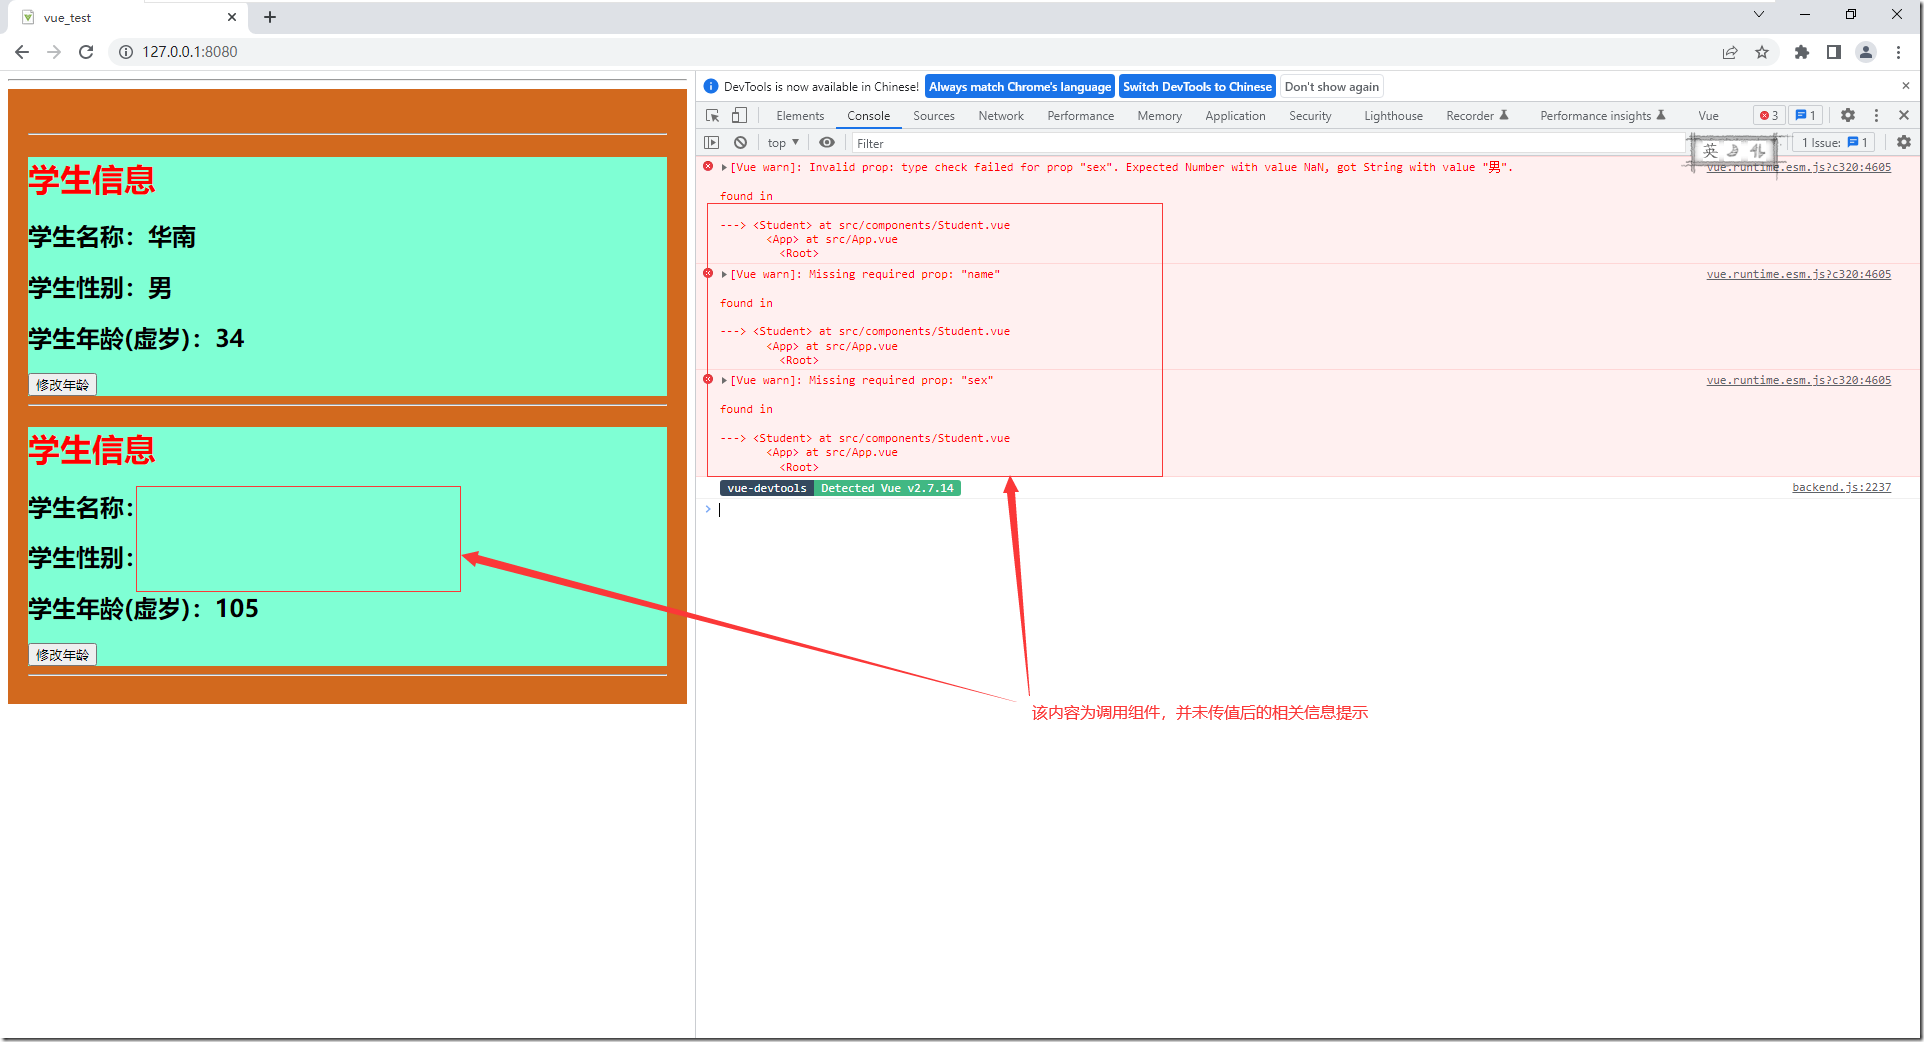
<script> export default { name:'Student', data () { return { msg:'学生信息', myAge:this.age } }, methods: { updateAge(){ this.myAge++; } }, /* 属性信息设置 */ // 组件数据接收器:简单接收数据模式 // props:['name','age','sex'] //组件数据接收器:配置组件数据接收属性类型,对传递过来的数据进行数据类型匹配检查,若传递过来的数据类型与配置的属性数据类型不匹配这会出现相对应的提示信息。 /* props:{ name:String, age:Number, sex:String } */ //接收的同时对数据进行类型限制+默认值的设置+必要性的限制 props:{ name:{ type:String,//配置对象属性数据类型 required:true //配置对象属性数据是否非空,是否必要有数据 }, age:{ type:Number,//配置对象属性数据类型 default:99 //配置对象属性默认值 }, sex:{ type:Number,//配置对象属性数据类型 required:true//配置对象属性数据是否非空,是否必要有数据 } } } </script><style> .schoolClassStyle{ background-color: aquamarine; } </style>
4:界面展示效果
为人:谦逊、激情、博学、审问、慎思、明辨、 笃行
学问:纸上得来终觉浅,绝知此事要躬行
为事:工欲善其事,必先利其器。
态度:道阻且长,行则将至;行而不辍,未来可期
.....................................................................
------- 桃之夭夭,灼灼其华。之子于归,宜其室家。 ---------------
------- 桃之夭夭,有蕡其实。之子于归,宜其家室。 ---------------
------- 桃之夭夭,其叶蓁蓁。之子于归,宜其家人。 ---------------
=====================================================================
* 博客文章部分截图及内容来自于学习的书本及相应培训课程以及网络其他博客,仅做学习讨论之用,不做商业用途。
* 如有侵权,马上联系我,我立马删除对应链接。 * @author Alan -liu * @Email no008@foxmail.com
转载请标注出处! ✧*꧁一品堂.技术学习笔记꧂*✧. ---> https://www.cnblogs.com/ios9/


 浙公网安备 33010602011771号