XSLT存档  

不及格的程序员-八神

 查看分类:  ASP.NET XML/XSLT JavaScripT   我的MSN空间Blog
package com.Iori.Util;

import android.app.Activity;
import android.content.ContentResolver;
import android.content.Context;
import android.content.Intent;
import android.content.pm.ShortcutInfo;
import android.content.pm.ShortcutManager;
import android.database.Cursor;
import android.graphics.drawable.Icon;
import android.net.Uri;
import android.os.Build;
import android.os.Parcelable;
import android.provider.Settings;
import android.text.TextUtils;

import static android.content.Context.SHORTCUT_SERVICE;

public class InstallUtil
{
    public static void createShortCut(Activity act, int iconResId,
                                      int appnameResId) {

        // com.android.launcher.permission.INSTALL_SHORTCUT
//        <uses-permission android:name="com.android.launcher.permission.INSTALL_SHORTCUT"/>
//        <uses-permission android:name="com.android.launcher.permission.READ_SETTINGS" />

        if (Build.VERSION.SDK_INT >= Build.VERSION_CODES.O)
        {
            ShortcutManager scm = (ShortcutManager) act.getSystemService(SHORTCUT_SERVICE);
            String shortcutID = act.getString(appnameResId);
            for (ShortcutInfo info : scm.getPinnedShortcuts())
            {
                if (shortcutID.equals(info.getId()))
                {
                    //判断快捷方式是否已存在
                    return;
                }
            }
            Intent launcherIntent = new Intent(act, act.getClass());//设置网络页面intent
            launcherIntent.setAction(Intent.ACTION_VIEW);
            ShortcutInfo si = new ShortcutInfo.Builder(act, shortcutID)
                    .setIcon(Icon.createWithResource(act, iconResId))
                    .setShortLabel(act.getString(appnameResId))
                    .setIntent(launcherIntent)
                    .build();
            assert scm != null;
            scm.requestPinShortcut(si, null);
            return;
        }

        Intent shortcutintent = new Intent(
                "com.android.launcher.action.INSTALL_SHORTCUT");
        // 不允许重复创建
        shortcutintent.putExtra("duplicate", false);
        // 需要现实的名称
        shortcutintent.putExtra(Intent.EXTRA_SHORTCUT_NAME,
                act.getString(appnameResId));
        // 快捷图片
        Parcelable icon = Intent.ShortcutIconResource.fromContext(
                act.getApplicationContext(), iconResId);
        shortcutintent.putExtra(Intent.EXTRA_SHORTCUT_ICON_RESOURCE, icon);
        // 点击快捷图片,运行的程序主入口
        shortcutintent.putExtra(Intent.EXTRA_SHORTCUT_INTENT,
                new Intent(act.getApplicationContext(), act.getClass()));
        // 发送广播
        if(isShortCutExist(act.getApplicationContext(),act.getString(appnameResId)) == false)
        {
            act.sendBroadcast(shortcutintent);
        }
    }

    /**
     * 检查快捷方式是否存在 <br/>
     * <font color=red>注意:</font> 有些手机无法判断是否已经创建过快捷方式<br/>
     * 因此,在创建快捷方式时,请添加<br/>
     * shortcutIntent.putExtra("duplicate", false);// 不允许重复创建<br/>
     * 最好使用{@link #isShortCutExist(Context, String, Intent)}
     * 进行判断,因为可能有些应用生成的快捷方式名称是一样的的<br/>
     */
    public static boolean isShortCutExist(Context context, String title)
    {
        boolean result = false;
        try
        {
            ContentResolver cr = context.getContentResolver();
            Uri uri = getUriFromLauncher(context);
            Cursor c = cr.query(uri, new String[]{"title"}, "title=? ", new String[]{title}, null);
            if (c != null && c.getCount() > 0) {
                result = true;
            }
            if (c != null && !c.isClosed()) {
                c.close();
            }
        }
        catch (Exception e)
        {
            result = false;
            e.printStackTrace();
        }
        return result;
    }

    /**
     * 不一定所有的手机都有效,因为国内大部分手机的桌面不是系统原生的<br/>
     * 更多请参考{@link #isShortCutExist(Context, String)}<br/>
     * 桌面有两种,系统桌面(ROM自带)与第三方桌面,一般只考虑系统自带<br/>
     * 第三方桌面如果没有实现系统响应的方法是无法判断的,比如GO桌面<br/>
     */
    public static boolean isShortCutExist(Context context, String title, Intent intent)
    {
        boolean result = false;
        try
        {
            ContentResolver cr = context.getContentResolver();
            Uri uri = getUriFromLauncher(context);
            Cursor c = cr.query(uri, new String[]{"title", "intent"}, "title=?  and intent=?",
                    new String[]{title, intent.toUri(0)}, null);
            if (c != null && c.getCount() > 0)
            {
                result = true;
            }
            if (c != null && !c.isClosed())
            {
                c.close();
            }
        }
        catch (Exception ex)
        {
            result = false;
            ex.printStackTrace();
        }
        return result;
    }

    private static Uri getUriFromLauncher(Context context)
    {
        StringBuilder uriStr = new StringBuilder();
        String authority = LauncherUtil.getAuthorityFromPermissionDefault(context);
        if (authority == null || authority.trim().equals(""))
        {
            authority = LauncherUtil.getAuthorityFromPermission(context, LauncherUtil.getCurrentLauncherPackageName(context) + ".permission.READ_SETTINGS");
        }
        //uriStr.append("content://");
        if (TextUtils.isEmpty(authority))
        {
            int sdkInt = android.os.Build.VERSION.SDK_INT;
            if (sdkInt < 8) { // Android 2.1.x(API 7)以及以下的
                uriStr.append("com.android.launcher.settings");
            } else if (sdkInt < 19) {// Android 4.4以下
                uriStr.append("com.android.launcher2.settings");
            } else {// 4.4以及以上
                uriStr.append("com.android.launcher3.settings");
            }
        } else {
            uriStr.append(authority);
        }
        //uriStr.append("/favorites?notify=true");
        return Uri.parse(uriStr.toString());
    }
}


<!-- 快捷方式相关 -->
<uses-permission android:name="com.android.launcher.permission.READ_SETTINGS" />
<uses-permission android:name="com.android.launcher.permission.WRITE_SETTINGS" />
<uses-permission android:name="com.android.launcher2.permission.READ_SETTINGS" />
<uses-permission android:name="com.android.launcher2.permission.WRITE_SETTINGS" />
<uses-permission android:name="com.android.launcher3.permission.READ_SETTINGS" />
<uses-permission android:name="com.android.launcher3.permission.WRITE_SETTINGS" />
<uses-permission android:name="com.google.android.launcher.permission.READ_SETTINGS" />
<uses-permission android:name="com.google.android.launcher.permission.WRITE_SETTINGS" />
<uses-permission android:name="org.adw.launcher.permission.READ_SETTINGS" />
<uses-permission android:name="org.adw.launcher.permission.WRITE_SETTINGS" />
<uses-permission android:name="com.htc.launcher.permission.READ_SETTINGS" />
<uses-permission android:name="com.htc.launcher.permission.WRITE_SETTINGS" />
<uses-permission android:name="com.qihoo360.launcher.permission.READ_SETTINGS" />
<uses-permission android:name="com.qihoo360.launcher.permission.WRITE_SETTINGS" />
<uses-permission android:name="com.lge.launcher.permission.READ_SETTINGS" />
<uses-permission android:name="com.lge.launcher.permission.WRITE_SETTINGS" />
<uses-permission android:name="net.qihoo.launcher.permission.READ_SETTINGS" />
<uses-permission android:name="net.qihoo.launcher.permission.WRITE_SETTINGS" />
<uses-permission android:name="org.adwfreak.launcher.permission.READ_SETTINGS" />
<uses-permission android:name="org.adwfreak.launcher.permission.WRITE_SETTINGS" />
<uses-permission android:name="org.adw.launcher_donut.permission.READ_SETTINGS" />
<uses-permission android:name="org.adw.launcher_donut.permission.WRITE_SETTINGS" />
<uses-permission android:name="com.huawei.launcher3.permission.READ_SETTINGS" />
<uses-permission android:name="com.huawei.launcher3.permission.WRITE_SETTINGS" />
<uses-permission android:name="com.fede.launcher.permission.READ_SETTINGS" />
<uses-permission android:name="com.fede.launcher.permission.WRITE_SETTINGS" />
<uses-permission android:name="com.sec.android.app.twlauncher.settings.READ_SETTINGS" />
<uses-permission android:name="com.sec.android.app.twlauncher.settings.WRITE_SETTINGS" />
<uses-permission android:name="com.anddoes.launcher.permission.READ_SETTINGS" />
<uses-permission android:name="com.anddoes.launcher.permission.WRITE_SETTINGS" />
<uses-permission android:name="com.tencent.qqlauncher.permission.READ_SETTINGS" />
<uses-permission android:name="com.tencent.qqlauncher.permission.WRITE_SETTINGS" />
<uses-permission android:name="com.huawei.launcher2.permission.READ_SETTINGS" />
<uses-permission android:name="com.huawei.launcher2.permission.WRITE_SETTINGS" />
<uses-permission android:name="com.android.mylauncher.permission.READ_SETTINGS" />
<uses-permission android:name="com.android.mylauncher.permission.WRITE_SETTINGS" />
<uses-permission android:name="com.ebproductions.android.launcher.permission.READ_SETTINGS" />
<uses-permission android:name="com.ebproductions.android.launcher.permission.WRITE_SETTINGS" />
<uses-permission android:name="com.oppo.launcher.permission.READ_SETTINGS" />
<uses-permission android:name="com.oppo.launcher.permission.WRITE_SETTINGS" />
<uses-permission android:name="com.lenovo.launcher.permission.READ_SETTINGS" />
<uses-permission android:name="com.lenovo.launcher.permission.WRITE_SETTINGS" />
<uses-permission android:name="com.huawei.android.launcher.permission.READ_SETTINGS" />
<uses-permission android:name="com.huawei.android.launcher.permission.WRITE_SETTINGS" />
<uses-permission android:name="telecom.mdesk.permission.READ_SETTINGS" />
<uses-permission android:name="telecom.mdesk.permission.WRITE_SETTINGS" />
<uses-permission android:name="dianxin.permission.ACCESS_LAUNCHER_DATA" />


Android 10 和 11 采坑记录之 open failed: EACCES (Permission denied)

1、打开文件异常 open failed: EACCES (Permission denied),提示权限拒绝  

第一步 检查AndroidManifest 中存储的读写权限是否添加:

<uses-permission android:name="android.permission.READ_EXTERNAL_STORAGE" />
<uses-permission android:name="android.permission.WRITE_EXTERNAL_STORAGE" />
<uses-permission android:name="android.permission.WRITE_EXTERNA" />

 第二步 存储的读写权限已添加 ,这时候就检查应用是否授权存储权限,打开设置—>权限管理—>您的应用—>存储权限:

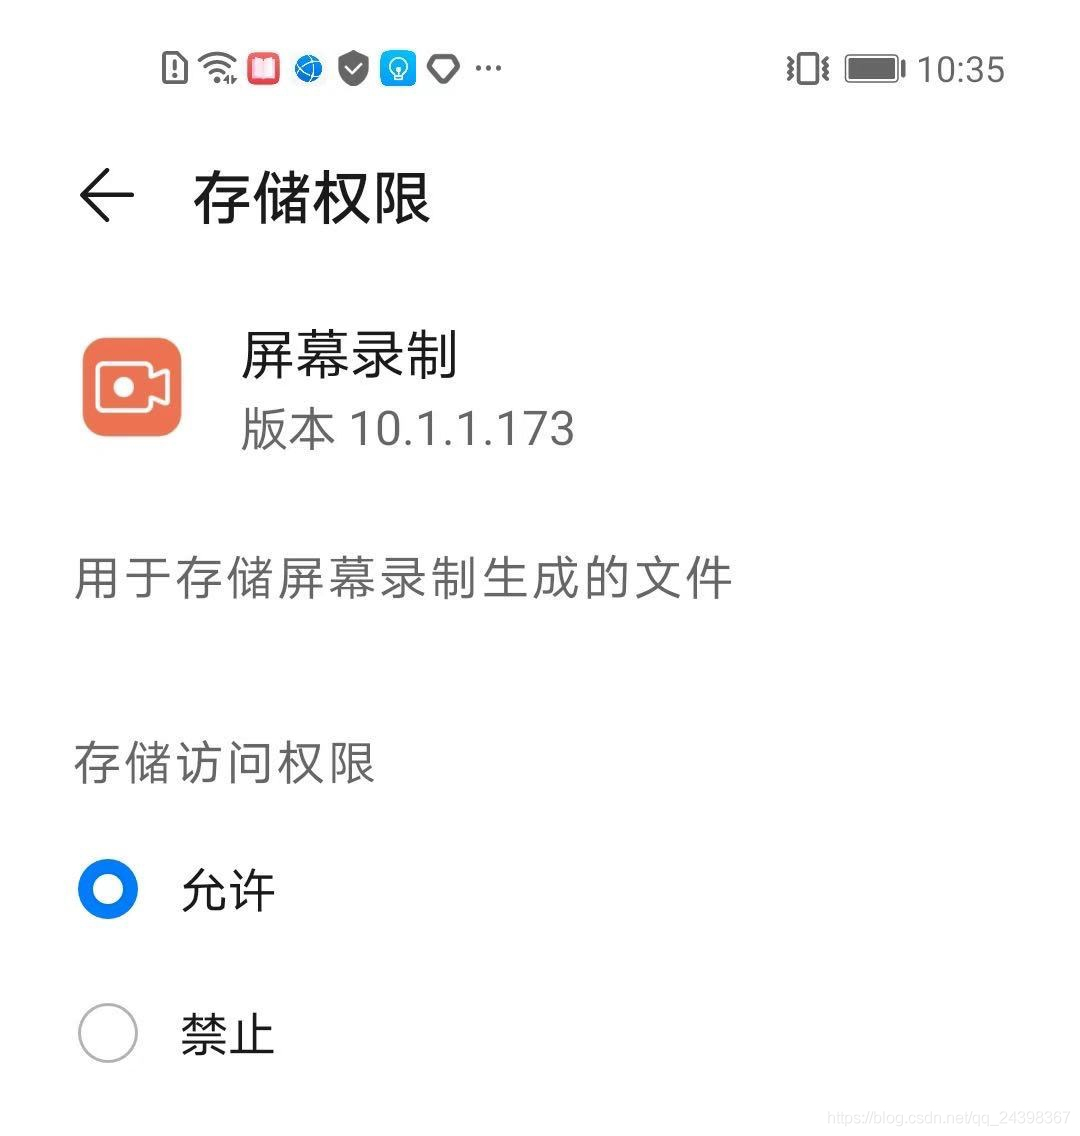
备注:在Android 6.0 以后添加权限管理,存储权限需要手动授权。这里推荐两个比较不错的第三方库,有空大家可以去了解一下 


//GitHub地址:https://github.com/tbruyelle/RxPermissions  
//最新版本 0.12
implementation 'com.github.tbruyelle:rxpermissions:0.12'

//GitHub地址:https://github.com/permissions-dispatcher/PermissionsDispatcher
//最新版本 4.8.0
 implementation "org.permissionsdispatcher:permissionsdispatcher:${latest.version}"
 annotationProcessor "org.permissionsdispatcher:permissionsdispatcher-processor:${latest.version}"

以上都没问题。那很有可能是 android10 特性分区储存变更,不建议访问绝对路径文件。这个时候坚持访问绝对路径需要在application属性下添加以下代码:

android:requestLegacyExternalStorage="true"

另外建议应用文件创建 把

Environment.getExternalStorageDirectory()(储存卡根目录)

变更为应用私有存储

context.getExternalFilesDir(null)(android/data/包名/files/)

Android 11 强制使用分区存储,一旦强制使用分区存储,APP将不能直接访问外部存储。

      application添加 android:requestLegacyExternalStorage=“true” 的配置在  Android 11上面是无效了,所以提供了 preserveLegacyExternalStorage 标记,在application添加android:preserveLegacyExternalStorage="true" 即可

由于 preserveLegacyExternalStorage 标记Android SDK 30 才有,所以你需要将项目Android SDK编译版本到 30

备注:如运行项目遇报错error: attribute android:preserveLegacyExternalStorage not found;解决办法如下两种:

       1.升级Android SDK编译版本到30,即升级tuyaversion插件即可

       2.如果不想升级编译版本,需要在Manifest的application标签内增加:tools:remove="preserveLegacyExternalStorage" ,移除此属性。原理见:https://developer.android.com/studio/build/manifest-merge。 (建议升级,否则会影响上架Google Play:https://developer.android.com/distribute/play-policies )


Android 快捷方式 shortcuts 使用
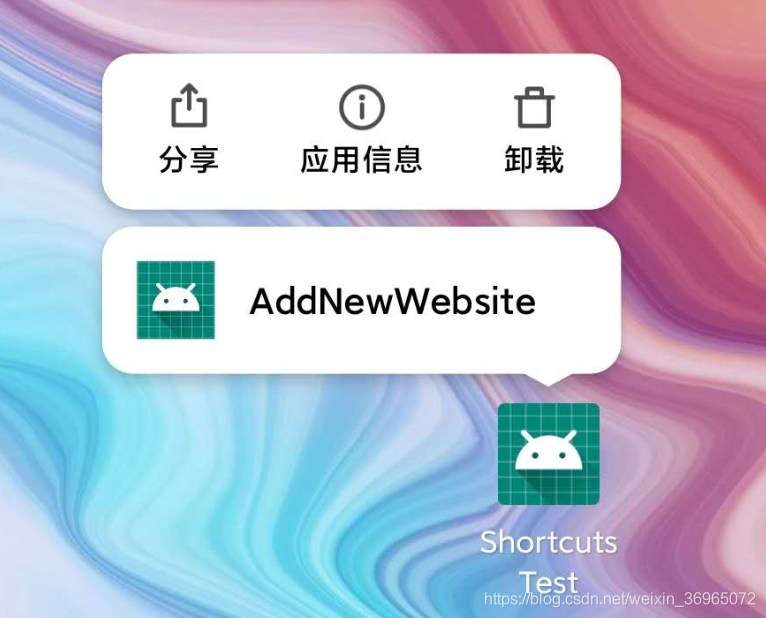
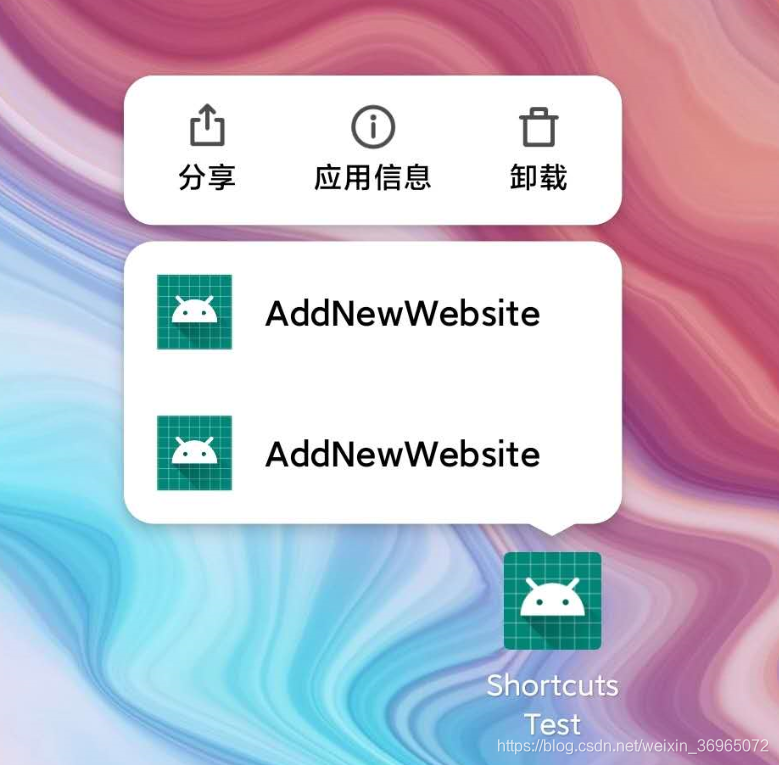
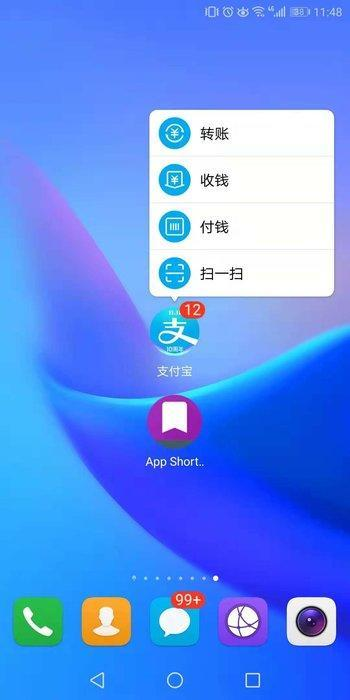
先上两个图

111
222

官方说明

快捷方式可帮助用户快速访问应用程序的各个部分,从而为用户提供特定类型的内容。
使用快捷方式交付内容的方式取决于您的用例以及快捷方式的上下文是应用程序驱动还是用户驱动。尽管静态快捷方式的上下文不会更改,而动态快捷方式的上下文会不断更改,但是两种情况下的上下文都是由您的应用程序驱动的。如果用户选择自己希望您的应用向其交付内容的方式(例如固定快捷方式),则上下文由用户定义。

有三种方式

1.静态快捷方式

最适合在用户与应用程序互动的整个生命周期内使用一致结构链接到内容的应用程序。由于大多数启动器一次 只能显示四个快捷方式,因此静态快捷方式对于常见活动很有用。

1.1 在清单文件中添加meda-data
    <application
        android:allowBackup="true"
        android:icon="@mipmap/ic_launcher"
        android:label="@string/app_name"
        android:roundIcon="@mipmap/ic_launcher_round"
        android:supportsRtl="true"
        android:theme="@style/AppTheme">
        <activity android:name=".MainActivity">
            <intent-filter>
                <action android:name="android.intent.action.MAIN" />
                <category android:name="android.intent.category.LAUNCHER" />
            </intent-filter>
            <meta-data android:name="android.app.shortcuts" android:resource="@xml/shortcuts"/>
        </activity>

        <activity android:name=".ShortcutActivity"/>

    </application>
1.2 创建shortcuts资源文件,res/xml/shortcuts.xml

一个shortcut标签表示一个快捷方式,这里我创建了两个,但是id不同其他都是相同的。
必须提供一个android:shortcutId和 android:shortcutShortLabel。所有其他值都是可选的。
各个属性定义:
shortcutId:id
shortcutShortLabel:简短的短语,描述了快捷方式的用途。尽可能将快捷方式的“简短描述”的长度限制为10个字符。
shortcutLongLabel:描述快捷方式用途的扩展短语。如果有足够的空间,启动器将显示该值而不是shortcutShortLabel。如果可能,将快捷方式的“详细描述”的长度限制为25个字符。
shortcutDisabledMessage:当用户尝试启动禁用的快捷方式时,在受支持的启动器中显示的消息。该消息应向用户说明为什么现在禁用了快捷方式。如果android:enabled为,则此属性的值无效true。
enabled:默认值是true,如果将其设置为false,还应该设置一个android:shortcutDisabledMessage,以说明为什么禁用了快捷方式。如果您不需要提供此类消息,则最简单的方法是从XML文件中完全删除快捷方式。
icon:图标,也可以是包含图像的资源文件。

<?xml version="1.0" encoding="utf-8"?>
<shortcuts xmlns:android="http://schemas.android.com/apk/res/android">
    <shortcut
        android:shortcutId="compose"
        android:icon="@mipmap/ic_launcher"
        android:shortcutShortLabel="@string/addShortcuts"
        android:shortcutLongLabel="@string/addNewWebsite"
        android:shortcutDisabledMessage="@string/shortcutsMessage">

        <intent
            android:action="android.intent.action.VIEW"
            android:targetClass="com.shy.shortcutstest.ShortcutActivity"
            android:targetPackage="com.shy.shortcutstest" />

    </shortcut>
    <shortcut
        android:shortcutId="compose1"
        android:icon="@mipmap/ic_launcher"
        android:shortcutShortLabel="@string/addShortcuts"
        android:shortcutLongLabel="@string/addNewWebsite"
        android:shortcutDisabledMessage="@string/shortcutsMessage">

        <intent
            android:action="android.intent.action.VIEW"
            android:targetClass="com.shy.shortcutstest.ShortcutActivity"
            android:targetPackage="com.shy.shortcutstest" />

    </shortcut>
</shortcuts>

附上资源文件

<resources>
    
    <string name="addShortcuts">Shortcuts</string>
    <string name="addNewWebsite">AddNewWebsite</string>
    <string name="shortcutsMessage">shortcutsMessage</string>
    
</resources>
创建好点击快捷方式的activity,也就是shortcut中intent,targetClass和targetOackage的指向。此时就可以跳转到制定的activity了。

2.动态快捷方式

动态快捷方式提供了指向应用程序中特定于上下文的特定操作的链接。这些操作可能会在您的应用使用之间发生变化,甚至在您的应用运行时也会发生变化。
在某个特定的时期为某个页面,或某个动作,甚至可以参与到周期较长的业务逻辑当中,添加一个快捷方式,以快速到达当前状态。

2.1 获得ShortcutManager
mSm = (ShortcutManager) getSystemService(Context.SHORTCUT_SERVICE);
2.2 调用ShortcutManager的api执行添加、设置、删除快捷方式的操作

setDynamicShortcuts():重新定义动态快捷键的完整列表。
addDynamicShortcuts():以增加动态快捷键的现有列表。
updateShortcuts():更新。
removeDynamicShortcuts():删除一组。
removeAllDynamicShortcuts():删除全部。
传入参数都是list,list中实际都是ShortcutInfo对象。

添加
Intent intent = new Intent(this, ShortcutActivity2.class);
intent.setAction(Intent.ACTION_VIEW);
intent.putExtra("name","孙三");
if (android.os.Build.VERSION.SDK_INT >= android.os.Build.VERSION_CODES.N_MR1) {
    ShortcutInfo builder = new ShortcutInfo.Builder(this, "id")
            .setShortLabel("动态标签")
            .setLongLabel("长长动态标签")
            .setIcon(Icon.createWithResource(this, R.mipmap.ic_launcher))
            .setIntent(intent)
            .build();
    mSm.addDynamicShortcuts(Arrays.asList(builder));
}
删除
List<String> id = new ArrayList<>();
id.add("id");
mSm.removeDynamicShortcuts(id);

ShortcutManager中还提供了获得快捷方式的函数,

mSm.getDynamicShortcuts();  //获得动态的快捷方式
mSm.getPinnedShortcuts();   //获得固定的快捷方式
mSm.getManifestShortcuts(); //获得静态的快捷方式

3. 固定快捷方式

在Android 8.0(API级别26)及更高版本上,您可以创建固定的快捷方式。与静态和动态快捷方式不同,固定的快捷方式在支持的启动器中显示为单独的图标。图1显示了这两种快捷方式之间的区别。

Intent intent = new Intent(this, ShortcutActivity2.class);
intent.setAction(Intent.ACTION_VIEW);
intent.putExtra("name", "孙三");
if (Build.VERSION.SDK_INT >= Build.VERSION_CODES.O) {
    if (mSm.isRequestPinShortcutSupported()) { // 验证设备是否支持
        //创建固定的快捷方式时,如果有这个快捷方式id,系统会自动绑定有关的所有信息,
        //如果要固定新的 就重新创建一个
        ShortcutInfo pinShortcutInfo = new ShortcutInfo.Builder(this, "id")
                .setShortLabel("固定的")
                .setIntent(intent)
                .build();
        Intent pinnedShortcutCallbackIntent = mSm.createShortcutResultIntent(pinShortcutInfo);
        PendingIntent successCallback = PendingIntent.getBroadcast(this, 0, pinnedShortcutCallbackIntent, 0);
        //尝试添加到桌面
        mSm.requestPinShortcut(pinShortcutInfo, successCallback.getIntentSender());
    }
}

当固定到屏幕后,可以调用updateShortcuts()更新。


Android 8.0应用快捷方式(ShortcutManager)的使用

在Android系统上,有时候会看到在桌面上长按应用图标弹出应用快捷列表,例如美团、支付宝、微博、印象笔记、QQ邮箱等,效果图如下所示:


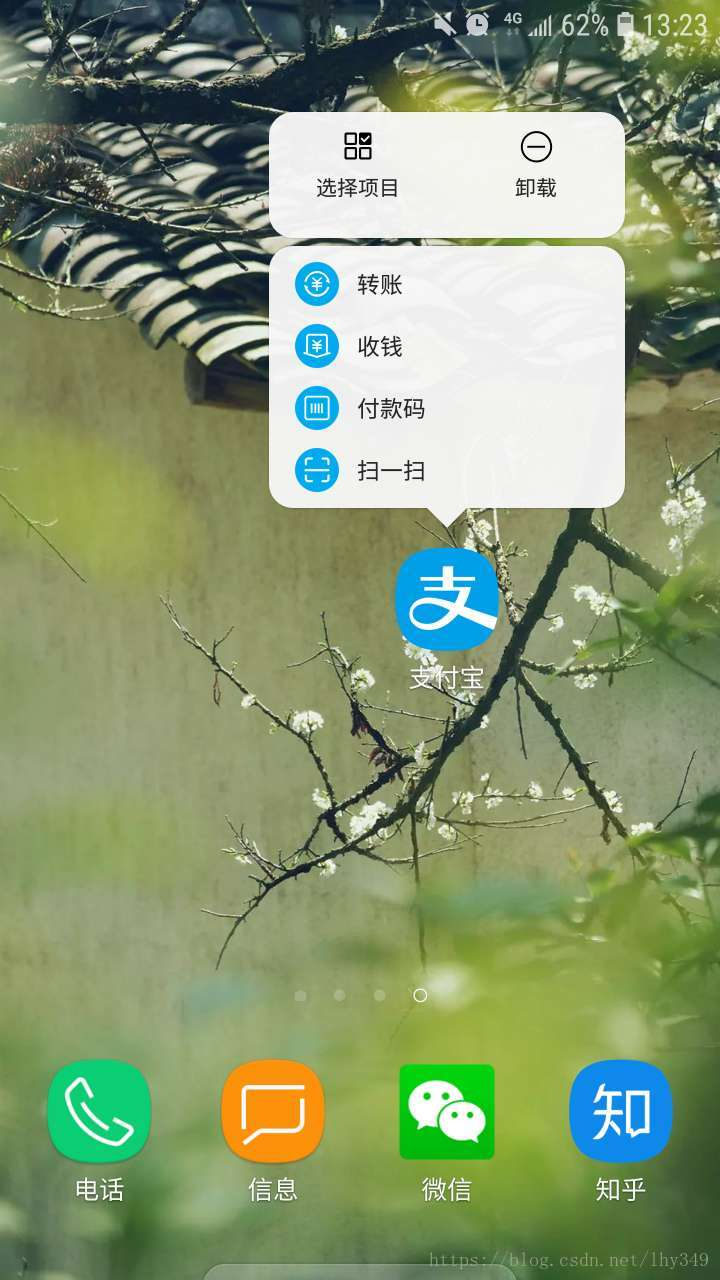
用户可以通过这些快捷键,直接访问应用具体的界面,并且长按这些快捷键可以在桌面上创建一个该快捷键的应用图标,比如长按上图中的收钱快捷键,拖动即可在桌面创建一个支付宝收钱快捷方式。
这个效果是Android 7.1之后新增的一个功能:应用快捷方式ShortcutManager,官方API地址:
https://developer.android.google.cn/reference/android/content/pm/ShortcutManager.html,接下来,我们将演示该快捷方式的具体实现方法:

  • 静态的: 在xml中定义, 适用于一些通用的动作.
  • 动态的: 由ShortcutManager发布, 可以根据用户的行为或者偏好添加, 可以动态更新.

注:该快捷方式只能在Android 7.1的设备上显示,且每一个应用目前最多可以有5个shortcuts(静态 + 动态)。

静态ShortcutManager的使用

静态的Shortcuts是写在xml中的,除非应用更新,否则不能被修改。
首先在res/xml/创建一个shortcuts.xml文件,内容如下所示:

<?xml version="1.0" encoding="utf-8"?>
<shortcuts xmlns:android="http://schemas.android.com/apk/res/android">
    <shortcut
        android:enabled="true"
        android:icon="@drawable/ic_search"
        android:shortcutDisabledMessage="@string/lable_shortcut_static_search_disable"
        android:shortcutId="shortcut_id_search"
        android:shortcutLongLabel="@string/lable_shortcut_static_search_disable"
        android:shortcutShortLabel="@string/lable_shortcut_static_search_disable">
        <intent
            android:action="android.intent.action.VIEW"
            android:targetClass="com.cjxj.androiddemo.activity.MainActivity"
            android:targetPackage="com.cjxj.androiddemo" />
        <categories android:name="android.shortcut.conversation" />
    </shortcut>
</shortcuts>

其中属性分别表示:

  • shortcutId表示 shortcut 唯一标识符,相同的 shortcutId 会被覆盖。必须字段。
  • shortcutShortLabel为将 shortcut 拖动到桌面时显示的名字,官方建议不超过 10 个字符,必须字段。
  • shortcutLongLabel为 shortcut 列表中每个 shortcut 的名字,不宜过长,如果过长或未设置默认会显示 ShortLabel,官方建议不超过 25 个字符。可选字段。
  • icon为 shortcut 的 icon,在列表展示和拖动到桌面时显示需要,可选字段。
  • enabled表示 shortcut 是否可用,false 表示禁用。
  • shortcutDisabledMessage为已固定在桌面的 shortcut 被 Disabled 后点击时的 Toast 提示内容。可选字段。
  • intent为点击 shortcut 时响应的 Intent,必须字段。

这里可以添加多个 Intent,但点击时不会启动所有 Intent,而是启动最后一个 Intent,在这个 Intent 回退时会启动它前面一个 Intent,相当于自动将所有 Intent 添加到了堆栈。

然后在应用的Manifest文件中配置启动界面的Activity,内容如下:

        <activity
            android:name=".activity.HomeListActivity"
            android:screenOrientation="portrait">
            <intent-filter>
                <action android:name="android.intent.action.MAIN" />

                <category android:name="android.intent.category.LAUNCHER" />
            </intent-filter>
            <meta-data android:name="android.app.shortcuts"
                android:resource="@xml/shortcuts"/>
        </activity>

至此,我们就添加了一个搜索功能的快捷方式,效果如下:


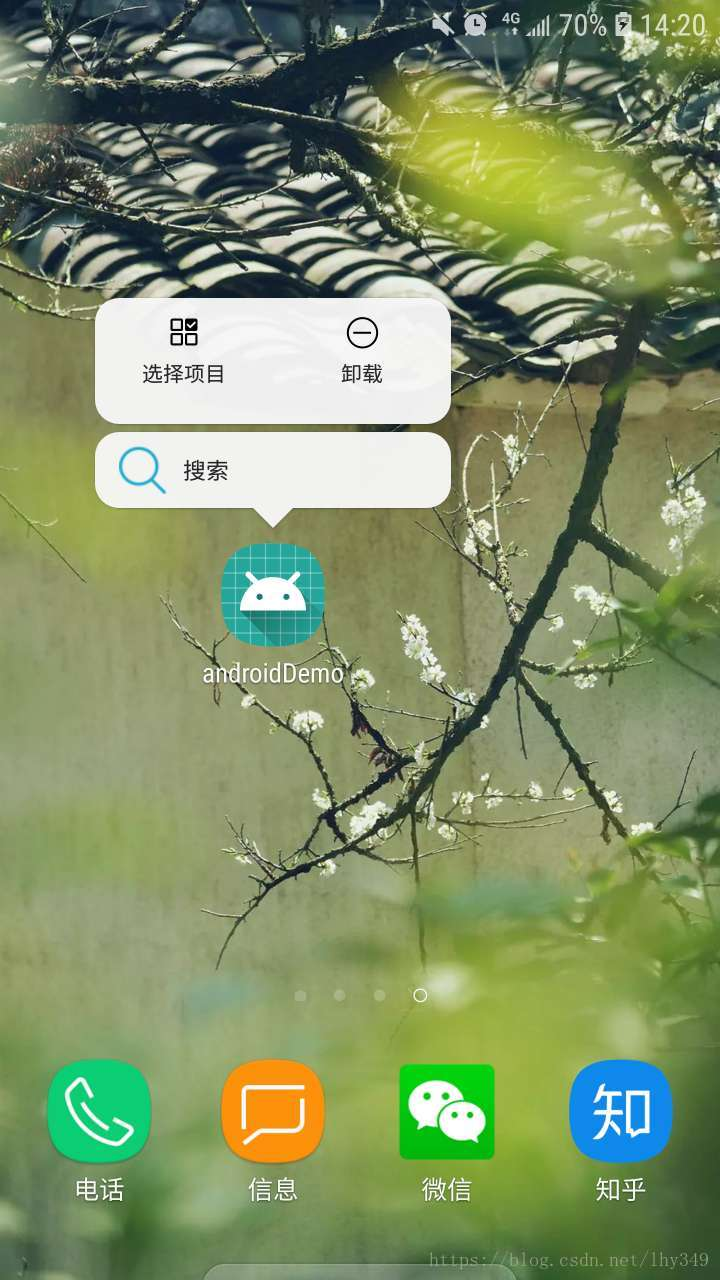
动态ShortcutManager的使用

动态是通过 ShortcutManager API 进行操作,可以动态添加、修改、删除。

        if (Build.VERSION.SDK_INT >= 25) {
            ShortcutInfo shortcutInfo = new ShortcutInfo.Builder(this, "shortcut_id_search")
                    .setShortLabelResId(R.string.lable_shortcut_static_search_disable)
                    .setLongLabelResId(R.string.lable_shortcut_static_search_disable)
                    .setIcon(Icon.createWithResource(this, R.drawable.ic_search))
                    .setIntent(new Intent(this, MainActivity.class))
                    .build();

            ShortcutManager shortcutManager = getSystemService(ShortcutManager.class);
            //这样就可以通过长按图标显示出快捷方式了
            shortcutManager.setDynamicShortcuts(Arrays.asList(shortcutInfo));

        }

通过ShortcutInfo.Builder新建 ShortcutInfo,再通过shortcutManager添加即可。其中:

  • setDynamicShortcuts(List)可以替换并添加所有 shortcut 列表;
  • addDynamicShortcuts(List)可以添加新的 shortcut 到列表,超过最大个数会报异常;
  • updateShortcuts(List)可以更新一组 shortcuts;
  • removeDynamicShortcuts(List)和removeAllDynamicShortcuts() 可以删除部分或所有 shortcuts。

至此,关于应用快捷方式的使用就介绍结束了,如有问题,欢迎留言。


Android快捷方式-Shortcuts

栏目: IOS · Android · 发布时间: 3年前

内容简介:就在前几天,跟一同事车回家,他用的是iOS版高德,每次发车前,重力长按高德icon,弹出shortcuts,很方便就进入回家的导航,也就是iOS 3D Touch功能。如下面这张图,截图来自647 iPhone X 。今天得空研究了一下,Android 在Android 7.1(API 25) 添加了App快捷方式的新功能,由ShortcutManager类来管理,这样开发者可以随意定义快速进入到指定的Activity或打开指定网页。目前有很多App已经有了这个特性,接了个图如下:下面我们就详细探讨一下这

就在前几天,跟一同事车回家,他用的是iOS版高德,每次发车前,重力长按高德icon,弹出shortcuts,很方便就进入回家的导航,也就是iOS 3D Touch功能。如下面这张图,截图来自647 iPhone X 。


今天得空研究了一下,Android 在Android 7.1(API 25) 添加了App快捷方式的新功能,由ShortcutManager类来管理,这样开发者可以随意定义快速进入到指定的Activity或打开指定网页。目前有很多App已经有了这个特性,接了个图如下:


下面我们就详细探讨一下这个特性。

实现Shortcuts的两种形式

静态Shortcuts

所谓的静态就是在工程中配置,利用xml写死。在APK中包含一个资源文件来描述Shortcut,目录res/xml/shortcuts.xml。这种方法做不到热更新,需要从新发布App才可。

<shortcuts xmlns:android="http://schemas.android.com/apk/res/android">
    <shortcut
        android:shortcutId="static shortcut"
        android:enabled="true"
        android:icon="@mipmap/ic_launcher"
        android:shortcutShortLabel="@string/shortcut_short_name"
        android:shortcutLongLabel="@string/shortcut_long_name"
        android:shortcutDisabledMessage="@string/shortcut_disable_msg">
        <intent
            android:action="android.intent.action.VIEW"
            android:targetPackage="d.shortcuts"
            android:targetClass="d.shortcuts.MainActivity" />
        <categories android:name="android.shortcut.conversation"/>
    </shortcut>
</shortcuts>
复制代码
<application ... 
             ...>
    <activity android:name=".MainActivity">
        <intent-filter>
            <action android:name="android.intent.action.MAIN" />
            <category android:name="android.intent.category.LAUNCHER" />
        </intent-filter>
        <meta-data
            android:name="android.app.shortcuts"
            android:resource="@xml/shortcuts"/>
    </activity>
</application>
复制代码

这种方式适合百年不变的场景,不然真是不够灵活。

动态Shortcuts

动态Shortcuts在运行时,通过ShortcutManager API来进行注册。用这种方式可以在运行时,动态的发布、更新和删除shortcut。官方给出了几个场景可以作为shortcut的例子,比如:

  • 在地图类app中,指导用户到特定的位置;
  • 在社交类app中,发送消息给一个朋友;
  • 在媒体类app中,播放视频的下一片段;
  • 在游戏类app中,下载最后保存的要点;

动态安装

给Activity页面构建shortcut

private void setupShortcutsForActivity() {
    mShortcutManager = getSystemService(ShortcutManager.class);
    List<ShortcutInfo> infos = new ArrayList<>();
    for (int i = 0; i < mShortcutManager.getMaxShortcutCountPerActivity(); i++) {
        Intent intent = new Intent(this, Main2Activity.class);
        intent.setAction(Intent.ACTION_VIEW);
        intent.putExtra("info", "this is info!");
        ShortcutInfo info = new ShortcutInfo.Builder(this, "ID:" + i)
                .setShortLabel("short label")
                .setLongLabel("long label")
                .setIcon(Icon.createWithResource(this, R.mipmap.ic_launcher))
                .setIntent(intent)
                .build();
        infos.add(info);
    }
    mShortcutManager.setDynamicShortcuts(infos);
}
复制代码

使用URL构建shortcut,打开默认浏览器,如下

private ShortcutInfo createShortcutForUrl(String urlAsString) {
      final ShortcutInfo.Builder b = new ShortcutInfo.Builder(mContext, urlAsString);
      final Uri uri = Uri.parse(urlAsString);
      b.setIntent(new Intent(Intent.ACTION_VIEW, uri));
      setSiteInformation(b, uri)
      setExtras(b);
      return b.build();
}

private ShortcutInfo.Builder setSiteInformation(ShortcutInfo.Builder b, Uri uri) {
        b.setShortLabel(uri.getHost());
        b.setLongLabel(uri.toString());
        Bitmap bmp = fetchFavicon(uri);
        if (bmp != null) {
            b.setIcon(Icon.createWithBitmap(bmp));
        } else {
            b.setIcon(Icon.createWithResource(mContext, R.drawable.link));
        }
        return b;
 }

private ShortcutInfo.Builder setExtras(ShortcutInfo.Builder b) {
        final PersistableBundle extras = new PersistableBundle();
        extras.putLong(EXTRA_LAST_REFRESH, System.currentTimeMillis());
        b.setExtras(extras);
        return b;
}

//注意要异步Task执行
private Bitmap fetchFavicon(Uri uri) {
        final Uri iconUri = uri.buildUpon().path("favicon.ico").build();
        InputStream is = null;
        BufferedInputStream bis = null;
        try
        {
            URLConnection conn = new URL(iconUri.toString()).openConnection();
            conn.connect();
            is = conn.getInputStream();
            bis = new BufferedInputStream(is, 8192);
            return BitmapFactory.decodeStream(bis);
        } catch (IOException e) {
            return null;
        }
    }
复制代码
Android快捷方式-Shortcuts

动态删除

public void removeShortcut(ShortcutInfo shortcut) { 
    mShortcutManager.removeDynamicShortcuts(Arrays.asList(shortcut.getId()));
}
复制代码

动态停用

public void disableShortcut(ShortcutInfo shortcut) {
    mShortcutManager.disableShortcuts(Arrays.asList(shortcut.getId()));
}
复制代码

动态开启

public void enableShortcut(ShortcutInfo shortcut) {
    mShortcutManager.enableShortcuts(Arrays.asList(shortcut.getId()));
}
复制代码

Pinning Shortcut

在动态里面还有一个Pinning Shortcuts概念,相当于app的另外一种快捷方式,只允许用户添加与删除它。

用isRequestPinShortcutSupported() 判断当前设备是否支持PinShort 。在Android 8.0 (API level 26) 以及以上的版本上支持创建pinned shortcuts。

ShortcutManager mShortcutManager = context.getSystemService(ShortcutManager.class);
if (mShortcutManager.isRequestPinShortcutSupported()) {
    // Assumes there's already a shortcut with the ID "my-shortcut".
    // The shortcut must be enabled.
    ShortcutInfo pinShortcutInfo =
            new ShortcutInfo.Builder(context, "my-shortcut").build();
    // Create the PendingIntent object only if your app needs to be notified
    // that the user allowed the shortcut to be pinned. Note that, if the
    // pinning operation fails, your app isn't notified. We assume here that the
    // app has implemented a method called createShortcutResultIntent() that
    // returns a broadcast intent.
    Intent pinnedShortcutCallbackIntent =
            mShortcutManager.createShortcutResultIntent(pinShortcutInfo);

    // Configure the intent so that your app's broadcast receiver gets
    // the callback successfully.For details, see PendingIntent.getBroadcast().
    PendingIntent successCallback = PendingIntent.getBroadcast(context, /* request code */ 0,
            pinnedShortcutCallbackIntent, /* flags */ 0);

    mShortcutManager.requestPinShortcut(pinShortcutInfo,
            successCallback.getIntentSender());
}
复制代码

shortcuts 最佳实践

1、不管是静态形式还是动态形式,每个应用最多可以注册4个Shortcuts。

2、 "short description" 限制在 10 个字符内

3、"long description" 限制在 25 个字符内

4、改变 dynamic and pinned shortcuts时,调用方法 updateShortcuts()

5、重复创建shortcut时,

  • 动态的 shortcuts使用方法: addDynamicShortcuts() 或 setDynamicShortcuts() .
  • Pinned shortcuts使用方法: requestPinShortcut() .

6、在每次启动与需要重新发布动态shortcut时,推荐检查方法 getDynamicShortcuts() 返回的数量。

public class MainActivity extends Activity {
    public void onCreate(Bundle savedInstanceState) {
        super.onCreate(savedInstanceState);
        ShortcutManager shortcutManager = getSystemService(ShortcutManager.class);
        if (shortcutManager.getDynamicShortcuts().size() == 0) {
            // Application restored. Need to re-publish dynamic shortcuts.
            if (shortcutManager.getPinnedShortcuts().size() > 0) {
                // Pinned shortcuts have been restored. Use
                // updateShortcuts() to make sure they contain
                // up-to-date information.
            }
        }
    }
    // ...
}
复制代码

本文demo地址:

github.com/donald99/sh…

推荐Google demo

github.com/googlesampl…

以上就是本文的全部内容,希望本文的内容对大家的学习或者工作能带来一定的帮助,也希望大家多多支持 码农网


 查看所有标签


本文来源:码农网
本文链接:https://www.codercto.com/a/39529.html


/   作者简介   /


明天就是周六啦,提前祝大家周末愉快!


本篇文章来自下位子的投稿,分享了桌面快捷方式的开发,相信会对大家有所帮助!同时也感谢作者贡献的精彩文章。


下位子的博客地址:

http://xiaweizi.cn/


/   开篇   /


Shortcuts 功能跟随着 Android7.1 Nougat 一起诞生,其主要目在于用户可以定义一些常用的操作路径,以快捷方式的形式存在,这些快捷方式展示在可以支持的设备上,帮助用户快速启动常用或者推荐的页面和行为。


最近也是有 Shortcut 相关的需求需要开发,特此进行了总结,希望可以帮助到大家。


/   概览  /


快捷方式一般是以两种方式存在:


一种通过 长按 应用 icon,此时会弹出列表弹窗,里面展示需要操作的路径,对于没有配置快捷方式的应用,一般只会展示分享或者应用信息的入口(不同手机可能展示不一样)。如果该应用配置了快捷方式,那么在列表中则会展示对应的快捷方式入口。


图片


图片


如上图所示,配置和没有配置快捷方式的区别就在于,列表中是否配置自定义的快捷方式入口。


另一种则以桌面快捷方式的形式存在,同一种行为可以存在多个相同的桌面快捷方式。


图片


如上图,对于 Chrome-打开新的标签页 这种行为可以有多个相同的桌面快捷方式。


Shortcuts 类型


每个快捷方式都可以携带一个或多个 intent,当用户点击快捷方式时,每个 intent 都会触发应用中对应的操作,一般快捷方式的创建类型取决于你具体快捷方式存在的形态和你想赋予他什么样的行为。可以以下面的例子作为参考:


  • 在天气应用中,想查看最近几天天气的趋势

  • 在电子邮件应用中,想创建新的电子邮件

  • 在地图应用中,定位一个具体的位置

  • 在聊天应用中,向指定好友发送信息

  • 在媒体应用中,播放电视节目的下一集

  • 在游戏应用中,加载游戏最后一个保存的时间点


你可以为你的应用发布以下类型的快捷方式


  • 静态的快捷方式: 其直接会打包到 apk 或 apk bundle 中,安装完应用便存在快捷方式入口。

  • 动态的快捷方式: 只有在应用运行时才会创建,可以随时的更新、添加和删除对应的快捷方式。

  • 桌面快捷方式: 必须在用户授权的情况下,可以主动的添加快捷方式到桌面,同样可以拷贝动态和静态的快捷方式到桌面。


Shortcuts 限制条件


虽然对于一个应用程序一般可以创建五个快捷方式,其中包括静态和动态的,但是但多数的设备上只能展示 四个


但是桌面快捷方式是不做限制的,不过桌面快捷方式非用户主动删除的话,是没法移除的,只能通过禁用的方式让该桌面快捷方式失效。


/   使用  /


快捷方式可以帮助用户快速访问常用的路径和页面,从而为用户提供特定类型的内容。


Shortcuts 类型选择


那该如何选择快捷方式类型,这取决你的快捷方式是应用驱动还是用户驱动。虽然静态快捷方式意图不可更改,动态的可更改,但是这两种都是属于应用驱动。如果用户想自定义想要的意图,通过桌面快捷方式形式的展现,那这就是用户驱动。


怎么理解呢?用简书作为例子进行讲解:


图片


静态快捷方式: 这种最适合那种在整个程序的生命周期中,意图不会改变,始完成整同一种行为。鉴于程序一般只能显示四个快捷方式,那静态的快捷方式一般对于那种比较常见的行为非常有用和有必要。


例如上图简书中,像「搜索」入口就比较常见,不需要传递参数或传递的参数不会改变,那这种就建议使用静态快捷方式。


动态快捷方式: 这种一般对意图较为敏感的操作。意图可能在应用运行中发生改变,需要更新快捷方式。


例如简书入口中的 「我的公开文章」,因为多账号的原因,可能切换账号,那跳转的页面所携带的参数就会改变,快捷方式就需要更新,这种就需要使用静态快捷方式。


桌面快捷方式: 这种允许用户自定义跳转意图。


例如简书支持将关注的人创建快捷方式到桌面,下次直接可以访问该人的动态信息,这种完全是用户自发的创建,所以使用桌面快捷方式。


Shortcuts 类型创建


有了上述类型的具体描述,下面针对这三种快捷方式的创建进行例子介绍。


创建静态快捷方式


静态快捷方式提供应用程序内的通用跳转,这些一般在整个程序的生命周期内是保持不变的。


通过以下步骤完成静态快捷方式的创建:


  1. 在 AndroidManifest.xml 中找到配置 android.intent.action.MAIN 和 android.intent.category.LAUNCHER 的 Activity。

  2. 添加 <meta-data> 元素到 Activity 中


<activity android:name=".MainActivity">
     <intent-filter>
       <action android:name="android.intent.action.MAIN" />

       <category android:name="android.intent.category.LAUNCHER" />
     </intent-filter>

     <meta-data
                android:name="android.app.shortcuts"
                android:resource="@xml/shortcuts" />
</activity>


创建新的资源文件:res/xml/shortcuts.xml


 <?xml version="1.0" encoding="utf-8"?>
   <shortcuts xmlns:android="http://schemas.android.com/apk/res/android">
       <shortcut
           android:enabled="true"
           android:icon="@drawable/add"
           android:shortcutDisabledMessage="@string/static_disabled_message"
           android:shortcutId="staticId"
           android:shortcutLongLabel="@string/static_shortcut_long_label"
           android:shortcutShortLabel="@string/static_shortcut_short_label">
           <intent
               android:action="android.intent.action.VIEW"
               android:data="content://xiaweizi.com/fromStaticShortcut"
               android:targetClass="com.example.xiaweizi.shortcutsdemo.TestActivity"
               android:targetPackage="com.example.xiaweizi.shortcutsdemo" />
           <categories android:name="android.shortcut.conversation" />
       </shortcut>
   </shortcuts>


具体参数配置说明如下:


图片


如果有数据的传递,要有对应的解析


if (getIntent().getData() != null && TextUtils.equals(getIntent().getAction(), Intent.ACTION_VIEW)) {
     Uri uri = getIntent().getData();
     List<String> pathSegments = uri.getPathSegments();
     if (pathSegments != null && pathSegments.size() > 0) {
       tvTest.setText(pathSegments.get(0));
     }
}


最终的运行效果:


图片


创建动态快捷方式


动态快捷方式提供向指向应用内特定的跳转或数据传递,这些跳转和数据可能会在应用执行中发生变化。


此时需要借助 ShortcutManager 提供的 API 来完成动态快捷方式的相应操作:


  • 创建: 使用 setDynamicShortcuts() 重新定义动态快捷方式的完整列表

  • 添加: 使用 addDynamicShortcut() 来扩充现有的动态快捷方式列表

  • 更新: 使用 updateShortcuts() 方法进行更新现有的动态快捷方式列表

  • 删除: 使用 removeDynamicShortcuts() 移除一组动态快捷方式,或者使用 removeAllDynamicShortcuts() 移除所有动态快捷方式


以创建为例,其他差不多,自行尝试,具体的操作可参考下面的代码:


1. 创建 ShortcutInfo 对象


@TargetApi(Build.VERSION_CODES.N_MR1)
   private ShortcutInfo createShortcutInfo1() {
     return new ShortcutInfo.Builder(this, ID_DYNAMIC_1)
       .setShortLabel(getString(R.string.dynamic_shortcut_short_label1))
       .setLongLabel(getString(R.string.dynamic_shortcut_long_label1))
       .setIcon(Icon.createWithResource(this, R.drawable.add))
       .setIntent(new Intent(Intent.ACTION_VIEW, Uri.parse("http://xiaweizi.cn/")))
       .build();
}


2. 调用 setDynamicShortcuts() 覆盖掉之前的,重新设置新的动态快捷方式列表


private void setDynamicShortcuts() {
 if (android.os.Build.VERSION.SDK_INT >= android.os.Build.VERSION_CODES.N_MR1) {
   ShortcutManager shortcutManager = getSystemService(ShortcutManager.class);
   List<ShortcutInfo> shortcutInfo = new ArrayList<>();
   shortcutInfo.add(createShortcutInfo1());
   shortcutInfo.add(createShortcutInfo2());
   if (shortcutManager != null) {
     shortcutManager.setDynamicShortcuts(shortcutInfo);
   }
 }
}


3. 可以配置 label 的字体颜色


@TargetApi(Build.VERSION_CODES.N_MR1)
private ShortcutInfo createShortcutInfo2() {
 Intent intent = new Intent(this, TestActivity.class);
 intent.setAction(Intent.ACTION_VIEW);
 intent.putExtra("key", "fromDynamicShortcut");
 ForegroundColorSpan colorSpan = new ForegroundColorSpan(Color.BLUE);
 String label = getResources().getString(R.string.dynamic_shortcut_short_label2);
 SpannableStringBuilder colouredLabel = new SpannableStringBuilder(label);
 colouredLabel.setSpan(colorSpan, 0, label.length(), Spanned.SPAN_INCLUSIVE_INCLUSIVE);
 return new ShortcutInfo.Builder(this, ID_DYNAMIC_2)
   .setShortLabel(colouredLabel)
   .setLongLabel(getString(R.string.dynamic_shortcut_long_label2))
   .setIcon(Icon.createWithResource(this, R.drawable.link))
   .setIntent(intent)
   .build();
}


最终的运行效果:


图片


创建桌面快捷方式


在 Android 8.0(API26)或者更高的版本上,可以创建桌面快捷方式。与静态和动态快捷方式不同,桌面快捷方式支持在设备上单独的 icon 展示。


如果想创建桌面快捷方式,按照以下步骤进行完成:


  1. 使用 isRequestPinShortcutSupported() 来验证设备是否支持应用创建桌面快捷方式

  2. 根据快捷方式是否已经存在,用下面两种方式之一来创建 ShortcutInfo 对象:

  3. 如果快捷方式已经存在,请创建仅包含现有快捷方式 id 的 ShortcutInfo 对象,系统自动查找并带上与快捷方式有关的所有相关数据

  4. 如果要固定新的快捷方式,请创建一个 ShortcutInfo 对象,其中包含新的快捷方式 id、意图和短标签

  5. 尝试通过调用 requestPinShortcut() 将快捷方式固定到设备桌面上,在此过程中,可以传入 pendingIntent 对象,该对象仅在快捷方式成功固定时告知应用。


具体的代码可参考下面:


private void createPinnedShortcuts() {
  if (android.os.Build.VERSION.SDK_INT >= android.os.Build.VERSION_CODES.O) {
    ShortcutManager shortcutManager = getSystemService(ShortcutManager.class);
    if (shortcutManager != null && shortcutManager.isRequestPinShortcutSupported()) {
      Intent intent = new Intent(this, TestActivity.class);
      intent.setAction(Intent.ACTION_VIEW);
      intent.putExtra("key", "fromPinnedShortcut");
      ShortcutInfo pinShortcutInfo = new ShortcutInfo.Builder(this, "my-shortcut")
        .setShortLabel(getString(R.string.pinned_shortcut_short_label2))
        .setLongLabel(getString(R.string.pinned_shortcut_long_label2))
        .setIcon(Icon.createWithResource(this, R.drawable.add))
        .setIntent(intent)
        .build();
      Intent pinnedShortcutCallbackIntent = shortcutManager.createShortcutResultIntent(pinShortcutInfo);
      PendingIntent successCallback = PendingIntent.getBroadcast(this, 0,
                                                                 pinnedShortcutCallbackIntent, 0);
      boolean b = shortcutManager.requestPinShortcut(pinShortcutInfo, successCallback.getIntentSender());
      Utils.showToast(this, "set pinned shortcuts " + (b ? "success" : "failed") + "!");
    }
  }
}


最终运行效果:


图片


好了,基础简单的使用就介绍到这了,相信对 Shortcuts 的使用场景和具体实现都有一定的了解了,接下来开始介绍进阶的使用。


/  Shortcuts进阶使用  /


快捷方式创建完成后,可能还需要对其进行管理,比如动态更新或者禁用某些快捷方式,此时就需要了解一些进阶的使用了。


移除 Shortcut


对于 静态快捷方式 而言,其在一开始就打包到了 apk 或者 apk bundle 中,是不允许对其进行更改的,除非发布新的版本覆盖掉之前的快捷方式,不然会一直存在。


对于 动态快捷方式 ,既然可以在代码中进行创建,同样也可以在代码中进行移除,这个之前也介绍过。


而对于 桌面快捷方式,它直接展示在桌面上,始终可见,仅在以下情况才能删除桌面快捷方式。


  • 用户主动移除

  • 卸载与快捷方式的应用

  • 用户在应用信息中,清除全部的缓存数据


Shortcut 展示顺序


对于一个应用上所有的快捷方式,展示的规则按照以下顺序:


  1. 静态快捷方式: isDeclaredInManifest() 放回 true 的快捷方式

  2. 动态快捷方式:ShortcutInfo.isDynamic() 返回 true 的快捷方式


在每种快捷方式中,又会按照 ShortcutInfo.getRank() 按等级递增的顺序排序。等级是非负的,连续的整数, 调用 updateShortcuts(List),addDynamicShortcuts(List) 或 setDynamicShortcuts(List) 时,可以更新现有快捷方式的等级。


排名是自动调整的,因此它们对于每种类型的快捷方式都是唯一的。 例如,有三个 rank 分别为 0、1和2 的动态快捷方式,此时再添加一个 rank 为 1 的动态快捷方式放在第二的位置上,那最后两个就会被顺延一个位置,rank 变成 2和3。


Shortcut intents 配置


如果希望应用在用户激活快捷方式时执行多项操作,则可以将其配置为触发后多项活动。你可以通过分配多个 intent,启动一个 activity 到另一个 activity,具体的要取决你快捷方式的类型。


使用 ShortcutInfo.Builder 创建快捷方式时,可以使用 setIntents() 而不是 setIntent()。通过调用 setIntents() 你可以在用户点击快捷方式时触发多个 activity,将除列表中最后一个 activity 之外的所有 activity 放在后续堆栈中。如果此时点击返回按钮,会按照之前存储的堆栈 activity 顺序进行展示,而不是直接回到首页。


比如按照下面代码配置多个 intent:


@TargetApi(Build.VERSION_CODES.N_MR1)
private ShortcutInfo createShortcutInfo1() {
  Intent intent1 = new Intent(Intent.ACTION_VIEW, Uri.parse("http://xiaweizi.cn/"));
  Intent intent = new Intent(this, TestActivity.class);
  intent.setAction(Intent.ACTION_VIEW);
  intent.putExtra("key", "fromDynamicShortcut");
  return new ShortcutInfo.Builder(this, ID_DYNAMIC_1)
    .setShortLabel(getString(R.string.dynamic_shortcut_short_label1))
    .setLongLabel(getString(R.string.dynamic_shortcut_long_label1))
    .setIcon(Icon.createWithResource(this, R.drawable.add))
    .setIntents(new Intent[]{intent, intent1})
    .build();
}


那么它会一次触发 intent 和 intent1,此时 intent 被压入 intent1 的栈底,点击返回,则展示 intent 的信息。如图:


图片


还有一个问题,静态快捷方式是不能拥有自定的 intent flag 的,静态快捷方式始终设置为 Intent.FLAG_ACTIVITY_NEW_TASK 和 Intent.FLAG_ACTIVITY_CLEAR_TASK 这意味着,当应用程序已经在运行时,启动静态快捷方式时,应用中所有的活动都将被销毁。


如果不希望出现这种情况,可以使用 trampoline activity,或者在 Activity.onCreate(Bundle) 中启动一个 不可见的 activity,然后调用 Activity.finish()。


  1. 在 AndroidManifest.xml 中, trampoline activity 应用设置 android:taskAffinity=""。

  2. 在快捷方式资源文件中,静态快捷方式中的 intent 应引用 trampoline activity。


更新 pinned Shortcuts


每个应用最多包含 getMaxShortcutCountPerActivity() 个快捷方式,其中包括动态和静态的总和。但是桌面快捷方式的数量是不限制的。


当动态快捷方式被放置到桌面时,即使代码中将该动态快捷方式移除,桌面的还依然存在,因此对于桌面的快捷方式是不止 getMaxShortcutCountPerActivity 的限制的。


假设 getMaxShortcutCountPerActivity() 的值为4:


  1. 聊天应用程序发布四个动态快捷方式,表示最近的四个对话(c1,c2,c3,c4)

  2. 用户将所有的快捷方式复制到桌面

  3. 然后用户又启动三个额外的最近对话(c5,c6和c7),这是重新发布更新动态快捷方式,那新的快捷方式列表为:c4,c5,c6,c7。改应用必须删除过 c1,c2喝c3,因为只能展示四个快捷方式,但是桌面已经保存的这三个快捷方式是可以正常访问的。


    用户现在其实可以总共访问七个快捷方式,其中包括四个最大的动态快捷方式和桌面的三个快捷方式

  4. 应用程序可以使用 updateShortcuts(List) 来更新上述七个任意快捷方式

  5. 使用 addDynamicShortcuts() 和 setDynamicShortcuts() 同样可以更新具有相同 shortcutId 的快捷方式对象,但是他们不能跟新非动态的快捷方式。


系统设置更改


系统设置的更改,比如修改系统的语言,Shortcuts 是不能动态更新的,此时需要创建广播监听 Intent.ACTION_LOCALE_CHANGED ,当收到广播时重新更新快捷方式,保证快捷方式展示没有问题。


处理前:


图片


处理后:


图片


track Shortcuts


为了确定静态和动态快捷方式以哪种方式出现,每次启动都会检查快捷方式的激活历史记录。可以通过调用 reportShortcutUsed() 方法传入其 shortcutId,提高 action 的响应速度。


ShortCuts 频率限制


当使用 setDynamicShortcuts()、addDynamicShortcuts() 和 updateDynamicShortcuts() 方法时,需要注意的是,你可能在后台调用这方法是有固定的次数限制的,那可以调用方法的次数限制就是 rate limiting。此功能用于防止 ShortcutManager过度消耗设备资源。


当处于 rate limiting 中,isRateLimitingActive() 返回 true,但是在某些操作执行会重置这个值,因此即使是在后台应用程序也可以调用 shortcutManager方法,直到再次达到速率限制。这些操作包括:


  1. 应用再次回到前台

  2. 系统区域设置更改

  3. 用户在通知栏处理嵌入的交互操作


如果在开发或者测试中遇到次数被限制的情况,可以在 开发者选项中 -> 重置 ShortcutsManager 调用频率限制 来恢复。或者使用 adb 命令


adb shell cmd shortcut reset-throttling [ --user your-user-id ]


/  建议  /


在设计和创建快捷方式时,请遵循以下建议:


遵循设计准则


要使应用程序的快捷方式与系统应用程序使用的快捷方式在视觉上保持一致,请遵循 快捷方式设计指南


仅发布四个不同的快捷方式


尽管 API 目前支持给任何应用最多五个快捷方式(静态和动态),但还是建议仅发布四个不同的快捷方式,以改善在设备上的视觉效果。


限制快捷方式的描述长度


快捷方式的菜单空间有限,在桌面展示应用程序需要考虑到这个因素。如果可以的话,将快捷方式的 shortLable 长度限制在 10 个字符,并将 longLable 长度限制在 25个字符。


记录快捷方式和其操作的历史记录


对于创建的每个快捷方式,请考虑用户在应用中是否可以直接用不同方式来完成相同的任务,需要记住的是,这种情况下,调用 reportShortcutUsed() ,这样 launcher 就可以提高 shortcut 对应的 actions 的响应速度。


只有在 shortcuts 的意义存在时更新


当改变动态快捷方式时,只有在 shortcut 仍然保持它的含义时,调用 updateShortcuts() 方法改变它的信息,否则,应该使用 addDynamicShortcuts() 或 setDynamicShortcuts() 创建一个具有新含义的 shortcutId 的快捷方式。


例如,如果我们已经创建了导航到一个超市的快捷方式,如果超市的名称改变了但是位置并没有变化时,只更新信息是合适的,但是如果用户开始再一个不同位置的超市购物时,最好就是创建一个新的快捷方式。


每次打开 APP 都需要检查快捷方式


在备份或恢复时,动态 shortcuts 不会被保存, 正是因为这个原因,推荐我们在需要 APP 启动和重新发布动态快捷方式时,检查 getDynamicShortcuts() 的对象的数量。


Demo地址:

https://github.com/xiaweizi/ShortcutsDemo


官方Demo:

https://github.com/googlesamples/android-AppShortcuts


官方文档:

https://developer.android.com/guide/topics/ui/shortcuts


推荐阅读:

Canvas可以画出任何你想要的效果

在Android Studio中编写一个自己的模板


Android开发之生成桌面快捷方式细则(原创)

骑小猪看流星IP属地: 重庆
22018.07.19 18:51:36字数 2,968阅读 17,885

本文已独家授权 郭霖 ( guolin_blog) 公众号发布!

申明,标题里的快捷方式不是指开发人员使用频率极高的Ctrl+C和Ctrl+V;也不是IDE里Ctrl+D、Ctrl+F等常用快捷键。这里的快捷键,是Android应用生成桌面快捷方式。

试想,有一Windows用户想进入D盘——my文件夹里面的子文件去找文件(因藏了些晦涩资源所以层级较深)。那么这位少侠更加便利省力的操作是:点击选中文件夹——右键:发送到——桌面快捷方式,即可帮他将快捷方式生成到桌面。该用户下次想使用这个文件夹,直接点击桌面上的快捷方式即可。好处在于,用户可以快速定位到某一应用具体的功能、干净利落。

当然,谷歌Android团队也考虑了这一点,给我们设计了原生API,方便我们开发人员更加便利的(Ctrl+C、V)生成桌面快捷方式。这样做的好处我想有以下几点,首先,提高了用户留存率,试想一个APP通过某种媒介生成了2个icon,这样是很容易吸引人的,因为生成桌面快捷方式的icon以及点击事件都是代码可控的,比如你的快捷方式的icon是一个萝莉或者御姐;正太或是直男?毕竟图片总有人会喜欢的嘛。其次,快捷方式的点击事件是控制的,跳转的界面控制在开发者(产品)手中等等。

言归正传,既然是生成桌面快捷方式,那么肯定需要权限,必要的权限如下:

    <uses-permission android:name="com.android.launcher.permission.WRITE_SETTINGS" />
    <!-- 添加快捷方式 -->
    <uses-permission android:name="com.android.launcher.permission.INSTALL_SHORTCUT" />
    <!-- 移除快捷方式 -->
    <uses-permission android:name="com.android.launcher.permission.UNINSTALL_SHORTCUT" />
    <!-- 查询快捷方式 -->
    <uses-permission android:name="com.android.launcher.permission.READ_SETTINGS" />

接着,因为Android难以言表的碎片化和厂商定制,所以还需要加一些权限来增加健壮性,下面直接copy就行:

   <uses-permission android:name="com.android.launcher2.permission.READ_SETTINGS" />
    <uses-permission android:name="com.android.launcher2.permission.WRITE_SETTINGS" />
    <uses-permission android:name="com.android.launcher3.permission.READ_SETTINGS" />
    <uses-permission android:name="com.android.launcher3.permission.WRITE_SETTINGS" />
    <uses-permission android:name="org.adw.launcher.permission.READ_SETTINGS" />
    <uses-permission android:name="org.adw.launcher.permission.WRITE_SETTINGS" />
    <uses-permission android:name="com.htc.launcher.permission.READ_SETTINGS" />
    <uses-permission android:name="com.htc.launcher.permission.WRITE_SETTINGS" />
    <uses-permission android:name="com.qihoo360.launcher.permission.READ_SETTINGS" />
    <uses-permission android:name="com.qihoo360.launcher.permission.WRITE_SETTINGS" />
    <uses-permission android:name="com.lge.launcher.permission.READ_SETTINGS" />
    <uses-permission android:name="com.lge.launcher.permission.WRITE_SETTINGS" />
    <uses-permission android:name="net.qihoo.launcher.permission.READ_SETTINGS" />
    <uses-permission android:name="net.qihoo.launcher.permission.WRITE_SETTINGS" />
    <uses-permission android:name="org.adwfreak.launcher.permission.READ_SETTINGS" />
    <uses-permission android:name="org.adwfreak.launcher.permission.WRITE_SETTINGS" />
    <uses-permission android:name="org.adw.launcher_donut.permission.READ_SETTINGS" />
    <uses-permission android:name="org.adw.launcher_donut.permission.WRITE_SETTINGS" />
    <uses-permission android:name="com.huawei.launcher3.permission.READ_SETTINGS" />
    <uses-permission android:name="com.huawei.launcher3.permission.WRITE_SETTINGS" />
    <uses-permission android:name="com.fede.launcher.permission.READ_SETTINGS" />
    <uses-permission android:name="com.fede.launcher.permission.WRITE_SETTINGS" />
    <uses-permission android:name="com.sec.android.app.twlauncher.settings.READ_SETTINGS" />
    <uses-permission android:name="com.sec.android.app.twlauncher.settings.WRITE_SETTINGS" />
    <uses-permission android:name="com.anddoes.launcher.permission.READ_SETTINGS" />
    <uses-permission android:name="com.anddoes.launcher.permission.WRITE_SETTINGS" />
    <uses-permission android:name="com.tencent.qqlauncher.permission.READ_SETTINGS" />
    <uses-permission android:name="com.tencent.qqlauncher.permission.WRITE_SETTINGS" />
    <uses-permission android:name="com.huawei.launcher2.permission.READ_SETTINGS" />
    <uses-permission android:name="com.huawei.launcher2.permission.WRITE_SETTINGS" />
    <uses-permission android:name="com.android.mylauncher.permission.READ_SETTINGS" />
    <uses-permission android:name="com.android.mylauncher.permission.WRITE_SETTINGS" />
    <uses-permission android:name="com.ebproductions.android.launcher.permission.READ_SETTINGS" />
    <uses-permission android:name="com.ebproductions.android.launcher.permission.WRITE_SETTINGS" />
    <uses-permission android:name="com.oppo.launcher.permission.READ_SETTINGS" />
    <uses-permission android:name="com.oppo.launcher.permission.WRITE_SETTINGS" />
    <uses-permission android:name="com.huawei.android.launcher.permission.READ_SETTINGS" />
    <uses-permission android:name="com.huawei.android.launcher.permission.WRITE_SETTINGS" />
    <uses-permission android:name="telecom.mdesk.permission.READ_SETTINGS" />
    <uses-permission android:name="telecom.mdesk.permission.WRITE_SETTINGS" />
    <uses-permission android:name="dianxin.permission.ACCESS_LAUNCHER_DATA" />

好了,权限已经添加完毕,下面就可以上代码了,首先是创建桌面快捷方式:

    //创建桌面快捷方式
    private void createShortCut(){
        //创建Intent对象
        Intent shortcutIntent = new Intent();
        
        //设置点击快捷方式,进入指定的Activity
        //注意:因为是从Lanucher中启动,所以这里用到了ComponentName
        //其中new ComponentName这里的第二个参数,是Activity的全路径名,也就是包名类名要写全。
        
        shortcutIntent.setComponent(new ComponentName(this.getPackageName(), "这里是包名.类名"));
        
        //给Intent添加 对应的flag
        shortcutIntent.addFlags(Intent.FLAG_ACTIVITY_EXCLUDE_FROM_RECENTS|Intent.FLAG_ACTIVITY_NEW_TASK);

        Intent resultIntent = new Intent();
        // Intent.ShortcutIconResource.fromContext 这个就是设置快捷方式的图标
        
        resultIntent.putExtra(Intent.EXTRA_SHORTCUT_ICON_RESOURCE,
                Intent.ShortcutIconResource.fromContext(this,
                        R.drawable.yuanbao));
        //启动的Intent
        resultIntent.putExtra(Intent.EXTRA_SHORTCUT_INTENT, shortcutIntent);
        
        //这里可以设置快捷方式的名称
        resultIntent.putExtra(Intent.EXTRA_SHORTCUT_NAME, "快捷名称");

        //设置Action
        resultIntent.setAction("com.android.launcher.action.INSTALL_SHORTCUT");

        //发送广播、通知系统创建桌面快捷方式
        sendBroadcast(resultIntent);
    }

创建桌面快捷方式的代码,理论上就是上面这些,ComponentName这个类用的较少,简单理解ComponentName的作用是,可以启动其他应用的Activity、Service(前提是要知道包名),然后搭配Intent使用,完成跳转。关于ComponentName与Activity、Service的参考代码如下:

    ComponentName  componentName = new ComponentName(param1,param2);
    
        param1:Activity、Service 所在应用的包名
        //获取应用的包名可以通过 this.getPackageName(); this代表当前的Activity
        param2:Activity、Service的包名+类名 
        //这里是全路径名:对应的就是 this.getPackageName()+"YourActivity"
        //this.getPackageName()+"YourService"

    //ComponentName结合Activity的写法如下:     
    ComponentName componentName = new ComponentName(this.getPackageName(), this.getPackageName()+"YourActivity");

        Intent intent =new Intent();

        intent.setComponent(componentName);

        startActivity(intent);
    
    //ComponentName结合Service的写法如下:  
    ComponentName componentName = new ComponentName(this.getPackageName(), this.getPackageName()+"YourService");

        Intent intent = new Intent();

        intent.setComponent(componentName);

        startService(intent);

另外,还需要在清单配置文件里面,对应的Activity和Service需要加上android:exported = "true",这个android:exported标签,是用来指示该服务是否能够被其他应用程序组件调用或跟它交互。设置成true,则能够被调用或交互;设置false,也就意味不能被其他组件交互。APP入口的Activity不声明默认就是android:exported="true"。关于ComponentName的说明就到此为止,还不是很好理解的可以自行谷歌百度。综上,还需要在清单文件配置一些代码,参考如下:

            <activity
            android:exported="true"
            android:excludeFromRecents="true"
            android:name=".TestCreatIconActivity">
            <intent-filter>
                <action android:name="android.intent.action.MAIN" 
                <action android:name="test.intent.action.SHORTCUT" />
                <category android:name="android.intent.category.LAUNCHER" />
                <!-- 必须加上这个。否则无法直接使用自定的action -->
                <category android:name="android.intent.category.DEFAULT" />
            </intent-filter>
            </activity>

            <activity
            android:name=".MainActivity"
            android:exported="true"
            android:excludeFromRecents="true"
            >
            <intent-filter>
                <action android:name="android.intent.action.MAIN" />
            </intent-filter>
            </activity>

这里的MainActivity,就是我点击快捷方式进入的Activity。可能你会说,我该如何传值给,快捷方式点进去的Activity?那么也是传统套路根据Intent来传值,也就是上面的shortcutIntent,参考代码如下:

                    //传参到指定界面,通过标识和具体数据执行
                    shortcutIntent.putExtra("key1","xxx");
                    shortcutIntent.putExtra("key2",true);
                    shortcutIntent.putExtra("key3",233);
                    ...

好了,创建快捷方式的代码是通过sendBroadcast(resultIntent);来实现的,因此可以判断这是系统的广播。

删除桌面快捷方式:
首先,用户可以直接在手机桌面拖拽快捷方式,进行删除
另外,上面的代码也实现了当删除APK以后,自动删除快捷方式(因为你跳转没有了目标,所以需要删除)由于代码删除快捷方式,网上的一些代码都有问题(又是令人无语的碎片化和厂商定制),所以这里不提供删除快捷方式的代码,理论上,上面2种手动删除实现即可。
值得注意的是,如果用户没有手动打开权限,也会创建失败,也需要提示用户手动对应用进行快捷方式权限授权设置。

Android 7.1系统快捷方式的变化:

从Android 7.1(API 25,也就是 minSdkVersion 25 )开始,新增了ShortcutManager,ShortcutManager,顾名思义,翻译过来就是快捷方式管理。
这个类可以对桌面久按应用图标弹出的快捷方式进行管理。

那么ShortcutManager的实现方式有2种:

第一种:XML注册
首先, 需要在res/xml目录下创建一个新的xml文件,根标签是shortcuts,参考代码如下:

<shortcuts xmlns:android="http://schemas.android.com/apk/res/android">
    <shortcut
        android:shortcutId="setting"
        android:enabled="true"
        android:icon="@drawable/yuanbao"
        android:shortcutShortLabel="@string/set_short_name"
        android:shortcutLongLabel="@string/set_long_name"
        android:shortcutDisabledMessage="@string/set_disable_msg">

        <intent
            android:action="android.intent.action.VIEW"
            android:targetPackage="com.share.shortcut"
            android:targetClass="com.share.shortcut.TargetActivity" />
        <categories android:name="android.shortcut.conversation"/>

    </shortcut>
</shortcuts>

嗯,可以看到新增了很多标签,这些标签代表什么意思咧?首先是shortcut的外部标签:

shortcutId, 快捷方式的id

enabled:表示这个shortcut是否可用,一般设置为true即可

shortcutShortLabel:配置快捷方式的短名称, 如果长名称显示不下, 就显示短名称

shortcutLongLabel: 配置快捷方式的长名称, launcher会优先选择长名称显示(优先级高于shortcutShortLabel)

shortcutDisabledMessage:这个标签的意思是指:当我们点击一个不可用的shortcut时,给用户一个有效提示

内部还有个intent标签:

 android:action,这里的action需要配置,否则会崩溃,默认写法是android.intent.action.VIEW

 targetPackage:目标应用的包名,

 targetClass:点击快捷方式要跳转的目标类, 这里要注意的是android:action一定要配置, 否则会崩溃

 categories:这个标签谷歌团队仅提供了android.shortcut.conversation 这一种,所以直接复制即可

好了,现在通过XML已经写好了快捷方式,那现在该如何使用,让快捷方式生效?
那么,只需要在清单文件中启动Activity的里面,加入以下2行代码(也就是通过meta-data配置进去)即可看到效果:

        <activity
            android:launchMode="singleInstance"
            android:name=".MainActivity"
            android:excludeFromRecents="true"
            >
            <intent-filter>
                <action android:name="android.intent.action.MAIN" />
                <!--<action android:name="test.intent.action.SHORTCUT" />-->
                <category android:name="android.intent.category.LAUNCHER" />
                <!-- 必须加上这个。否则无法直接使用自定的action -->
                <category android:name="android.intent.category.DEFAULT" />
            </intent-filter>
        静态注册
            <meta-data
                android:name="android.app.shortcuts"
                android:resource="@xml/shortcut"/>
        </activity>

这里的meta-data就是配置了桌面快捷方式的一些信息。代码运行后,执行创建快捷方式的操作即可看到效果:


7.1系统效果图

说完了第一种XML注册在来说第二种注册:代码动态注册
首先,获取系统服务,固定写法:getSystemService(ShortcutManager.class);获取ShortcutManager类对象
接着,获取完ShortcutManager对象以后,通过setDynamicShortcuts( List<ShortcutInfo> )方法去设置Shortcut快捷方式具体的名字、icon以及逻辑。
既然,现在要通过ShortcutInfo去完成信息填充,那么我们就先看下ShortcutInfo的基本写法:

//获取系统服务得到ShortcutManager对象
 ShortcutManager  systemService = getSystemService(ShortcutManager.class);

        if (Build.VERSION.SDK_INT >= 25) {
            
            //设置Intent跳转逻辑
            Intent intent = new Intent(ShortCut7_0Activity.this, TargetActivity.class);
            intent.setAction(Intent.ACTION_VIEW);

            //设置ID
            ShortcutInfo shortcutInfo = new ShortcutInfo.Builder(this, "onlyId")
                    //设置短标题        
                    .setShortLabel("雅蠛蝶")
                    //设置长标题
                    .setLongLabel("江山留胜迹")
                    //设置icon
                    .setIcon(Icon.createWithResource(this, R.drawable.yuanbao))
                    //设置Intent
                    .setIntent(intent)
                    .build();
            //这样就可以通过长按图标显示出快捷方式了
            systemService.setDynamicShortcuts(Arrays.asList(shortcutInfo));

以上代码就可以创建桌面快捷方式,通过ShortcutInfo的Builder写法可以动态的插入快捷方式的名称、icon、以及Intent逻辑。值得一提的是,ShortcutManager最大可以创建5个,但桌面上只能最多只能显示4个快捷方式,可能是谷歌团队基于何种情况的考虑进行的限制,这里就不做深入研究。另外,快捷方式的顺序排列是:前面添加的显示在下方,后面添加的显示在上面。


7.1系统多快捷方式效果图

另外,移除快捷方式可以调用如下API:
void removeDynamicShortcuts(@NonNull List shortcutIds);

Android 8.0系统快捷方式的变化:

可能是谷歌出新版本需要优化增加既有版本的一些功能从Android 8.0(API 26,也就是 minSdkVersion 26,也就是Android O )开始,对ShortcutManager这个类新增了更多的管理措施。
那么O系统主要的扩充说明有那些?我这里就简单说明下,

一:

APP可以使用requestPinShortcut(ShortcutInfo,IntentSender)将现有的快捷方式(静态或动态)或全新的快捷方式固定到支持的启动器。这俩参数的意思是:
ShortcutInfo对象 - 如果快捷方式已存在,则该对象仅包含快捷方式的ID。如果快捷方式不存在,新的ShortcutInfo对象必须包含新快捷方式的ID,意图和短标签。
PendingIntent对象 - 此意图表示如果快捷方式成功固定到设备的启动器,您的应用程序将收到回调。

分析:也就是说,谷歌要求新的快捷方式需要编写的严谨,然后该快捷方式是否固定到设备加了新的判断标准

二:

由于Android O中引入的后台执行限制,最好使用清单声明的接收器来接收回调。
另外,为了防止其他应用程序调用接收器,需要将属性赋值android:exported =“false”添加到接收者的清单条目中。

分析:针对O系统对于服务的严格限制,这是对快捷方式功能的扩充

三:

并不是所有的启动器都支持固定快捷方式!!!所以,如果要确定该APP是否支持国定快捷方式,可以使用isRequestPinShortcutSupported()这个方法的返回值。
根据返回值,可以决定隐藏App中允许,用户固定快捷方式的选项。该方法返回TRUE,则意味着,桌面支持requestPinShortcut;
但是用户也可能会更改,更改选项以后,再次启动APP返回值可能就会发生变化。另外,系统版本低于Android O,那么它支持使用旧的私有意图com.android.launcher.action.INSTALL_SHORTCUT。
requestPinShortcut这个方法请求创建固定的快捷方式。默认启动器将收到该请求,并要求用户批准。如果用户批准,将创建快捷方式,并且将发送resultIntent。但是,如果请求被用户拒绝,则不会向呼叫者发送任何响应。需要注意的是,只有具有前台活动或前台服务的应用程序才能调用此方法。否则,它将抛出IllegalStateException。

分析:也就是说,这种启动器的固定快捷方式能否成功很大程度跟用户的操作密切相关(这个可以跟产品吹一波了)。另外可以看到O系统对于服务的严格控制,严格控制后台服务需要使用前台服务的举措在于让应用更加安全(因此IntentService在新版本上要慎用。当然谷歌在开发者文档上针对后台服务这一问题也给了对应的解决办法),这也看到了谷歌技术团队对后续版本使用应用安全的决心。
综上:可以有以下代码

  @RequiresApi(api = Build.VERSION_CODES.O)
    public static void testShortCut(Context context) {
        ShortcutManager shortcutManager = (ShortcutManager) context.getSystemService(Context.SHORTCUT_SERVICE);
        boolean requestPinShortcutSupported = shortcutManager.isRequestPinShortcutSupported();
        Log.i(TAG, "启动器是否支持固定快捷方式: "+requestPinShortcutSupported);

        if (requestPinShortcutSupported) {

            Intent shortcutInfoIntent = new Intent(context, TargetActivity.class);

            shortcutInfoIntent.setAction(Intent.ACTION_VIEW);

            ShortcutInfo info = new ShortcutInfo.Builder(context, "tzw")
                    .setIcon(Icon.createWithResource(context, R.drawable.yuanbao))
                    .setShortLabel("O系统短")
                    .setLongLabel("O系统长")
                    .setIntent(shortcutInfoIntent)
                    .build();

            //当添加快捷方式的确认弹框弹出来时,将被回调CallBackReceiver里面的onReceive方法
            PendingIntent shortcutCallbackIntent = PendingIntent.getBroadcast(context, 0, new Intent(context, CallBackReceiver.class), PendingIntent.FLAG_UPDATE_CURRENT);

            shortcutManager.requestPinShortcut(info, shortcutCallbackIntent.getIntentSender());

        }
    }
 class CallBackReceiver extends BroadcastReceiver {
        @Override
        public void onReceive(Context context, Intent intent) {
            Log.i(TAG, "onReceive: 固定快捷方式的回调");
        }
    }

下面是应用启动后,Android Studio自带8.0模拟器,首先创建快捷方式的逻辑顺序:

 
O系统启动器快捷方式

点击ADD...以后,我们的应用就显示这样了,可以看到快捷方式向卫星一样挂靠在应用icon上面:

 
允许之后

如果点击CANCEL,那么就没有创建,退出以后icon还是原样,当我们第二次打开应用,选择申请桌面快捷方式的时候,又会弹出上面的申请界面。

这篇博客花了一些时间,因为要考虑三种不同情况(如果想要看到三种情况的效果,需要手动更改 minSdkVersion版本号、以及对应版本的模拟器资源,或者根据系统版本号进行自行判断),如果写的不好或者有任何问题可以直接在评论区或者github指出。

文章用到的所有源码


Android创建桌面快捷方式


背景

    在Android设备上,为某个应用创建一个特定的快捷方式,可以快速进入应用的某个操作,比如浏览器将某个页面收藏到桌面,点击桌面的快捷方式直接打开页面。

代码实现

    添加桌面图标快捷方式代码非常简单,在API 26(Android O)以下的版本,并没有提供API进行创建桌面快捷方式,但是用户可以通过广播的方式创建桌面快捷方式。在API 26(Android O)及以上版本的系统,对开发者开放了快捷方式的相关API,可以调用API直接创建快捷方式。


    其实发送广播的方式创建快捷方式,是发送一个广播给桌面应用Launcher接收,Launcher收到广播后创建应用。


实现代码

/**
     * 添加桌面图标快捷方式
     * @param activity Activity对象
     * @param name 快捷方式名称
     * @param icon 快捷方式图标
     * @param actionIntent 快捷方式图标点击动作
     */
    public void addShortcut(Activity activity, String name, Bitmap icon, Intent actionIntent) {
        if (Build.VERSION.SDK_INT < Build.VERSION_CODES.O) {
            //  创建快捷方式的intent广播
            Intent shortcut = new Intent("com.android.launcher.action.INSTALL_SHORTCUT");
            // 添加快捷名称
            shortcut.putExtra(Intent.EXTRA_SHORTCUT_NAME, name);
            //  快捷图标是允许重复(不一定有效)
            shortcut.putExtra("duplicate", false);
            // 快捷图标
            // 使用资源id方式
//            Intent.ShortcutIconResource iconRes = Intent.ShortcutIconResource.fromContext(activity, R.mipmap.icon);
//            shortcut.putExtra(Intent.EXTRA_SHORTCUT_ICON_RESOURCE, iconRes);
            // 使用Bitmap对象模式
            shortcut.putExtra(Intent.EXTRA_SHORTCUT_ICON, icon);
            // 添加携带的下次启动要用的Intent信息
            shortcut.putExtra(Intent.EXTRA_SHORTCUT_INTENT, actionIntent);
            // 发送广播
            activity.sendBroadcast(shortcut);
        } else {
            ShortcutManager shortcutManager = (ShortcutManager) activity.getSystemService(Context.SHORTCUT_SERVICE);
            if (null == shortcutManager) {
                // 创建快捷方式失败
                Log.e("MainActivity", "Create shortcut failed");
                return;
            }
            ShortcutInfo shortcutInfo = new ShortcutInfo.Builder(activity, name)
                    .setShortLabel(name)
                    .setIcon(Icon.createWithBitmap(icon))
                    .setIntent(actionIntent)
                    .setLongLabel(name)
                    .build();
            shortcutManager.requestPinShortcut(shortcutInfo, PendingIntent.getActivity(activity,
                    RC_CREATE_SHORTCUT, actionIntent, PendingIntent.FLAG_UPDATE_CURRENT).getIntentSender());
        }
    }

配置权限

    实现创建桌面快捷方式的功能,还需要在AndroidManifest.xml中配置权限,配置的权限是与Launcher的相关权限

<uses-permission android:name="com.android.launcher.permission.INSTALL_SHORTCUT" />
<uses-permission android:name="com.android.launcher.permission.UNINSTALL_SHORTCUT" />

注意:使用较高版本的buildTool的时候,在AndroidManifest.xml中配置权限的时候,能投提示有两个关于快捷方式的两个权限(安装和卸载),但是在低版本系统中会无效。

<uses-permission android:name="android.permission.INSTALL_SHORTCUT" />
<uses-permission android:name="android.permission.UNINSTALL_SHORTCUT" />

    根据查看API文档发现,这两个权限是在API 19才加进去的,再看看对应的值,其实和上面配置的是一样的,`android.permission.INSTALL_SHORTCUT`对应的值是`com.android.launcher.permission.INSTALL_SHORTCUT`,`android.permission.UNINSTALL_SHORTCAT`对应的值是`com.android.launcher.permission.UNINSTALL_SHORTCUT`,所以在AndroidManifest.xml中配置对应的值才能正常工作,为了兼容性,建议同时将这四个都加进去。


存在问题

    创建桌面快捷方式在碎片化的Android设备上,也不一定可以成功,特别是前一种使用广播的方式进行创建,在某些深度定制的ROM上容易出现失败,后一种方式没有经过验证,大家有条件可以对比一下。


posted on 2022-11-01 13:12  不及格的程序员-八神  阅读(355)  评论(1编辑  收藏  举报