

python 音频处理(1)——重采样、音高提取
采集数据->采样率调整
-
使用
torchaudio进行重采样(cpu版)-
首先导入相关包,既然使用torch作为我们的选项,安装torch环境我就不必多说了,如果你不想用torch可以使用后文提到的另一个库
1 import torch
2 import torchaudio
3 from torchaudio.transforms import Resample
4 from time import time#仅计算时间,不影响主体
-
使用
torchaudio.load导入音频文件 -
设定目标采样率并构造
resample函数 -
调用构造好的
resample函数 -
调用
torchaudio的保存函数
封装一下,总函数【记得先导入】:

1 def resample_by_cpu(): 2 file_path = input("please input your file path: ") 3 start_time = time()#不影响,可去掉 4 y, sr = torchaudio.load(file_path) #使用torchaudio.load导入音频文件 5 6 target_sample = 32000 #设定目标采样率 7 resampler = Resample(orig_freq=sr, new_freq=target_sample)#构造resample函数,输入原始采样率和目标采样率 8 resample_misic = resampler(y) #调用resample函数 9 10 torchaudio.save("test.mp3", resample_misic, target_sample)#调用torchaudio的保存即可 11 print(f"cost :{time() - start_time}s")#不影响,可去掉
最后结果大概是几秒钟这样子
-
使用使用
torchaudio进行重采样(gpu版):有了上面cpu的基础,其实调用gpu也就更换一下设备,和放入gpu的操作就好了,因此不过多赘述
def resample_use_cuda(): device = torch.device('cuda' if torch.cuda.is_available() else 'cpu') start_time = time() file_path = input("please input your file path:") y, sr = torchaudio.load(file_path) y = y.to(device) target_sample = 32000 resampler = Resample(orig_freq=sr, new_freq=target_sample).to(device) resample_misic = resampler(y) torchaudio.save("test.mp3", resample_misic.to('cpu'), target_sample) #这里注意要把结果从gpu中拿出来到cpu,不然会报错。 print(f"cost :{time() - start_time}s")
时间方面嘛,单个音频多了放入gpu取出gpu的步骤肯定会稍慢的,但是跑过cuda都知道它的强大,更多是用于后续的操作说是。
-
使用librosa库进行重采样
具体步骤:
-
导入两个库文件,
librosa和音频文件读写库soundfileimport librosa
import soundfile as sf
from time import time#仅计算时间,不影响主体 -
导入音频文件
-
设定目标采样率
-
重采样
-
输出
综合封装成函数:
1 def resample_by_lisa():
2     file_path = input("please input your file path:")
3     start_time = time()
4     y, sr = librosa.load(file_path)     #使用librosa导入音频文件
5     target_sample_rate = 32000
6     y_32k = librosa.resample(y=y, orig_sr=sr, target_sr=target_sample_rate)         #使用librosa进行重采样至目标采样率
7     sf.write("test_lisa.mp3", data=y_32k, samplerate=target_sample_rate)        #使用soundfile进行文件写入
8     print(f"cost :{time() - start_time}s")
总结:
-
优点,简单小巧,
ibrosa有很多能处理音频的功能 -
缺点:无法调用cuda,保存的时候需要依赖
soundfile库。 -
时间:也是几秒左右,和
torchaudiocpu版差不多 -
小声bb:提取32k的效果好像没有torchaudio好【嘛,毕竟librosa历史有点久了,没有专注深度学习的torch好很正常啦】,你们也可以自己测一下
-
all code:
1 import torch 2 import torchaudio 3 from torchaudio.transforms import Resample 4 import librosa 5 import soundfile as sf 6 from time import time 7 8 def resample_by_cpu(): 9 file_path = input("please input your file path: ") 10 start_time = time() 11 y, sr = torchaudio.load(file_path) #使用torchaudio.load导入音频文件 12 13 target_sample = 32000 #设定目标采样率 14 resampler = Resample(orig_freq=sr, new_freq=target_sample)#构造resample函数,输入原始采样率和目标采样率 15 resample_misic = resampler(y) #调用resample函数 16 17 torchaudio.save("test.mp3", resample_misic, target_sample)#调用torchaudio的保存即可 18 print(f"cost :{time() - start_time}s") 19 def resample_use_cuda(): 20 21 device = torch.device('cuda' if torch.cuda.is_available() else 'cpu') 22 start_time = time() 23 file_path = input("please input your file path:") 24 y, sr = torchaudio.load(file_path) 25 26 y = y.to(device) 27 target_sample = 32000 28 resampler = Resample(orig_freq=sr, new_freq=target_sample).to(device) 29 resample_misic = resampler(y) 30 torchaudio.save("test.mp3", resample_misic.to('cpu'), target_sample) 31 print(f"cost :{time() - start_time}s") 32 33 def resample_by_lisa(): 34 file_path = input("please input your file path:") 35 start_time = time() 36 y, sr = librosa.load(file_path)#使用librosa导入音频文件 37 target_sample_rate = 32000 38 y_32k = librosa.resample(y=y, orig_sr=sr, target_sr=target_sample_rate)#使用librosa进行重采样至目标采样率 39 sf.write("test_lisa.mp3", data=y_32k, samplerate=target_sample_rate)#使用soundfile进行文件写入 40 print(f"cost :{time() - start_time}s") 41 42 if __name__ == '__main__': 43 resample_use_cuda() 44 resample_by_cpu() 45 resample_by_lisa()
-

2.2 提取pitch基频特征【音高提取】
-
使用
torchaudio进行基频特征提取其实主要使用的这个函数:
torchaudio.transforms._transforms.PitchShift让我们来看看它官方的
example,仿照着来写就好啦>>> waveform, sample_rate = torchaudio.load("test.wav", normalize=True) >>> transform = transforms.PitchShift(sample_rate, 4) >>> waveform_shift = transform(waveform) # (channel, time)
步骤:
-
导入依赖
import torchaudio
import torchaudio.transforms as Tf
import matplotlib.pyplot as plt     #画图依赖
-
导入音频
-
构造
PitchShift -
使用这个函数对歌曲进行基频提取
code:
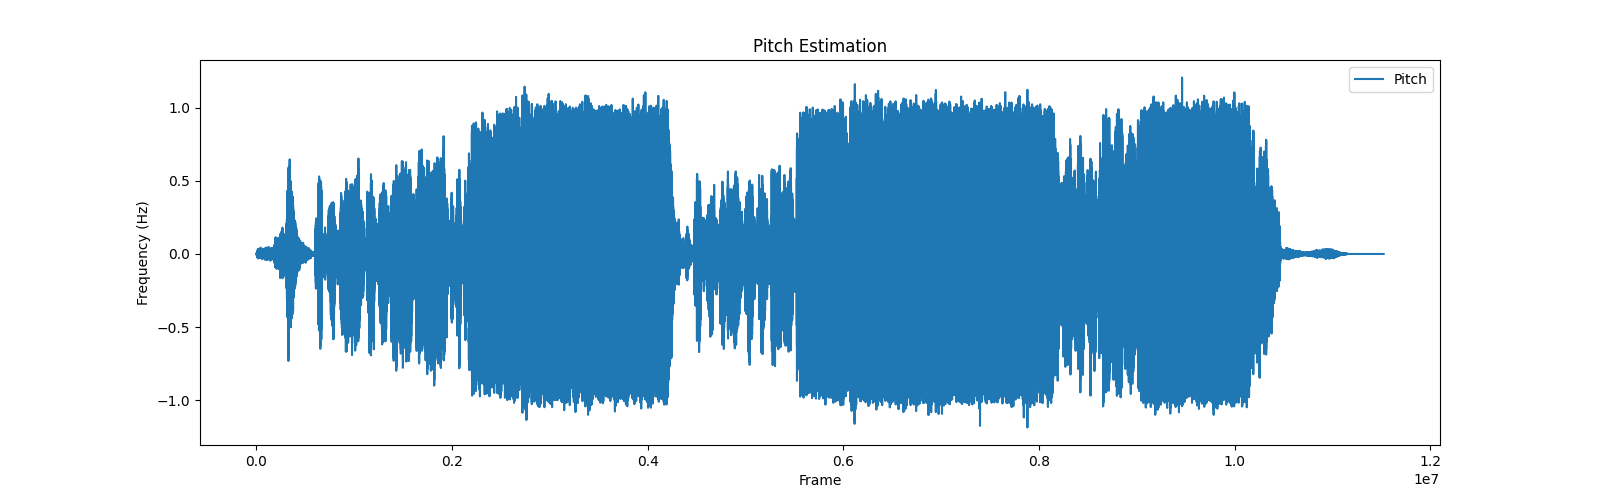
def get_pitch_by_torch():
    file_path = input("file path:")
    y, sr = torchaudio.load(file_path)
    """specimen:
    >>> waveform, sample_rate = torchaudio.load("test.wav", normalize=True)
    >>> transform = transforms.PitchShift(sample_rate, 4)
    >>> waveform_shift = transform(waveform)  # (channel, time)
    """
    pitch_tf = Tf.PitchShift(sample_rate=sr, n_steps=0)
    feature = pitch_tf(y)
    # 绘制基频特征 这部分可以忽略,只是画图而已,可以直接复制不用理解
    plt.figure(figsize=(16, 5))
    plt.plot(feature[0].numpy(), label='Pitch')
    plt.xlabel('Frame')
    plt.ylabel('Frequency (Hz)')
    plt.title('Pitch Estimation')
    plt.legend()
    plt.show()
输出图片【总歌曲】效果:
将输出的范围稍微改一下,切分特征的一部分,就是歌曲部分的音高特征啦,效果就很明显了
改为:
plt.plot(feature[0][5000:10000].numpy(), label='Pitch')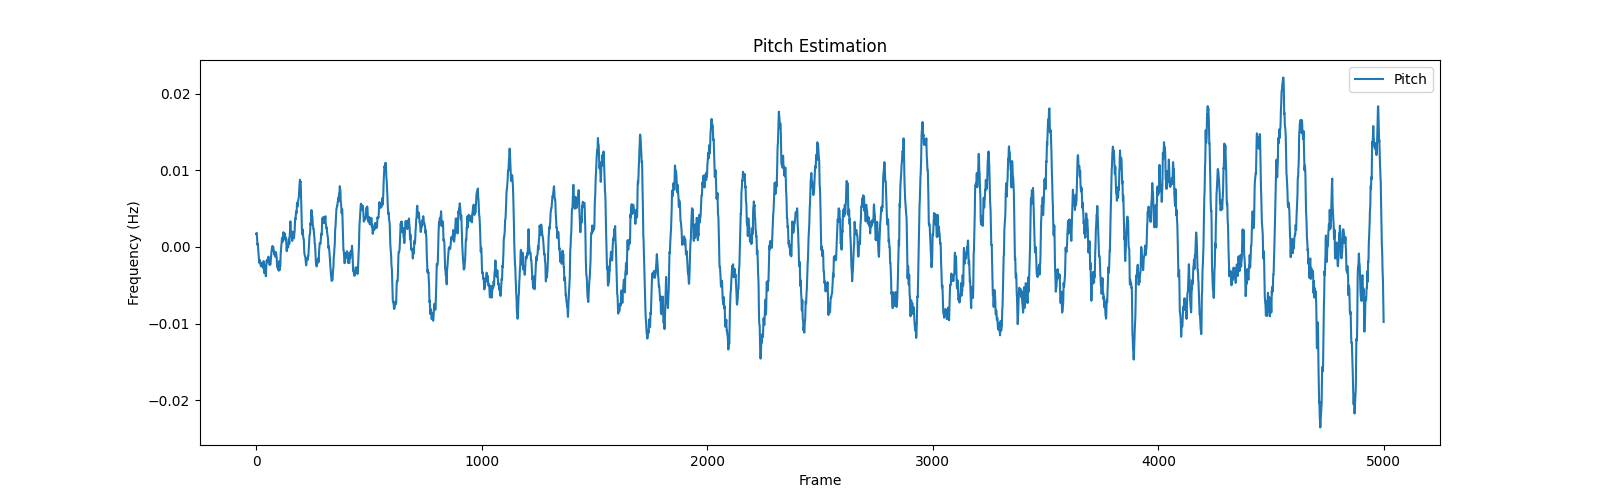
-
-
使用librosa提取基频特征
-
步骤:
-
导入包
-
提取基频特征
-
(可选)绘制基频特征
-
-
主要函数:
librosa.pyin,请见官方example
#Computing a fundamental frequency (F0) curve from an audio input
>>> y, sr = librosa.load(librosa.ex('trumpet'))
>>> f0, voiced_flag, voiced_probs = librosa.pyin(y,
...                                              sr=sr,
...                                              fmin=librosa.note_to_hz('C2'),
...                                              fmax=librosa.note_to_hz('C7'))
>>> times = librosa.times_like(f0, sr=sr)
code:
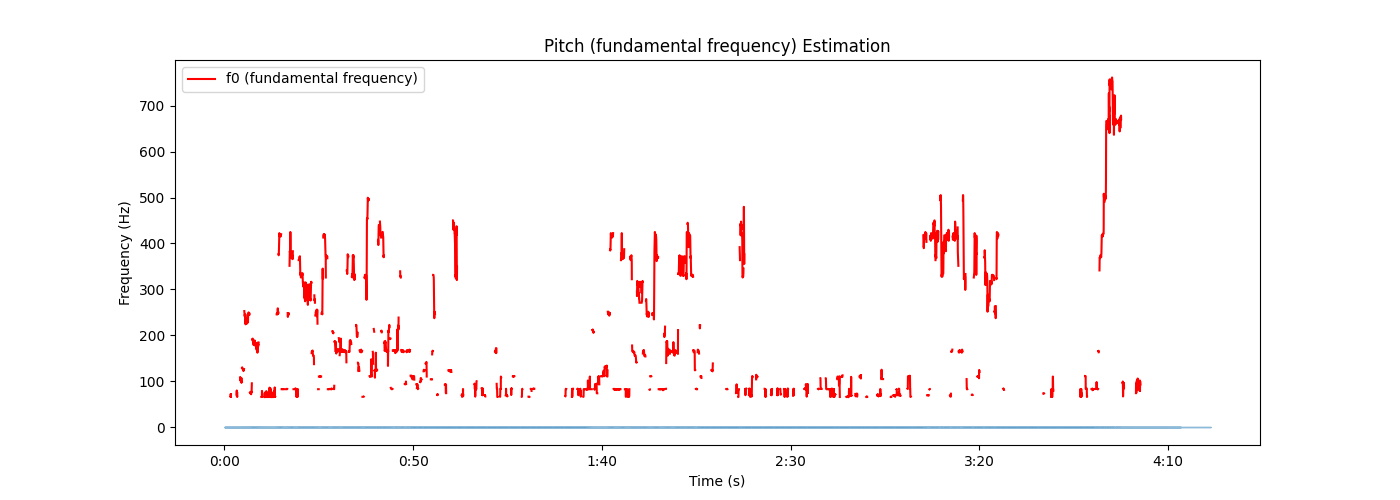
1 def get_pitch_by_librosa(): 2 3 file_path = input("请输入音频文件路径:") 4 y, sr = librosa.load(file_path) 5 """librosa.pyin(y,sr=sr,fmin=librosa.note_to_hz('C2'),fmax=librosa.note_to_hz('C7'))""" 6 # 使用pyin提取基频特征 7 f0, voiced_flag, voiced_probs = librosa.pyin(y, sr=sr, fmin=librosa.note_to_hz('C2'), fmax=librosa.note_to_hz('C7')) 8 9 # 绘制基频特征,可忽略 10 plt.figure(figsize=(14, 5)) 11 librosa.display.waveshow(y, sr=sr, alpha=0.5) 12 plt.plot(librosa.times_like(f0), f0, label='f0 (fundamental frequency)', color='r') 13 plt.xlabel('Time (s)') 14 plt.ylabel('Frequency (Hz)') 15 plt.title('Pitch (fundamental frequency) Estimation') 16 plt.legend() 17 plt.show()
-
总结:
-
比torchaudio略微麻烦一点,不过多了两个参数
voiced_flag, voiced_probs,看起来的视觉图好像也有些不一样,不过都是按照官方的这个来了,这也不对的话我也不会了
-
-
输出:
-
-
all code:
import torchaudio import torchaudio.transforms as Tf import matplotlib.pyplot as plt import librosa def get_pitch_by_torch(): file_path = input("file path:") y, sr = torchaudio.load(file_path) """specimen: >>> waveform, sample_rate = torchaudio.load("test.wav", normalize=True) >>> transform = transforms.PitchShift(sample_rate, 4) >>> waveform_shift = transform(waveform) # (channel, time) """ pitch_tf = Tf.PitchShift(sample_rate=sr, n_steps=0) feature = pitch_tf(y) # 绘制基频特征 plt.figure(figsize=(16, 5)) plt.plot(feature[0][5000:10000].numpy(), label='Pitch') plt.xlabel('Frame') plt.ylabel('Frequency (Hz)') plt.title('Pitch Estimation') plt.legend() plt.show() def get_pitch_by_librosa(): file_path = input("请输入音频文件路径:") y, sr = librosa.load(file_path) """librosa.pyin(y,sr=sr,fmin=librosa.note_to_hz('C2'),fmax=librosa.note_to_hz('C7'))""" # 使用pyin提取基频特征 f0, voiced_flag, voiced_probs = librosa.pyin(y, sr=sr, fmin=librosa.note_to_hz('C2'), fmax=librosa.note_to_hz('C7')) # 绘制基频特征,可忽略 plt.figure(figsize=(14, 5)) librosa.display.waveshow(y, sr=sr, alpha=0.5) plt.plot(librosa.times_like(f0), f0, label='f0 (fundamental frequency)', color='r') plt.xlabel('Time (s)') plt.ylabel('Frequency (Hz)') plt.title('Pitch (fundamental frequency) Estimation') plt.legend() plt.show() if __name__ == '__main__': # get_pitch_by_torch() # get_pitch_by_librosa()
后续PPG特征、vec特征见下一章


【推荐】国内首个AI IDE,深度理解中文开发场景,立即下载体验Trae
【推荐】编程新体验,更懂你的AI,立即体验豆包MarsCode编程助手
【推荐】抖音旗下AI助手豆包,你的智能百科全书,全免费不限次数
【推荐】轻量又高性能的 SSH 工具 IShell:AI 加持,快人一步
· 无需6万激活码!GitHub神秘组织3小时极速复刻Manus,手把手教你使用OpenManus搭建本
· Manus爆火,是硬核还是营销?
· 终于写完轮子一部分:tcp代理 了,记录一下
· 别再用vector<bool>了!Google高级工程师:这可能是STL最大的设计失误
· 单元测试从入门到精通