
传统项目的高可用方案
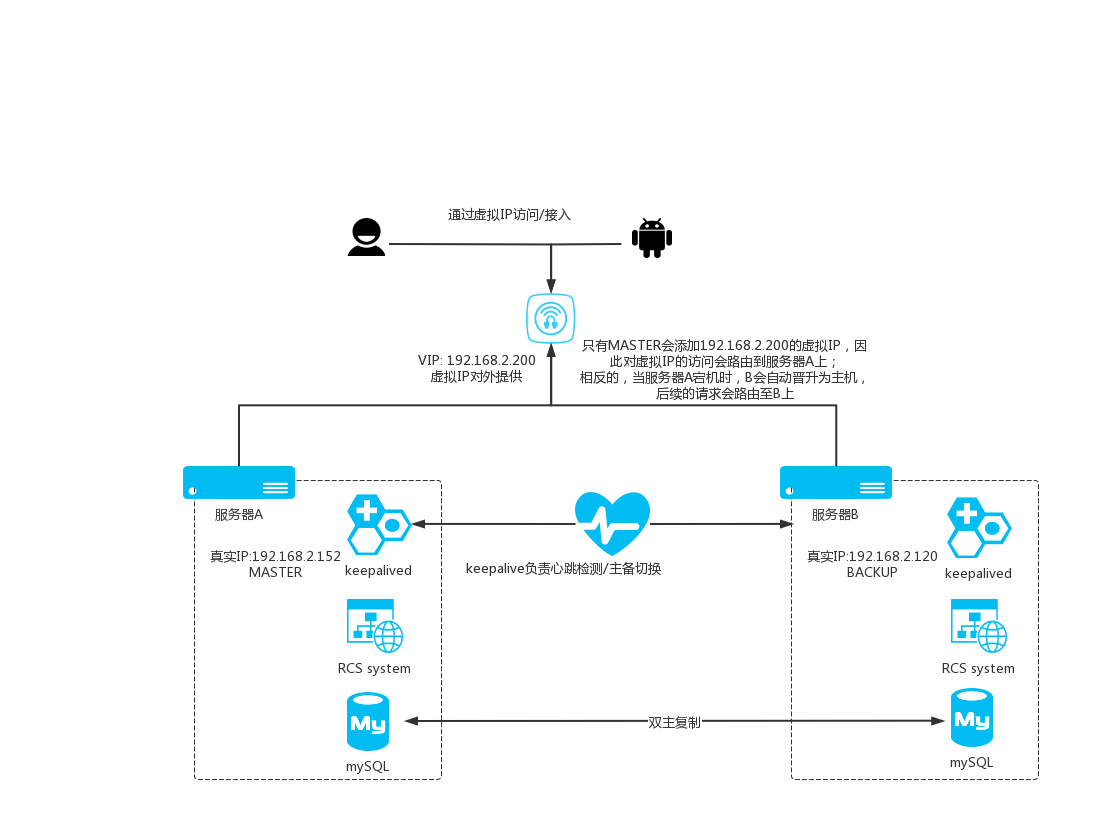
双机热备基础网络拓扑
环境搭建
基础环境:
两台CentOS的服务器A和B。
服务器A的真实IP为192.168.2.152
服务器B的真实IP为192.168.2.120
期望对外提供的虚拟IP为192.168.2.200,计划将服务器A设置成MASTER,服务器B设置为BACKUP。
双机热备——通过keepalived实现主机健康监测
针对服务器A的配置:
安装keepalived
keepalived提供了心跳检测,主备自动切换,提供虚拟IP的能力。
是我们实现双机热备高可用方案的关键。
在联网情况下可以通过yum install安装,安装前需要将依赖项一并安装。
# 安装依赖项
yum install -y curl gcc openssl-devel libnl3-devel net-snmp-devel

# 安装keepalived
yum install -y keepalived
安装成功后可以通过 systemctl status keepalived 查看是否安装成功,正常输出如下结果:
# 输出
● keepalived.service - LVS and VRRP High Availability Monitor
   Loaded: loaded (/usr/lib/systemd/system/keepalived.service; disabled; vendor preset: disabled)
   Active: inactive (dead)
修改/etc/keepalived/keepalived.conf,将服务器A配置为MASTER,最基本配置如下:
! Configuration File for keepalived

global_defs {
   router_id ha_test
   vrrp_skip_check_adv_addr
   vrrp_garp_interval 0
   vrrp_gna_interval 0
}


vrrp_instance VI_1 {
    state MASTER
    interface enp1s0
    virtual_router_id 107
    priority 150
    advert_int 1
    authentication {
        auth_type PASS
        auth_pass 1111
    }
    virtual_ipaddress {
	     192.168.2.200
    }
  }
}
其中主备的route_id 和 virtual_router_id要保持相同。virtual_ipaddress配置了虚拟IP(即我们期望对外暴露的IP),其地址为 192.168.2.200。vrrp_instance表示配置一个VRRP实例,因为服务器A我们希望它是主机,因此state是MASTER,并且给予了较高的优先级——150。interface后面gender是要监测的网卡,可以通过ifconfig查询主机A的网络配置,写入相应的网卡。
配置成功后,通过 systemctl start keepalived启动程序,再通过systemctl status keepalived 查看服务信息,以便校验配置是否正确。
正常的话会输出类似下列的信息:
● keepalived.service - LVS and VRRP High Availability Monitor
   Loaded: loaded (/usr/lib/systemd/system/keepalived.service; disabled; vendor preset: disabled)
   Active: active (running) since 三 2021-04-07 15:11:35 CST; 2 days ago
  Process: 1372 ExecStart=/usr/sbin/keepalived $KEEPALIVED_OPTIONS (code=exited, status=0/SUCCESS)
 Main PID: 1373 (keepalived)
   CGroup: /system.slice/keepalived.service
           ├─1373 /usr/sbin/keepalived -D
           ├─1374 /usr/sbin/keepalived -D
           └─1375 /usr/sbin/keepalived -D
还可以通过ip addr 查看对应网卡下是否已经添加了虚拟IP
...
2: enp1s0: <BROADCAST,MULTICAST,UP,LOWER_UP> mtu 1500 qdisc pfifo_fast state UP qlen 1000
    link/ether 4c:cc:6a:cc:d0:ce brd ff:ff:ff:ff:ff:ff
    inet 192.168.2.152/24 brd 192.168.2.255 scope global enp1s0
       valid_lft forever preferred_lft forever
    inet 192.168.2.200/32 scope global enp1s0
       valid_lft forever preferred_lft forever
    inet6 fe80::640:14ee:9503:3926/64 scope link
       valid_lft forever preferred_lft forever
...
服务器B的配置
同理在服务器B上安装并配置keepalived,配置和A的基本相同,仅需要修改state为BACKUP,降低优先级,同时确认需要服务器B的网卡,完整配置如下:
! Configuration File for keepalived

global_defs {
   router_id ha_test
   vrrp_skip_check_adv_addr
   vrrp_garp_interval 0
   vrrp_gna_interval 0
}


vrrp_instance VI_1 {
    state BACKUP
    interface p3p1
    virtual_router_id 107
    priority 120
    advert_int 1
    authentication {
        auth_type PASS
        auth_pass 1111
    }

    virtual_ipaddress {
	   192.168.2.200
    }
}
配置完后启动keepalived,并查看服务状态是否正常。
如果此时通过ip addr查询服务器B,会发现并没有添加192.168.2.200的IP。说明虚拟IP仅会被加到主机的服务器上。
如果此时你用网络内的其它主机查询ARP。会发现192.168.2.200对应的MAC地址是服务器A的MAC地址。
测试IP漂移
在服务器A,B均正常运行keepalived的情况下,将MASTER(即服务器A)的keepalived关闭,分别在服务器A,B上运行ip addr 观察是否A已经没有了200的IP,而B上多了该IP。同时,在另一台主机上用ARP确认200对应的MAC地址改成了服务器B的地址。
对程序的检测
上述的步骤仅仅能保证A,B中有一台服务器宕机时(或是keepalived挂掉),另一台服务器接管。而无法保证我们的应用程序故障时,备机能正常接管。
因此我们需要添加额外的检测脚本。
原理如下:当检测脚本监测失败(说明应用程序不存活),降低当前服务器的优先级,此时备机拥有更高的优先级,从而抢占成为主机,实现服务的接管。
另外,考虑到对单机环境的最小差异,我们用了在热备的时候采用单活的形式——即,主备服务器同一时刻有且仅有一台服务器运行着我们的程序。
这就要求我们在主降为备时关闭程序,而在备升主时拉起程序。
增加了进程监测和主备切换通知后的配置如下(以服务器A的配置为例,服务器B的配置要增加的部分类似):
! Configuration File for keepalived

global_defs {
   router_id ha_test
   vrrp_skip_check_adv_addr
   vrrp_garp_interval 0
   vrrp_gna_interval 0
   script_user ha
}

vrrp_script check_running {
   script "/etc/keepalived/check_running.sh"
   interval 1
   weight -50
}

vrrp_instance VI_1 {
    state MASTER
    interface enp1s0
    virtual_router_id 107
    priority 150
    advert_int 1
    authentication {
        auth_type PASS
        auth_pass 1111
    }
    virtual_ipaddress {
	     192.168.2.200
    }

    track_script {
      check_running
    }

    notify_master "/etc/keepalived/to_master.sh ha"
    notify_backup "/etc/keepalived/to_backup.sh ha"
  }
}
vrrp_script 块声明了一个脚本,该脚本在 vrrp_instance中的track_script被使用。块中同时还声明了脚本的执行周期和脚本执行结果对权重的影响。
另外,notify_master和notify_backup表示发生主备状态变化时,执行的动作,后面参数表示执行的脚本和执行脚本的用户(可不填,不填时会使用默认用户或是全局配置的用户来执行)。
script_user声明了脚本执行的默认用户,如果没配置将会用keepalived的默认用户,最好配置脚本执行的用户,避免默认用户权限不足的问题。
双主复制——解决持久层的数据同步
仅程序的备份无法实现真正的高可用,还需要数据的高可用。
对于数据库的高可用我们采用了服务器A,B进行双主复制的情况,二者互为主从,保证任一服务器挂掉后,另一个服务器上的数据状态仍然完整可用。
配置A为主,B为从,B向A复制
修改配置文件
修改配置文件的主要目的是确保启动bin.log,并且保证server-id唯一。同时,为了避免两个数据库主键冲突的情况,设置ID自增步长2,但是出事ID不同。
基本的配置如下
# Example MySQL config file for medium systems.
#
# This is for a system with little memory (32M - 64M) where MySQL plays
# an important part, or systems up to 128M where MySQL is used together with
# other programs (such as a web server)
#
# MySQL programs look for option files in a set of
# locations which depend on the deployment platform.
# You can copy this option file to one of those
# locations. For information about these locations, see:
# http://dev.mysql.com/doc/mysql/en/option-files.html
#
# In this file, you can use all long options that a program supports.
# If you want to know which options a program supports, run the program
# with the "--help" option.
# The following options will be passed to all MySQL clients
[client]
default-character-set=utf8
#password = your_password
port = 3306
socket = /tmp/mysql.sock
# Here follows entries for some specific programs
# The MySQL server
[mysqld]
basedir = /usr/local/mysql

port = 3306

socket = /tmp/mysql.sock

datadir = /usr/local/mysql/data

pid-file = /usr/local/mysql/data/mysql.pid

log-error = /usr/local/mysql/data/mysql.err


server-id = 120

auto_increment_offset = 1

auto_increment_increment = 2 #奇数ID


log-bin = /var/lib/mysql/mysql-bin #打开二进制功能,MASTER主服务器必须打开此项
binlog-do-db=ercs #需要备份的数据库名,如果备份多个数据库,重复设置这个选项 即可
binlog-format=ROW
#binlog-row-p_w_picpath=minimal
log-slave-updates=true
gtid-mode=on
enforce-gtid-consistency=true
master-info-repository=TABLE
relay-log-info-repository=TABLE
sync-master-info=1
slave-parallel-workers=0
sync_binlog=0
binlog-checksum=CRC32
master-verify-checksum=1
slave-sql-verify-checksum=1
binlog-rows-query-log_events=1
#expire_logs_days=5
max_binlog_size=1024M #binlog单文件最大值


replicate-ignore-db = mysql #忽略不同步主从的数据库
replicate-ignore-db = information_schema
replicate-ignore-db = performance_schema
replicate-ignore-db = dispatcher


max_connections = 3000

max_connect_errors = 30


skip-character-set-client-handshake #忽略应用程序想要设置的其他字符集

init-connect='SET NAMES utf8' #连接时执行的SQL

character-set-server=utf8 #服务端默认字符集

wait_timeout=1800 #请求的最大连接时间

interactive_timeout=1800 #和上一参数同时修改才会生效

sql_mode=NO_ENGINE_SUBSTITUTION,STRICT_TRANS_TABLES #sql模式

max_allowed_packet = 10M

bulk_insert_buffer_size = 8M

query_cache_type = 1

query_cache_size = 128M

query_cache_limit = 4M

key_buffer_size = 256M

read_buffer_size = 16K


skip-name-resolve

slow_query_log=1

long_query_time = 6

slow_query_log_file=slow-query.log

innodb_flush_log_at_trx_commit = 2

innodb_log_buffer_size = 16M

[mysqldump]
quick
max_allowed_packet = 16M

[mysql]
no-auto-rehash
# Remove the next comment character if you are not familiar with SQL
#safe-updates
default-character-set=utf8

[myisamchk]
key_buffer_size = 20M
sort_buffer_size = 20M
read_buffer = 2M
write_buffer = 2M

[mysqlhotcopy]
interactive-timeout
配置完成后,重启mysql。
创建用户,分配复制权限
在mysql的终端中,执行下列SQL,创建用于复制的用户。
# 创建复制的用户
CREATE USER 'repl'@'%' IDENTIFIED BY '123456';

# 给用户分配复制权限
GRANT REPLICATION SLAVE ON *.* TO 'repl'@'%';

# 刷新,生效
flush privileges;
查看主服务器的master状态
在mysql终端中查询服务器状态
SHOW MASTER STATUS\G;
会得到下列类似的输出:
*************************** 1. row ***************************
             File: mysql-bin.000002
         Position: 16771846
     Binlog_Do_DB: ercs
 Binlog_Ignore_DB:
Executed_Gtid_Set: 8510df3f-e1f2-11ea-90f7-4ccc6accd0ce:1-5434,
a625da6c-2983-11eb-a1ad-f48e388b9a6d:1-5811
1 row in set (0.00 sec)
记录其中File和Postion后的值,会在从数据库中复制时使用。
修改从服务器数据库的配置
从服务器数据库的配置和主服务器相同,只是server-id不能相同。
修改完后重启mysql。
从服务器开始复制主服务器
在从服务器的mysql终端中执行下列语句:
#在从服务器中设置主服务器的信息,其中地址,用户名,密码,复制文件和坐标都根据实际情况填写
CHANGE MASTER TO
    ->     MASTER_HOST='192.168.2.150',
    ->     MASTER_USER='rep1',
    ->     MASTER_PASSWORD='123456',
    ->     MASTER_LOG_FILE='mysql-bin.000002',
    ->     MASTER_LOG_POS=16771846;

#开始复制
start slaves;
上述操作完成后应该能正常开始复制,可以通过命令检查是否正常:
#查询从服务器状态 确认配置生效
show slave status\G;

#输出
*************************** 1. row ***************************
               Slave_IO_State: Waiting for master to send event
                  Master_Host: 192.168.2.152
                  Master_User: rep
                  Master_Port: 3306
                Connect_Retry: 60
              Master_Log_File: mysql-bin.000002
          Read_Master_Log_Pos: 16785227
               Relay_Log_File: localhost-relay-bin.000007
                Relay_Log_Pos: 680855
        Relay_Master_Log_File: mysql-bin.000002
             Slave_IO_Running: Yes
            Slave_SQL_Running: Yes
              Replicate_Do_DB:
          Replicate_Ignore_DB: mysql,information_schema,performance_schema,dispatcher
           Replicate_Do_Table:
       Replicate_Ignore_Table:
      Replicate_Wild_Do_Table:
  Replicate_Wild_Ignore_Table:
                   Last_Errno: 0
                   Last_Error:
                 Skip_Counter: 0
          Exec_Master_Log_Pos: 16785227
              Relay_Log_Space: 681106
              Until_Condition: None
               Until_Log_File:
                Until_Log_Pos: 0
           Master_SSL_Allowed: No
           Master_SSL_CA_File:
           Master_SSL_CA_Path:
              Master_SSL_Cert:
            Master_SSL_Cipher:
               Master_SSL_Key:
        Seconds_Behind_Master: 0
Master_SSL_Verify_Server_Cert: No
                Last_IO_Errno: 0
                Last_IO_Error:
               Last_SQL_Errno: 0
               Last_SQL_Error:
  Replicate_Ignore_Server_Ids:
             Master_Server_Id: 152
                  Master_UUID: 8510df3f-e1f2-11ea-90f7-4ccc6accd0ce
             Master_Info_File: mysql.slave_master_info
                    SQL_Delay: 0
          SQL_Remaining_Delay: NULL
      Slave_SQL_Running_State: Slave has read all relay log; waiting for more updates
           Master_Retry_Count: 86400
                  Master_Bind:
      Last_IO_Error_Timestamp:
     Last_SQL_Error_Timestamp:
               Master_SSL_Crl:
           Master_SSL_Crlpath:
           Retrieved_Gtid_Set: 8510df3f-e1f2-11ea-90f7-4ccc6accd0ce:24-5444
            Executed_Gtid_Set: 8510df3f-e1f2-11ea-90f7-4ccc6accd0ce:24-5444,
a625da6c-2983-11eb-a1ad-f48e388b9a6d:1-5811
                Auto_Position: 0
         Replicate_Rewrite_DB:
                 Channel_Name:
           Master_TLS_Version:
1 row in set (0.00 sec)
确认上述输出中的主服务器地址正常,且Slave_IO_Running和Slave_SQL_Running均为Yes。基本说明配置成功。
此时可以在主数据库中插入一条数据,然后从从数据库中查询,查看数据是否正确同步。
配置B为主,A为从,A向B复制
配置步骤和上述类似,不再重复。
都完成后,完成的双机热备高可用环境搭建完成。

 浙公网安备 33010602011771号