Google免费GPU使用教程(亲测可用)
今天突然看到一篇推文,里面讲解了如何薅资本主义羊毛,即如何免费使用Google免费提供的GPU使用权。
可以免费使用的方式就是通过Google Colab,全名Colaboratory。我们可以用它来提高Python技能,也可以用Keras、TensorFlow、PyTorch、OpenCV等等流行的深度学习库来练习开发深度学习的应用。
现在我们介绍如何免费的使用这个非常非常给力的应用!!!
一 项目建立与配置
(1)在Google Drive上创建文件夹:这项功能的使用主要是通过Google Drive,首先需要在Google Drive里面创建新的文件夹,因为我们所有的操作都是通过Google Drive文件的方式进行的,这里我们创建了一个名为gpu的文件夹,然后打开文件夹;
(2)创建新的Colaboratory:右键更多选择Colaboratory, 如果更多没有的话,可以点击关联更多应用搜索添加即可!
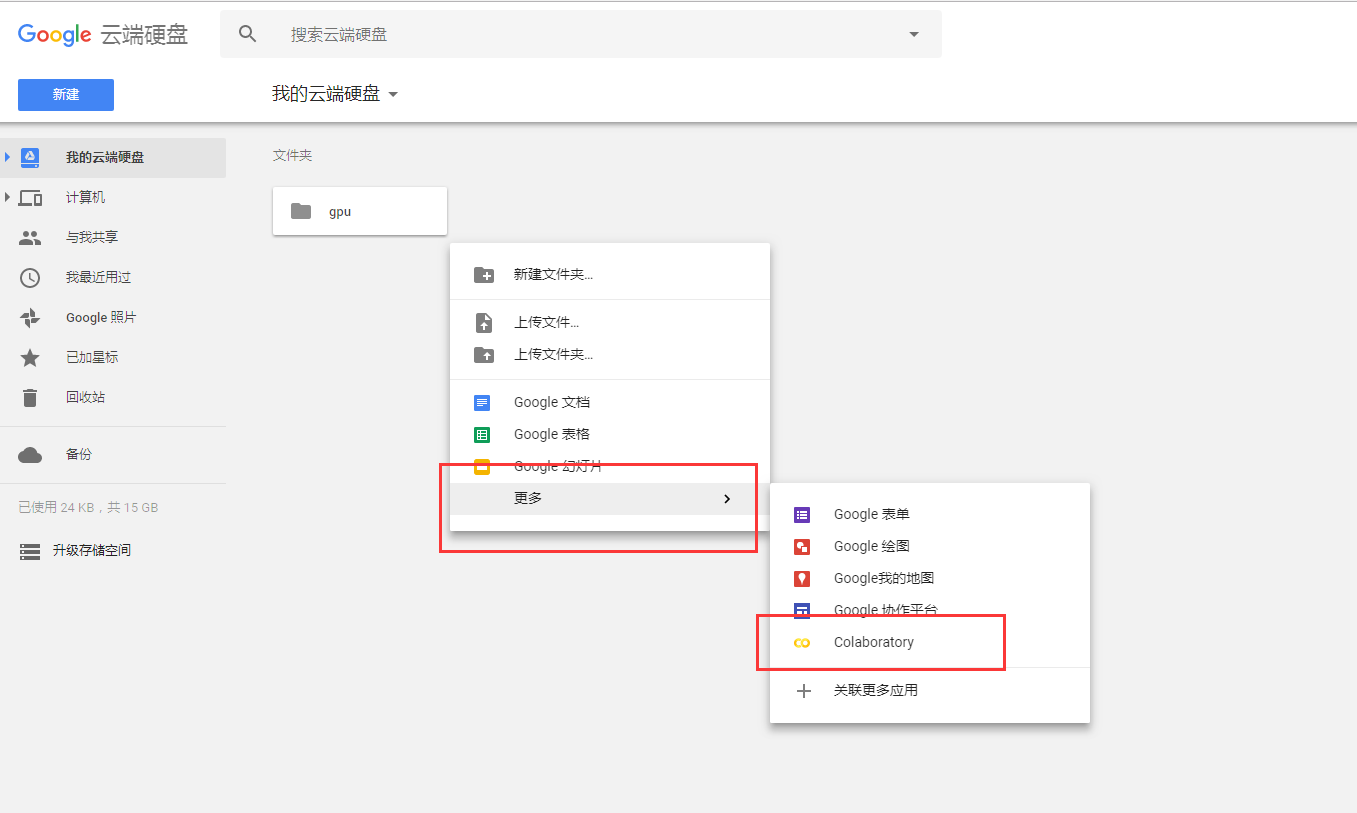
并且这里可以随意修改文件名

(3)设置后端Python版本和免费的GPU使用:然后就可以进行代码编写了~~~
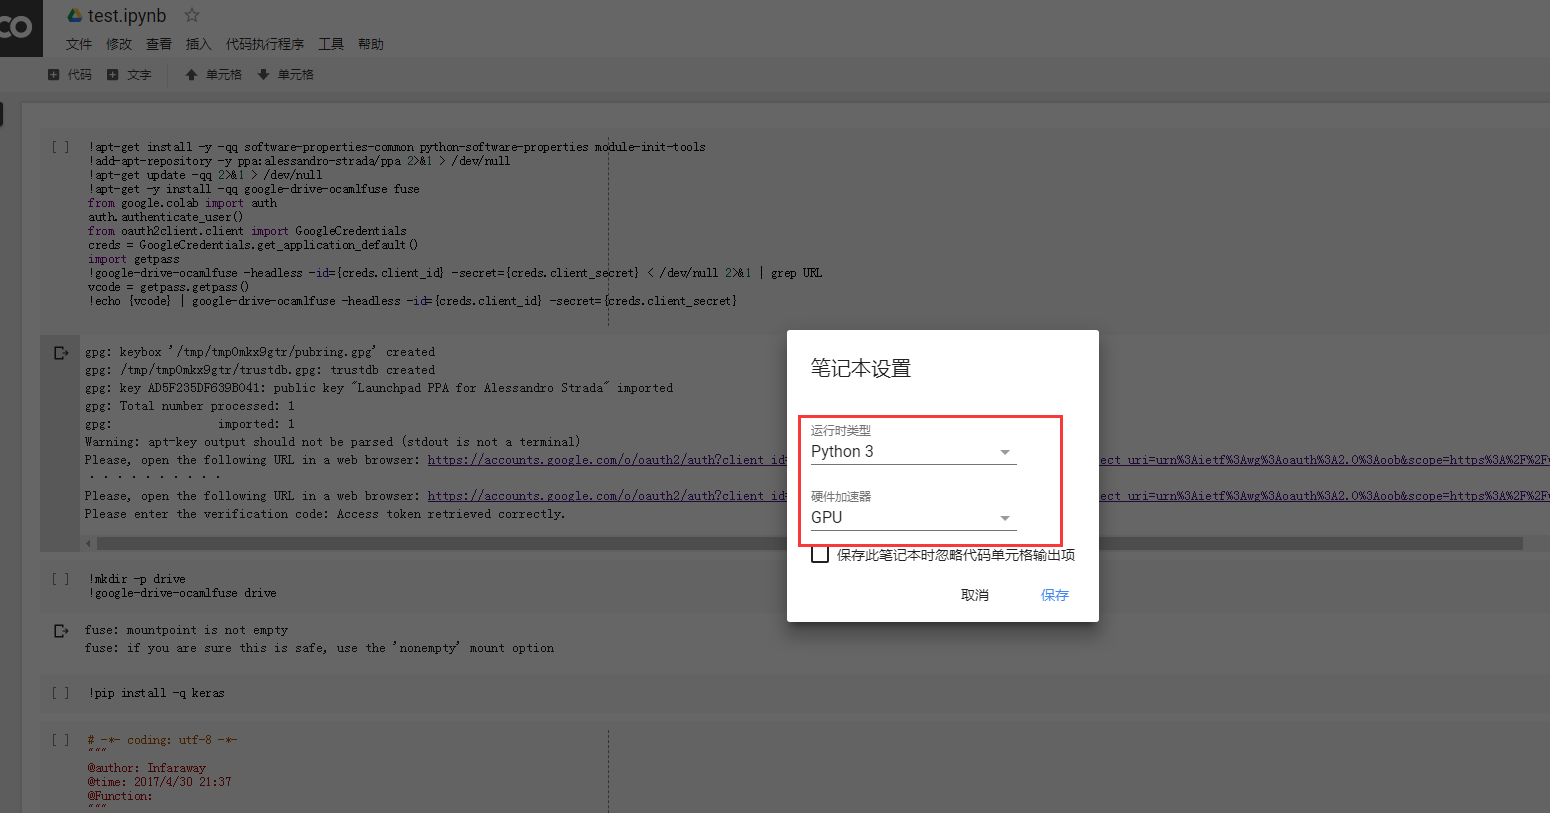
二 授权与挂载
(4)当完成基本的文件建立和配置后,就需要先运行下面这些代码,来安装必要的库、执行授权:

 1 !apt-get install -y -qq software-properties-common python-software-properties module-init-tools
 2 !add-apt-repository -y ppa:alessandro-strada/ppa 2>&1 > /dev/null
 3 !apt-get update -qq 2>&1 > /dev/null
 4 !apt-get -y install -qq google-drive-ocamlfuse fuse
 5 from google.colab import auth
 6 auth.authenticate_user()
 7 from oauth2client.client import GoogleCredentials
 8 creds = GoogleCredentials.get_application_default()
 9 import getpass
10 !google-drive-ocamlfuse -headless -id={creds.client_id} -secret={creds.client_secret} < /dev/null 2>&1 | grep URL
11 vcode = getpass.getpass()
12 !echo {vcode} | google-drive-ocamlfuse -headless -id={creds.client_id} -secret={creds.client_secret}
点击运行可以看到如下结果:此时,点击链接地址,获取验证码。
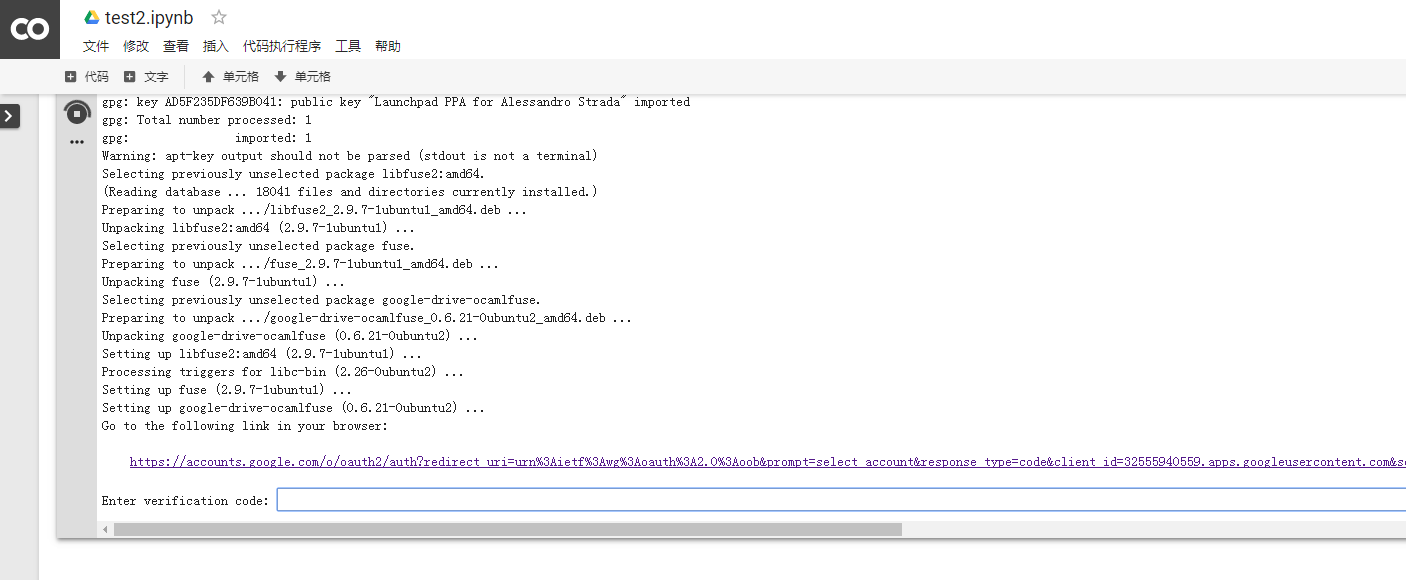
点击链接地址,获取验证码。

提示成功!
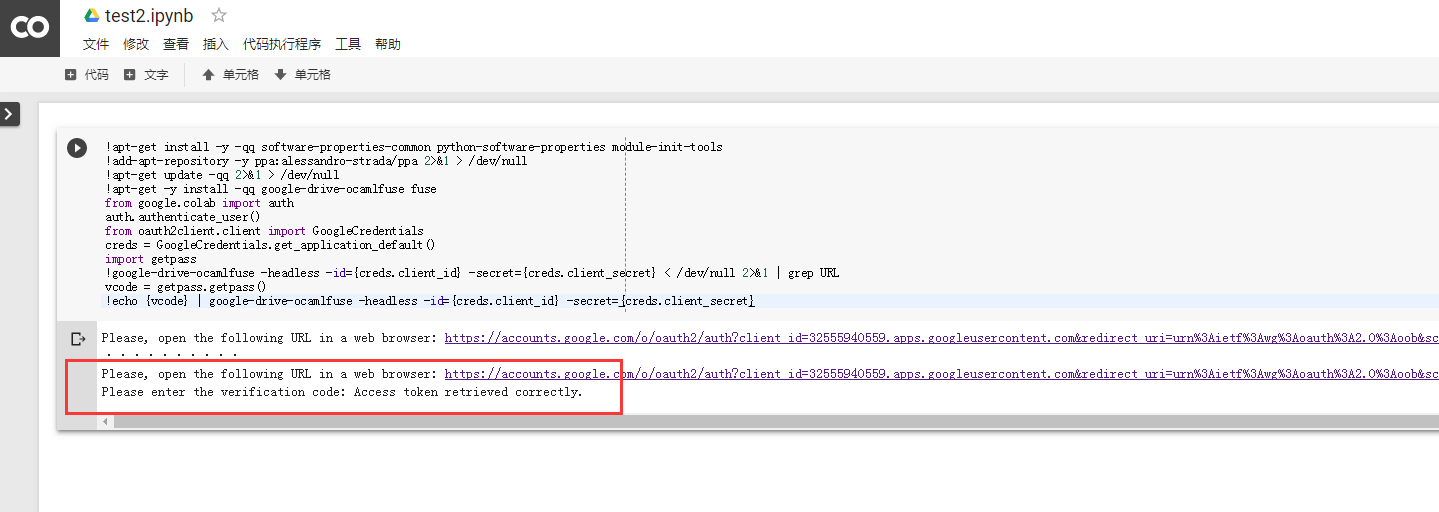
(5)授权完成后,就可以挂载Google Drive了
1 !mkdir -p drive
2 !google-drive-ocamlfuse drive
三 测试阶段
我们使用安装Keras中的测试样例代码进行效果的测试:
 1 # -*- coding: utf-8 -*-
 2
 3
 4 '''Trains a simple convnet on the MNIST dataset.
 5 Gets to 99.25% test accuracy after 12 epochs
 6 (there is still a lot of margin for parameter tuning).
 7 16 seconds per epoch on a GRID K520 GPU.
 8 '''
 9
10 from __future__ import print_function
11 import keras
12 from keras.datasets import mnist
13 from keras.models import Sequential
14 from keras.layers import Dense, Dropout, Flatten
15 from keras.layers import Conv2D, MaxPooling2D
16 from keras import backend as K
17
18 batch_size = 128
19 num_classes = 10
20 epochs = 12
21
22 # input image dimensions
23 img_rows, img_cols = 28, 28
24
25 # the data, shuffled and split between train and test sets
26 (x_train, y_train), (x_test, y_test) = mnist.load_data()
27
28 if K.image_data_format() == 'channels_first':
29     x_train = x_train.reshape(x_train.shape[0], 1, img_rows, img_cols)
30     x_test = x_test.reshape(x_test.shape[0], 1, img_rows, img_cols)
31     input_shape = (1, img_rows, img_cols)
32 else:
33     x_train = x_train.reshape(x_train.shape[0], img_rows, img_cols, 1)
34     x_test = x_test.reshape(x_test.shape[0], img_rows, img_cols, 1)
35     input_shape = (img_rows, img_cols, 1)
36
37 x_train = x_train.astype('float32')
38 x_test = x_test.astype('float32')
39 x_train /= 255
40 x_test /= 255
41 print('x_train shape:', x_train.shape)
42 print(x_train.shape[0], 'train samples')
43 print(x_test.shape[0], 'test samples')
44
45 # convert class vectors to binary class matrices
46 y_train = keras.utils.to_categorical(y_train, num_classes)
47 y_test = keras.utils.to_categorical(y_test, num_classes)
48
49 model = Sequential()
50 model.add(Conv2D(32, kernel_size=(3, 3),
51                  activation='relu',
52                  input_shape=input_shape))
53 model.add(Conv2D(64, (3, 3), activation='relu'))
54 model.add(MaxPooling2D(pool_size=(2, 2)))
55 model.add(Dropout(0.25))
56 model.add(Flatten())
57 model.add(Dense(128, activation='relu'))
58 model.add(Dropout(0.5))
59 model.add(Dense(num_classes, activation='softmax'))
60
61 model.compile(loss=keras.losses.categorical_crossentropy,
62               optimizer=keras.optimizers.Adadelta(),
63               metrics=['accuracy'])
64
65 model.fit(x_train, y_train,
66           batch_size=batch_size,
67           epochs=epochs,
68           verbose=1,
69           validation_data=(x_test, y_test))
70 score = model.evaluate(x_test, y_test, verbose=0)
71 print('Test loss:', score[0])
72 print('Test accuracy:', score[1])
这里使用Google GPU的效率每个Epoch大概需要11s左右即可完成
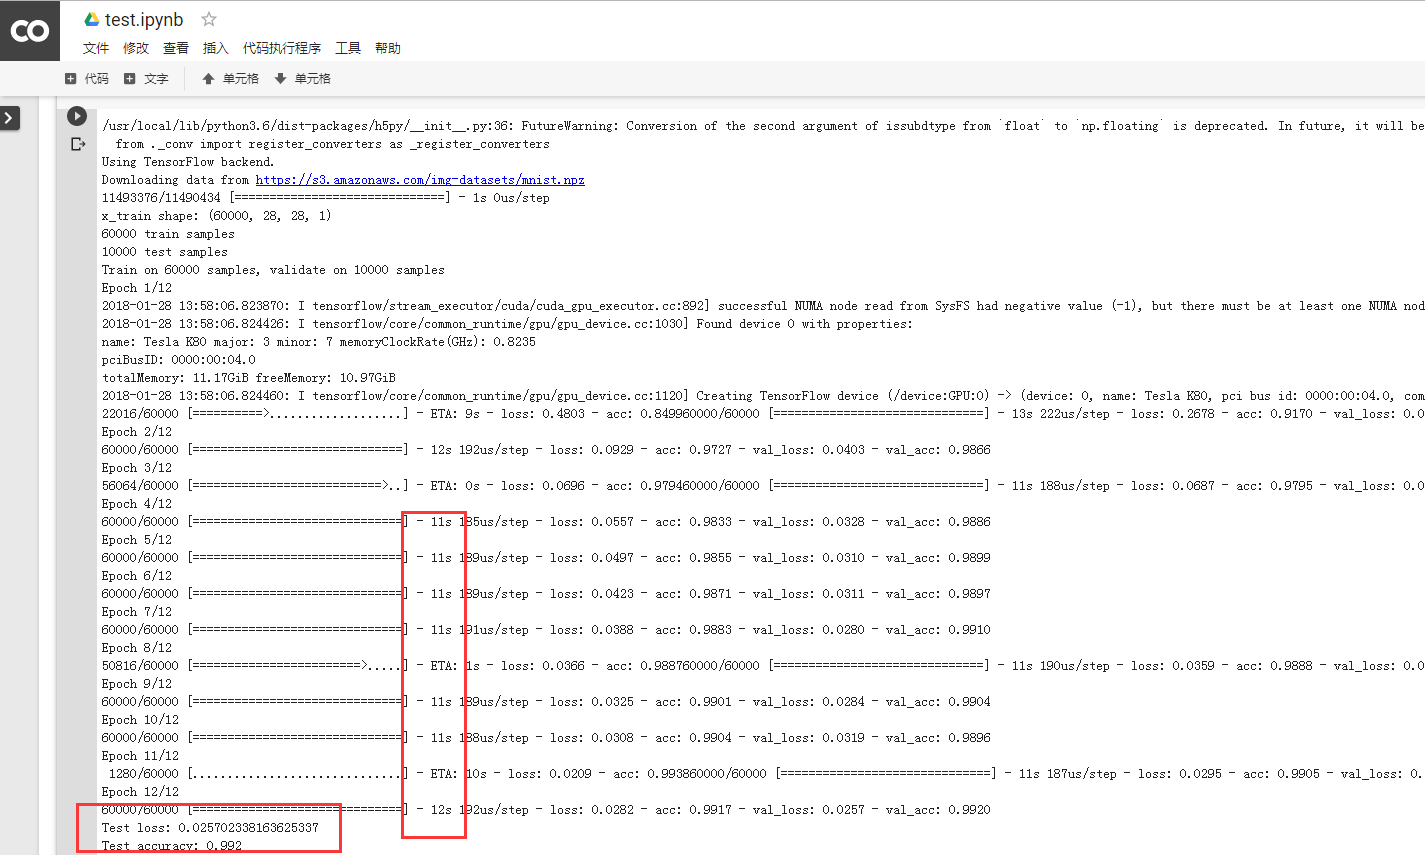
而我们使用实验室的工作站

每个率每个Epoch大概需要130s+完成

四 相关命令
(1)查看是否使用GPU:
1 import tensorflow as tf
2 tf.test.gpu_device_name()
(2)在使用哪个GPU:
1 from tensorflow.python.client import device_lib
2 device_lib.list_local_devices()
(3)RAM大小:
1 !cat /proc/meminfo
当然Google的使用需要自备FQ工具!
原文链接:https://medium.com/deep-learning-turkey/google-colab-free-gpu-tutorial-e113627b9f5d


