现实生活中的 CUDA 编程 Part3 Unified Memory
Or: going back to basics
这是 CUDA programming series 的第 3 部分,欢迎您查看以前的 posts:
- Part 0 — an overview
- Part 1 — introduction to the GPU
- Part 2 — your first CUDA program
接下来的几篇 posts 将着眼于理解与 general purpose GPU programming 相关的关键概念,尤其是 CUDA programming。 虽然每篇 post 都会包含一些 functional code 来演示正在讨论的概念,但它们的主要目的是尽可能最好地解释这些概念。
In short
在这篇 post 中,我们将讨论一般 GPU 使用的 memory model,特别是 CUDA,您需要了解 memory model 才能高效地编写 code 并编写高效的 code。
What is a memory model?
一般来说,memory model 是程序员查看 machine’s memory 的方式。 在经典 programs 中,我们通常谈论两种 types 的 memory——stack 和 heap。The stack is where all your static variables, those that you create inside classes and function, go。 The heap 是 dynamic memory 所在的地方。 两者之间的主要区别在于 compiler 可以提前计算 static memory,which allocates space in the stack for all those variables(以及 function calls 和 returns,but that is a different subject),while the dynamic memory is only requested at runtime。 在良好的 old C 代码中,这种区别是显而易见的。 memory dynamically 的唯一方法(例如,创建一个 size 在运行时决定的 array)只能通过特殊 functions 如 malloc 实现。Any and all other variables 的 size 必须在 compile 时已知(例如,simple arrays 必须具有由 hard-coded number 或 constant variable 指定 size,以便 compiler 知道 the size of the array)。在后来的更复杂的 languages 中,边界变得模糊(例如,在 C++ 和 Java 中,you can create arrays of a size that is decided at runtime),但由于 CUDA 扩展了 C memory model,that is the one we will keep in mind。
The CUDA memory model
在为 GPU programming 时,必须记住有两台 machines 可以存储你的 memory,它们是 host(the computer running the program)和device(the GPU executing the CUDA code)。 它们中的每一个都实现了一个 C memory model,即每个都有一个单独的stack 和 heap。You might be beginning to see the problem inherent to this separation。 在编写包含 CUDA 部分的 code 时,重要的是要意识到在某些时候您必须将 memory 从 host memory(由 CPU 使用)转移到 device memory(由 GPU 使用)。 这是一项乏味且低效的任务,主要原因有两个。
- 首先,it requires that you manually write the code for copying the memory from one to the other,这很容易被遗忘和/或弄乱。
- 其次,这种 method 在运行时效率低下。 由于 GPU 无法访问 host memory,因此 memory sections 必须由 CPU 串行复制到 device memory 中,这是一项代价高昂的操作。
对我们来说幸运的是,开发 CUDA 的 NVIDIA 优秀人员为我们提供了一个很好的解决方案,可以解决这两个问题——unified memory。
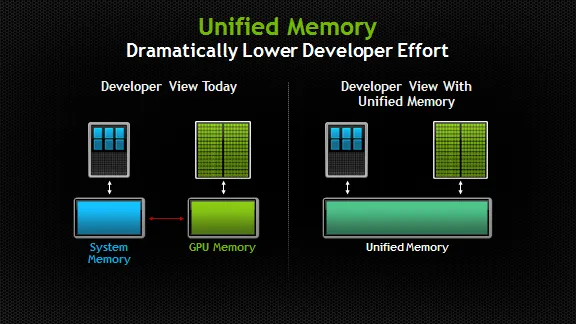
source: NVIDIA developer blog
正如 image 和 name 所清楚表达的那样,unified memory model 有一个简单的目的——它为程序员提供了 one memory space to work with。 概念上很简单,但在实践中,这种 memory model 为我们的开发人员节省了时间和精力。 In giving us one heap to work with,我们现在可以分配可从 CPU 和 GPU 都可以访问的 memory。 此外,这种方法允许我们在使用前预取 memory,这意味着它在运行时更容易供 GPU 使用。
Coding Time!
让我们看一些实际的 code。
我们将对该 code 进行多次 iterations,以展示 unified memory 的各种功能。
此 code 将基于您在上一篇 post 中首次看到的基本 code。
/*UnifiedMemoryWithoutPrefetch.cpp*/

void initArrays(float* x, float* y,int N){
  for(int i=0;i<N;i++){
    x[i] = 1;
    y[i] = 2;
  }
}

__global__
void addArrays(float*x,float* y,int N){

  int index = blockIdx.x * blockDim.x + threadIdx.x;
  int stride = blockDim.x * gridDim.x;
  for(int i=index;i<N;i+=stride)
    y[i] = x[i] + y[i];
}

int main(void)
{
  int N = 1<<20;
  float *x, *y;

  // Allocate memory on the GPU that is also accessible on the host
  cudaMallocManaged(&x,N*sizeof(float)));
  cudaMallocManaged(&y,N*sizeof(float)));

  initArrays(x,y,N);

  int blockSize = 256;
  int numBlocks = (N + blockSize - 1) / blockSize;
  addArrays<<<numBlocks,blockSize>>>(x,y,N);

  // Wait for GPU to finish before accessing on host
  cudaDeviceSynchronize();

  cudaFree(x);
  cudaFree(y);

}
The simple Hello World program from the last post
这段 code 有几点值得注意。
首先,每个 pointer 只有一个 allocation call。 该 pointer 现在拥有一个地址,CPU 和 GPU 都可以使用该地址。 You might be wondering how this is possible。 简短的回答是,在 GPU 请求时,CUDA 在幕后将 memory 移动到 device memory(for the longer answer you are welcome to read this post by the NVIDIA developer team, which goes into more detail about the unified memory migration system) . 如果你认为这是低效的,那你是对的。 We’ll see how to improve the performance in a second。
其次,使用指向 shared memory 的 pointers 意味着您可以将 pointers 传递给 regular functions 和 kernel function,如 code 中所示。 这使我们能够编写更加灵活的 code,因为我们不需要经常检查 memory 在 host 和 device 之间是否 synchronized。
这是相同 code 的第二个版本,这次使用 prefetching。 唯一的变化是第 13-17 行的 main function。( // Prefetch the data to the GPU到cudaMemPrefetchAsync(y, N*sizeof(float), device, NULL);)
int main(void)
{
  int N = 1<<20;
  float *x, *y;

  // Allocate memory on the GPU that is also accessible on the host
  cudaMallocManaged(&x,N*sizeof(float)));
  cudaMallocManaged(&y,N*sizeof(float)));

  // Put some values in the arrays
  initArrays(x,y,N);

  // Prefetch the data to the GPU
  int device = -1;/*比UnifiedMemoryWithoutPrefetch.cpp多的*/
  cudaGetDevice(&device); // Now device is an int corresponding to the /*比UnifiedMemoryWithoutPrefetch.cpp多的*/
  cudaMemPrefetchAsync(x, N*sizeof(float), device, NULL);/*和UnifiedMemoryWithoutPrefetch.cpp不同*/
  cudaMemPrefetchAsync(y, N*sizeof(float), device, NULL);/*和UnifiedMemoryWithoutPrefetch.cpp不同*/

  // Run the kernel
  int blockSize = 256;
  int numBlocks = (N + blockSize - 1) / blockSize;
  addArrays<<<numBlocks,blockSize>>>(x,y,N);

  // Wait for GPU to finish before accessing on host
  cudaDeviceSynchronize();

  cudaFree(x);
  cudaFree(y);

}

/*UnifiedMemoryPrefetch.cpp*/
我们使用 cudaMemPrefetchAsync 函数使 memory 在 GPU 实际请求之前可用。 Notice where we call the function。 We do so immediately before the kernel call but after all calls to CPU function。 在启动 kernel 之前调用 prefetch function 会导致 memory 开始在后台复制到 device memory 中。 运行此操作需要 CPU 和 GPU,因此我们仅在所有其他 CPU 操作之后执行此操作。 请注意,我们还必须告诉 prefetch function 我们希望将 memory 复制到的 device。 获取 device id(第 14-15 行(int device = -1;和cudaGetDevice(&device);))通常由 CUDA library 自动完成,但也可以通过为函数提供不同的编号来覆盖(例如,如果您想编写 multi-GPU code)。 对于那些感兴趣的人, the full docs for the prefetch function can be found here。
使用 prefetching 可以将我们的性能提高一倍,使我们能够编写更具可扩展性和持久性的 code。
Summary
So, what have we learned?
- We understood what a memory model is and the problems we need to face
- We saw how the unified memory model solves those problems
- We used prefetching to improve our memory performance so that we could write better code!
Next time — CUDA error checking. See you then!
Bonus points:将初始化 arrays 的函数编写为 kernel,我们现在需要在哪里 prefetch 内存?
原文链接:Real Life CUDA Programming — part 3 — Unified Memory

 浙公网安备 33010602011771号