现实生活中的 CUDA 编程 Part2 Hello CUDA
If you haven’t read the first two posts in this series,they are An Overview and An Introduction to the GPU。
Setup
Compiling GPU code 首先需要的是我们在上一 section 中描述的 tools。 这些 tools 包含在 CUDA Toolkit 中,可在此处下载和安装。 根据您的 GPU 和 driver version,您可能需要使用早期 version 的 CUDA toolkit。
请注意,以下 code sections 可以针对任何 OS 进行 compiled,but were tested on Linux。
我喜欢使用如下所示的简单 Makefile 来 compiling 和 profiling 代码:
# The paths to the compilation and profiling tools
NVCC=/usr/local/cuda-8.0/bin/nvcc
NVPROF=/usr/local/cuda-8.0/bin/nvprof


TARGET = kernel
PROFILE = profile

$(TARGET): $(TARGET).cpp
    $(NVCC) -x cu -arch=sm_35 -std=c++11 $< -o $@

$(PROFILE): $(TARGET)
    $(NVPROF) --unified-memory-profiling off ./$<
使用 makefile,compiling 只需使用 make 完成,而 profiling 则使用 make profile 完成。
Let’s get coding!
The classical starter code,即 GPU programming 的“Hello World”,是一个 adding two vectors 的简单 program。 虽然很简单,但该 program 演示了几个关键点。 其中,该 program 向我们展示了如何执行 GPU threads、不同 launch configurations 给我们带来的 time factor,以及如何调整 regular code 以使其能够在 GPU 上运行。
我们将致力于改进 the addition of the vectors 的简单 program。 为了正确地看到我们通过使用 GPU 的 parallel computing capabilities 获得的好处,我们必须有一个足够大的 array。 我们将使用的 size 为 1,000,000。 Adding two arrays, each a million elements long, has significant benefits when running in a parallel fashion on the GPU. 。 使用 GPU,我们可以实现高达 11K 的 performance improvement,但为了获得如此大的 performance improvement,我们必须通过多次 iterations 来改进我们的 code。
void initArrays(float* x, float* y,int N){
  for(int i=0;i<N;i++){
    x[i] = 1;
    y[i] = 2;
  }
}

void addArrays(float*x,float* y,int N){
  for(int i=0;i<N;i++)
    y[i] = x[i] + y[i];
}

int main(void)
{
  int N = 1<<20;
  float *x, *y;

  x = (float*)malloc(N*sizeof(float));
  y = (float*)malloc(N*sizeof(float));
  initArrays(x,y,N);
  addArrays(x,y,N);

  free(x);
  free(y);

}
The CPU version of the code
我们将从在 GPU 上运行 code 所需的最基本 element 开始——kernel function。 The kernel function 是一个用 __global__ annotation 注释的 regular C++ function, which tells the GPU compiler to regard this function as one that will be called from the CPU, but run on the GPU。 更多关于 function types 的内容在以后的 post 中。This function will always have the same basic structure。
Thread away
第一种 kernel function 是 thread-only function。 此 function 将针对多个 threads 运行,但仅在一个 thread block 上运行,如果您还记得上一篇 post,thread block 是一组可以 shared resources 并可以 cooperate with each other 的 threads。 以这种方式运行 kernel 会加速我们的 code,but not by the factor we’re aiming for。The kernel function 如下。
/*HelloCudaOneBlockKernel.cpp*/

void initArrays(float* x, float* y,int N){
  for(int i=0;i<N;i++){
    x[i] = 1;
    y[i] = 2;
  }
}

__global__/*比CPU version多的*/
void addArrays(float*x,float* y,int N){

  int index = threadIdx.x;/*比CPU version多的*/
  int stride = blockDim.x;/*比CPU version多的*/
  for(int i=index;i<N;i+=stride)
    y[i] = x[i] + y[i];
}

int main(void)
{
  int N = 1<<20;
  float *x, *y;

  // Allocate memory on the GPU that is also accessible on the host
  cudaMallocManaged(&x,N*sizeof(float)));/*比CPU version多的*/
  cudaMallocManaged(&y,N*sizeof(float)));/*比CPU version多的*/

  initArrays(x,y,N);
  addArrays<<<1,256>>>(x,y,N);/*two sets of triple sharp brackets*/

  // Wait for GPU to finish before accessing on host
  cudaDeviceSynchronize();/*比CPU version多的*/

  cudaFree(x);
  cudaFree(y);

}
Let’s understand what’s going on here。
首先,我们可以看到 kernel 可以访问一些特殊 variables,例如 threadIdx 和 blockDim(我们很快就会看到更多 variables)。 这些 variables 对应于 kernel 运行时使用的 launch configurations。 从广义上讲,launch configurations 由两 parts 组成:the number of blocks to run 和 the number of threads in each。 对于这个 kernel,只有一个 block。 我们还可以看到 loop 本身(在 addArrays 函数内)发生了变化,但变化不大。 查看新 loop,我们可以看到唯一的区别是我们运行 multiple threads,而不是按顺序遍历每个 element,每个thread 负责 array 中的一些 elements,which is the reason for the new loop structure。
运行任何 kernel 都只是使用 CUDA 提供的特殊语法的简单问题。 语法相当简单,由两组三重 sharp brackets 组成:<<< 和 >>>。 (你可以忽略 memory allocation lines,我们将在下一篇 post 中处理它们)。
在这两组 brackets 之间,我们以我们已经讨论过的两个 elements 的形式给出了 launch configuration,即 block dimensions(number of threads per block)和grid dimensions(number of blocks to run)。 为方便起见,其中每一个最多可以有三个 dimensions,使我们能够更轻松地为具有更多 dimensions 的 structures 构建 programs 。 (这种情况下的经典示例是 matrix multiplication,我们希望有一个 2-dimensional array of threads,每个 thread 负责 matrix 中的一个 element)。
回顾上面的例子,我们已经注意到只有一个 thread block 和特定数量的 threads,这意味着 launch 将改善 code 的运行时间,但只是一个 constant value(in this case, the number of threads)。 这很酷,但我们可以做得更好。
Blocks galore
我们如何 enhance 此 code? 还有一个 dimension 我们还没有利用——thread blocks。 使用多个 blocks 启动我们的 kernel 允许我们扩展到更大和更复杂的 programs。 更改 kernel 以在多个 blocks 上运行只是重新计算 kernel 内部使用的索引的问题。 The launch configuration 相应地发生变化,array 中的每个 element 现在都在 GPU 上接收它自己的 thread。 新的 launch configuration 终于给了我们想要的 speedup!
要理解 code,了解 blocks 和 threads 的结构可能会有所帮助:
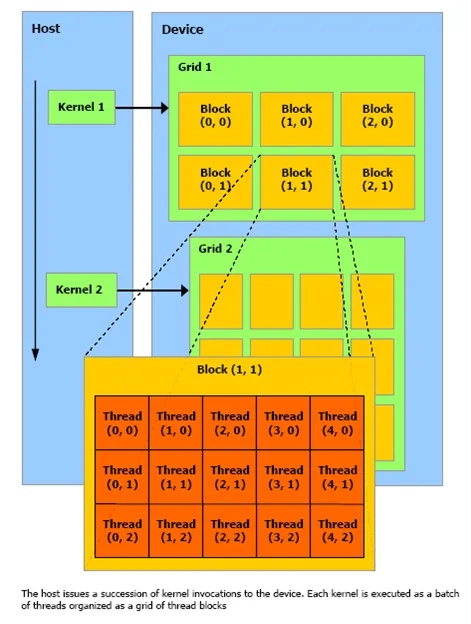
Block and Thread structure (source: http://geco.mines.edu/tesla/cuda_tutorial_mio/pic/Picture1.png)
使用此 image 作为参考,我们现在可以理解 kernel function 中的 loop,它根据不同的 block 和 grid 维度为每个 thread 提供不同的 element 来处理。
/*HelloCudaManyBlockKernel.cpp*/

void initArrays(float* x, float* y,int N){
  for(int i=0;i<N;i++){
    x[i] = 1;
    y[i] = 2;
  }
}

__global__
void addArrays(float*x,float* y,int N){

  int index = blockIdx.x * blockDim.x + threadIdx.x;/*HelloCudaOneBlockKernel.cpp为int index = threadIdx.x; */
  int stride = blockDim.x * gridDim.x;/*HelloCudaOneBlockKernel.cpp为int stride = blockDim.x; */
  for(int i=index;i<N;i+=stride)
    y[i] = x[i] + y[i];
}

int main(void)
{
  int N = 1<<20;
  float *x, *y;

  // Allocate memory on the GPU that is also accessible on the host
  cudaMallocManaged(&x,N*sizeof(float)));
  cudaMallocManaged(&y,N*sizeof(float)));

  initArrays(x,y,N);

  int blockSize = 256;/*比HelloCudaOneBlockKernel.cpp多的 */
  int numBlocks = (N + blockSize - 1) / blockSize;/*比HelloCudaOneBlockKernel.cpp多的 */
  addArrays<<<numBlocks,blockSize>>>(x,y,N);

  // Wait for GPU to finish before accessing on host
  cudaDeviceSynchronize();

  cudaFree(x);
  cudaFree(y);

}
这段 code 与前一段 code 的区别只是我们安排 threads 的方式。 由于我们使用了多个 blocks,因此每个 thread 的 beginning index 和 stride 都会相应变化。
Summing Up
We saw how to write and launch kernels。
我们了解什么是 launch configurations 以及它们如何影响我们的 performance 和 kernels。
We wrote our very first CUDA program
Next time — CUDA memory and error checking. See you then!
Bonus points:编写另一个 kernel,这个内核负责 filling the array(instead of the CPU function that there is currently called)。
原文链接:Real Life CUDA Programming — part 2 — Hello CUDA

 浙公网安备 33010602011771号