Linux 0.11: 从开机到执行shell
参考
参考闪客的系列,将开机到执行shell的整个过程浓缩成本文。
bootsect.s
当按下开机键的那一刻,在主板上提前写死的固件程序 BIOS 会将硬盘中启动区的 512 字节的数据,原封不动复制到内存中的 0x7c00 这个位置,并跳转到那个位置进行执行。
Linux-0.11 的最开始的代码是用汇编语言写的 bootsect.s,位于 boot 文件夹下。通过编译,这个 bootsect.s 会被编译成二进制文件,存放在启动区的第一扇区。
启动区的定义非常简单,只要硬盘中的 0 盘 0 道 1 扇区的 512 个字节的最后两个字节分别是 0x55 和 0xaa,那么 BIOS 就会认为它是个启动区。
所以对于我们理解操作系统而言,此时的 BIOS 仅仅就是个代码搬运工,把 512 字节的二进制数据从硬盘搬运到了内存中而已。所以作为操作系统的开发人员,仅仅需要把操作系统最开始的那段代码,编译并存储在硬盘的 0 盘 0 道 1 扇区即可。之后 BIOS 会帮我们把它放到内存里,并且跳过去执行。
_start:
	mov	$BOOTSEG, %ax	#将ds段寄存器设置为0x7C0
	mov	%ax, %ds
	mov	$INITSEG, %ax	#将es段寄存器设置为0x900
	mov	%ax, %es
	mov	$256, %cx		#设置移动计数值256字
	sub	%si, %si		#源地址	ds:si = 0x07C0:0x0000
	sub	%di, %di		#目标地址 es:si = 0x9000:0x0000
	rep					#重复执行并递减cx的值
	movsw				#从内存[si]处移动cx个字到[di]处
	ljmp	$INITSEG, $go	#段间跳转,这里INITSEG指出跳转到的段地址,解释了cs的值为0x9000
这里就是一件事:把代码移动到 0x90000 处,然后跳转 新位置 偏移 go 处。
ljmp $INITSEG, $go 相当于 cs = 0x90000, ip = $go
go:	mov	%cs, %ax		#将ds,es,ss都设置成移动后代码所在的段处(0x9000)
	mov	%ax, %ds
	mov	%ax, %es
# put stack at 0x9ff00.
	mov	%ax, %ss # ss = 0x9000
	mov	$0xFF00, %sp	#目前的栈顶地址就是ss:sp,即0x9FF00 处。
这一部分是设置栈,把栈顶设置得离代码足够远。
##ah=0x02 读磁盘扇区到内存	al=需要独出的扇区数量
##ch=磁道(柱面)号的低八位 cl=开始扇区(位0-5),磁道号高2位(位6-7)
##dh=磁头号					dl=驱动器号(硬盘则7要置位)
##es:bx ->指向数据缓冲区;如果出错则CF标志置位,ah中是出错码
load_setup:
	mov	$0x0000, %dx		# drive 0, head 0
	mov	$0x0002, %cx		# sector 2, track 0
	mov	$0x0200, %bx		# address = 512, in INITSEG
	.equ    AX, 0x0200+SETUPLEN
	mov     $AX, %ax		# service 2, nr of sectors
	int	$0x13			    # read it
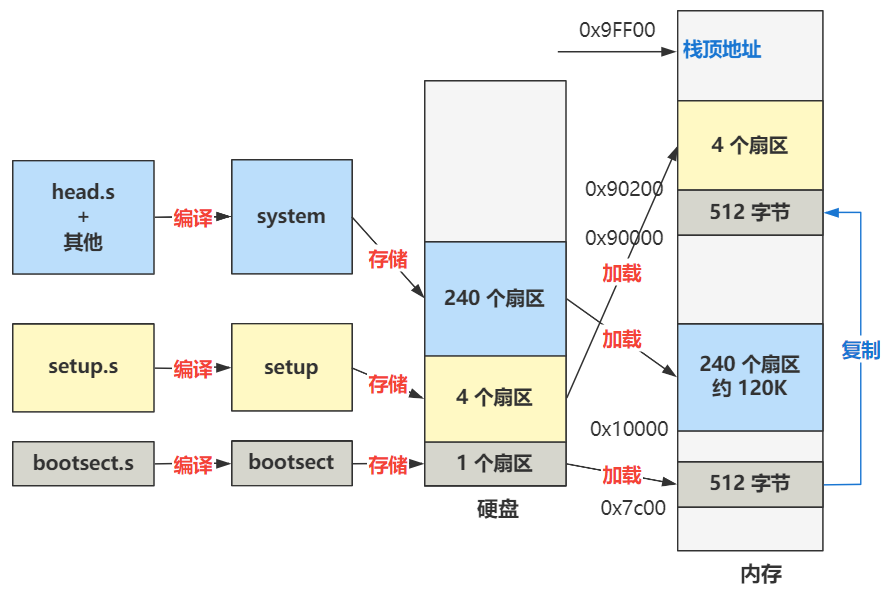
将硬盘的第 2 (cx)个扇区开始,把数据加载到内存 0x90200(bx) 处,共加载 4(SETUPLEN) 个扇区
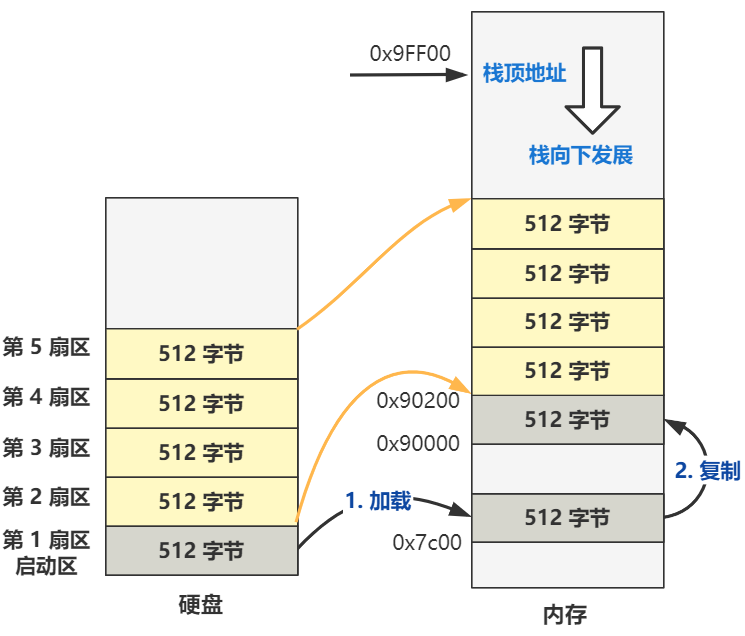
如果加载成功则跳转到 ok_load_setup,之后的主要逻辑是把从硬盘第 6 个扇区开始往后的 240 个扇区,加载到内存 0x10000 处,然后跳转到 0x90200 处的代码,也就是 setup.s 文件的第一行代码。
ok_load_setup:
    ...
    mov ax,#0x1000
    mov es,ax       ; segment of 0x10000
    call read_it
    ...
    jmpi 0,0x9020
setup.s
setup.s 被编译成setup 放在磁盘的2~5扇区。
setup的开始部分就是获取一些参数,存储在内存中:
| 内存地址 | 长度(字节) | 名称 |
|---|---|---|
| 0x90000 | 2 | 光标位置 |
| 0x90002 | 2 | 扩展内存数 |
| 0x90004 | 2 | 显示页面 |
| 0x90006 | 1 | 显示模式 |
| 0x90007 | 1 | 字符列数 |
| 0x90008 | 2 | 未知 |
| 0x9000A | 1 | 显示内存 |
| 0x9000B | 1 | 显示状态 |
| 0x9000C | 2 | 显卡特性参数 |
| 0x9000E | 1 | 屏幕行数 |
| 0x9000F | 1 | 屏幕列数 |
| 0x90080 | 16 | 硬盘1参数表 |
| 0x90090 | 16 | 硬盘2参数表 |
| 0x901FC | 2 | 根设备号 |
接着又是进行了内存的移动操作:
...
# now we want to move to protected mode ...

	cli			# no interrupts allowed !
	# 因为后面我们要把原本是 BIOS 写好的中断向量表给覆盖掉,也就是给破坏掉了,写上我们自己的中断向量表,所以这个时候是不允许中断进来的。

# first we move the system to it's rightful place

	mov	$0x0000, %ax
	cld			# 'direction'=0, movs moves forward
do_move:
	mov	%ax, %es	# destination segment
	add	$0x1000, %ax
	cmp	$0x9000, %ax
	jz	end_move
	mov	%ax, %ds	# source segment
	sub	%di, %di
	sub	%si, %si
	mov 	$0x8000, %cx
	rep
	movsw
	jmp	do_move
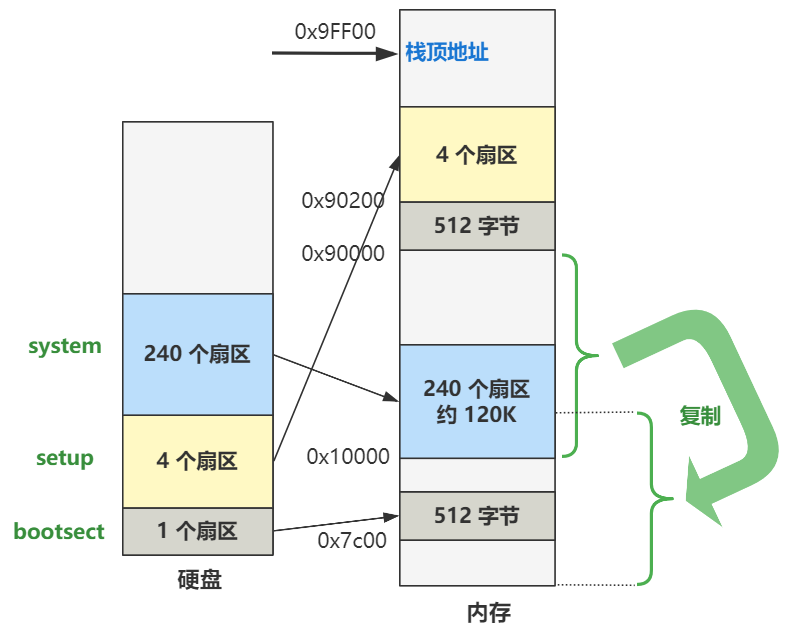
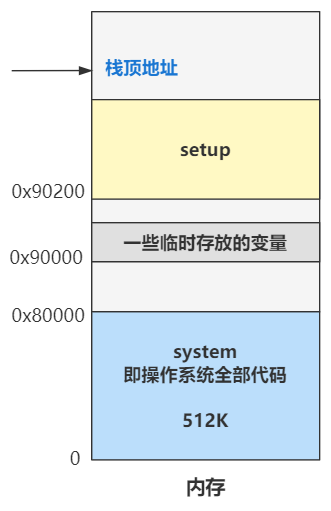
于是,现在的内存布局变成了:
# then we load the segment descriptors

end_move:
	mov	$SETUPSEG, %ax	# right, forgot this at first. didn't work :-)
	mov	%ax, %ds
	lidt	idt_48		# load idt with 0,0
	lgdt	gdt_48		# load gdt with whatever appropriate
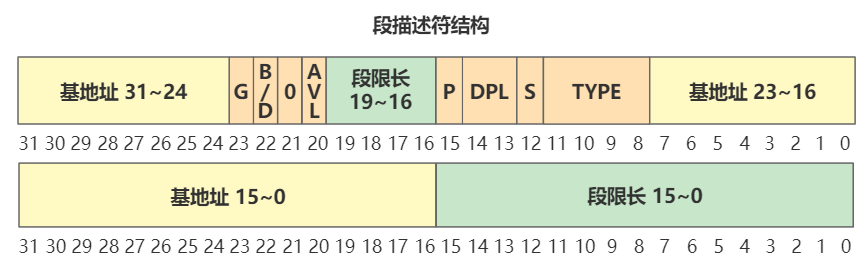
这里会加载idt和gdt。以gdt为例解释一下:
gdt:
	.word	0,0,0,0		# dummy

	.word	0x07FF		# 8Mb - limit=2047 (2048*4096=8Mb),代码段描述符
	.word	0x0000		# base address=0,数据段描述符
	.word	0x9A00		# code read/exec
	.word	0x00C0		# granularity=4096, 386

	.word	0x07FF		# 8Mb - limit=2047 (2048*4096=8Mb)
	.word	0x0000		# base address=0
	.word	0x9200		# data read/write
	.word	0x00C0		# granularity=4096, 386

gdt_48: # 注意是小端序,0x800在低16位,0x9在高16位
	.word	0x800			# gdt limit=2048, 256 GDT entries
	.word   512+gdt, 0x9		# gdt base = 0X9xxxx,
	# 512+gdt is the real gdt after setup is moved to 0x9020 * 0x10
gdt_48 的高32位 为 gdt 在内存中的地址(gdt是setup文件的偏移,因为setup在内存中的起始位置为0x9020,所以要加上0x9020)
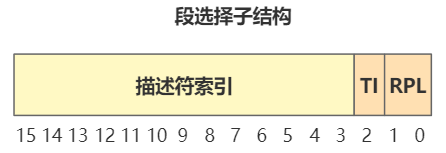
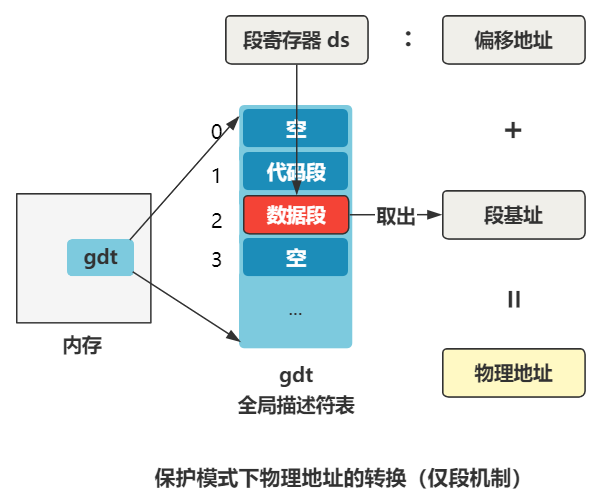
ds 寄存器里存储的值,在实模式下叫做段基址(段基址左移4位加上偏移得到物理地址),在保护模式下叫段选择子。段选择子里存储着段描述符的索引。
通过段描述符索引,可以从全局描述符表 gdt 中找到一个段描述符,段描述符里存储着段基址。
段基址取出来,再和偏移地址相加,就得到了物理地址,整个过程如下:
inb     $0x92, %al	# open A20 line(Fast Gate A20).
orb     $0b00000010, %al
outb    %al, $0x92
打开A20地址线。这是为了兼容20位模式,如果不打开,即使有32位地址线,高于20位的位也会被丢掉。
接下来是对可编程中断控制器 8259 芯片进行的编程。
因为中断号是不能冲突的, Intel 把 0 到 0x19 号中断都作为保留中断,比如 0 号中断就规定为除零异常,软件自定义的中断都应该放在这之后,但是 IBM 在原 PC 机中搞砸了,跟保留中断号发生了冲突,以后也没有纠正过来,所以我们得重新对其进行编程,不得不做,却又一点意思也没有。这是 Linus 在上面注释上的原话。
mov	%cr0, %eax	# get machine status(cr0|MSW)
bts	$0, %eax	# turn on the PE-bit
mov	%eax, %cr0	# protection enabled
启用保护模式(将cr0的第0位置为1)
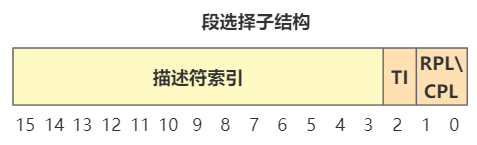
# segment-descriptor        (INDEX:TI:RPL)
	.equ	sel_cs0, 0x0008
	# select for code segment 0 (  001:0 :00)
	ljmp	$sel_cs0, $0	# jmp offset 0 of code segment 0 in gdt
对照段选择子的结构,可以知道 描述符索引值是 1,也就是要去 全局描述符表(gdt) 中找第一项段描述符。这里取的就是代码段描述符,段基址是 0,偏移也是 0,那加一块就还是 0,所以最终这个跳转指令,就是跳转到内存地址的 0 地址处,开始执行。就是操作系统全部代码的 system 这个大模块的起始处。
head
pg_dir: # 页目录在0地址处,会覆盖掉执行过的代码
.globl startup_32
startup_32:
movl $0x10,%eax
mov %ax,%ds
mov %ax,%es
mov %ax,%fs
mov %ax,%gs
lss stack_start,%esp
再往下连续五个 mov 操作,分别给 ds、es、fs、gs 这几个段寄存器赋值为 0x10,根据段描述符结构解析,表示这几个段寄存器的值为指向全局描述符表中的2号段描述符,也就是数据段描述符。
最后 lss 指令相当于让 ss:esp 这个栈顶指针指向了 _stack_start 这个标号的位置。
这个 stack_start 标号定义在了 sched.c 里:
long user_stack[4096 >> 2];
struct{
	long *a;
	short b;
} stack_start = { &user_stack[4096 >> 2], 0x10 };
stack_start 结构中的高位 16 字节是 0x10,将会赋值给 ss 栈段寄存器,低位 32 字节是 user_stack 这个数组的最后一个元素的地址值,将其赋值给 esp 寄存器。
赋值给 ss 的 0x10 仍然按照保护模式下的段选择子去解读,其指向的是全局描述符表中的第二个段描述符(数据段描述符),段基址是 0。
call setup_idt
call setup_gdt
movl $0x10,%eax		# reload all the segment registers
mov %ax,%ds		# after changing gdt. CS was already
mov %ax,%es		# reloaded in 'setup_gdt'
mov %ax,%fs
mov %ax,%gs
lss stack_start,%esp
重新设置idt和gdt,因为原来的是在setup中的,这块地方接下来要被缓冲区覆盖掉。所以这里重新将其设置在head中。因为重新设置了gdt,所以还要重新执行mov刷新一遍才能生效。
...
	jmp after_page_tables
...
after_page_tables:
	pushl $0		# These are the parameters to main :-)
	pushl $0
	pushl $0
	pushl $L6		# return address for main, if it decides to.
	pushl $main
	jmp setup_paging
L6:
	jmp L6			# main should never return here, but

.align 2
setup_paging:
	movl $1024*5,%ecx	/* 5 pages - pg_dir(页目录)占一页,4 个页表分别占一页 */
	xorl %eax,%eax
	xorl %edi,%edi		 /* pg_dir is at 0x000 */
	cld;rep;stosl        /* 将开头的5页内存清零 */
	movl $pg0+7,pg_dir	 /* set present r/w bit/user*/
	movl $pg1+7,pg_dir+4 /* 这里加7是为了将最低3位置1,即页存在,用户可读写*/
	movl $pg2+7,pg_dir+8
	movl $pg3+7,pg_dir+12
	movl $pg3+4092,%edi

.org 0x1000 pg0:
.org 0x2000 pg1:
.org 0x3000 pg2:
.org 0x4000 pg3:
.org 0x5000
setup_paging 会初始化分页机制,也就是设置好页目录和页表。注意 pg_dir 在 0地址,也就是将之前执行的代码覆盖掉,作为页目录,存储了四个页目录项。一个页表包含1024个页表项,1页为4KB,因此16M 的地址空间可以用 1 个页目录表 + 4 个页表搞定。
	movl $pg3+4092,%edi     /* 从最后一个页表的最后一个页表项开始 */
	movl $0xfff007,%eax		/*  16Mb - 4096 + 7 (r/w user,p) */
	std             /* 向低地址遍历 */
1:	stosl			/* fill pages backwards - more efficient :-) */
	subl $0x1000,%eax
	jge 1b
	cld
这一步通过一个循环来填充页表项,使得线性地址和对应的物理地址一样。
	xorl %eax,%eax		/* pg_dir is at 0x0000 */
	movl %eax,%cr3		/* cr3 - page directory start */
	movl %cr0,%eax
	orl $0x80000000,%eax
	movl %eax,%cr0		/* set paging (PG) bit */
这一步设置了页目录的起始地址(存储在cr3寄存器),并且设置cr0的最高位为1以开启分页。
ret /* this also flushes prefetch-queue */
ret会跳转到main函数。这是怎么实现的呢?注意到在 jmp setup_paging 之前压入了5个参数,实际上这是模拟call指令的压栈过程,因此ret后pop出栈顶作为返回地址,即可跳转到main函数执行。
	pushl $0		# These are the parameters to main :-)
	pushl $0
	pushl $0
	pushl $L6		# return address for main, if it decides to.
	pushl $main
	jmp setup_paging
main
内存初始化
void main(void) /* This really IS void, no error here. */
{ 	/* The startup routine assumes (well, ...) this */
	/* Interrupts are still disabled. Do necessary setups, then enable them */
	ROOT_DEV = ORIG_ROOT_DEV;
	drive_info = DRIVE_INFO;

	// EXT_MEM_K 是之前在setup中获取和设置的
	// EXT_MEM_K 存储的是系统从1MB开始的扩展内存数值,单位是KB,所以和以字节为单位的1MB相加时需要左移10位。
	memory_end = (1<<20) + (EXT_MEM_K<<10); // 忽略不到4KB(1页)的内存
	memory_end &= 0xfffff000;
	// 如果内存超过16MB,则按照16MB计算
	if (memory_end > 16*1024*1024)
		memory_end = 16*1024*1024;
	// 如果内存大于12MB则缓冲区末端为4MB
	if (memory_end > 12*1024*1024)
		buffer_memory_end = 4*1024*1024;
	// 如果内存大于6MB则缓冲区末端为2MB
	else if (memory_end > 6*1024*1024)
		buffer_memory_end = 2*1024*1024;
	// 剩下的情况,也就是内存为0MB---6MB,则缓冲区末端为1MB
	else
		buffer_memory_end = 1*1024*1024;
	// 主内存起始地址 = 缓冲区末端
	main_memory_start = buffer_memory_end;
	...
}
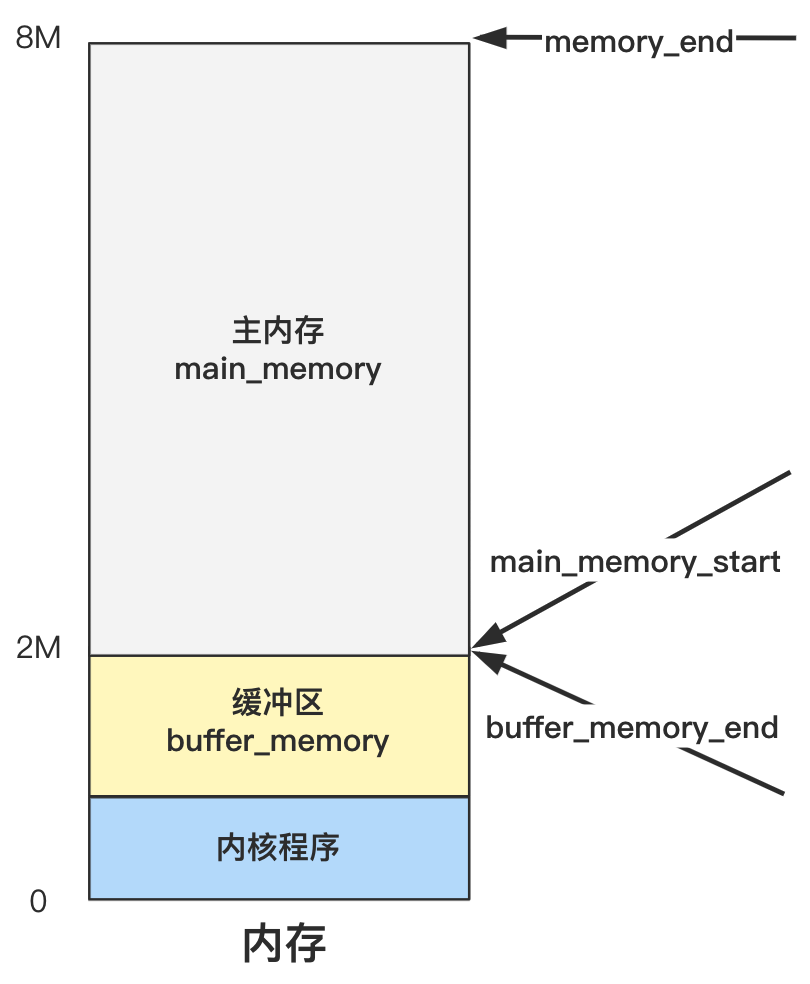
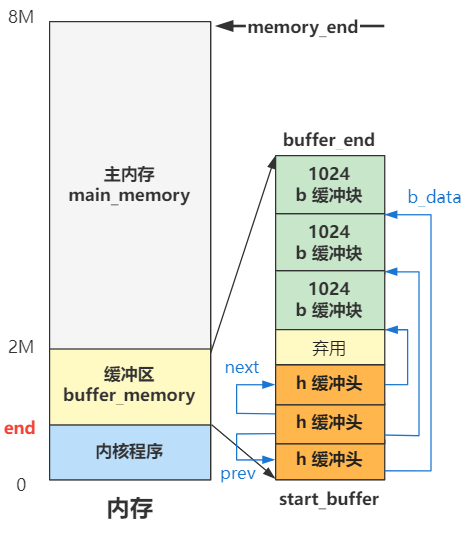
这一堆就是划定主内存和缓冲区,确定三个边界变量:buffer_memory_end、main_memory_start、memory_end
具体主内存区是如何管理和分配的,要看 mem_init 里做了什么。而缓冲区是如何管理和分配的,就要看再后面的 buffer_init 里干了什么。
先看mem_init
void mem_init(long start_mem, long end_mem)
{
	int i;

	HIGH_MEMORY = end_mem;
	for (i=0 ; i<PAGING_PAGES ; i++)
		mem_map[i] = USED;
	i = MAP_NR(start_mem);
	end_mem -= start_mem;
	end_mem >>= 12;
	while (end_mem-->0)
		mem_map[i++]=0;
}
就是对内存分页,mem_map这个数组的每一项管理一页。
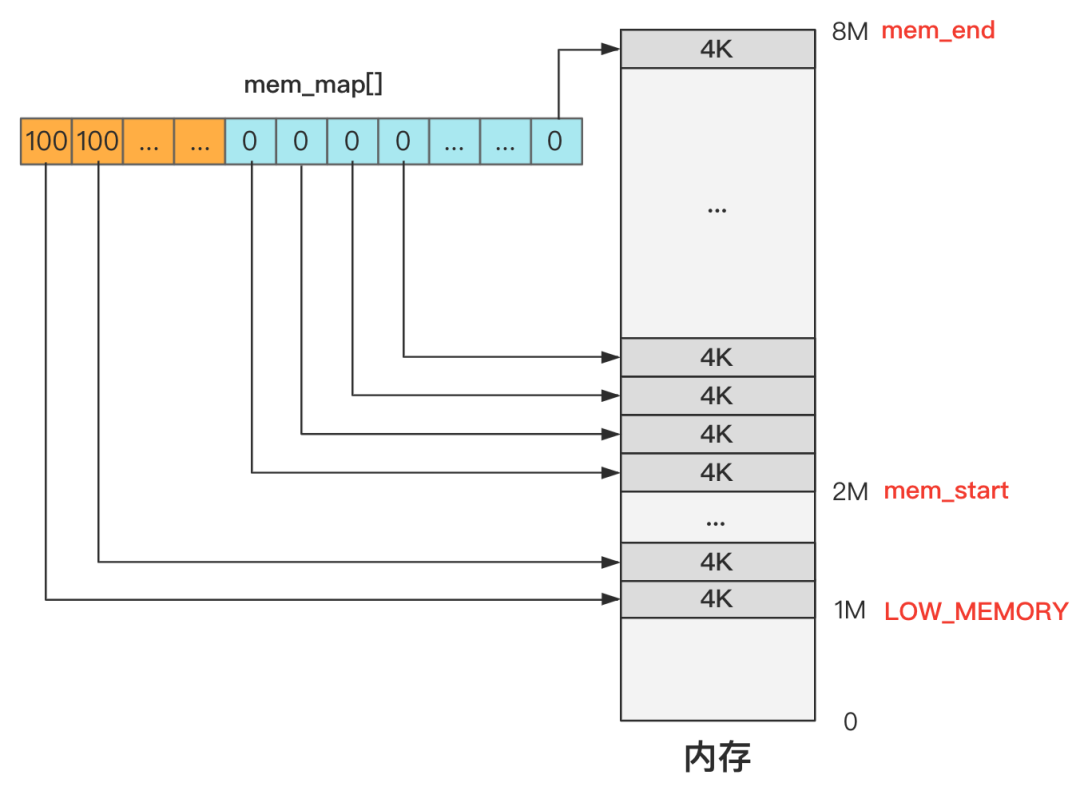
以上图为例:
- 1M 以下的内存这个数组干脆没有记录,这里的内存是无需管理的,或者换个说法是无权管理的,也就是没有权利申请和释放,因为这个区域是内核代码所在的地方,不能被“污染”。
- 1M 到 2M 这个区间是缓冲区,2M 是缓冲区的末端,缓冲区的开始在哪里之后再说,这些地方不是主内存区域,因此直接标记为 USED,产生的效果就是无法再被分配了。
- 2M 以上的空间是主内存区域,而主内存目前没有任何程序申请,所以初始化时统统都是零,未来等着应用程序去申请和释放这里的内存资源。
中断初始化
- trap_init:给0到48号中断设置中断处理函数
void trap_init(void)
{
int i;
set_trap_gate(0,÷_error);
set_trap_gate(1,&debug);
set_trap_gate(2,&nmi);
set_system_gate(3,&int3); /* int3-5 can be called from all */
set_system_gate(4,&overflow);
set_system_gate(5,&bounds);
set_trap_gate(6,&invalid_op);
set_trap_gate(7,&device_not_available);
set_trap_gate(8,&double_fault);
set_trap_gate(9,&coprocessor_segment_overrun);
set_trap_gate(10,&invalid_TSS);
set_trap_gate(11,&segment_not_present);
set_trap_gate(12,&stack_segment);
set_trap_gate(13,&general_protection);
set_trap_gate(14,&page_fault); // 缺页中断
set_trap_gate(15,&reserved);
set_trap_gate(16,&coprocessor_error);
for (i=17;i<48;i++)
set_trap_gate(i,&reserved);
set_trap_gate(45,&irq13);
outb_p(inb_p(0x21)&0xfb,0x21);
outb(inb_p(0xA1)&0xdf,0xA1);
set_trap_gate(39,¶llel_interrupt);
}
- tty_init:设置键盘中断的中断处理函数
- sti:开启中断(set interrupt flag)
#define sti() __asm__ ("sti"::)
块设备初始化
一次读盘的请求用一个request结果来表示,使用request数组维护所有的请求。
/*
 * The request-struct contains all necessary data
 * to load a nr of sectors into memory
 */
struct request request[NR_REQUEST];
/*
 * Ok, this is an expanded form so that we can use the same
 * request for paging requests when that is implemented. In
 * paging, 'bh' is NULL, and 'waiting' is used to wait for
 * read/write completion.
 */
struct request {
	int dev;		/* 设备号,-1 表示无请求 */
	int cmd;		/* READ or WRITE */
	int errors;
	unsigned long sector; /* 起始扇区 */
	unsigned long nr_sectors; /* 扇区数 */
	char * buffer; /* 数据缓冲区,读盘后数据放在内存中的位置 */
	struct task_struct * waiting; /* 哪个进程发起的请求 */
	struct buffer_head * bh; /* 缓冲区头指针 */
	struct request * next; /* 链表,指向下一个 */
};
void blk_dev_init(void)
{
	int i;

	for (i=0 ; i<NR_REQUEST ; i++) {
		request[i].dev = -1;
		request[i].next = NULL;
	}
}
时间初始化
static void time_init(void)
{
	struct tm time;

	do {
		time.tm_sec = CMOS_READ(0);
		time.tm_min = CMOS_READ(2);
		time.tm_hour = CMOS_READ(4);
		time.tm_mday = CMOS_READ(7);
		time.tm_mon = CMOS_READ(8);
		time.tm_year = CMOS_READ(9);
	} while (time.tm_sec != CMOS_READ(0));
	BCD_TO_BIN(time.tm_sec);
	BCD_TO_BIN(time.tm_min);
	BCD_TO_BIN(time.tm_hour);
	BCD_TO_BIN(time.tm_mday);
	BCD_TO_BIN(time.tm_mon);
	BCD_TO_BIN(time.tm_year);
	time.tm_mon--;
	startup_time = kernel_mktime(&time);
}
CMOS_READ 负责从CMOS指定端口读取时间数据
#define CMOS_READ(addr) ({ \
outb_p(0x80|addr,0x70); \
inb_p(0x71); \
})
进程调度初始化
void sched_init(void)
{
	int i;
	struct desc_struct * p;

	if (sizeof(struct sigaction) != 16)
		panic("Struct sigaction MUST be 16 bytes");
	// 设置init_task的TSS和LDT
	set_tss_desc(gdt+FIRST_TSS_ENTRY,&(init_task.task.tss));
	set_ldt_desc(gdt+FIRST_LDT_ENTRY,&(init_task.task.ldt));
	p = gdt+2+FIRST_TSS_ENTRY;
	// 余下的项清0
	for(i=1;i<NR_TASKS;i++) {
		task[i] = NULL;
		p->a=p->b=0;
		p++;
		p->a=p->b=0;
		p++;
	}
/* Clear NT, so that we won't have troubles with that later on */
	__asm__("pushfl ; andl $0xffffbfff,(%esp) ; popfl");
	ltr(0);
	lldt(0);
	// 设置定时器
	outb_p(0x36,0x43);		/* binary, mode 3, LSB/MSB, ch 0 */
	outb_p(LATCH & 0xff , 0x40);	/* LSB */
	outb(LATCH >> 8 , 0x40);	/* MSB */
	// 设置时钟中断处理程序
	set_intr_gate(0x20,&timer_interrupt);
	// 启用时钟中断
	outb(inb_p(0x21)&~0x01,0x21);
	// 设置系统调用处理函数
	set_system_gate(0x80,&system_call);
}
TSS 叫任务状态段,就是保存和恢复进程的上下文的,所谓上下文,其实就是各个寄存器的信息而已,这样进程切换的时候,才能做到保存和恢复上下文,继续执行。
struct tss_struct {
	long	back_link;	/* 16 high bits zero */
	long	esp0;
	long	ss0;		/* 16 high bits zero */
	long	esp1;
	long	ss1;		/* 16 high bits zero */
	long	esp2;
	long	ss2;		/* 16 high bits zero */
	long	cr3;
	long	eip;
	long	eflags;
	long	eax,ecx,edx,ebx;
	long	esp;
	long	ebp;
	long	esi;
	long	edi;
	long	es;		/* 16 high bits zero */
	long	cs;		/* 16 high bits zero */
	long	ss;		/* 16 high bits zero */
	long	ds;		/* 16 high bits zero */
	long	fs;		/* 16 high bits zero */
	long	gs;		/* 16 high bits zero */
	long	ldt;		/* 16 high bits zero */
	long	trace_bitmap;	/* bits: trace 0, bitmap 16-31 */
	struct i387_struct i387;
};
而 LDT 叫局部描述符表,是与 GDT 全局描述符表相对应的,内核态的代码用 GDT 里的数据段和代码段,而用户进程的代码用每个用户进程自己的 LDT 里的数据段和代码段。
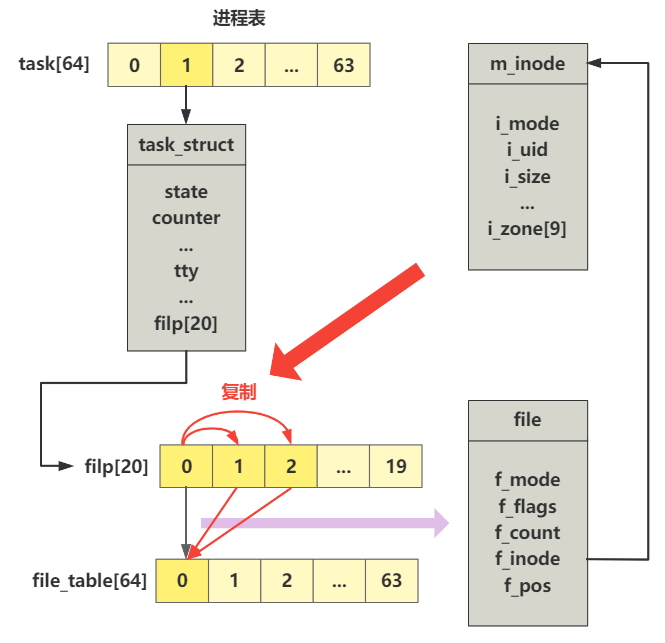
每个进程用一个 task_struct 表示,里面就有 ldt 和 tss 两个成员。ldt包含三项,分别为0、cs(代码段)、ds&ss(数据段)
struct task_struct {
/* these are hardcoded - don't touch */
	long state;	/* -1 unrunnable, 0 runnable, >0 stopped */
	long counter;
	long priority;
	long signal;
	struct sigaction sigaction[32];
	long blocked;	/* bitmap of masked signals */
/* various fields */
	int exit_code;
	unsigned long start_code,end_code,end_data,brk,start_stack;
	long pid,father,pgrp,session,leader;
	unsigned short uid,euid,suid;
	unsigned short gid,egid,sgid;
	long alarm;
	long utime,stime,cutime,cstime,start_time;
	unsigned short used_math;
/* file system info */
	int tty;		/* -1 if no tty, so it must be signed */
	unsigned short umask;
	struct m_inode * pwd;
	struct m_inode * root;
	struct m_inode * executable;
	unsigned long close_on_exec;
	struct file * filp[NR_OPEN];
/* ldt for this task 0 - zero 1 - cs 2 - ds&ss */
	struct desc_struct ldt[3];
/* tss for this task */
	struct tss_struct tss;
};
缓冲区初始化
缓冲区被分成一个个1024byte的块,每个块对应一个buffer_head
struct buffer_head {
	char * b_data;			/* pointer to data block (1024 bytes) */
	unsigned long b_blocknr;	/* block number */
	unsigned short b_dev;		/* device (0 = free) */
	unsigned char b_uptodate;
	unsigned char b_dirt;		/* 0-clean,1-dirty */
	unsigned char b_count;		/* users using this block */
	unsigned char b_lock;		/* 0 - ok, 1 -locked */
	struct task_struct * b_wait;
	struct buffer_head * b_prev;
	struct buffer_head * b_next;
	struct buffer_head * b_prev_free;
	struct buffer_head * b_next_free;
};
extern int end; // end 是链接器计算出的内核代码的末尾地址
struct buffer_head * start_buffer = (struct buffer_head *) &end;

void buffer_init(long buffer_end)
{
	struct buffer_head * h = start_buffer;
	void * b;
	int i;

	if (buffer_end == 1<<20)
		b = (void *) (640*1024);
	else
		b = (void *) buffer_end;
	// 缓冲区结尾侧的 b 每次循环 -1024,也就是一页的值,缓冲区开头侧的 h 每次循环 +1(一个 buffer_head 大小的内存),直到碰一块为止。
	while ( (b -= BLOCK_SIZE) >= ((void *) (h+1)) ) {
		h->b_dev = 0;
		h->b_dirt = 0;
		h->b_count = 0;
		h->b_lock = 0;
		h->b_uptodate = 0;
		h->b_wait = NULL;
		h->b_next = NULL;
		h->b_prev = NULL;
		h->b_data = (char *) b;
		h->b_prev_free = h-1;
		h->b_next_free = h+1;
		h++;
		NR_BUFFERS++;
		if (b == (void *) 0x100000)
			b = (void *) 0xA0000;
	}
	h--;
	free_list = start_buffer;
	free_list->b_prev_free = h;
	h->b_next_free = free_list;
	for (i=0;i<NR_HASH;i++)
		hash_table[i]=NULL;
}
硬盘初始化
void hd_init(void)
{
	blk_dev[MAJOR_NR].request_fn = DEVICE_REQUEST; // 初始化硬盘的请求处理函数
	set_intr_gate(0x2E,&hd_interrupt); // 设置硬盘中断的处理函数
	// 允许硬盘控制器发送中断请求信号
	outb_p(inb_p(0x21)&0xfb,0x21);
	outb(inb_p(0xA1)&0xbf,0xA1);
}
/* blk_dev_struct is:
 *	do_request-address
 *	next-request
 */
struct blk_dev_struct blk_dev[NR_BLK_DEV] = {
	{ NULL, NULL },		/* no_dev */
	{ NULL, NULL },		/* dev mem */
	{ NULL, NULL },		/* dev fd */
	{ NULL, NULL },		/* dev hd */
	{ NULL, NULL },		/* dev ttyx */
	{ NULL, NULL },		/* dev tty */
	{ NULL, NULL }		/* dev lp */
};
一个新进程的产生
move_to_user_mode
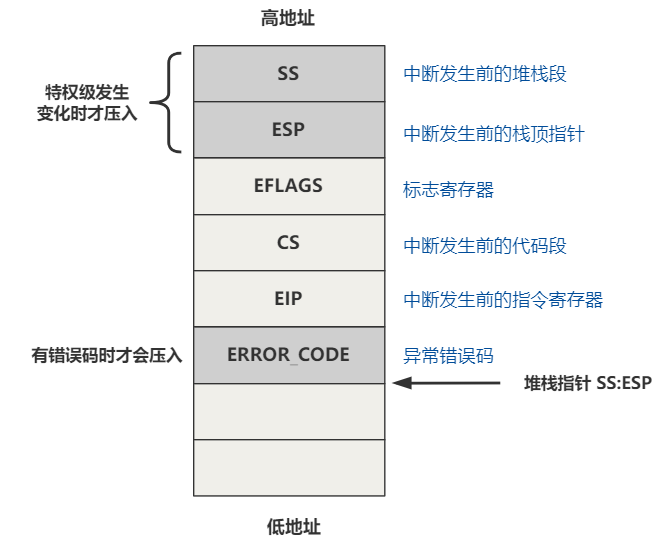
数据访问只能高特权级访问低特权级,代码跳转只能同特权级跳转,要想实现特权级转换,可以通过中断和中断返回来实现。
没有中断,就构造中断,中断发生时会按顺序push 5个寄存器,中断返回时再pop出来,我们只需要在自己push的值里面做点手脚,把特权级设置成用户态,中断返回后就是处于用户态了。
#define move_to_user_mode() \
__asm__ ("movl %%esp,%%eax\n\t" \
	"pushl $0x17\n\t" \ 	// SS
	"pushl %%eax\n\t" \ 	// ESP
	"pushfl\n\t" \ 			// EFLAGS
	"pushl $0x0f\n\t" \ 	// CS
	"pushl $1f\n\t" \ 		// EIP
	"iret\n" \
	"1:\tmovl $0x17,%%eax\n\t" \
	"movw %%ax,%%ds\n\t" \
	"movw %%ax,%%es\n\t" \
	"movw %%ax,%%fs\n\t" \
	"movw %%ax,%%gs" \
	:::"ax")
iret 返回后,pop出我们push的值给相应的寄存器,因此:
- CS = 0x0f
- EIP = 标签1的地址
段选择子最后两位 11 表示特权级为 3,即用户态。倒数第三位 TI 表示,前面的描述符索引,是从 GDT 还是 LDT 中取,1 表示 LDT,也就是从局部描述符表中取。而LDT的第二项刚好就是代码段描述符。因此只需要让最后三位为1,iret返回后自然就是用户态了。
进程调度
我们在shed_init中设置过时钟中断的处理函数:
set_intr_gate(0x20,&timer_interrupt);
这样,当时钟中断,也就是 0x20 号中断来临时,CPU 会查找中断向量表中 0x20 处的函数地址,即中断处理函数,并跳转过去执行。
.align 2
timer_interrupt:
	push %ds		# save ds,es and put kernel data space
	push %es		# into them. %fs is used by _system_call
	push %fs
	pushl %edx		# we save %eax,%ecx,%edx as gcc doesn't
	pushl %ecx		# save those across function calls. %ebx
	pushl %ebx		# is saved as we use that in ret_sys_call
	pushl %eax
	movl $0x10,%eax
	mov %ax,%ds
	mov %ax,%es
	movl $0x17,%eax
	mov %ax,%fs
	incl jiffies
	movb $0x20,%al		# EOI to interrupt controller #1
	outb %al,$0x20
	movl CS(%esp),%eax  # 发生中断时处理器自动压入CS,这里读取出来,检查CPL(current privilege level)
	andl $3,%eax		# %eax is CPL (0 or 3, 0=supervisor)
	pushl %eax			# CPL 作为参数
	call do_timer		# 'do_timer(long CPL)' does everything from
	addl $4,%esp		# task switching to accounting ...
	jmp ret_from_sys_call
timer_interrupt 函数做了两件事,一个是将系统滴答数这个变量 jiffies 加一,一个是调用了另一个函数 do_timer。
void do_timer(long cpl)
{
	extern int beepcount;
	extern void sysbeepstop(void);

	if (beepcount)
		if (!--beepcount)
			sysbeepstop();

	if (cpl)
		current->utime++;
	else
		current->stime++;

	...
	if (current_DOR & 0xf0)
		do_floppy_timer();
	if ((--current->counter)>0) return; // 时间片未到0,返回
	current->counter=0;
	if (!cpl) return; // 如果当前是内核态则不调度
	schedule(); // 时间片到0,且为用户模式,进行调度。
}
#define FIRST_TASK task[0]
#define LAST_TASK task[NR_TASKS-1]
void schedule(void)
{
	int i,next,c;
	struct task_struct ** p;

/* check alarm, wake up any interruptible tasks that have got a signal */

	for(p = &LAST_TASK ; p > &FIRST_TASK ; --p)
		if (*p) {
			if ((*p)->alarm && (*p)->alarm < jiffies) {
					(*p)->signal |= (1<<(SIGALRM-1));
					(*p)->alarm = 0;
				}
				// (*p)->signal 表示待处理的信号
				// ~(_BLOCKABLE & (*p)->blocked)) 表示未被屏蔽的信号
				// TASK_INTERRUPTIBLE: 处于睡眠状态,并且等待某个信号
			if (((*p)->signal & ~(_BLOCKABLE & (*p)->blocked)) &&
			(*p)->state==TASK_INTERRUPTIBLE)
				(*p)->state=TASK_RUNNING;
		}

/* this is the scheduler proper: */

	while (1) {
		c = -1; // 所有进程剩余时间片的最大值
		next = 0; // 最大剩余时间片进程的索引
		i = NR_TASKS;
		p = &task[NR_TASKS];
		while (--i) {
			if (!*--p)
				continue;
			if ((*p)->state == TASK_RUNNING && (*p)->counter > c)
				c = (*p)->counter, next = i;
		}
		if (c) break; // 如果存在一个剩余时间片不为0的任务,则break,否则设置所有任务的剩余时间片
		for(p = &LAST_TASK ; p > &FIRST_TASK ; --p)
			if (*p)
				(*p)->counter = ((*p)->counter >> 1) +
						(*p)->priority;
	}
	// 切换到目标进程
	switch_to(next);
}
#define FIRST_TSS_ENTRY 4
#define FIRST_LDT_ENTRY (FIRST_TSS_ENTRY+1)
#define _TSS(n) ((((unsigned long) n)<<4)+(FIRST_TSS_ENTRY<<3))
// FIRST_TSS_ENTRY<<3表示左移3位,因为TI和RPL总共占3位
// n<<4,实际上索引加上 n<<1,因为一个进程占一个TSS和一个LDT
#define _LDT(n) ((((unsigned long) n)<<4)+(FIRST_LDT_ENTRY<<3))
/*
 *	switch_to(n) should switch tasks to task nr n, first
 * checking that n isn't the current task, in which case it does nothing.
 * This also clears the TS-flag if the task we switched to has used
 * tha math co-processor latest.
 */
#define switch_to(n) {\
struct {long a,b;} __tmp; \
__asm__("cmpl %%ecx,current\n\t" # 先比较是不是要切换到当前任务 \
	"je 1f\n\t" # 如果是就什么都不做 \
	"movw %%dx,%1\n\t" # 把TSS赋给__tmp.b \
	"xchgl %%ecx,current\n\t" # 交换 ecx 和 current \
	"ljmp *%0\n\t" # 将__tmp.b作为段选择子 \
	"cmpl %%ecx,last_task_used_math\n\t" \
	"jne 1f\n\t" \
	"clts\n" \
	"1:" \
	::"m" (*&__tmp.a),"m" (*&__tmp.b), \
	"d" (_TSS(n)),"c" ((long) task[n])); \
}
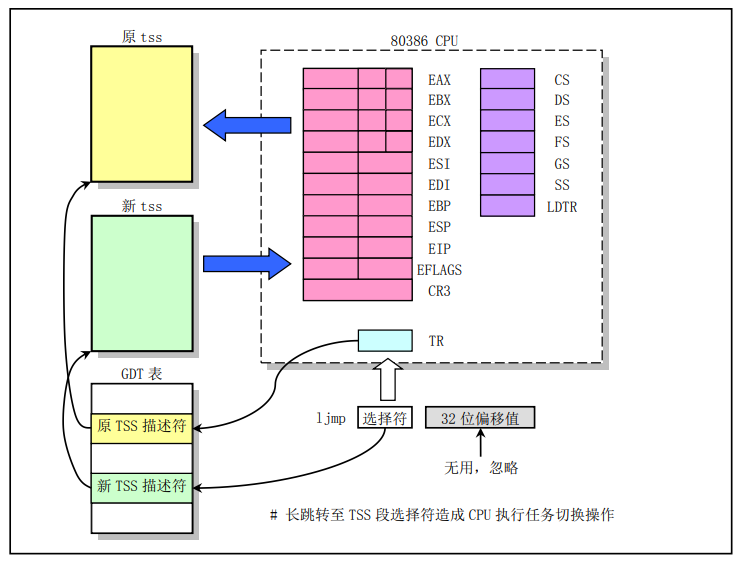
这里 "d" (_TSS(n)) 表示把要切换到的进程的TSS段选择子加载给 edx,"c" ((long) task[n]) 表示把要切换到的进程的任务结构指针加载给 ecx
CPU 规定,如果 ljmp 指令后面跟的是一个 tss 段选择子,那么,会由硬件将当前各个寄存器的值保存在当前进程的 tss 中,并将新进程的 tss 信息加载到各个寄存器。 CPU得到TSS描述符后,就会将其加载到任务寄存器TR中,然后根据TSS描述符的信息(主要是基址)找到任务的tss内容(包括所有的寄存器信息,如eip),根据其内容就可以开始新任务的运行。
那么CPU怎么识别描述符是TSS描述符而不是其他描述符呢?这是因为所有描述符(一个描述符是64位)中都有4位用来指示该描述符的类型,如描述符类型值是9或11都表示该描述符是TSS描述符。
fork
#define _syscall0(type,name) \
  type name(void) \
{ \
long __res; \
__asm__ volatile ("int $0x80" \
	: "=a" (__res) \
	: "0" (__NR_##name)); \
if (__res >= 0) \
	return (type) __res; \
errno = -__res; \
return -1; \
}
static inline _syscall0(int,fork)
宏展开:
int fork(void) {
     volatile long __res;
    _asm {
        _asm mov eax,__NR_fork
        _asm int 80h
        _asm mov __res,eax
    }
    if (__res >= 0)
        return (void) __res;
    errno = -__res;
    return -1;
}
系统调用统一通过 int 0x80 中断来进入,具体调用这个表里的哪个功能函数,就由 eax 寄存器传过来,这里的值是个数组索引的下标,通过这个下标就可以找到在 sys_call_table 这个数组里的具体函数。
.align 2
system_call:
	cmpl $nr_system_calls-1,%eax
	ja bad_sys_call
	push %ds
	push %es
	push %fs
	pushl %edx
	pushl %ecx		# push %ebx,%ecx,%edx as parameters
	pushl %ebx		# to the system call
	movl $0x10,%edx		# set up ds,es to kernel space
	mov %dx,%ds
	mov %dx,%es
	movl $0x17,%edx		# fs points to local data space
	mov %dx,%fs
	call *sys_call_table(,%eax,4)
	pushl %eax
	movl current,%eax
	cmpl $0,state(%eax)		# state
	jne reschedule
	cmpl $0,counter(%eax)		# counter
	je reschedule
ret_from_sys_call:
	movl current,%eax		# task[0] cannot have signals
	cmpl task,%eax
	je 3f
	cmpw $0x0f,CS(%esp)		# was old code segment supervisor ?
	jne 3f
	cmpw $0x17,OLDSS(%esp)		# was stack segment = 0x17 ?
	jne 3f
	movl signal(%eax),%ebx
	movl blocked(%eax),%ecx
	notl %ecx
	andl %ebx,%ecx
	bsfl %ecx,%ecx
	je 3f
	btrl %ecx,%ebx
	movl %ebx,signal(%eax)
	incl %ecx
	pushl %ecx
	call do_signal
	popl %eax
3:	popl %eax
	popl %ebx
	popl %ecx
	popl %edx
	pop %fs
	pop %es
	pop %ds
	iret
linux/sys.h 中可以找到 sys_call_table
fn_ptr sys_call_table[] = { sys_setup, sys_exit, sys_fork, sys_read,
sys_write, sys_open, sys_close, sys_waitpid, sys_creat, sys_link,
sys_unlink, sys_execve, sys_chdir, sys_time, sys_mknod, sys_chmod,
sys_chown, sys_break, sys_stat, sys_lseek, sys_getpid, sys_mount,
sys_umount, sys_setuid, sys_getuid, sys_stime, sys_ptrace, sys_alarm,
sys_fstat, sys_pause, sys_utime, sys_stty, sys_gtty, sys_access,
sys_nice, sys_ftime, sys_sync, sys_kill, sys_rename, sys_mkdir,
sys_rmdir, sys_dup, sys_pipe, sys_times, sys_prof, sys_brk, sys_setgid,
sys_getgid, sys_signal, sys_geteuid, sys_getegid, sys_acct, sys_phys,
sys_lock, sys_ioctl, sys_fcntl, sys_mpx, sys_setpgid, sys_ulimit,
sys_uname, sys_umask, sys_chroot, sys_ustat, sys_dup2, sys_getppid,
sys_getpgrp, sys_setsid, sys_sigaction, sys_sgetmask, sys_ssetmask,
sys_setreuid,sys_setregid, sys_iam, sys_whoami };
如果是fork,则会调用到sys_fork
.align 2
sys_fork:
	call find_empty_process
	testl %eax,%eax
	js 1f
	push %gs
	pushl %esi
	pushl %edi
	pushl %ebp
	pushl %eax
	call copy_process
	addl $20,%esp
1:	ret
int find_empty_process(void)
{
	int i;

	repeat:
		if ((++last_pid)<0) last_pid=1;
		for(i=0 ; i<NR_TASKS ; i++)
			if (task[i] && task[i]->pid == last_pid) goto repeat; // 如果last_pid被某个进程使用了,就增加last_pid
	for(i=1 ; i<NR_TASKS ; i++)
		if (!task[i]) // 找到一个空位
			return i;
	return -EAGAING;
}
/*
 *  Ok, this is the main fork-routine. It copies the system process
 * information (task[nr]) and sets up the necessary registers. It
 * also copies the data segment in it's entirety.
 */
int copy_process(int nr,long ebp,long edi,long esi,long gs,long none,
		long ebx,long ecx,long edx,
		long fs,long es,long ds,
		long eip,long cs,long eflags,long esp,long ss)
{
	struct task_struct *p;
	int i;
	struct file *f;

	p = (struct task_struct *) get_free_page(); // 为每个进程分配一页
	if (!p)
		return -EAGAIN;
	task[nr] = p; // 将新分配出的页的起始地址记录到task[]中,也就是把页的底部作为task_struct

	// NOTE!: the following statement now work with gcc 4.3.2 now, and you
	// must compile _THIS_ memcpy without no -O of gcc.#ifndef GCC4_3
	*p = *current;	/* NOTE! this doesn't copy the supervisor stack */
	p->state = TASK_UNINTERRUPTIBLE;
	p->pid = last_pid;
	p->father = current->pid;
	p->counter = p->priority;
	p->signal = 0;
	p->alarm = 0;
	p->leader = 0;		/* process leadership doesn't inherit */
	p->utime = p->stime = 0;
	p->cutime = p->cstime = 0;
	p->start_time = jiffies;
	p->tss.back_link = 0;
	// ss0 和 esp0 表示 0 特权级也就是内核态时的 ss:esp 的指向。
	p->tss.esp0 = PAGE_SIZE + (long) p; // 因此新分配的页的顶部作为内核栈
	p->tss.ss0 = 0x10;
	p->tss.eip = eip;
	p->tss.eflags = eflags;
	p->tss.eax = 0;
	p->tss.ecx = ecx;
	p->tss.edx = edx;
	p->tss.ebx = ebx;
	p->tss.esp = esp;
	p->tss.ebp = ebp;
	p->tss.esi = esi;
	p->tss.edi = edi;
	p->tss.es = es & 0xffff;
	p->tss.cs = cs & 0xffff;
	p->tss.ss = ss & 0xffff;
	p->tss.ds = ds & 0xffff;
	p->tss.fs = fs & 0xffff;
	p->tss.gs = gs & 0xffff;
	p->tss.ldt = _LDT(nr);
	p->tss.trace_bitmap = 0x80000000;
	if (last_task_used_math == current)
		__asm__("clts ; fnsave %0"::"m" (p->tss.i387));
	if (copy_mem(nr,p)) {
		task[nr] = NULL;
		free_page((long) p);
		return -EAGAIN;
	}
	for (i=0; i<NR_OPEN;i++)
		if ((f=p->filp[i]))
			f->f_count++;
	if (current->pwd)
		current->pwd->i_count++;
	if (current->root)
		current->root->i_count++;
	if (current->executable)
		current->executable->i_count++;
	set_tss_desc(gdt+(nr<<1)+FIRST_TSS_ENTRY,&(p->tss));
	set_ldt_desc(gdt+(nr<<1)+FIRST_LDT_ENTRY,&(p->ldt));
	p->state = TASK_RUNNING;	/* do this last, just in case */
	return last_pid;
}
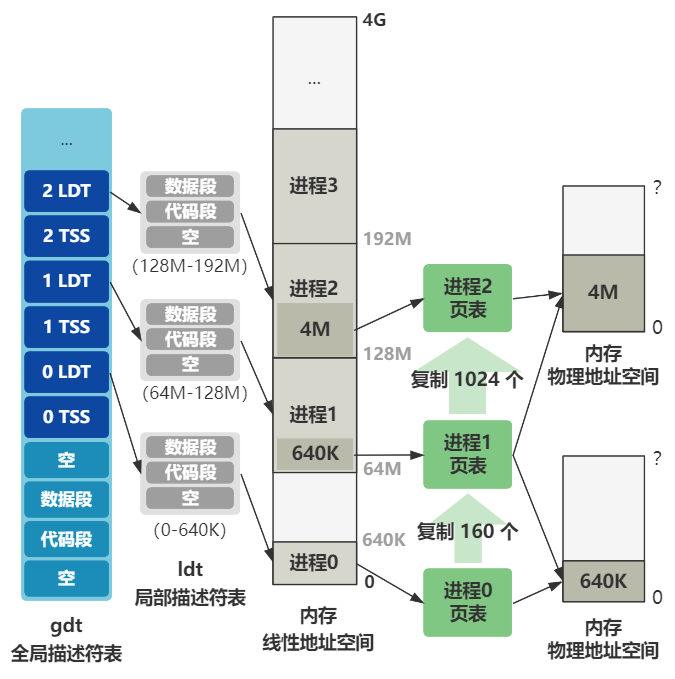
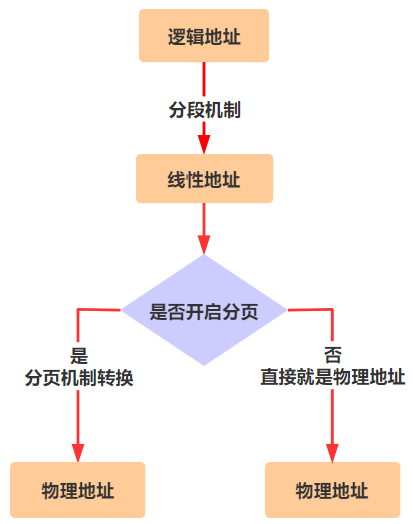
copy_mem 主要负责ldt的赋值,逻辑地址通过分段机制转为线性地址,线性地址再通过分页机制转为物理地址。
ldt保存了进程代码段和数据段的段选择子。
#define _set_base(addr,base)  \
__asm__ ("push %%edx\n\t" \
	"movw %%dx,%0\n\t" \
	"rorl $16,%%edx\n\t # edx >>= 16" \
	"movb %%dl,%1\n\t" \
	"movb %%dh,%2\n\t" \
	"pop %%edx" \
	::"m" (*((addr)+2)), \
	 "m" (*((addr)+4)), \
	 "m" (*((addr)+7)), \
	 "d" (base) \
	)
#define set_base(ldt,base) _set_base( ((char *)&(ldt)) , (base) )
// 一个段描述符通常是8字节,基地址占其中的4字节,分布在第2、第3、第4和第7字节中。
int copy_mem(int nr,struct task_struct * p)
{
	unsigned long old_data_base,new_data_base,data_limit;
	unsigned long old_code_base,new_code_base,code_limit;

	code_limit=get_limit(0x0f); // 取进程0设置好的段长
	data_limit=get_limit(0x17);
	old_code_base = get_base(current->ldt[1]);
	old_data_base = get_base(current->ldt[2]);
	if (old_data_base != old_code_base)
		panic("We don't support separate I&D");
	if (data_limit < code_limit)
		panic("Bad data_limit");
	new_data_base = new_code_base = nr * 0x4000000; // 每个进程占线性地址空间 64M
	p->start_code = new_code_base;
	set_base(p->ldt[1],new_code_base);
	set_base(p->ldt[2],new_data_base);
	if (copy_page_tables(old_data_base,new_data_base,data_limit)) {
		printk("free_page_tables: from copy_mem\n");
		free_page_tables(new_data_base,data_limit);
		return -ENOMEM;
	}
	return 0;
}
copy_mem 最后进行了 copy_page_tables ,将老进程的页表拷贝给新进程,让新旧进程共享同一份物理地址空间
/*
 *  Well, here is one of the most complicated functions in mm. It
 * copies a range of linerar addresses by copying only the pages.
 * Let's hope this is bug-free, 'cause this one I don't want to debug :-)
 *
 * Note! We don't copy just any chunks of memory - addresses have to
 * be divisible by 4Mb (one page-directory entry), as this makes the
 * function easier. It's used only by fork anyway.
 *
 * NOTE 2!! When from==0 we are copying kernel space for the first
 * fork(). Then we DONT want to copy a full page-directory entry, as
 * that would lead to some serious memory waste - we just copy the
 * first 160 pages - 640kB. Even that is more than we need, but it
 * doesn't take any more memory - we don't copy-on-write in the low
 * 1 Mb-range, so the pages can be shared with the kernel. Thus the
 * special case for nr=xxxx.
 */
int copy_page_tables(unsigned long from,unsigned long to,long size)
{
	unsigned long * from_page_table;
	unsigned long * to_page_table;
	unsigned long this_page;
	unsigned long * from_dir, * to_dir;
	unsigned long nr;

	if ((from&0x3fffff) || (to&0x3fffff))
		panic("copy_page_tables called with wrong alignment");
	from_dir = (unsigned long *) ((from>>20) & 0xffc); /* _pg_dir = 0 */
	to_dir = (unsigned long *) ((to>>20) & 0xffc);
	size = ((unsigned) (size+0x3fffff)) >> 22;
	for( ; size-->0 ; from_dir++,to_dir++) {
		if (1 & *to_dir)
			panic("copy_page_tables: already exist");
		if (!(1 & *from_dir))
			continue;
		from_page_table = (unsigned long *) (0xfffff000 & *from_dir);
		if (!(to_page_table = (unsigned long *) get_free_page())) // 分配一个页作为页表
			return -1;	/* Out of memory, see freeing */
		*to_dir = ((unsigned long) to_page_table) | 7; // 页表地址填入页目录
		nr = (from==0)?0xA0:1024;
		for ( ; nr-- > 0 ; from_page_table++,to_page_table++) { // 从from_page_table拷贝页表项到to_page_table
			this_page = *from_page_table;
			if (!(1 & this_page))
				continue;
			this_page &= ~2; // 设置为只读,实现Copy On Write,新老进程一开始共享同一个物理内存空间,如果只有读,那就相安无事,但如果任何一方有写操作,由于页面是只读的,将触发缺页中断,然后就会分配一块新的物理内存给产生写操作的那个进程,此时这一块内存就不再共享了。
			*to_page_table = this_page;
			if (this_page > LOW_MEM) {
				*from_page_table = this_page;
				this_page -= LOW_MEM;
				this_page >>= 12;
				mem_map[this_page]++;
			}
		}
	}
	invalidate();
	return 0;
}
shell 的到来
由于 fork 函数一调用,就又多出了一个进程,子进程(进程 1)会返回 0,父进程(进程 0)返回子进程的 ID,所以 init 函数只有进程 1 才会执行。
void main(void) {
    ...
    move_to_user_mode();
    if (!fork()) {
        init();
    }
    for(;;) pause();
}
void init(void) {
...
  setup((void *) &drive_info);
...
}
setup 是个系统调用,会通过中断最终调用到 sys_setup 函数
setup 传入的drive_info 是来自内存 0x90080 的数据,这部分是由之前 setup.s 程序将硬盘 1 的参数信息放在这里了,包括柱面数、磁头数、扇区数等信息。
#define MAX_HD		2
struct hd_i_struct { // 硬盘参数
    int head; // 磁头数
	int sect; // 每磁道扇区数
	int cyl; // 柱面数
	int wpcom; // 写前预补偿柱面号
	int lzone; // 磁头着陆区柱面号
	int ctl; // 控制字节
};
struct hd_i_struct hd_info[] = { {0,0,0,0,0,0},{0,0,0,0,0,0} };
static struct hd_struct { // 硬盘分区
    long start_sect; // 开始扇区
    long nr_sects; // 总扇区数
} hd[5*MAX_HD] = {}

struct partition {
	unsigned char boot_ind;		/* 0x80 - active (unused) */
	unsigned char head;		/* ? */
	unsigned char sector;		/* ? */
	unsigned char cyl;		/* ? */
	unsigned char sys_ind;		/* ? */
	unsigned char end_head;		/* ? */
	unsigned char end_sector;	/* ? */
	unsigned char end_cyl;		/* ? */
	unsigned int start_sect;	/* starting sector counting from 0 */
	unsigned int nr_sects;		/* nr of sectors in partition */
};

int sys_setup(void * BIOS)
{
	static int callable = 1; // callable 保证 sys_setup 只被调用一次
	int i,drive;
	unsigned char cmos_disks;
	struct partition *p;
	struct buffer_head * bh;

	if (!callable)
		return -1;
	callable = 0;
#ifndef HD_TYPE
	for (drive=0 ; drive<2 ; drive++) {
		hd_info[drive].cyl = *(unsigned short *) BIOS;
		hd_info[drive].head = *(unsigned char *) (2+BIOS);
		hd_info[drive].wpcom = *(unsigned short *) (5+BIOS);
		hd_info[drive].ctl = *(unsigned char *) (8+BIOS);
		hd_info[drive].lzone = *(unsigned short *) (12+BIOS);
		hd_info[drive].sect = *(unsigned char *) (14+BIOS);
		BIOS += 16;
	}
	if (hd_info[1].cyl)
		NR_HD=2;
	else
		NR_HD=1;
#endif
	// 设置硬盘分区表
	for (i=0 ; i<NR_HD ; i++) {
		hd[i*5].start_sect = 0;
		// 总扇区数 = 磁头数 * 每磁道扇区数 * 柱面数
		hd[i*5].nr_sects = hd_info[i].head * hd_info[i].sect * hd_info[i].cyl;
	}

	if ((cmos_disks = CMOS_READ(0x12)) & 0xf0)
		if (cmos_disks & 0x0f)
			NR_HD = 2;
		else
			NR_HD = 1;
	else
		NR_HD = 0;
	for (i = NR_HD ; i < 2 ; i++) {
		hd[i*5].start_sect = 0;
		hd[i*5].nr_sects = 0;
	}
	for (drive=0 ; drive<NR_HD ; drive++) {
		// 0x300:第一块设备的主设备号
		// 0:读取第一个块
		if (!(bh = bread(0x300 + drive*5,0))) {
			printk("Unable to read partition table of drive %d\n\r",
				drive);
			panic("");
		}
		// 检查魔数
		if (bh->b_data[510] != 0x55 || (unsigned char)
		    bh->b_data[511] != 0xAA) {
			printk("Bad partition table on drive %d\n\r",drive);
			panic("");
		}
		// 硬盘分区表的信息在硬盘的第一个扇区的 0x1BE 偏移处
		p = 0x1BE + (void *)bh->b_data;
		for (i=1;i<5;i++,p++) {
			hd[i+5*drive].start_sect = p->start_sect;
			hd[i+5*drive].nr_sects = p->nr_sects;
		}
		brelse(bh);
	}
	if (NR_HD)
		printk("Partition table%s ok.\n\r",(NR_HD>1)?"s":"");
	rd_load();
	mount_root();
	return (0);
}
setup 方法中的最后一个函数 mount_root,加载根文件系统。有了根文件系统之后,操作系统才能从一个根儿开始找到所有存储在硬盘中的文件,所以它是文件系统的基石,很重要。
从整体上说,它就是要把硬盘中的数据,以文件系统的格式进行解读,加载到内存中设计好的数据结构,这样操作系统就可以通过内存中的数据,以文件系统的方式访问硬盘中的一个个文件了。
struct m_inode {
	unsigned short i_mode;
	unsigned short i_uid;
	unsigned long i_size;
	unsigned long i_mtime;
	unsigned char i_gid;
	unsigned char i_nlinks;
	unsigned short i_zone[9];
/* these are in memory also */
	struct task_struct * i_wait;
	unsigned long i_atime;
	unsigned long i_ctime;
	unsigned short i_dev;
	unsigned short i_num;
	unsigned short i_count;
	unsigned char i_lock;
	unsigned char i_dirt;
	unsigned char i_pipe;
	unsigned char i_mount;
	unsigned char i_seek;
	unsigned char i_update;
};
struct file {
	unsigned short f_mode;
	unsigned short f_flags;
	unsigned short f_count;
	struct m_inode * f_inode;
	off_t f_pos;
};
struct super_block {
	unsigned short s_ninodes; // inode 的总数
	unsigned short s_nzones;
	unsigned short s_imap_blocks;
	unsigned short s_zmap_blocks;
	unsigned short s_firstdatazone;
	unsigned short s_log_zone_size;
	unsigned long s_max_size;
	unsigned short s_magic;
/* These are only in memory */
	struct buffer_head * s_imap[8];
	struct buffer_head * s_zmap[8];
	unsigned short s_dev;
	struct m_inode * s_isup;
	struct m_inode * s_imount;
	unsigned long s_time;
	struct task_struct * s_wait;
	unsigned char s_lock;
	unsigned char s_rd_only;
	unsigned char s_dirt;
};

#define NR_FILE 64
struct file file_table[NR_FILE];
void mount_root(void)
{
	int i,free;
	struct super_block * p;
	struct m_inode * mi;

	for(i=0;i<NR_FILE;i++)
		file_table[i].f_count=0; // f_count 表示被引用的次数
	for(p = &super_block[0] ; p < &super_block[NR_SUPER] ; p++) {
		p->s_dev = 0;
		p->s_lock = 0;
		p->s_wait = NULL;
	}
	if (!(p=read_super(ROOT_DEV))) // 读取硬盘的超级块信息到内存中来
		panic("Unable to mount root");
	if (!(mi=iget(ROOT_DEV,ROOT_INO))) // 读取根 inode 信息
		panic("Unable to read root i-node");
	mi->i_count += 3 ;	/* NOTE! it is logically used 4 times, not 1 */
	p->s_isup = p->s_imount = mi;
	current->pwd = mi;
	current->root = mi;
	free=0;
	i=p->s_nzones;
	while (-- i >= 0)
		if (!set_bit(i&8191,p->s_zmap[i>>13]->b_data))
			free++;
	printk("%d/%d free blocks\n\r",free,p->s_nzones);
	free=0;
	i=p->s_ninodes+1;
	while (-- i >= 0)
		if (!set_bit(i&8191,p->s_imap[i>>13]->b_data))
			free++;
	printk("%d/%d free inodes\n\r",free,p->s_ninodes);
}
首先硬盘中的文件系统,无非就是硬盘中的一堆数据,我们按照一定格式去解析罢了。Linux-0.11 中的文件系统是 MINIX 文件系统,它就长成这个样子。

每一个块结构的大小是 1024 字节,也就是 1KB,硬盘里的数据就按照这个结构,妥善地安排在硬盘里。
可是硬盘中凭什么就有了这些信息呢?这就是个鸡生蛋蛋生鸡的问题了。你可以先写一个操作系统,然后给一个硬盘做某种文件系统类型的格式化,这样你就得到一个有文件系统的硬盘了,有了这个硬盘,你的操作系统就可以成功启动了。
MINIX 文件系统的格式:
- 引导块就是我们系列最开头说的启动区,当然不一定所有的硬盘都有启动区,但我们还是得预留出这个位置,以保持格式的统一。
- 超级块用于描述整个文件系统的整体信息,我们看它的字段就知道了,有后面的 inode 数量,块数量,第一个块在哪里等信息。有了它,整个硬盘的布局就清晰了。
- inode 位图和块位图,就是位图的基本操作和作用了,表示后面 inode 和块的使用情况。
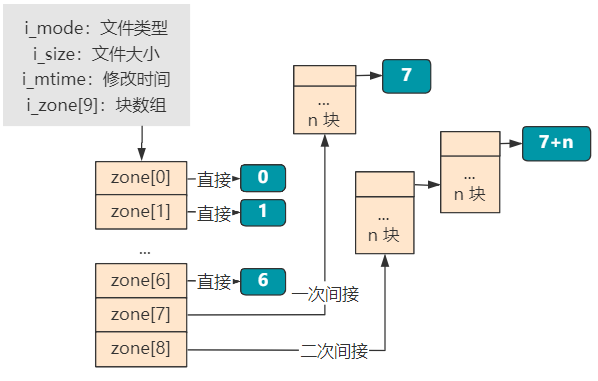
- inode 存放着每个文件或目录的元信息和索引信息,元信息就是文件类型、文件大小、修改时间等,索引信息就是大小为 9 的 i_zone[9] 块数组,表示这个文件或目录的具体数据占用了哪些块。其中块数组里,0~6 表示直接索引,7 表示一次间接索引,8 表示二次间接索引。当文件比较小时,比如只占用 2 个块就够了,那就只需要 zone[0] 和 zone[1] 两个直接索引即可。
再往后,就都是存放具体文件或目录实际信息的块了。如果是一个普通文件类型的 inode 指向的块,那里面就直接是文件的二进制信息。如果是一个目录类型的 inode 指向的块,那里面存放的就是这个目录下的文件和目录的 inode 索引以及文件或目录名称等信息。
init 接下来会调用open打开"/dev/tty0"文件
	(void) open("/dev/tty0",O_RDWR,0);
	(void) dup(0);
	(void) dup(0);
int sys_open(const char * filename,int flag,int mode)
{
	struct m_inode * inode;
	struct file * f;
	int i,fd;

	mode &= 0777 & ~current->umask;
	// 在进程文件描述符数组 filp 中找到一个空闲项
	for(fd=0 ; fd<NR_OPEN ; fd++)
		if (!current->filp[fd])
			break;
	if (fd>=NR_OPEN)
		return -EINVAL;
	current->close_on_exec &= ~(1<<fd);
	// 在系统文件表 file_table 中找到一个空闲项
	f=0+file_table;
	for (i=0 ; i<NR_FILE ; i++,f++)
		if (!f->f_count) break;
	if (i>=NR_FILE)
		return -EINVAL;
	// 将进程的文件描述符数组项和系统的文件表项,对应起来
	(current->filp[fd]=f)->f_count++;
	// 根据文件名从文件系统中找到这个文件
	if ((i=open_namei(filename,flag,mode,&inode))<0) {
		current->filp[fd]=NULL;
		f->f_count=0;
		return i;
	}
/* ttys are somewhat special (ttyxx major==4, tty major==5) */
	if (S_ISCHR(inode->i_mode)) {
		if (MAJOR(inode->i_zone[0])==4) {
			if (current->leader && current->tty<0) {
				current->tty = MINOR(inode->i_zone[0]);
				tty_table[current->tty].pgrp = current->pgrp;
			}
		} else if (MAJOR(inode->i_zone[0])==5)
			if (current->tty<0) {
				iput(inode);
				current->filp[fd]=NULL;
				f->f_count=0;
				return -EPERM;
			}
	}
/* Likewise with block-devices: check for floppy_change */
	if (S_ISBLK(inode->i_mode))
		check_disk_change(inode->i_zone[0]);
	f->f_mode = inode->i_mode;
	f->f_flags = flag;
	f->f_count = 1;
	f->f_inode = inode;
	f->f_pos = 0;
	return (fd);
}
// 从进程的 filp 中找到下一个空闲项,然后把要复制的文件描述符 fd 的信息,统统复制到这里
static int dupfd(unsigned int fd, unsigned int arg)
{
	if (fd >= NR_OPEN || !current->filp[fd])
		return -EBADF;
	if (arg >= NR_OPEN)
		return -EINVAL;
	// 在进程文件描述符数组 filp 中找到一个空闲项
	while (arg < NR_OPEN)
		if (current->filp[arg])
			arg++;
		else
			break;
	if (arg >= NR_OPEN)
		return -EMFILE;
	current->close_on_exec &= ~(1<<arg);
	(current->filp[arg] = current->filp[fd])->f_count++;
	return arg;
}

int sys_dup(unsigned int fildes)
{
	return dupfd(fildes,0);
}
execve
void init(void) {
    ...
    if (!(pid=fork())) {
        close(0);
        open("/etc/rc",O_RDONLY,0);
        execve("/bin/sh",argv_rc,envp_rc);
        _exit(2);
    }
    ...
}
init 进程接着fork出一个新进程,新进程通过 close 和 open 函数,将 0 号文件描述符指向的标准输入 /dev/tty0 更换为指向 /etc/rc 文件
接下来进程 2 就将变得不一样了,会通过一个 execve 函数调用,使自己摇身一变,成为 /bin/sh 程序继续运行!
.align 2
sys_execve:
	lea EIP(%esp),%eax
	pushl %eax # 传入do_execve的第一个参数:调用方触发系统调用时由 CPU 压入栈空间中的 eip 的指针
	call do_execve
	addl $4,%esp
	ret
struct exec {
unsigned long a_magic; /* Use macros N_MAGIC, etc for access */
unsigned a_text; /* length of text, in bytes */
unsigned a_data; /* length of data, in bytes */
unsigned a_bss; /* length of uninitialized data area for file, in bytes */
unsigned a_syms; /* length of symbol table data in file, in bytes */
unsigned a_entry; /* start address */
unsigned a_trsize; /* length of relocation info for text, in bytes */
unsigned a_drsize; /* length of relocation info for data, in bytes */
};
/*
* MAX_ARG_PAGES defines the number of pages allocated for arguments
* and envelope for the new program. 32 should suffice, this gives
* a maximum env+arg of 128kB !
*/
#define MAX_ARG_PAGES 32
/*
* 'do_execve()' executes a new program.
* eip 指向的内存处保存了系统调用时由 CPU 压入栈空间中的 eip
* tmp 是一个无用的占位参数。
* filename 是 "/bin/sh"
* argv 是 { "/bin/sh", NULL }
* envp 是 { "HOME=/", NULL }
*/
int do_execve(unsigned long * eip,long tmp,char * filename,
char ** argv, char ** envp)
{
struct m_inode * inode;
struct buffer_head * bh;
struct exec ex;
unsigned long page[MAX_ARG_PAGES];
int i,argc,envc;
int e_uid, e_gid;
int retval;
int sh_bang = 0;
unsigned long p=PAGE_SIZE*MAX_ARG_PAGES-4;
if ((0xffff & eip[1]) != 0x000f)
panic("execve called from supervisor mode");
for (i=0 ; i<MAX_ARG_PAGES ; i++) /* clear page-table */
page[i]=0;
// 根据文件名 /bin/sh 获取 inode
if (!(inode=namei(filename))) /* get executables inode */
return -ENOENT;
argc = count(argv);
envc = count(envp);
restart_interp:
if (!S_ISREG(inode->i_mode)) { /* must be regular file */
retval = -EACCES;
goto exec_error2;
}
i = inode->i_mode;
e_uid = (i & S_ISUID) ? inode->i_uid : current->euid;
e_gid = (i & S_ISGID) ? inode->i_gid : current->egid;
if (current->euid == inode->i_uid)
i >>= 6;
else if (current->egid == inode->i_gid)
i >>= 3;
if (!(i & 1) &&
!((inode->i_mode & 0111) && suser())) {
retval = -ENOEXEC;
goto exec_error2;
}
// 根据 inode 读取文件第一块数据(1024KB)
if (!(bh = bread(inode->i_dev,inode->i_zone[0]))) {
retval = -EACCES;
goto exec_error2;
}
// 解析这 1KB 的数据为 exec 结构
ex = *((struct exec *) bh->b_data); /* read exec-header */
if ((bh->b_data[0] == '#') && (bh->b_data[1] == '!') && (!sh_bang)) {
/*
* This section does the #! interpretation.
* Sorta complicated, but hopefully it will work. -TYT
*/
...
}
// 已经把这个缓冲块内容解析成 exec 结构保存到我们程序的栈空间里了,那么这个缓冲块就可以释放
brelse(bh);
if (N_MAGIC(ex) != ZMAGIC || ex.a_trsize || ex.a_drsize ||
ex.a_text+ex.a_data+ex.a_bss>0x3000000 ||
inode->i_size < ex.a_text+ex.a_data+ex.a_syms+N_TXTOFF(ex)) {
retval = -ENOEXEC;
goto exec_error2;
}
if (N_TXTOFF(ex) != BLOCK_SIZE) {
printk("%s: N_TXTOFF != BLOCK_SIZE. See a.out.h.", filename);
retval = -ENOEXEC;
goto exec_error2;
}
if (!sh_bang) {
// 往参数表里面存放信息,不过具体存放的只是字符串常量值的信息,随后他们将被引用
p = copy_strings(envc,envp,page,p,0);
p = copy_strings(argc,argv,page,p,0);
if (!p) {
retval = -ENOMEM;
goto exec_error2;
}
}
/* OK, This is the point of no return */
if (current->executable)
iput(current->executable);
current->executable = inode;
for (i=0 ; i<32 ; i++)
current->sigaction[i].sa_handler = NULL;
for (i=0 ; i<NR_OPEN ; i++)
if ((current->close_on_exec>>i)&1)
sys_close(i);
current->close_on_exec = 0;
free_page_tables(get_base(current->ldt[1]),get_limit(0x0f));
free_page_tables(get_base(current->ldt[2]),get_limit(0x17));
if (last_task_used_math == current)
last_task_used_math = NULL;
current->used_math = 0;
// change_ldt: 根据 ex.a_text 修改局部描述符中的代码段限长 code_limit
// ex 结构里的 a_text 是生成 /bin/sh 这个 a.out 格式的文件时,写在头部的值,用来表示代码段的长度。至于具体是怎么生成的,我们无需关心。
// 由于这个函数返回值是数据段限长,也就是 64M,所以最终的 p 值被调整为了以每个进程的线性地址空间视角下的地址偏移
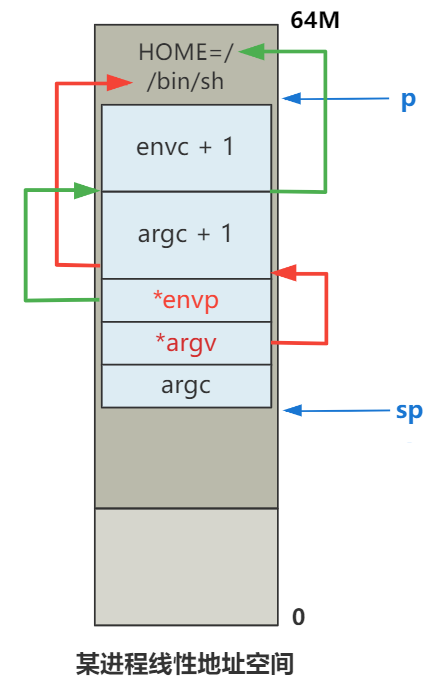
p += change_ldt(ex.a_text,page)-MAX_ARG_PAGES*PAGE_SIZE;
p = (unsigned long) create_tables((char *)p,argc,envc);
current->brk = ex.a_bss +
(current->end_data = ex.a_data +
(current->end_code = ex.a_text));
current->start_stack = p & 0xfffff000;
current->euid = e_uid;
current->egid = e_gid;
i = ex.a_text+ex.a_data;
while (i&0xfff)
put_fs_byte(0,(char *) (i++));
// 代码指针 eip 决定了 CPU 将执行哪一段指令,栈指针 esp 决定了 CPU 压栈操作的位置,以及读取栈空间数据的位置,在高级语言视角下就是局部变量以及函数调用链的栈帧。
// 所以这两行代码,第一行重新设置了代码指针 eip 的值,指向 /bin/sh 这个 a.out 格式文件的头结构 exec 中的 a_entry 字段,表示该程序的入口地址。
// 第二行重新设置了栈指针 esp 的值,指向了我们经过一路计算得到的 p,也就是图中 sp 的值。将这个值作为新的栈顶十分合理。
eip[0] = ex.a_entry; /* eip, magic happens :-) */
eip[3] = p; /* stack pointer */
// 设置完 eip 和 esp,中断返回后pop出来就能达到执行新进程的效果。
return 0;
exec_error2:
iput(inode);
exec_error1:
for (i=0 ; i<MAX_ARG_PAGES ; i++)
free_page(page[i]);
return(retval);
}
缺页中断

execve 加载 /bin/sh 返回后就会跳转到 a.out 格式头部数据结构 exec.a_entry 所指向的内存地址去执行指令。
gdb 调试发现会发现跳到逻辑地址 0处。由于我们现在所处的代码是属于进程 2,所以逻辑地址 0 通过分段机制映射到线性地址空间,就是 0x8000000,表示 128M 位置处。
128M 这个线性地址,随后将会通过分页机制的映射转化为物理地址,这才定位到最终的真实物理内存。
可是,128M 这个线性地址并没有页表映射它,也就是因为上面我们说的,我们除了 /bin/sh 文件的头部加载到了内存外,其他部分并没有进行加载操作。
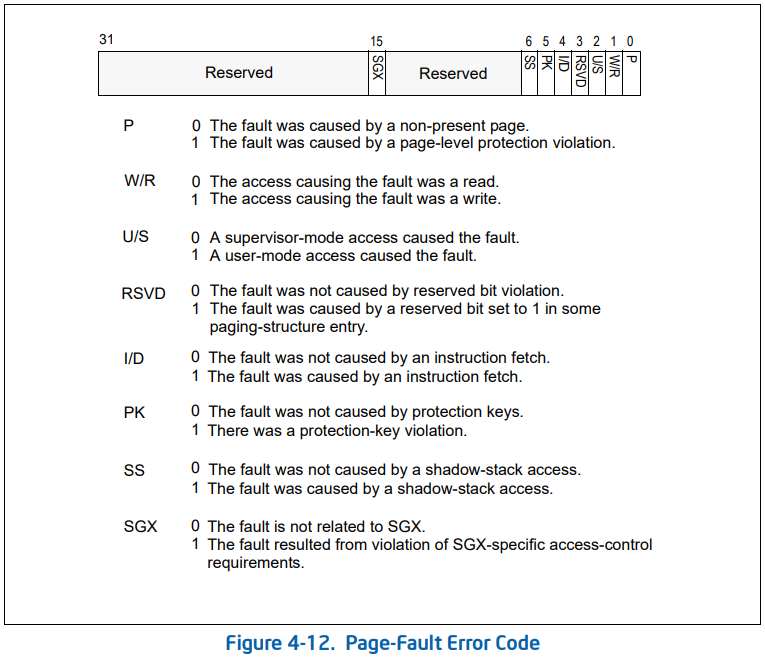
再准确点说,是 0x8000000 这个线性地址的访问,遇到了页表项的存在位 P 等于 0 的情况。
一旦遇到了这种情况,CPU 会触发一个中断:页错误(Page-Fault),CPU 会帮我们保存在中断的出错码 Error Code 里。
.globl page_fault

page_fault:
	xchgl %eax,(%esp) # 将错误码保存到eax
	pushl %ecx
	pushl %edx
	push %ds
	push %es
	push %fs
	movl $0x10,%edx
	mov %dx,%ds
	mov %dx,%es
	mov %dx,%fs
	movl %cr2,%edx
	pushl %edx
	pushl %eax
	testl $1,%eax # 检查错误码的第0位,如果为0则走do_no_page,处理缺页逻辑
	jne 1f
	call do_no_page
	jmp 2f
1:	call do_wp_page
2:	addl $8,%esp
	pop %fs
	pop %es
	pop %ds
	popl %edx
	popl %ecx
	popl %eax
	iret
void do_no_page(unsigned long error_code,unsigned long address)
{
	int nr[4];
	unsigned long tmp;
	unsigned long page;
	int block,i;

	// 对齐到 4KB
	address &= 0xfffff000;
	// 计算相对于进程基址的偏移
	tmp = address - current->start_code;
	if (!current->executable || tmp >= current->end_data) {
		get_empty_page(address);
		return;
	}
	if (share_page(tmp))
		return;
	if (!(page = get_free_page()))
		oom();
/* remember that 1 block is used for header */
	// 计算这个地址在文件中的哪个数据块
	block = 1 + tmp/BLOCK_SIZE;
	// 计算文件中的4个块在设备中的位置
	for (i=0 ; i<4 ; block++,i++)
		nr[i] = bmap(current->executable,block);
	// 从设备连续读取4KB到page中
	bread_page(page,current->executable->i_dev,nr);
	i = tmp + 4096 - current->end_data;
	tmp = page + 4096;
	while (i-- > 0) {
		tmp--;
		*(char *)tmp = 0;
	}
	if (put_page(page,address))
		return;
	free_page(page);
	oom();
}
/*
 * This function puts a page in memory at the wanted address.
 * It returns the physical address of the page gotten, 0 if
 * out of memory (either when trying to access page-table or
 * page.)
 */
unsigned long put_page(unsigned long page,unsigned long address)
{
	unsigned long tmp, *page_table;

/* NOTE !!! This uses the fact that _pg_dir=0 */

	if (page < LOW_MEM || page >= HIGH_MEMORY)
		printk("Trying to put page %p at %p\n",page,address);
	if (mem_map[(page-LOW_MEM)>>12] != 1)
		printk("mem_map disagrees with %p at %p\n",page,address);
	page_table = (unsigned long *) ((address>>20) & 0xffc); // 找到页目录项
	if ((*page_table)&1)
		page_table = (unsigned long *) (0xfffff000 & *page_table);
	else {
		if (!(tmp=get_free_page())) // 页目录不存在,分配一页作为页表
			return 0;
		*page_table = tmp|7; // 页表地址写入页目录项
		page_table = (unsigned long *) tmp;
	}
	page_table[(address>>12) & 0x3ff] = page | 7; // 将新分配的页写入页表项中
/* no need for invalidate */
	return page;
}


【推荐】国内首个AI IDE,深度理解中文开发场景,立即下载体验Trae
【推荐】编程新体验,更懂你的AI,立即体验豆包MarsCode编程助手
【推荐】抖音旗下AI助手豆包,你的智能百科全书,全免费不限次数
【推荐】轻量又高性能的 SSH 工具 IShell:AI 加持,快人一步
· 无需6万激活码!GitHub神秘组织3小时极速复刻Manus,手把手教你使用OpenManus搭建本
· C#/.NET/.NET Core优秀项目和框架2025年2月简报
· Manus爆火,是硬核还是营销?
· 终于写完轮子一部分:tcp代理 了,记录一下
· 【杭电多校比赛记录】2025“钉耙编程”中国大学生算法设计春季联赛(1)