ESP8266点亮nokia5110,打造自己的小电视
材料清单:
-
esp8266
-
nokia5110
-
面包板
-
跳线
布线参考 https://www.zonnepanelen.wouterlood.com/25-nokia-5510-8448-lcd-and-nodemcu-esp8266/
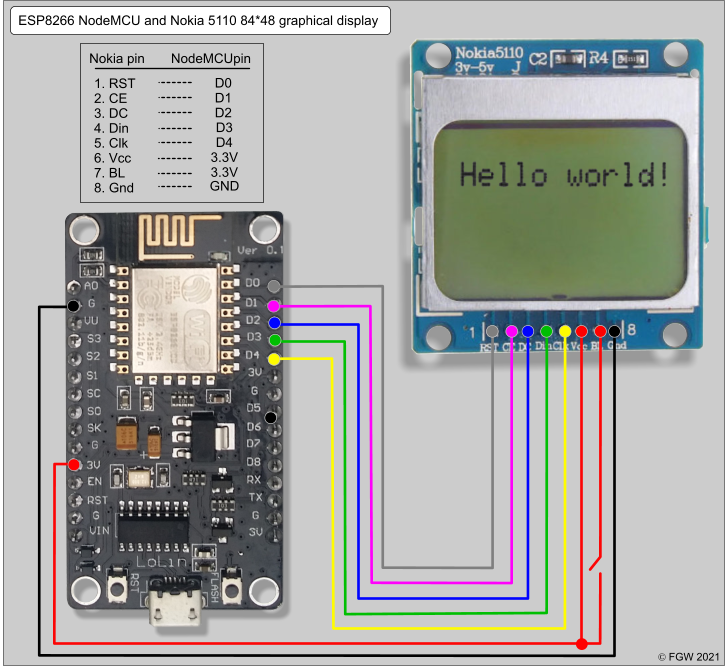
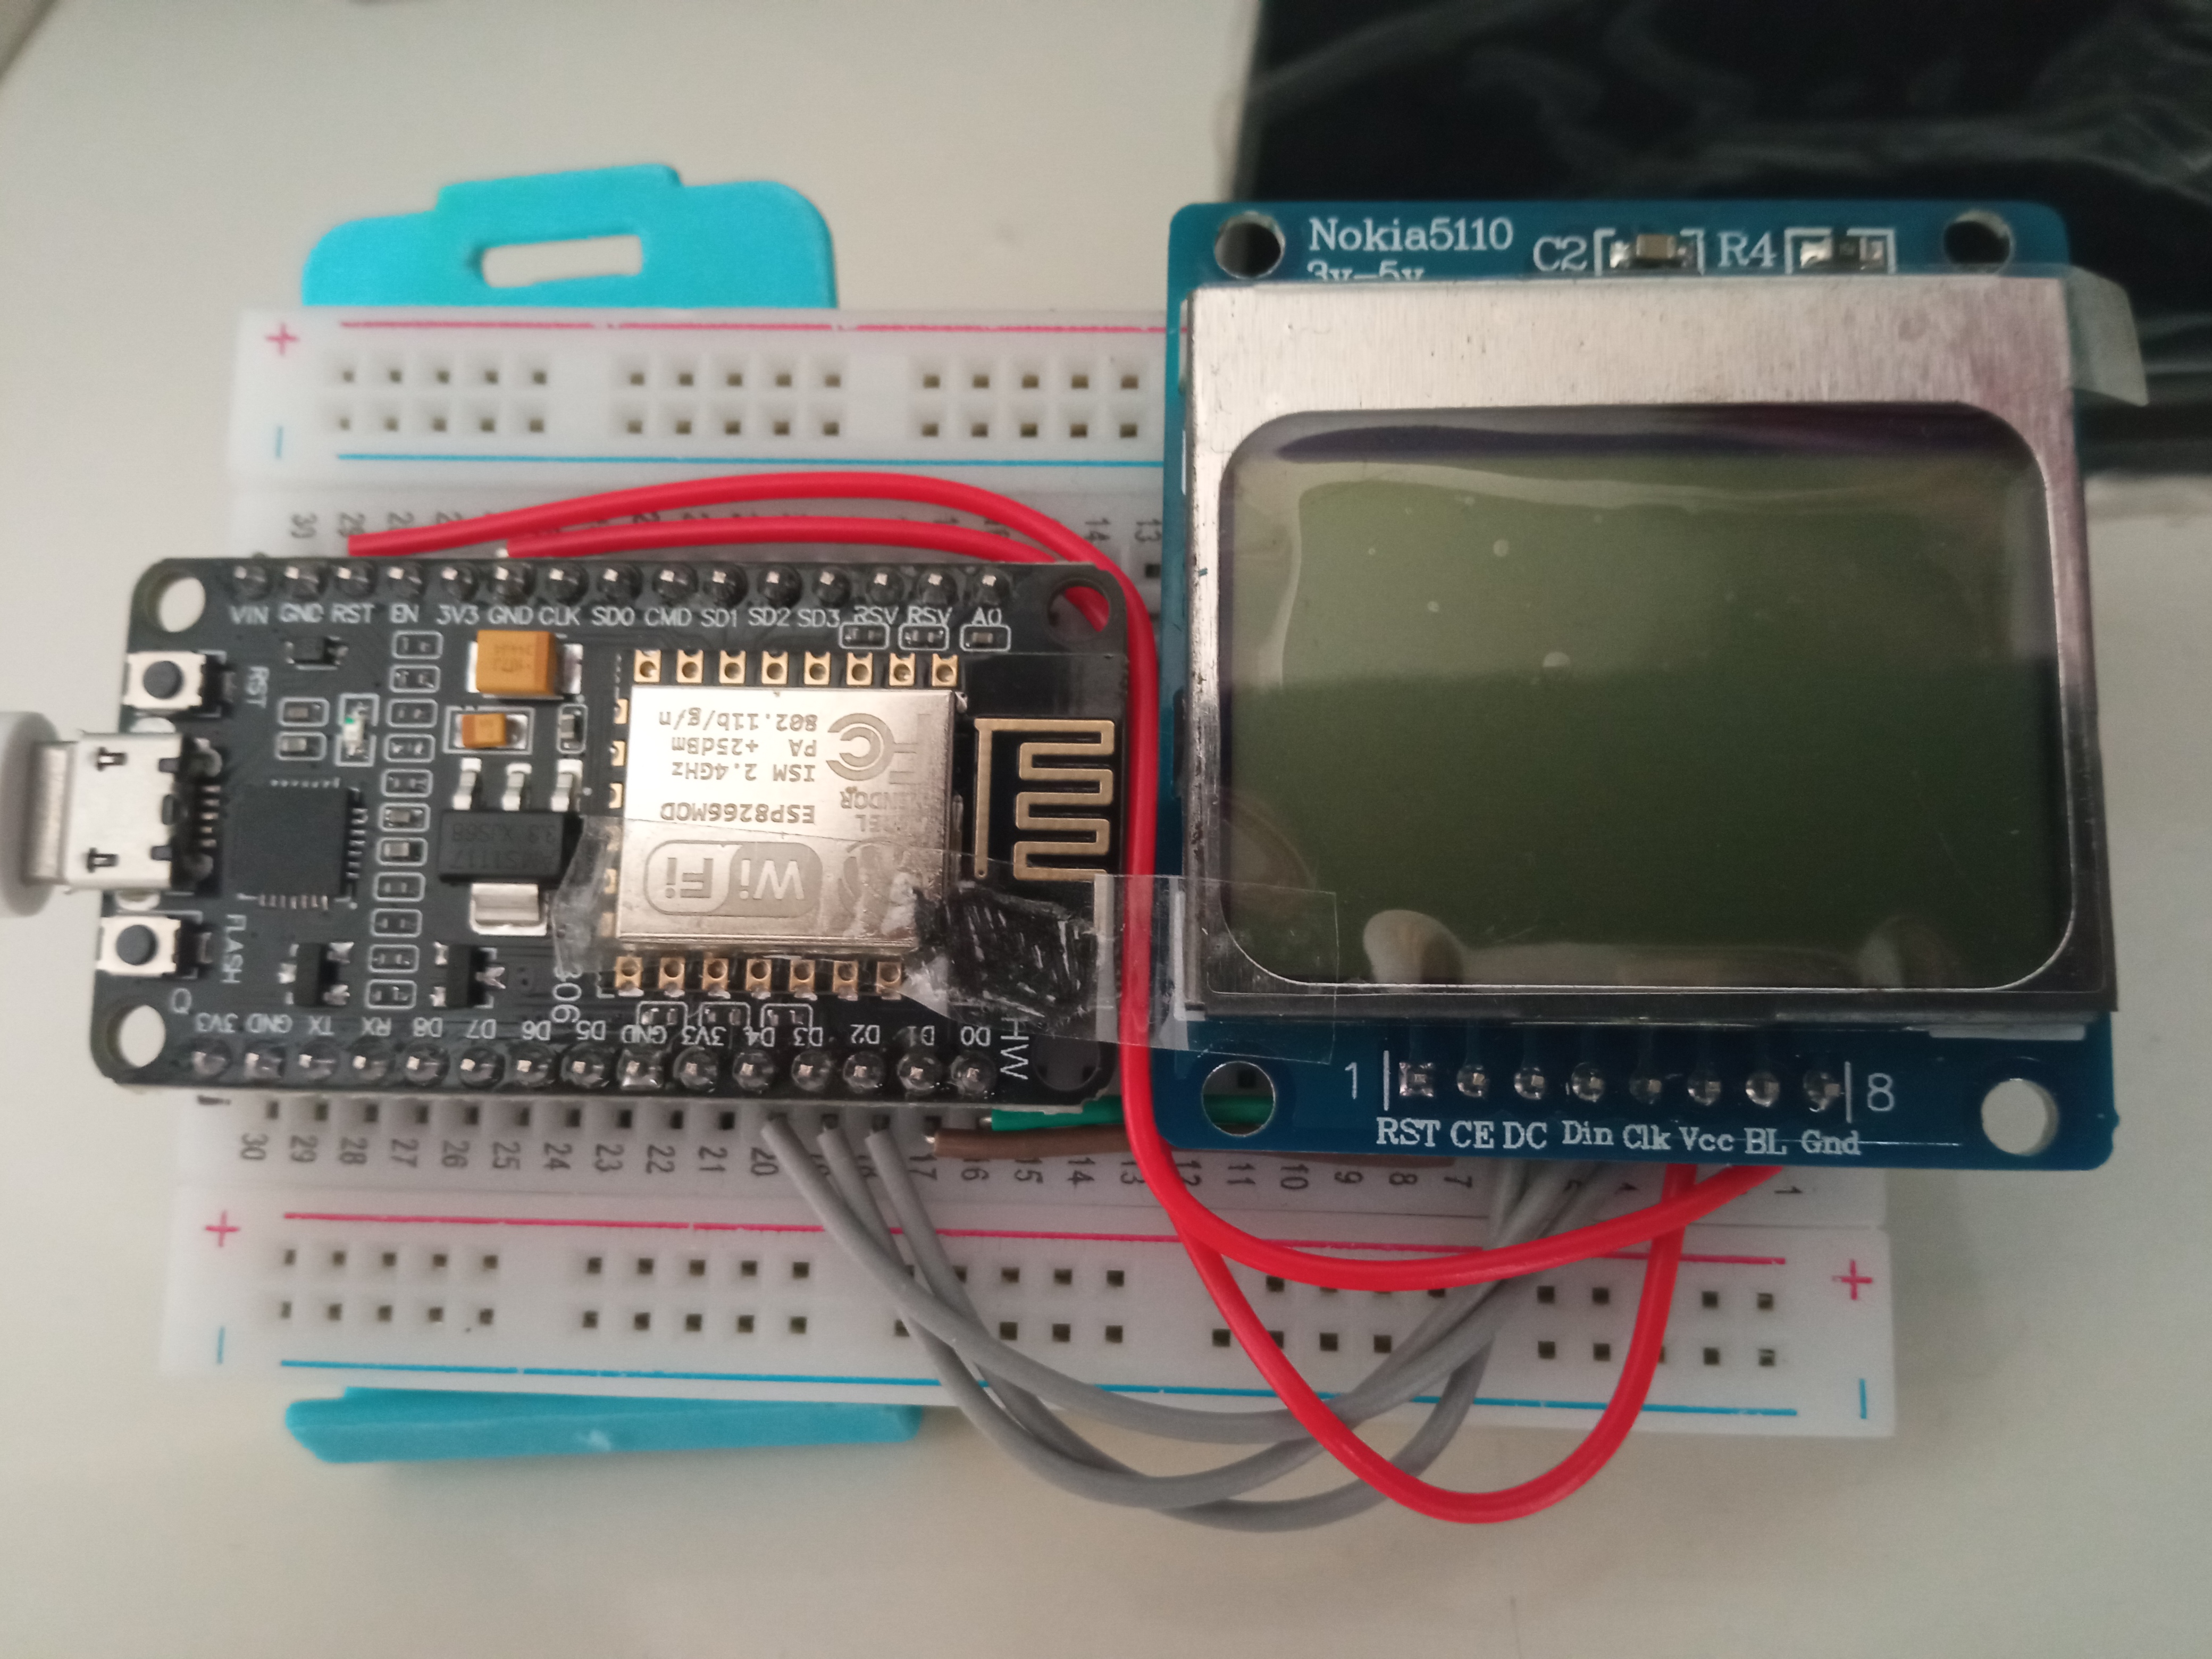
ARDUINO IDE下载
Arduino IDE离线安装esp8266 SDK (8266_package_2.6.3)
下载 https://ifwz.lanzouw.com/i65oOz3on0f
双击运行即可解压,解压完成后,再打开Arduino IDE,即可在 菜单栏>工具>开发板 中找到你使用的esp8266开发板
**ESP8266-NodeMCU开发板驱动 (CP210X) **
https://ifwz.lanzouw.com/iNKVPz3on2h
可以上传个blink测试一下板子
点亮 nokia5110
参考 https://microcontrollerslab.com/nokia-5110-lcd-esp8266-nodemcu-tutorial/
安装 这两个库

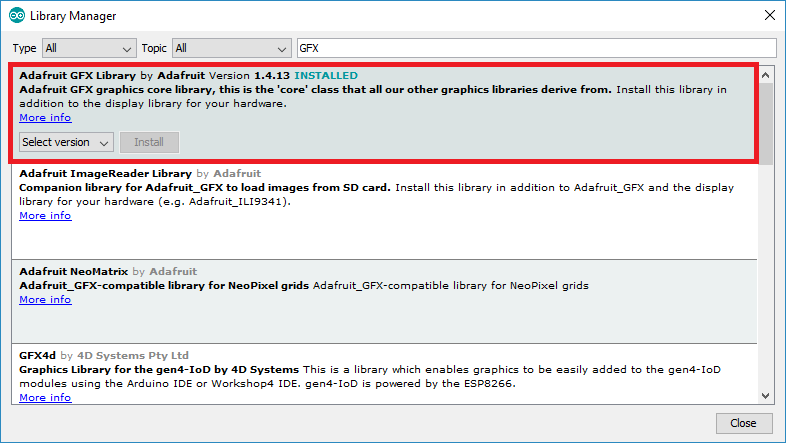
测试代码
点击查看代码
#include <SPI.h>
#include <Adafruit_GFX.h>
#include <Adafruit_PCD8544.h>

Adafruit_PCD8544 display = Adafruit_PCD8544(D4,D3,D2,D1,D0);

void setup()   {
  Serial.begin(115200);
  display.begin();
  display.setContrast(50);

  display.clearDisplay();
  display.setTextSize(1);
  display.setTextColor(BLACK);
  display.setCursor(10,10);
  display.println("Welcome!");
  display.display();
}
void loop(){

}
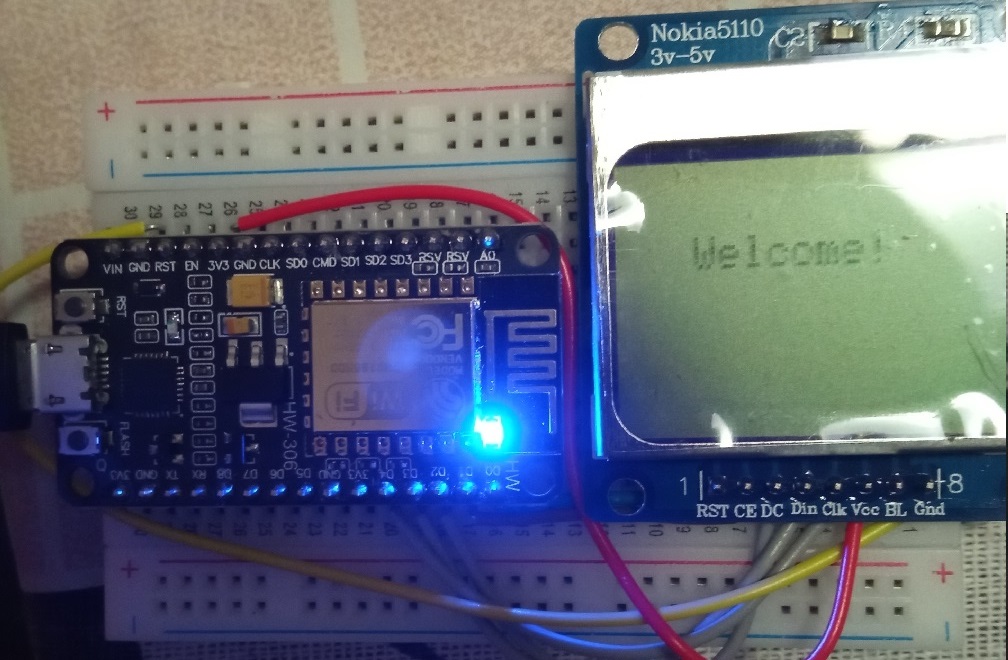
显示图案
使用 https://javl.github.io/image2cpp/
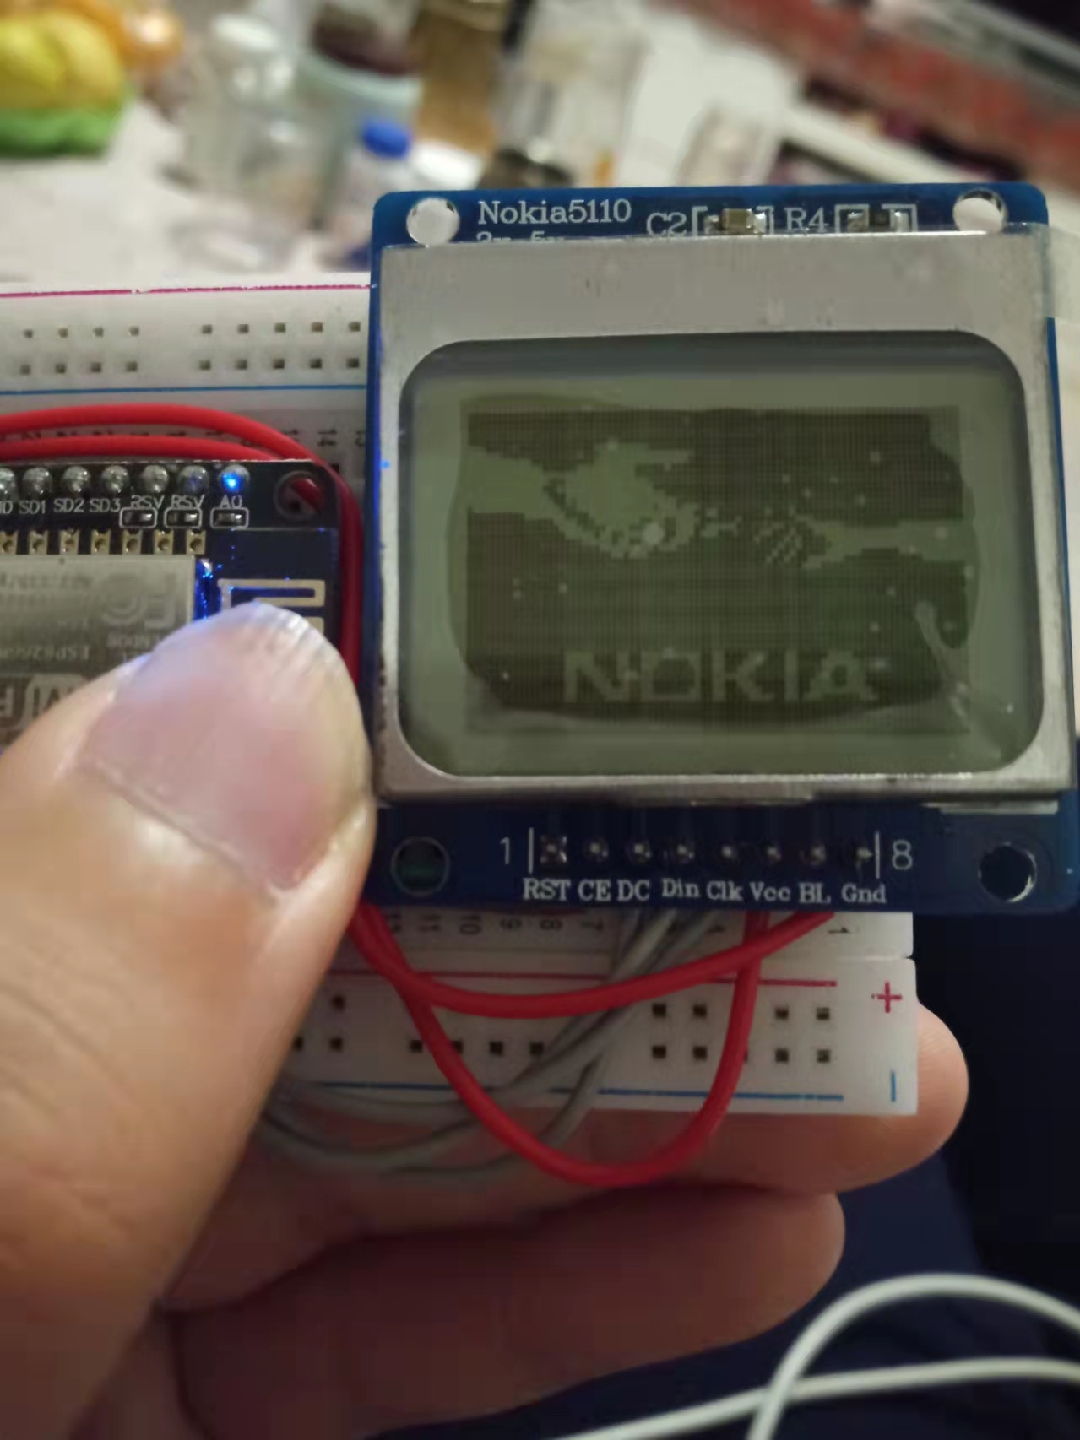
因为使用的nokia屏幕,致敬一下经典握手开机logo
点击查看代码
#include <SPI.h>
#include <Adafruit_GFX.h>
#include <Adafruit_PCD8544.h>

Adafruit_PCD8544 display = Adafruit_PCD8544(D4,D3,D2,D1,D0);

static const uint8_t bitmap_image[1024]  = {
  0xff, 0xff, 0xff, 0xff, 0xff, 0xff, 0xff, 0xff, 0xff, 0xff, 0xf0, 0xff, 0xff, 0xff, 0xff, 0xff,
  0xff, 0xff, 0xff, 0xff, 0xff, 0xf0, 0xff, 0xff, 0xff, 0xff, 0xff, 0xff, 0xff, 0xff, 0xff, 0xff,
  0xf0, 0xff, 0xff, 0xff, 0xff, 0xff, 0xff, 0xff, 0xff, 0xff, 0xff, 0xf0, 0xff, 0xff, 0xff, 0xff,
  0xff, 0xff, 0xff, 0xff, 0xff, 0xff, 0xf0, 0x1f, 0xff, 0xfc, 0x01, 0xff, 0xff, 0xff, 0xff, 0xff,
  0xff, 0xf0, 0x03, 0xff, 0xee, 0x00, 0x01, 0xff, 0xff, 0xff, 0xff, 0xff, 0xf0, 0x00, 0x1f, 0xfc,
  0x00, 0x03, 0xff, 0xff, 0xff, 0xff, 0xff, 0xf0, 0x00, 0x07, 0xe0, 0x07, 0xdf, 0xff, 0xff, 0xff,
  0xff, 0xff, 0xf0, 0x00, 0x00, 0x00, 0x07, 0xff, 0xff, 0xff, 0xff, 0xff, 0xff, 0xf0, 0x00, 0x03,
  0x80, 0x01, 0xff, 0xff, 0xff, 0xff, 0xff, 0xff, 0xf0, 0x00, 0x07, 0x80, 0x00, 0xff, 0xff, 0xff,
  0xff, 0xff, 0xff, 0xf0, 0x00, 0x03, 0x80, 0x00, 0x3f, 0xff, 0xff, 0xff, 0xff, 0xff, 0xf0, 0x00,
  0x01, 0xa0, 0x02, 0x0f, 0xff, 0xff, 0xff, 0xff, 0xff, 0xf0, 0x80, 0x00, 0xe0, 0x00, 0x88, 0xff,
  0xff, 0xff, 0xff, 0xff, 0xf0, 0xff, 0xc0, 0x78, 0x00, 0x01, 0x9f, 0xee, 0xff, 0xff, 0xff, 0xf0,
  0xff, 0xfe, 0x1c, 0x03, 0x30, 0xfd, 0xff, 0x1f, 0xff, 0xff, 0xf0, 0xff, 0xff, 0x0f, 0x0e, 0x71,
  0x83, 0xf3, 0xc0, 0xff, 0x80, 0x00, 0xff, 0xff, 0x82, 0x60, 0x31, 0x1f, 0xce, 0xe0, 0x00, 0x00,
  0x00, 0xff, 0xff, 0xf0, 0x4c, 0x63, 0xff, 0xbd, 0x78, 0x00, 0x00, 0x00, 0xff, 0xff, 0xfe, 0x00,
  0x8f, 0xff, 0xfb, 0x7c, 0x00, 0x00, 0x00, 0xff, 0xff, 0xff, 0x91, 0xff, 0xff, 0xf6, 0xf8, 0x1f,
  0x80, 0x00, 0xff, 0xff, 0xff, 0xff, 0xff, 0xff, 0xed, 0xc0, 0xff, 0xf8, 0x00, 0xff, 0xff, 0xff,
  0xff, 0xff, 0xff, 0xff, 0x8f, 0xff, 0xff, 0xf0, 0xff, 0xff, 0xff, 0xff, 0xff, 0xff, 0xff, 0xff,
  0xff, 0xff, 0xf0, 0xff, 0xff, 0xff, 0xff, 0xff, 0xff, 0xff, 0xff, 0xff, 0xff, 0xf0, 0xff, 0xff,
  0xff, 0xff, 0xff, 0xff, 0xff, 0xff, 0xff, 0xff, 0xf0, 0xff, 0xff, 0xff, 0xff, 0xff, 0xff, 0xff,
  0xff, 0xff, 0xff, 0xf0, 0xff, 0xff, 0xff, 0xff, 0xff, 0xff, 0xff, 0xff, 0xff, 0xff, 0xf0, 0xff,
  0xff, 0xff, 0xff, 0xff, 0xff, 0xff, 0xff, 0xff, 0xff, 0xf0, 0xff, 0xff, 0xff, 0xff, 0xff, 0xff,
  0xff, 0xff, 0xff, 0xff, 0xf0, 0xff, 0xff, 0xff, 0xff, 0xff, 0xff, 0xff, 0xff, 0xff, 0xff, 0xf0,
  0xff, 0xff, 0xff, 0xff, 0xff, 0xff, 0xff, 0xff, 0xff, 0xff, 0xf0, 0xff, 0xff, 0xff, 0xff, 0xff,
  0xff, 0xff, 0xff, 0xff, 0xff, 0xf0, 0xff, 0xff, 0xff, 0xff, 0xff, 0xff, 0xff, 0xff, 0xff, 0xff,
  0xf0, 0xff, 0xff, 0xff, 0xff, 0xff, 0xff, 0xff, 0xff, 0xff, 0xff, 0xf0, 0xff, 0xff, 0x83, 0xcc,
  0x00, 0xcf, 0x1c, 0xf8, 0x7f, 0xff, 0xf0, 0xff, 0xff, 0x83, 0xcc, 0x7c, 0xce, 0x3c, 0xf0, 0x3f,
  0xff, 0xf0, 0xff, 0xff, 0x91, 0xcc, 0xfe, 0xcc, 0x7c, 0xf3, 0x3f, 0xff, 0xf0, 0xff, 0xff, 0x98,
  0xcc, 0xfe, 0xc0, 0xfc, 0xe7, 0x1f, 0xff, 0xf0, 0xff, 0xff, 0x9c, 0x6c, 0xfe, 0xcc, 0x7c, 0xc3,
  0x1f, 0xff, 0xf0, 0xff, 0xff, 0x9e, 0x0c, 0xfc, 0xce, 0x3c, 0xc0, 0x0f, 0xff, 0xf0, 0xff, 0xff,
  0x9f, 0x0c, 0x00, 0xcf, 0x0c, 0x8f, 0xc7, 0xff, 0xf0, 0xff, 0xff, 0xff, 0xff, 0xff, 0xff, 0xff,
  0xff, 0xff, 0xff, 0xf0, 0xff, 0xff, 0xff, 0xff, 0xff, 0xff, 0xff, 0xff, 0xff, 0xff, 0xf0, 0xff,
  0xff, 0xff, 0xff, 0xff, 0xff, 0xff, 0xff, 0xff, 0xff, 0xf0, 0xff, 0xff, 0xff, 0xff, 0xff, 0xff,
  0xff, 0xff, 0xff, 0xff, 0xf0, 0xff, 0xff, 0xff, 0xff, 0xff, 0xff, 0xff, 0xff, 0xff, 0xff, 0xf0
  };

void setup()   {
  Serial.begin(115200);
  display.begin();
  display.setContrast(50);
  display.clearDisplay();
  display.drawBitmap(0, 0, bitmap_image, 84, 48, 1);
  display.display();
}

void loop() {}
ESP8266自动配网 – WiFiManager库 (强烈推荐,非常好用)
http://www.taichi-maker.com/homepage/esp8266-nodemcu-iot/iot-c/esp8266-tips/wifimanager/
点击查看代码
#include <ESP8266WiFi.h>
#include <DNSServer.h>
#include <ESP8266WebServer.h>
#include <WiFiManager.h>

void setup() {
    Serial.begin(9600);
    // 建立WiFiManager对象
    WiFiManager wifiManager;

    // 自动连接WiFi。以下语句的参数是连接ESP8266时的WiFi名称
    wifiManager.autoConnect("AutoConnectAP");

    // 如果您希望该WiFi添加密码,可以使用以下语句:
    // wifiManager.autoConnect("AutoConnectAP", "12345678");
    // 以上语句中的12345678是连接AutoConnectAP的密码

    // WiFi连接成功后将通过串口监视器输出连接成功信息
    Serial.println("");
    Serial.print("ESP8266 Connected to ");
    Serial.println(WiFi.SSID());              // WiFi名称
    Serial.print("IP address:\t");
    Serial.println(WiFi.localIP());           // IP
}

void loop() {}
ESP8266获取时间
点击查看代码
#include <NTPClient.h>
// change next line to use with another board/shield
#include <ESP8266WiFi.h>
//#include <WiFi.h> // for WiFi shield
//#include <WiFi101.h> // for WiFi 101 shield or MKR1000
#include <WiFiUdp.h>

const char *ssid     = "Mobile WiFi";//输入Wifi账号
const char *password = "";//输入WiFi密码

WiFiUDP ntpUDP;
NTPClient timeClient(ntpUDP,"ntp.aliyun.com");//NTP服务器地址

void setup(){
  Serial.begin(9600);//串口通讯波特率
  WiFi.begin(ssid, password);//连接WiFi

  while ( WiFi.status() != WL_CONNECTED ) {
    delay ( 500 );
    Serial.print ( "." );
  }
  timeClient.begin();
  // + 1区 偏移3600, +8区 :3600×8 = 28800,如果注释掉这行代码会发现通过串口监听器
  //打印出来的时间和电脑中显示的时间并不同步,相差8小时。
  timeClient.setTimeOffset(28800);
}

void loop() {
  timeClient.update();
  Serial.println(timeClient.getFormattedTime());//打印时间
  delay(1000);
}
ESP8266获取并解析心知天气数据
http://www.taichi-maker.com/homepage/iot-development/iot-platform/seniverse/esp8266-application/
点击查看代码
#include <ArduinoJson.h>
#include <ESP8266WiFi.h>

const char* ssid     = "chen";       // 连接WiFi名(此处使用taichi-maker为示例)
                                            // 请将您需要连接的WiFi名填入引号中
const char* password = "88888888";          // 连接WiFi密码(此处使用12345678为示例)
                                            // 请将您需要连接的WiFi密码填入引号中

const char* host = "api.seniverse.com";     // 将要连接的服务器地址
const int httpPort = 80;                    // 将要连接的服务器端口

// 心知天气HTTP请求所需信息
String reqUserKey = "smtq3n0ixdggurox";   // 私钥
String reqLocation = "handan";            // 城市
String reqUnit = "c";                      // 摄氏/华氏

void setup(){
  Serial.begin(9600);
  Serial.println("");

  // 连接WiFi
  connectWiFi();
}

void loop(){
  // 建立心知天气API当前天气请求资源地址
  String reqRes = "/v3/weather/now.json?key=" + reqUserKey +
                  + "&location=" + reqLocation +
                  "&language=en&unit=" +reqUnit;

  // 向心知天气服务器服务器请求信息并对信息进行解析
  httpRequest(reqRes);
  delay(3000);
}

// 向心知天气服务器服务器请求信息并对信息进行解析
void httpRequest(String reqRes){
  WiFiClient client;

  // 建立http请求信息
  String httpRequest = String("GET ") + reqRes + " HTTP/1.1\r\n" +
                              "Host: " + host + "\r\n" +
                              "Connection: close\r\n\r\n";
  Serial.println("");
  Serial.print("Connecting to "); Serial.print(host);

  // 尝试连接服务器
  if (client.connect(host, 80)){
    Serial.println(" Success!");

    // 向服务器发送http请求信息
    client.print(httpRequest);
    Serial.println("Sending request: ");
    Serial.println(httpRequest);

    // 获取并显示服务器响应状态行
    String status_response = client.readStringUntil('\n');
    Serial.print("status_response: ");
    Serial.println(status_response);

    // 使用find跳过HTTP响应头
    if (client.find("\r\n\r\n")) {
      Serial.println("Found Header End. Start Parsing.");
    }

    // 利用ArduinoJson库解析心知天气响应信息
    parseInfo(client);
  } else {
    Serial.println(" connection failed!");
  }
  //断开客户端与服务器连接工作
  client.stop();
}

// 连接WiFi
void connectWiFi(){
  WiFi.begin(ssid, password);                  // 启动网络连接
  Serial.print("Connecting to ");              // 串口监视器输出网络连接信息
  Serial.print(ssid); Serial.println(" ...");  // 告知用户NodeMCU正在尝试WiFi连接

  int i = 0;                                   // 这一段程序语句用于检查WiFi是否连接成功
  while (WiFi.status() != WL_CONNECTED) {      // WiFi.status()函数的返回值是由NodeMCU的WiFi连接状态所决定的。
    delay(1000);                               // 如果WiFi连接成功则返回值为WL_CONNECTED
    Serial.print(i++); Serial.print(' ');      // 此处通过While循环让NodeMCU每隔一秒钟检查一次WiFi.status()函数返回值
  }                                            // 同时NodeMCU将通过串口监视器输出连接时长读秒。
                                               // 这个读秒是通过变量i每隔一秒自加1来实现的。
  Serial.println("");                          // WiFi连接成功后
  Serial.println("Connection established!");   // NodeMCU将通过串口监视器输出"连接成功"信息。
  Serial.print("IP address:    ");             // 同时还将输出NodeMCU的IP地址。这一功能是通过调用
  Serial.println(WiFi.localIP());              // WiFi.localIP()函数来实现的。该函数的返回值即NodeMCU的IP地址。
}

// 利用ArduinoJson库解析心知天气响应信息
void parseInfo(WiFiClient client){
  const size_t capacity = JSON_ARRAY_SIZE(1) + JSON_OBJECT_SIZE(1) + 2*JSON_OBJECT_SIZE(3) + JSON_OBJECT_SIZE(6) + 230;
  DynamicJsonDocument doc(capacity);

  deserializeJson(doc, client);

  JsonObject results_0 = doc["results"][0];

  JsonObject results_0_now = results_0["now"];
  const char* results_0_now_text = results_0_now["text"]; // "Sunny"
  const char* results_0_now_code = results_0_now["code"]; // "0"
  const char* results_0_now_temperature = results_0_now["temperature"]; // "32"

  const char* results_0_last_update = results_0["last_update"]; // "2020-06-02T14:40:00+08:00"

  // 通过串口监视器显示以上信息
  String results_0_now_text_str = results_0_now["text"].as<String>();
  int results_0_now_code_int = results_0_now["code"].as<int>();
  int results_0_now_temperature_int = results_0_now["temperature"].as<int>();

  String results_0_last_update_str = results_0["last_update"].as<String>();

  Serial.println(F("======Weahter Now======="));
  Serial.print(F("Weather Now: "));
  Serial.print(results_0_now_text_str);
  Serial.print(F(" "));
  Serial.println(results_0_now_code_int);
  Serial.print(F("Temperature: "));
  Serial.println(results_0_now_temperature_int);
  Serial.print(F("Last Update: "));
  Serial.println(results_0_last_update_str);
  Serial.println(F("========================"));
}
ESP8266获取并解析哔哩哔哩API数据 (获取 粉丝数量)
点击查看代码
#include <ESP8266WiFi.h>
#include "ESP8266_BiliBili.h"

const char* ssid     = "chen"; // 连接WiFi名(此处使用taichimaker为示例)
                                      // 请将您需要连接的WiFi名填入引号中
const char* password = "88888888";    // 连接WiFi密码(此处使用12345678为示例)
                                      // 请将您需要连接的WiFi密码填入引号中

FansInfo fansInfo("30847042");       // 建立对象用于获取粉丝信息
                                      // 括号中的参数是B站的UUID

void setup(){
  Serial.begin(9600);
  Serial.println("");

  connectWiFi();    // 连接wifi

}

void loop(){

  if(fansInfo.update()){  // 更新信息成功
    Serial.println("Update OK");
    Serial.print("Server Response: ");
    Serial.println(fansInfo.getServerCode());
    Serial.print(F("Fans Number: "));
    Serial.println(fansInfo.getFansNumber());
    Serial.print(F("Guan Zhu: "));
    Serial.println(fansInfo.getFollowing());
    Serial.print(F("Hei Ming Dan: "));
    Serial.println(fansInfo.getBlack());
  } else {     // 更新失败
    Serial.println("Update Fail...");
    Serial.print("Server Response: ");
    Serial.println(fansInfo.getServerCode());
  }
  Serial.println(F("======================"));
  delay(3000);
}

// 连接WiFi
void connectWiFi(){
  WiFi.begin(ssid, password);                  // 启动网络连接
  Serial.print("Connecting to ");              // 串口监视器输出网络连接信息
  Serial.print(ssid); Serial.println(" ...");  // 告知用户NodeMCU正在尝试WiFi连接

  int i = 0;                                   // 这一段程序语句用于检查WiFi是否连接成功
  while (WiFi.status() != WL_CONNECTED) {      // WiFi.status()函数的返回值是由NodeMCU的WiFi连接状态所决定的。
    delay(1000);                               // 如果WiFi连接成功则返回值为WL_CONNECTED
    Serial.print(i++); Serial.print(' ');      // 此处通过While循环让NodeMCU每隔一秒钟检查一次WiFi.status()函数返回值
  }                                            // 同时NodeMCU将通过串口监视器输出连接时长读秒。
                                               // 这个读秒是通过变量i每隔一秒自加1来实现的。
  Serial.println("");                          // WiFi连接成功后
  Serial.println("Connection established!");   // NodeMCU将通过串口监视器输出"连接成功"信息。
  Serial.print("IP address:    ");             // 同时还将输出NodeMCU的IP地址。这一功能是通过调用
  Serial.println(WiFi.localIP());              // WiFi.localIP()函数来实现的。该函数的返回值即NodeMCU的IP地址。
}
将以上代码综合一下
点击查看代码
#include <NTPClient.h>
// change next line to use with another board/shield
#include <ESP8266WiFi.h>
//#include <WiFi.h> // for WiFi shield
//#include <WiFi101.h> // for WiFi 101 shield or MKR1000
#include <WiFiUdp.h>


#include <DNSServer.h>
#include <ESP8266WebServer.h>
#include <WiFiManager.h>

#include <SPI.h>
#include <Adafruit_GFX.h>
#include <Adafruit_PCD8544.h>

#include <ArduinoJson.h>
#include "ESP8266_BiliBili.h"


Adafruit_PCD8544 display = Adafruit_PCD8544(D4,D3,D2,D1,D0);


WiFiUDP ntpUDP;
NTPClient timeClient(ntpUDP,"ntp.aliyun.com");//NTP服务器地址

// 心知天气HTTP请求所需信息
String reqUserKey = "smtq3n0ixdggurox";   // 私钥
String reqLocation = "handan";            // 城市
String reqUnit = "c";                      // 摄氏/华氏

const char* host = "api.seniverse.com";     // 将要连接的服务器地址
const int httpPort = 80;                    // 将要连接的服务器端口

String temperature = "";

FansInfo fansInfo("30847042");       // 建立对象用于获取粉丝信息
                                      // 括号中的参数是B站的UUID

void setup(){
  Serial.begin(9600);//串口通讯波特率

   // 建立WiFiManager对象
    WiFiManager wifiManager;

    // 自动连接WiFi。以下语句的参数是连接ESP8266时的WiFi名称
    wifiManager.autoConnect("AutoConnectAP");


  while ( WiFi.status() != WL_CONNECTED ) {
    delay ( 500 );
    Serial.print ( "." );
  }
  timeClient.begin();
  // + 1区 偏移3600, +8区 :3600×8 = 28800,如果注释掉这行代码会发现通过串口监听器
  //打印出来的时间和电脑中显示的时间并不同步,相差8小时。
  timeClient.setTimeOffset(28800);


}

void loop() {
  timeClient.update();

  display.begin();
  display.setContrast(50);


  // 建立心知天气API当前天气请求资源地址
  String reqRes = "/v3/weather/now.json?key=" + reqUserKey +
                  + "&location=" + reqLocation +
                  "&language=en&unit=" +reqUnit;

  // 向心知天气服务器服务器请求信息并对信息进行解析
  httpRequest(reqRes);

    display.clearDisplay();

  display.setTextSize(1);
  display.setTextColor(BLACK);
  display.setCursor(0,5);
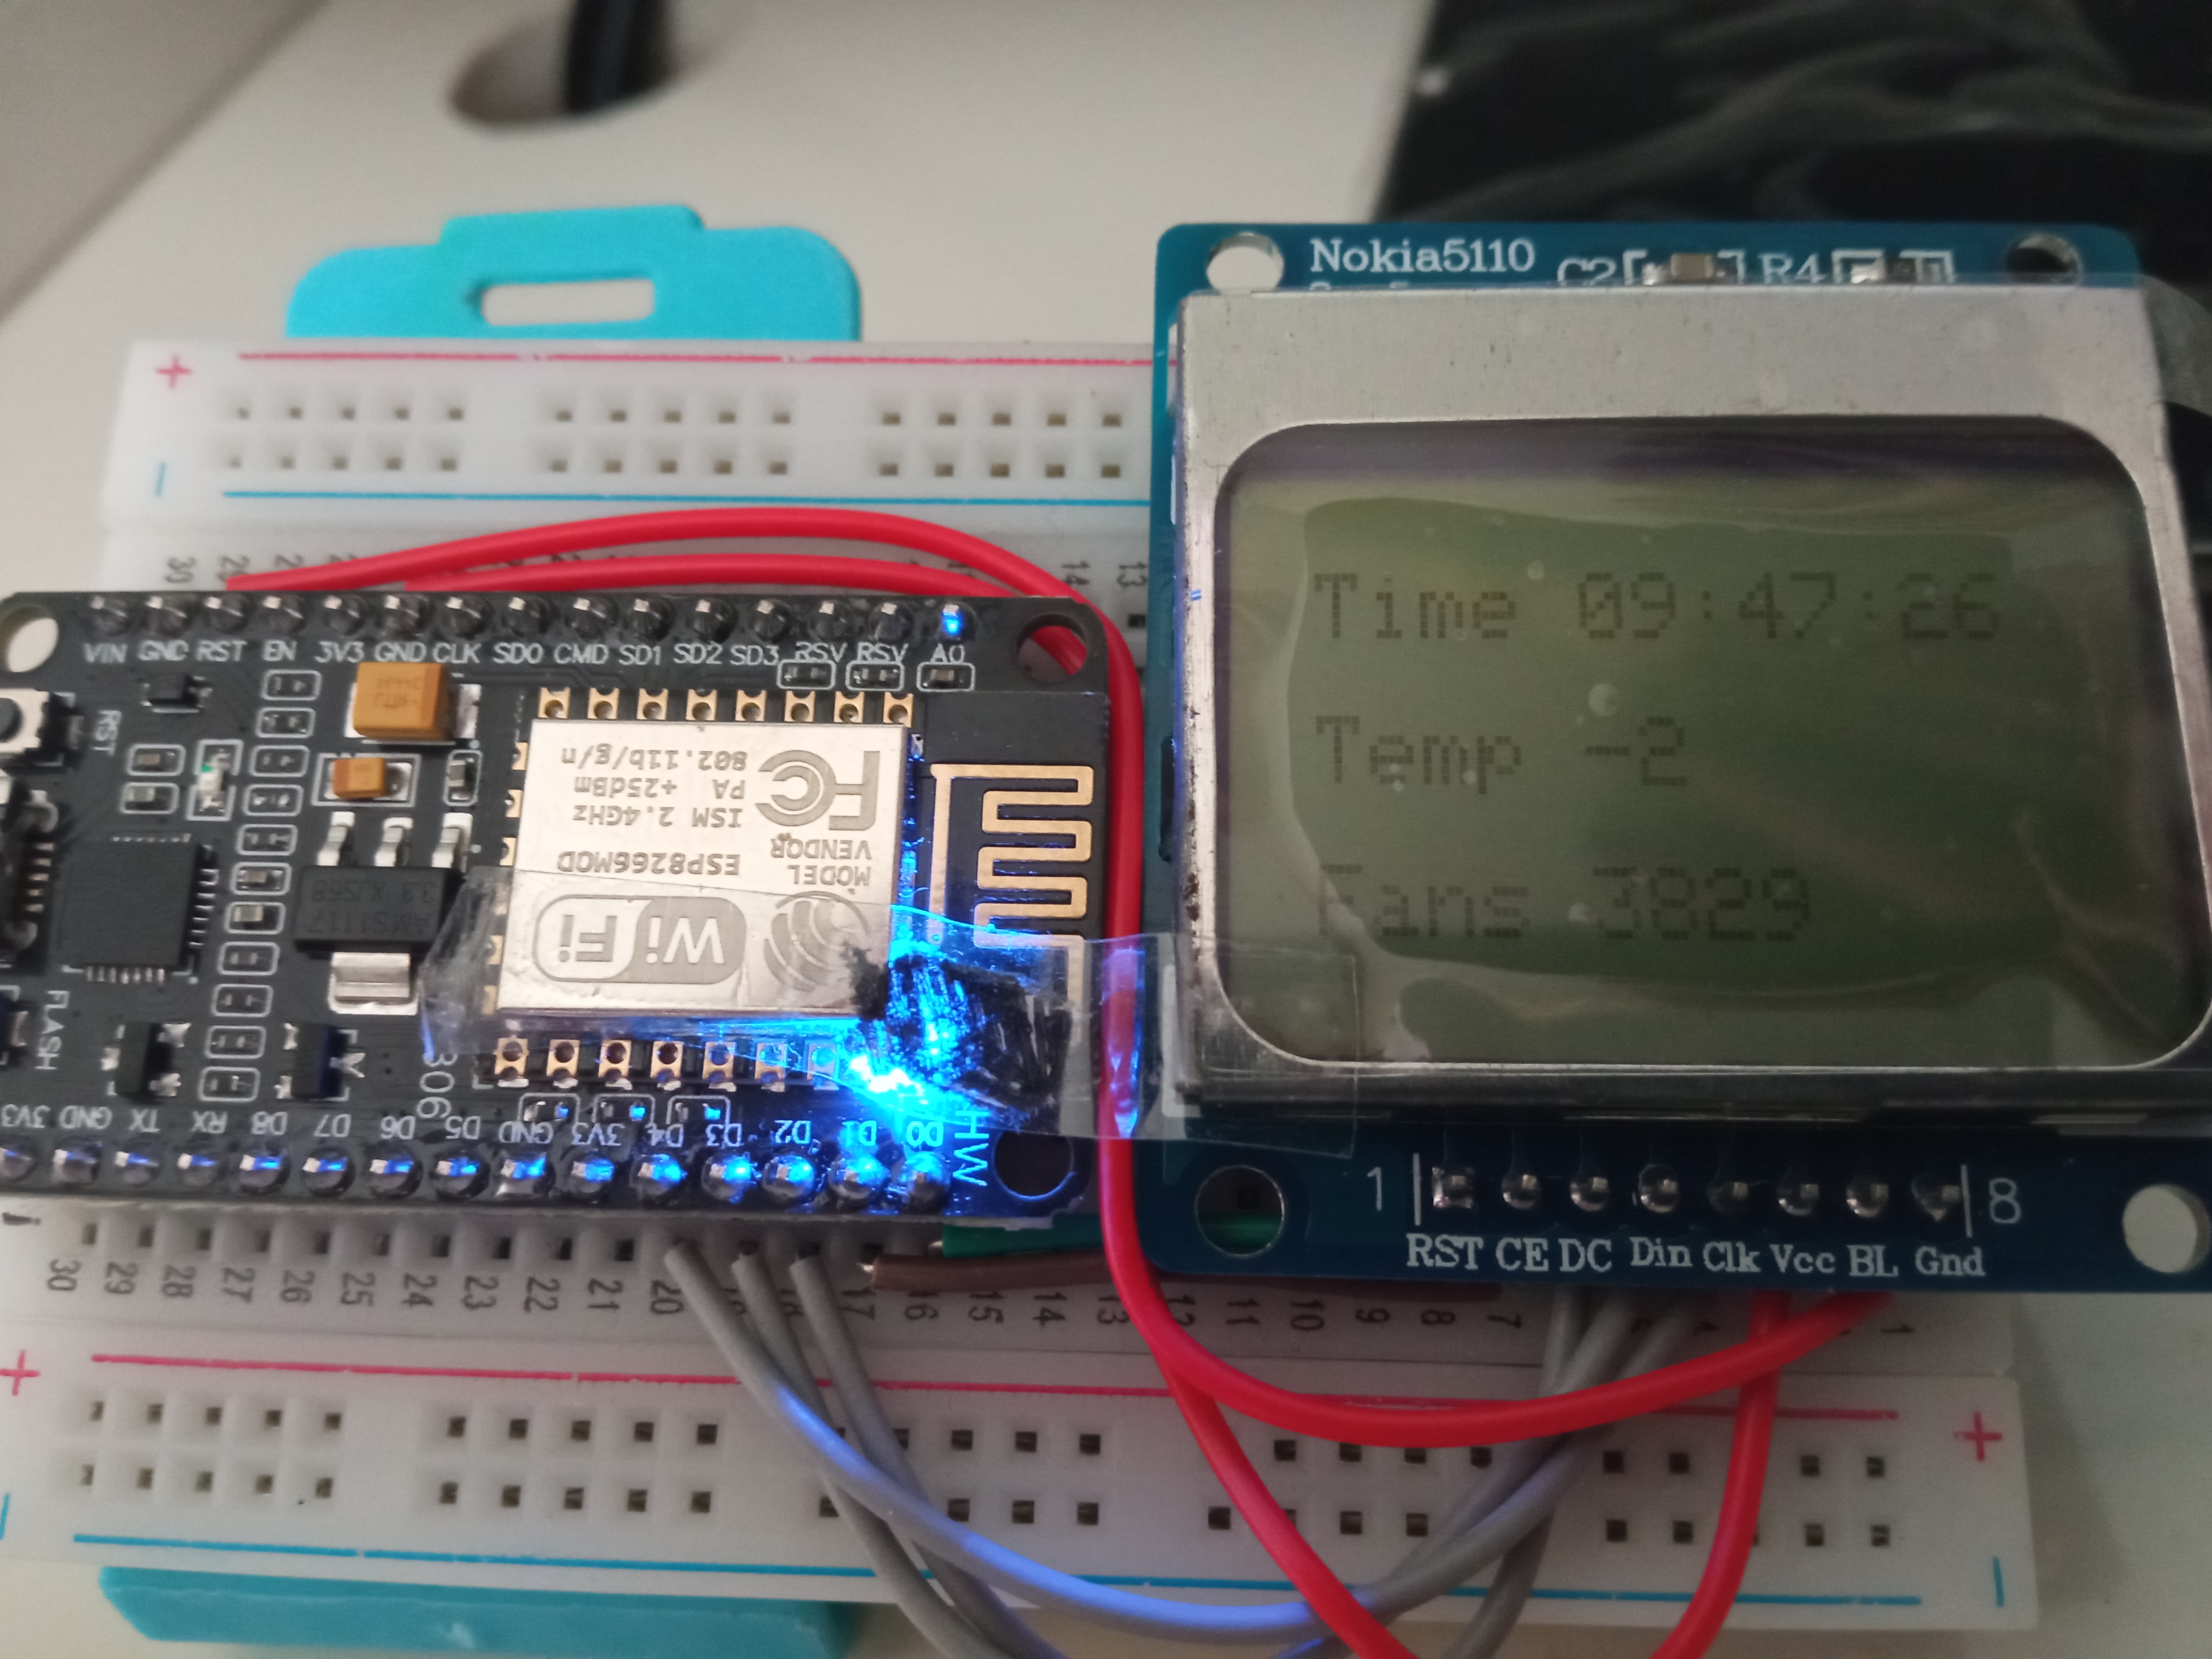
  display.println("Time " + timeClient.getFormattedTime());
  display.display();

   display.setTextSize(1);
  display.setTextColor(BLACK);
  display.setCursor(0,20);
  display.println("Temp " + temperature);
  display.display();

  display.setTextSize(1);
  display.setTextColor(BLACK);
  display.setCursor(0,35);
  display.println("Fans ");
  display.display();

  display.setTextSize(1);
  display.setTextColor(BLACK);
  display.setCursor(30,35);
  display.println(fansInfo.getFansNumber());
  display.display();


  if(fansInfo.update()){  // 更新信息成功
    Serial.println("Update OK");
    Serial.print("Server Response: ");
    Serial.println(fansInfo.getServerCode());
    Serial.print(F("Fans: "));
    Serial.println(fansInfo.getFansNumber());
    Serial.print(F("Guan Zhu: "));
    Serial.println(fansInfo.getFollowing());
    Serial.print(F("Hei Ming Dan: "));
    Serial.println(fansInfo.getBlack());
  } else {     // 更新失败
    Serial.println("Update Fail...");
    Serial.print("Server Response: ");
    Serial.println(fansInfo.getServerCode());
  }


  delay(300);


}


// 向心知天气服务器服务器请求信息并对信息进行解析
void httpRequest(String reqRes){
  WiFiClient client;

  // 建立http请求信息
  String httpRequest = String("GET ") + reqRes + " HTTP/1.1\r\n" +
                              "Host: " + host + "\r\n" +
                              "Connection: close\r\n\r\n";
  Serial.println("");
  Serial.print("Connecting to "); Serial.print(host);

  // 尝试连接服务器
  if (client.connect(host, 80)){
    Serial.println(" Success!");

    // 向服务器发送http请求信息
    client.print(httpRequest);
    Serial.println("Sending request: ");
    Serial.println(httpRequest);

    // 获取并显示服务器响应状态行
    String status_response = client.readStringUntil('\n');
    Serial.print("status_response: ");
    Serial.println(status_response);

    // 使用find跳过HTTP响应头
    if (client.find("\r\n\r\n")) {
      Serial.println("Found Header End. Start Parsing.");
    }

    // 利用ArduinoJson库解析心知天气响应信息
    parseInfo(client);
  } else {
    Serial.println(" connection failed!");
  }
  //断开客户端与服务器连接工作
  client.stop();
}

// 利用ArduinoJson库解析心知天气响应信息
void parseInfo(WiFiClient client){
  const size_t capacity = JSON_ARRAY_SIZE(1) + JSON_OBJECT_SIZE(1) + 2*JSON_OBJECT_SIZE(3) + JSON_OBJECT_SIZE(6) + 230;
  DynamicJsonDocument doc(capacity);

  deserializeJson(doc, client);

  JsonObject results_0 = doc["results"][0];

  JsonObject results_0_now = results_0["now"];
  const char* results_0_now_text = results_0_now["text"]; // "Sunny"
  const char* results_0_now_code = results_0_now["code"]; // "0"
  const char* results_0_now_temperature = results_0_now["temperature"]; // "32"

  const char* results_0_last_update = results_0["last_update"]; // "2020-06-02T14:40:00+08:00"

  // 通过串口监视器显示以上信息
  String results_0_now_text_str = results_0_now["text"].as<String>();
  int results_0_now_code_int = results_0_now["code"].as<int>();
  int results_0_now_temperature_int = results_0_now["temperature"].as<int>();

  String results_0_last_update_str = results_0["last_update"].as<String>();

  Serial.println(F("======Weahter Now======="));
  Serial.print(F("Weather Now: "));
  Serial.print(results_0_now_text_str);
  Serial.print(F(" "));
  Serial.println(results_0_now_code_int);
  Serial.print(F("Temperature: "));
  Serial.println(results_0_now_temperature_int);
  Serial.print(F("Last Update: "));
  Serial.println(results_0_last_update_str);
  Serial.println(F("========================"));

  temperature=results_0_now_temperature_int;


}
本文作者:ifwz1729
本文链接:https://www.cnblogs.com/ifwz/p/15832512.html
版权声明:本作品采用知识共享署名-非商业性使用-禁止演绎 2.5 中国大陆许可协议进行许可。


【推荐】国内首个AI IDE,深度理解中文开发场景,立即下载体验Trae
【推荐】编程新体验,更懂你的AI,立即体验豆包MarsCode编程助手
【推荐】抖音旗下AI助手豆包,你的智能百科全书,全免费不限次数
【推荐】轻量又高性能的 SSH 工具 IShell:AI 加持,快人一步
· TypeScript + Deepseek 打造卜卦网站:技术与玄学的结合
· 阿里巴巴 QwQ-32B真的超越了 DeepSeek R-1吗?
· 如何调用 DeepSeek 的自然语言处理 API 接口并集成到在线客服系统
· 【译】Visual Studio 中新的强大生产力特性
· 2025年我用 Compose 写了一个 Todo App