Springboot2整合ehcache缓存笔记整理
EhCache是一个比较成熟的Java缓存框架,最早从hibernate发展而来, 是进程中的缓存系统,它提供了用内存,磁盘文件存储,以及分布式存储方式等多种灵活的cache管理方案,快速简单。
Springboot对ehcache的使用非常支持,所以在Springboot中只需做些配置就可使用,且使用方式也简易。
1. pom.xml中添加依赖
<!-- Spring Boot 缓存支持启动器 -->
        <dependency>
            <groupId>org.springframework.boot</groupId>
            <artifactId>spring-boot-starter-cache</artifactId>
        </dependency>
        <!-- Ehcache 坐标 -->
        <dependency>
            <groupId>net.sf.ehcache</groupId>
            <artifactId>ehcache</artifactId>
        </dependency>
完整的pom.xml如下
<?xml version="1.0" encoding="UTF-8"?>
<project xmlns="http://maven.apache.org/POM/4.0.0" xmlns:xsi="http://www.w3.org/2001/XMLSchema-instance"
         xsi:schemaLocation="http://maven.apache.org/POM/4.0.0 https://maven.apache.org/xsd/maven-4.0.0.xsd">
    <modelVersion>4.0.0</modelVersion>
    <parent>
        <groupId>org.springframework.boot</groupId>
        <artifactId>spring-boot-starter-parent</artifactId>
        <version>2.3.5.RELEASE</version>
        <relativePath/> <!-- lookup parent from repository -->
    </parent>
    <groupId>com.roncoo.eshop</groupId>
    <artifactId>cache</artifactId>
    <version>0.0.1-SNAPSHOT</version>
    <name>cache</name>
    <description>Demo project for Spring Boot</description>

    <properties>
        <spring.framework.version>5.2.10.RELEASE</spring.framework.version>
        <project.build.sourceEncoding>UTF-8</project.build.sourceEncoding>
        <java.version>1.8</java.version>
    </properties>

    <dependencies>
        <dependency>
            <groupId>org.springframework.boot</groupId>
            <artifactId>spring-boot-starter-web</artifactId>
        </dependency>

        <dependency>
            <groupId>org.projectlombok</groupId>
            <artifactId>lombok</artifactId>
            <version>1.18.10</version>
            <scope>provided</scope>
        </dependency>

        <!-- Spring Boot 缓存支持启动器 -->
        <dependency>
            <groupId>org.springframework.boot</groupId>
            <artifactId>spring-boot-starter-cache</artifactId>
        </dependency>
        <!-- Ehcache 坐标 -->
        <dependency>
            <groupId>net.sf.ehcache</groupId>
            <artifactId>ehcache</artifactId>
        </dependency>

        <dependency>
            <groupId>org.springframework.boot</groupId>
            <artifactId>spring-boot-starter-test</artifactId>
            <scope>test</scope>
            <exclusions>
                <exclusion>
                    <groupId>org.junit.vintage</groupId>
                    <artifactId>junit-vintage-engine</artifactId>
                </exclusion>
            </exclusions>
        </dependency>
    </dependencies>

    <build>
        <plugins>
            <plugin>
                <groupId>org.springframework.boot</groupId>
                <artifactId>spring-boot-maven-plugin</artifactId>
            </plugin>
        </plugins>
    </build>

</project>
2. 创建ehcache.xml配置文件
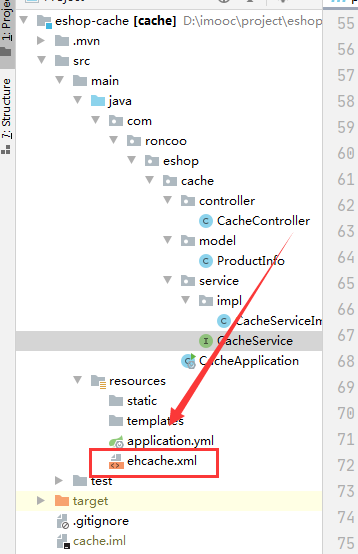
位置:classpath目录下,即src/main/resources/ehcache.xml

<?xml version="1.0" encoding="UTF-8"?>
<ehcache xmlns:xsi="http://www.w3.org/2001/XMLSchema-instance"
    xsi:noNamespaceSchemaLocation="http://ehcache.org/ehcache.xsd"
    updateCheck="false">

  	<!-- diskStore:ehcache其实是支持内存+磁盘+堆外内存,几个层级的缓存 -->
  	<!-- 在这里设置一下,但是一般不用的 -->
    <diskStore path="java.io.tmpdir/Tmp_EhCache" />

    <!-- defaultCache,是默认的缓存策略 -->
    <!-- 如果你指定的缓存策略没有找到,那么就用这个默认的缓存策略 -->
    <!-- external:如果设置为true的话,那么timeout就没有效果,缓存就会一直存在,一般默认就是false -->
    <!-- maxElementsInMemory:内存中可以缓存多少个缓存条目,在实践中,你是需要自己去计算的,比如你计算你要缓存的对象是什么?有多大?最多可以缓存多少MB,或者多少个G的数据?除以每个对象的大小,计算出最多可以放多少个对象 -->
    <!-- overflowToDisk:如果内存不够的时候,是否溢出到磁盘 -->
    <!-- diskPersistent:是否启用磁盘持久化的机制,在jvm崩溃的时候和重启之间,不用 -->
    <!-- timeToIdleSeconds:对象最大的闲置的时间,如果超出闲置的时间,可能就会过期,我们这里就不用了,缓存最多闲置5分钟就被干掉了 -->
    <!-- timeToLiveSeconds:对象最多存活的时间,我们这里也不用,超过这个时间,缓存就过期,就没了 -->
    <!-- memoryStoreEvictionPolicy:当缓存数量达到了最大的指定条目数的时候,需要采用一定的算法,从缓存中清除一批数据,LRU,最近最少使用算法,最近一段时间内,最少使用的那些数据,就被干掉了 -->
    <defaultCache
        eternal="false"
        maxElementsInMemory="1000"
        overflowToDisk="false"
        diskPersistent="false"
        timeToIdleSeconds="300"
        timeToLiveSeconds="0"
        memoryStoreEvictionPolicy="LRU" />

 	<!-- 手动指定的缓存策略 -->
 	<!-- 比如你一个应用吧,可能要缓存很多种不同的数据,比如说商品信息,或者是其他的一些数据 -->
 	<!-- 对不同的数据,缓存策略可以在这里配置多种 -->
    <cache
        name="local"
        eternal="false"
        maxElementsInMemory="1000"
        overflowToDisk="false"
        diskPersistent="false"
        timeToIdleSeconds="300"
        timeToLiveSeconds="0"
        memoryStoreEvictionPolicy="LRU" />

	<!-- ehcache这种东西,简单实用,是很快速的,1小时上手可以用在项目里了,没什么难度的 -->
    <!-- ehcache这个技术,如果讲深了,里面的东西还是很多的,高级的feature,但是我们这里就不涉及了 -->

</ehcache>
3. 在application.yml中加入以下配置代码
spring:
  cache:
    type: ehcache
    ehcache:
      config: classpath:ehcache.xml
4. 在启动类前加上@EnableCaching注解;这样的话,启动类启动时会去启动缓存启动器
@SpringBootApplication
@EnableCaching
public class CacheApplication {

    public static void main(String[] args) {
        SpringApplication.run(CacheApplication.class, args);
    }

}
至此ehcache在Springboot中就配置完成,下面编写测试代码
5. 实体类实现可序列化接口Serializable;由于需要实体类支持缓存中的磁盘存储,所以需要实体类实现可序列化接口
import lombok.AllArgsConstructor;
import lombok.Data;
import lombok.NoArgsConstructor;

import java.io.Serializable;

/**
 * 商品信息
 *
 * @author Administrator
 */
@Data
@NoArgsConstructor
@AllArgsConstructor
public class ProductInfo implements Serializable {

    private Long id;
    private String name;
    private Double price;
}
6. 使用@CachePut存数据到缓存使用@Cacheable读取缓存
import com.roncoo.eshop.cache.model.ProductInfo;

/**
 * 缓存service接口
 * @author Administrator
 *
 */
public interface CacheService {

	/**
	 * 将商品信息保存到本地缓存中
	 * @param productInfo
	 * @return
	 */
	public ProductInfo saveLocalCache(ProductInfo productInfo);

	/**
	 * 从本地缓存中获取商品信息
	 * @param id
	 * @return
	 */
	public ProductInfo getLocalCache(Long id);

}
import org.springframework.cache.annotation.CachePut;
import org.springframework.cache.annotation.Cacheable;
import org.springframework.stereotype.Service;

import com.roncoo.eshop.cache.model.ProductInfo;
import com.roncoo.eshop.cache.service.CacheService;

/**
 * 缓存Service实现类
 *
 * @author Administrator
 */
@Service
public class CacheServiceImpl implements CacheService {

    public static final String CACHE_NAME = "local";

    /**
     * 将商品信息保存到本地缓存中
     *
     * @param productInfo
     * @return
     */
    @CachePut(value = CACHE_NAME, key = "'key_'+#productInfo.getId()")
    public ProductInfo saveLocalCache(ProductInfo productInfo) {
        return productInfo;
    }

    /**
     * 从本地缓存中获取商品信息
     *
     * @param id
     * @return
     */
    @Cacheable(value = CACHE_NAME, key = "'key_'+#id")
    public ProductInfo getLocalCache(Long id) {
        return null;
    }

}
7. 编写控制器代码
import com.roncoo.eshop.cache.model.ProductInfo;
import com.roncoo.eshop.cache.service.CacheService;
import org.springframework.beans.factory.annotation.Autowired;
import org.springframework.web.bind.annotation.*;

/**
 * 缓存Controller
 *
 * @author Administrator
 */
@RestController
public class CacheController {

    @Autowired
    private CacheService cacheService;

    @PostMapping("/testPutCache")
    public String testPutCache(@RequestBody ProductInfo productInfo) {
        cacheService.saveLocalCache(productInfo);
        return "success";
    }

    @GetMapping("/testGetCache")
    public ProductInfo testGetCache(Long id) {
        return cacheService.getLocalCache(id);
    }

}
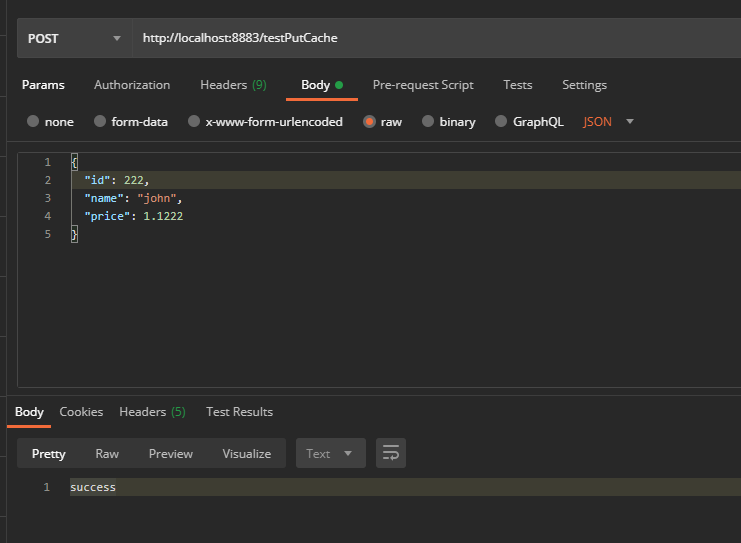
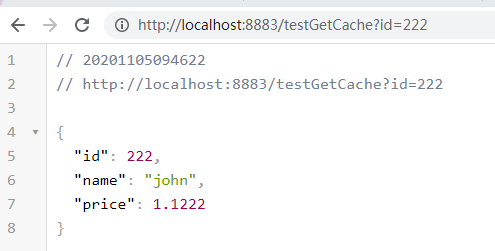
8. 测试


补充
// 使用@CacheEvict清除缓存
@CacheEvict(value="users",allEntries=true)
public void saveUsers(Users users) {
	this.usersRepository.save(users);
}
// @CacheEvict是用来标注在需要清除缓存元素的方法或类上的。当标记在一个类上时表示其中所有的方法的执行都会触发缓存的清除操作。@CacheEvict可以指定的属性有value、key、condition、allEntries和beforeInvocation。
// 其中value、key和condition的语义与@Cacheable对应的属性类似;allEntries是boolean类型,表示是否需要清除缓存中的所有元素。默认为false,表示不需要。
// 当指定了allEntries为true时,Spring Cache将忽略指定的key。有的时候我们需要Cache一下清除所有的元素,这比一个一个清除元素更有效率

// 使用@CachePut标注的方法在执行前不会去检查缓存中是否存在之前执行过的结果,而是每次都会执行该方法,并将执行结果以键值对的形式存入指定的缓存中。

// @Cacheable:类或者方法上,类代表所有的方法都使用它,方法上针对特定的方法,作用就是先查询缓存是否有值,有的话就直接返回缓存结果

