【原】无脑操作:Eclipse + Maven + jFinal + MariaDB 环境搭建
一、开发环境
1、windows 7 企业版
2、Eclipse IDE for Enterprise Java Developers Version: 2019-03 (4.11.0)
3、JDK 1.8
4、Maven 3.5.2
5、MariaDB
6、Tomcat 8.5
二、基础配置
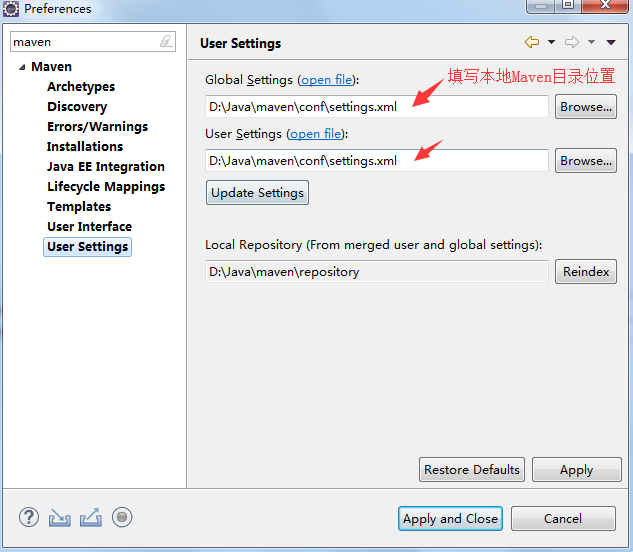
1、Eclipse中Maven的设置如下图
2、数据库使用默认的test库,创建表category
1 CREATE TABLE category
2 (
3     categoryid INT AUTO_INCREMENT PRIMARY KEY,
4     categoryname VARCHAR(10) NOT NULL
5 );
6
7 INSERT INTO category VALUES(NULL, '图书'), (NULL, '美妆');
8
9 SELECT * FROM category;
三、环境搭建
1、创建Maven工程
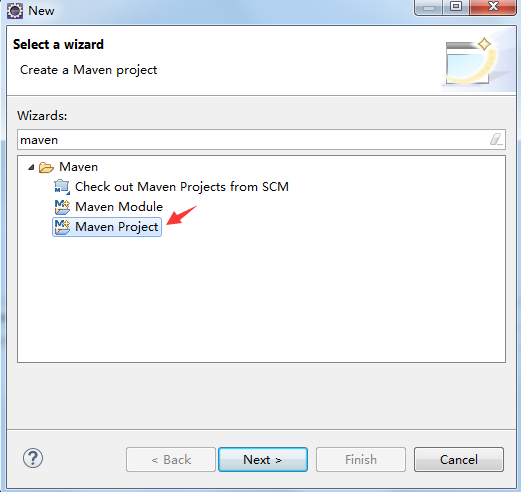
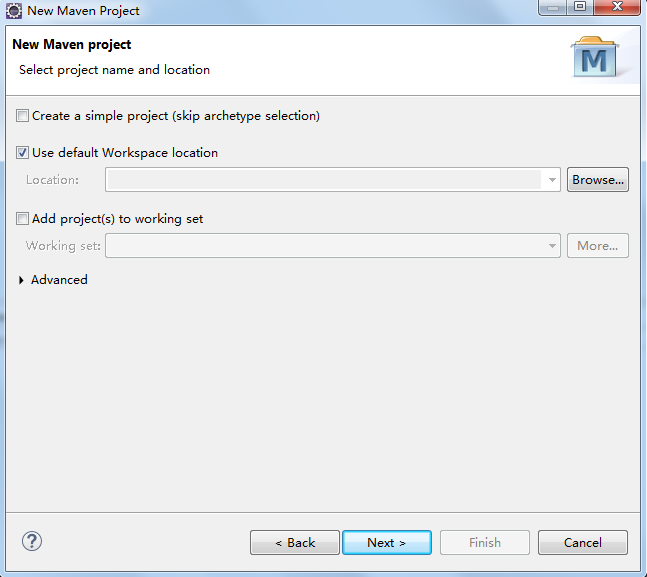
2、使用默认工作空间
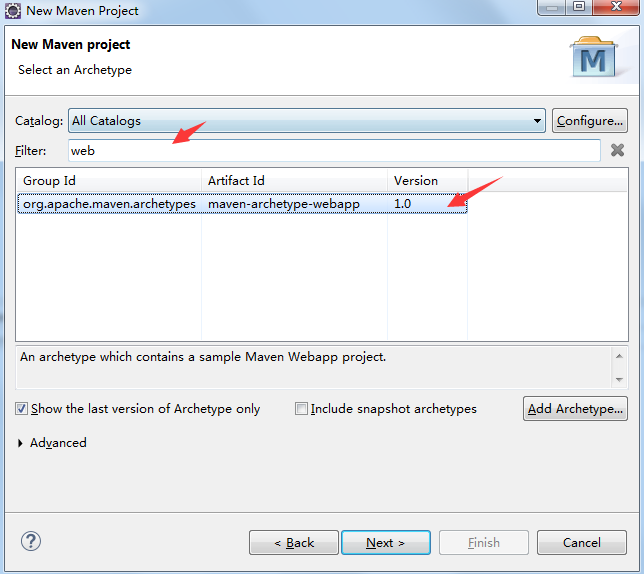
3、选择工程初始类型webapp
4、填写包名和工程名

5、点击Finish,开始创建Maven工程。创建完毕后,会提示找不到Servlet包的错误。可以通过导入Tomcat解决该问题。
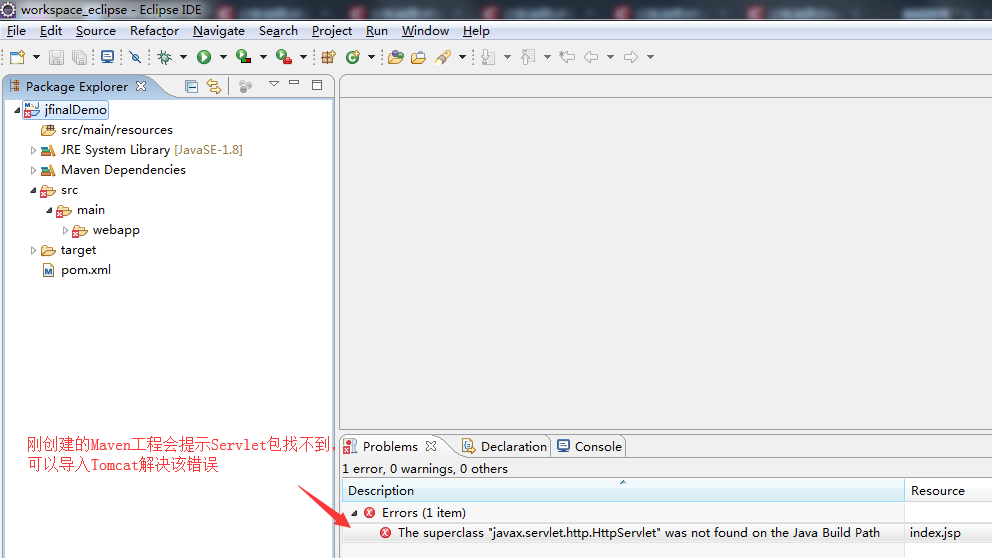
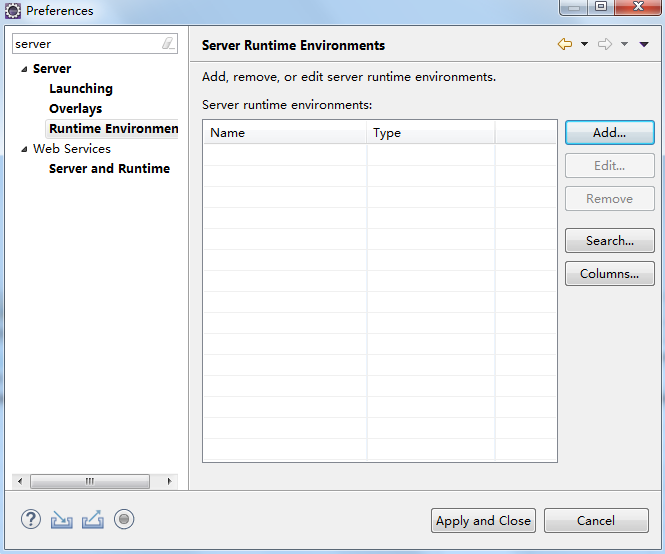
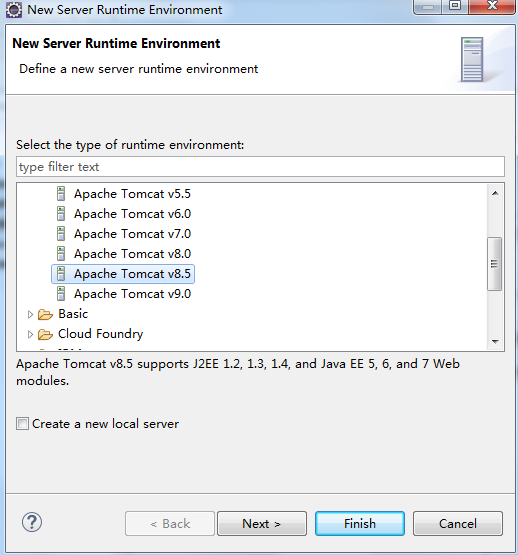
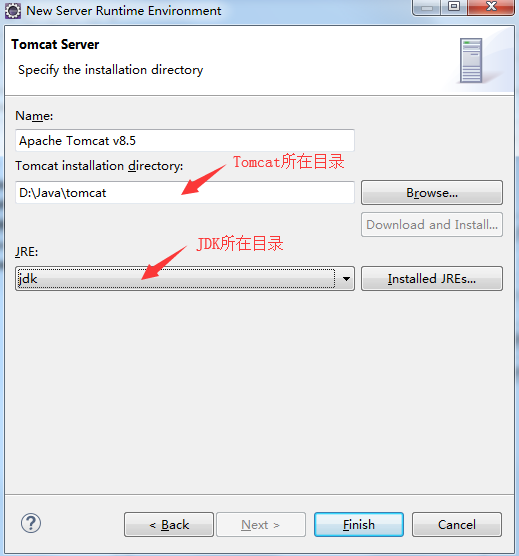
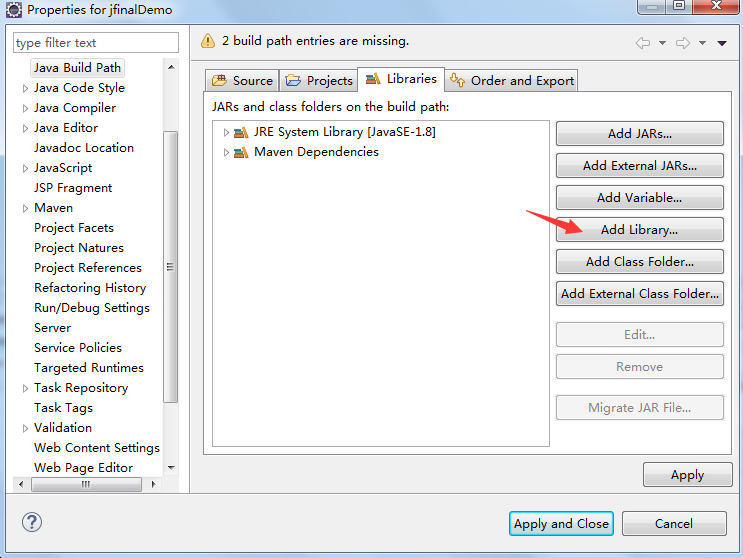
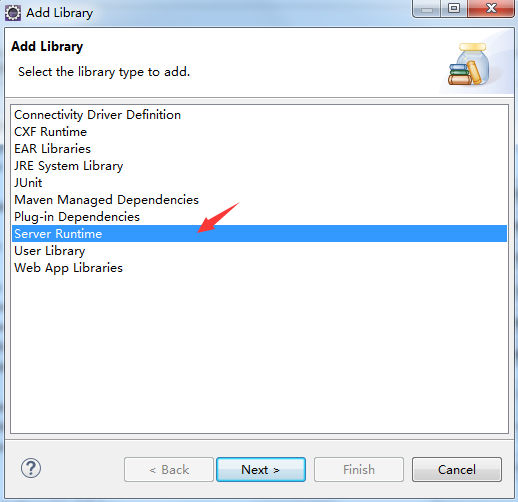
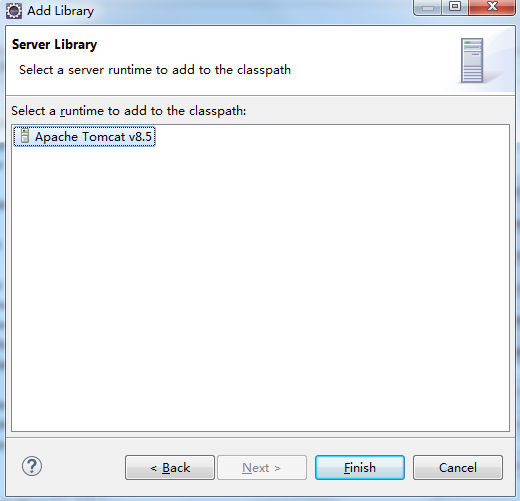
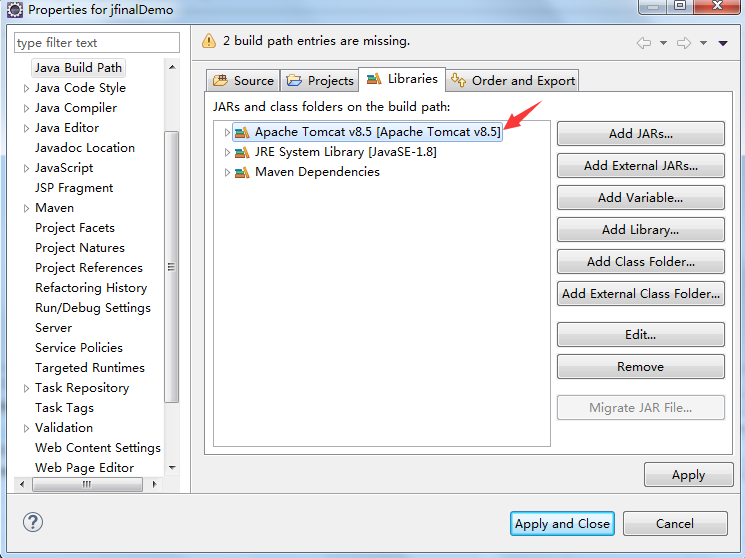
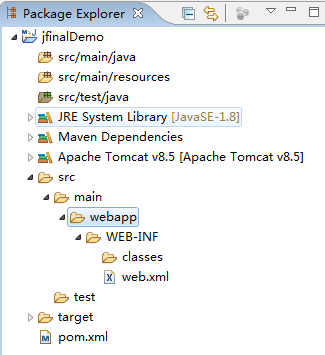
删除默认的index.jsp文件,后面我们使用html页面。在webapp目录的WEB-INF目录下新建classes目录。最终的目录结构如下
6、编写pom.xml文件
 1 <project xmlns="http://maven.apache.org/POM/4.0.0"
 2     xmlns:xsi="http://www.w3.org/2001/XMLSchema-instance"
 3     xsi:schemaLocation="http://maven.apache.org/POM/4.0.0 http://maven.apache.org/maven-v4_0_0.xsd">
 4     <modelVersion>4.0.0</modelVersion>
 5     <groupId>cn.temptation</groupId>
 6     <artifactId>jfinalDemo</artifactId>
 7     <packaging>war</packaging>
 8     <version>0.0.1-SNAPSHOT</version>
 9     <name>jfinalDemo Maven Webapp</name>
10     <url>http://maven.apache.org</url>
11     <dependencies>
12         <dependency>
13             <groupId>junit</groupId>
14             <artifactId>junit</artifactId>
15             <version>3.8.1</version>
16             <scope>test</scope>
17         </dependency>
18         <!-- 添加jfinal依赖 -->
19         <dependency>
20             <groupId>com.jfinal</groupId>
21             <artifactId>jfinal</artifactId>
22             <version>3.8</version>
23         </dependency>
24         <!-- 添加jetty server依赖 -->
25         <dependency>
26             <groupId>com.jfinal</groupId>
27             <artifactId>jetty-server</artifactId>
28             <version>2019.3</version>
29             <!-- 使用IDEA开发时,scope设置成为compile,否则提示缺少jar包,打包时记得要改回 provided -->
30             <scope>provided</scope>
31         </dependency>
32         <!-- mysql驱动 -->
33         <dependency>
34             <groupId>mysql</groupId>
35             <artifactId>mysql-connector-java</artifactId>
36             <version>5.1.37</version>
37         </dependency>
38         <!-- druid连接池 -->
39         <dependency>
40             <groupId>com.alibaba</groupId>
41             <artifactId>druid</artifactId>
42             <version>1.0.29</version>
43         </dependency>
44     </dependencies>
45     <build>
46         <finalName>jfinalDemo</finalName>
47     </build>
48 </project>
7、编写web.xml配置文件,主要就是设置一下过滤器
 1 <!DOCTYPE web-app PUBLIC
 2  "-//Sun Microsystems, Inc.//DTD Web Application 2.3//EN"
 3  "http://java.sun.com/dtd/web-app_2_3.dtd" >
 4
 5 <web-app>
 6     <filter>
 7         <filter-name>jFinal</filter-name>
 8         <filter-class>com.jfinal.core.JFinalFilter</filter-class>
 9         <init-param>
10             <param-name>configClass</param-name>
11             <param-value>cn.temptation.config.MyConfig</param-value>
12         </init-param>
13     </filter>
14     <filter-mapping>
15         <filter-name>jFinal</filter-name>
16         <url-pattern>/*</url-pattern>
17     </filter-mapping>
18 </web-app>
8、编写数据库连接配置文件db.properties,为了能在框架中读取到该配置文件内容,把该文件放在前面创建的webapp目录的WEB-INF目录下的classes目录中。
1 jdbcUrl = jdbc:mysql://localhost/test?characterEncoding=utf8
2 user = root
3 password = sa
4 devMode = true
5 showSql = true
9、编写实体类Category,因为要使用ActiveRecord,所以从com.jfinal.plugin.activerecord.Model继承
1 package cn.temptation.bean;
2
3 import com.jfinal.plugin.activerecord.Model;
4
5 @SuppressWarnings("serial")
6 public class Category extends Model<Category> {
7
8 }
10、编写配置类MyConfig
 1 package cn.temptation.config;
 2
 3 import com.jfinal.config.Constants;
 4 import com.jfinal.config.Handlers;
 5 import com.jfinal.config.Interceptors;
 6 import com.jfinal.config.JFinalConfig;
 7 import com.jfinal.config.Plugins;
 8 import com.jfinal.config.Routes;
 9 import com.jfinal.core.JFinal;
10 import com.jfinal.plugin.activerecord.ActiveRecordPlugin;
11 import com.jfinal.plugin.druid.DruidPlugin;
12 import com.jfinal.template.Engine;
13
14 import cn.temptation.bean.Category;
15 import cn.temptation.web.CategoryController;
16
17 public class MyConfig extends JFinalConfig {
18     /**
19      * 配置常量
20      */
21     @Override
22     public void configConstant(Constants me) {
23         // 加载数据库配置文件
24         loadPropertyFile("db.properties");
25         me.setDevMode(true);
26         // 开启支持注解,支持 Controller、Interceptor 之中使用 @Inject 注入业务层,并且自动实现 AOP
27         me.setInjectDependency(true);
28     }
29
30     @Override
31     public void configRoute(Routes me) {
32         me.add("/", CategoryController.class);
33     }
34
35     /**
36      * 配置插件
37      */
38     @Override
39     public void configPlugin(Plugins me) {
40         // 配置druid连接池
41         DruidPlugin db = new DruidPlugin(getProperty("jdbcUrl"), getProperty("user"), getProperty("password"));
42         me.add(db);
43         // ActiveRecord是作为JFinal的Plugin而存在的,所以使用时需要在JFinalConfig中配置ActiveRecordPlugin
44         ActiveRecordPlugin activeRecordPlugin = new ActiveRecordPlugin(db);
45         activeRecordPlugin.addMapping("category", Category.class);
46         // 展示sql语句
47         activeRecordPlugin.setShowSql(true);
48         me.add(activeRecordPlugin);
49     }
50
51     /**
52      * 配置全局拦截器
53      */
54     @Override
55     public void configInterceptor(Interceptors me) {
56
57     }
58
59     /**
60      * 配置处理器
61      */
62     @Override
63     public void configHandler(Handlers me) {
64
65     }
66
67     /**
68      * 配置模板
69      */
70     @Override
71     public void configEngine(Engine me) {
72
73     }
74
75     /**
76      * 启动方法
77      *
78      * @param args
79      */
80     public static void main(String[] args) {
81         JFinal.start("src/main/webapp", 8080, "/", 5);
82     }
83 }
11、编写控制器CategoryController,从com.jfinal.core.Controller继承
 1 package cn.temptation.web;
 2
 3 import java.util.List;
 4
 5 import com.jfinal.core.Controller;
 6
 7 import cn.temptation.bean.Category;
 8
 9 public class CategoryController extends Controller {
10     private Category categoryDao = new Category().dao();
11
12     public void index() {
13         List<Category> categories = categoryDao.find("SELECT * FROM category");
14         setAttr("categories", categories);
15         render("category.html");
16     }
17 }
12、在webapp目录下新建category.html,将服务端获取到的类别数据循环取出呈现
 1 <!DOCTYPE html>
 2 <html>
 3 <head>
 4 <meta charset="UTF-8">
 5 <title>类别列表</title>
 6 <style>
 7 .tblCategory {
 8     border: 1px solid black;
 9     border-collapse: collapse;
10 }
11 </style>
12 </head>
13 <body>
14     <table border="1" class="tblCategory">
15         <tr>
16             <th width="100px">类别编号</th>
17             <th width="150px">类别名称</th>
18         </tr>
19         #for(category:categories)
20         <tr>
21             <td>#(category.categoryid)</td>
22             <td>#(category.categoryname)</td>
23         </tr>
24         #end
25     </table>
26 </body>
27 </html>
13、启动程序,在MyConfig类中直接运行(ctrl + F11)或调试程序(F11),一切顺利的话,可以看到如下内容。这是整合了jetty作为web容器的玩法

14、 整个工程的目录结构
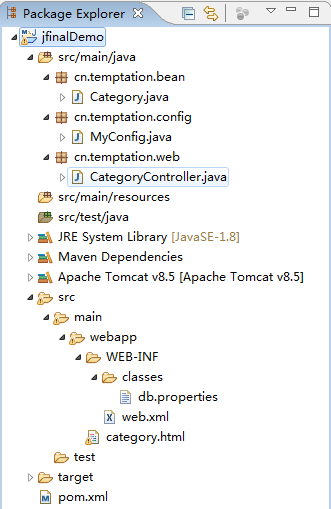
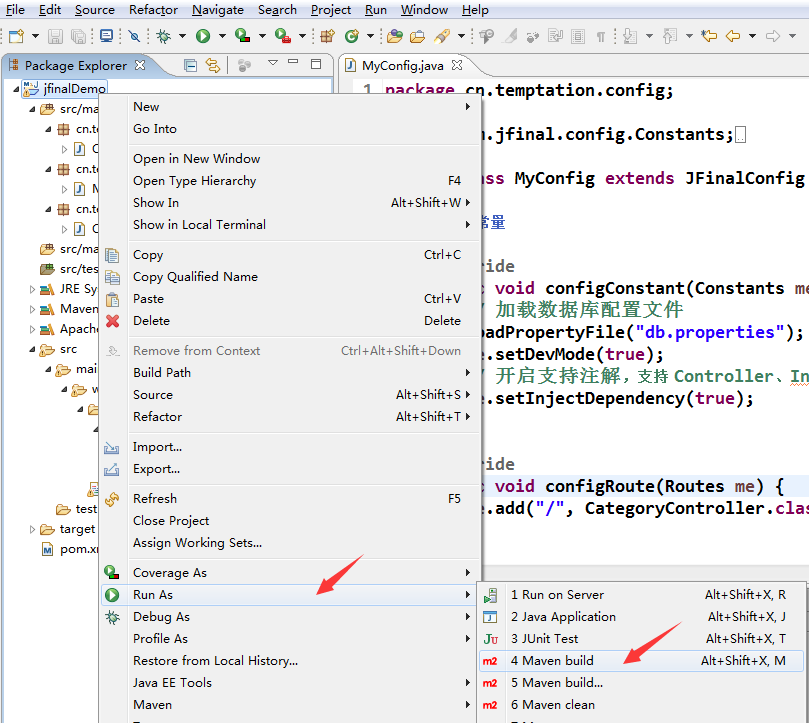
15、要发布成war包,丢到tomcat中运行也很简单,只要在工程上右键找到Run AS----->Maven build,输入clean package,再点击Run,即可打war包。把生成好的war包丢到tomcat的webapps目录下,启动tomcat运行吧,注意,tomcat下访问的路径默认是要带上该工程的目录的,比如本例子中访问的路径就应该是http://localhost:8080/jfinalDemo/


 浙公网安备 33010602011771号