CSS固定定位与粘性定位4大企业级案例
前面两篇文章为大家详细讲解了相对定位与绝对定位的应用场景和案例。如果想了解的可以在公众号里面查看去看。本小节我们学习下固定定位与粘性定位的应用场景和案例。

固定定位
相对于浏览器窗口进行定位,其它与绝对定位的特性一致。
常见的应用有:楼梯式导航、浏览器右侧菜单、底部通栏、全屏黑色半透明遮罩弹出层、弹出注册和登录框、左上固定右自适应后台管理系统布局
粘性定位
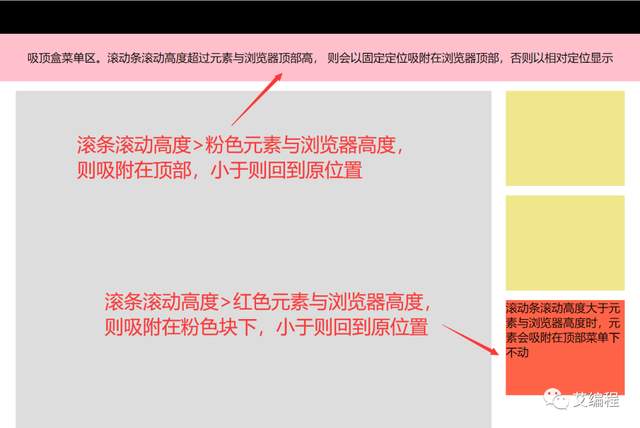
当滚动的高度>元素与浏览器的高度时,会以fixed固定定位显示。
当滚动高度<元素与浏览器高度时,会以relative相对定位显示。
常见的应用有:吸顶盒导航,滚动吸附效果
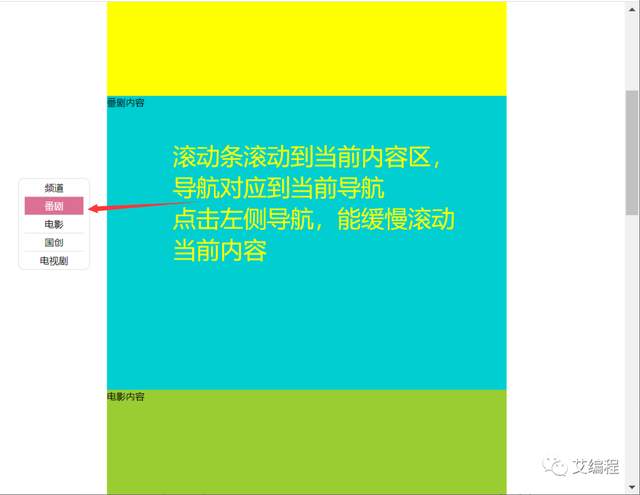
1、楼梯式导航、浏览器右侧菜单、底部通栏(固定定位应用)
这三个案例用都是用固定定位来控制其与浏览器位置。最难是楼梯式导航的js部分

<style>
       body,ul,li{
           margin:0;
           padding: 0;
      }
       .header,.footer{
           height: 200px;
           background-color: skyblue;
      }
       .container{
           width: 1280px;
           margin:20px auto;
      }
       .container .item:nth-child(odd){
           height:600px;
           background-color:yellow;
      }
       .container .item:nth-child(even){
           height:700px;/*代码来自-艾编程-清心*/
           background-color:darkturquoise;
      }
       ul.louti{
           list-style: none;
           width: 100px;
           padding:0px 10px;
           border: 1px solid #ddd;
           border-radius: 10px;
           background-color: #fff;
           position: fixed;/*通过固定定位来控制楼梯式导航的位置*/
           top:300px;
           left:50px;
      }
       ul.louti li{
           height: 30px;
           line-height: 30px;
           text-align: center;
           border-bottom:1px solid #ddd;
           cursor: pointer;
      }
       ul.louti li:last-child{
           border:none;
      }
       ul.louti li.current{
           background-color: palevioletred;
           color:#fff;
      }
   </style>
<body>
   <div class="header"></div>
   <div class="container">
       <div class="item">频道内容</div>
       <div class="item">番剧内容</div>
       <div class="item">电影内容</div>
       <div class="item">国创内容</div>
       <div class="item">电视剧内容</div>
   </div>
   <div class="footer"></div>
   <ul class="louti"><!--楼梯式导航 固定定位-->
       <li class="current">频道</li>
       <li>番剧</li>
       <li>电影</li>
       <li>国创</li>
       <li>电视剧</li>
   </ul>
</body><script>
var itemTop=[];//用来保存每个区块与页面顶部距离
var itemHeight=[]
var oItem=document.querySelectorAll('.container .item')
var oLi=document.querySelectorAll('.louti li');
var len=oItem.length;
var dirSpeed=20;//定义方向和速度
var flag=-1;//提高性能优化标签
var scrollTop=0;//保存浏览器滚动高
var timer=null;//全局定时器
//把每个盒子与浏览器顶部距离,和高度分别保存到数组中
for(var i=0;i<len ;i++){
itemTop.push(oItem[i].offsetTop);
itemHeight.push(oItem[i].clientHeight);
}
window.onscroll=function(){//滚动浏览器滚动条
//获取滚动条滚动的高度
scrollTop=document.documentElement.scrollTop || document.body.scrollTop;
for(var i=0;i<len;i++){
if(parseInt(scrollTop)<=parseInt(itemTop[i]+itemHeight[i]/3)){
break;
}/*代码来自-艾编程-清心*/
}
if(flag!=i){//如果在当前楼层滚动,则不会重复执行代码
flag=i;
for(var j=0;j<len;j++){
oLi[j].className='';
}
oLi[i].className='current';
}
}
for(var j=0;j<oLi.length;j++){
oLi[j].index=j;//保存序列号,后面方便使用
oLi[j].onclick=function(){//给导航加点击事件
clearInterval(timer);//清除定时器
var that=this;//保存this
//首先要获取当前滚动条高度
scrollTop=document.documentElement.scrollTop || document.body.scrollTop;
scrollTop>=itemTop[that.index]+itemHeight[that.index]/3?dirSpeed=-20:dirSpeed=20;
timer=setInterval(function(){/*代码来自-艾编程-清心*/
scrollTop+=dirSpeed;
if(scrollTop<=itemTop[that.index]+itemHeight[that.index]/3 && dirSpeed<0 || scrollTop>=itemTop[that.index]+itemHeight[that.index]/3 && dirSpeed>0){
scrollTop=itemTop[that.index]+itemHeight[that.index]/3;
clearInterval(timer);
}
(document.documentElement.scrollTop=scrollTop) || (document.body.scrollTop=scrollTop);
},5)
}
}
</script>2、视频弹窗播放效果(固定定位应用)
这个效果中黑色的半透明遮罩层和弹出的视频都是相对于浏览器来固定定位的。弹出登录注册框的原理和这个是一样的。这里以相对较为复杂的视频弹窗效是为例来讲解。
<style>
       .video{
           width:300px;
           height: 200px;
      }
       .video img{
           width: 100%;
           height: 100%;
           object-fit: cover;
           cursor: pointer;
      }
       .mask{
           background-color: rgba(0,0,0,0.5);
           position: fixed;
           top:0px;
           bottom:0px;
           left:0px;
           right:0px;
           display: none;
      }
       .mask video{
           position: fixed;
           left:50%;
           top:50%;
           transform:translateX(-50%) translateY(-50%);
      }
   </style>
<body>
   <!--视频播放列表-->
   <div class="video"><!--data-src放着对应的视频地址-->
       <img src='images/mz8.jpg' data-src="mp4/meizu.mp4"></video>
   </div>
   <div class="mask"><!--黑色半透明遮罩层-->
       <video src="" controls width="70%"></video><!--视频-->
   </div>
   <script>
       var img=document.querySelector('.video img');
       var mask=document.querySelector('.mask');
       var video=document.querySelector('.mask video')
       img.onclick=function(){
           mask.style.display='block';
           video.src=this.dataset.src;//将视频地址赋值给视频播放器
           //视频弹出后,立马自动播放
           video.play();
      }
   </script>
</body>
3、左边和顶部固定,右自适应后台管理界面布局
(固定定位应用)
顶部导航和左侧菜单相对于浏览器固定定位。右侧的内容区则自适应浏览器的宽度
<style>
   body{
       margin:0;
  }
   .top{
       height: 100px;
       position: fixed;/*固定定位 要实现水平自适应,就不要加宽*/
       left:10px;
       right:10px;
       top:0px;
       background-color: pink;
       border-radius: 10px;
  }
   .siderbar{
       width: 250px;
       position: fixed;/*固定定位 要实现垂直自适应,就不要加高*/
       left:10px;
       top:110px;
       bottom:10px;
       background-color: pink;
       border-radius: 10px;
  }
   .main{
       margin:110px 10px 0px 270px;/*水平自适应,不要加宽*/
       min-height:900px;
       background-color: skyblue;
  }
</style>
<body>
   <div class="top"></div><!--顶部-->
   <div class="siderbar"></div><!--左侧边栏-->
   <div class="main"></div><!--主内容区-->
</body>
4、吸顶盒导航和常见左右吸附效果(粘性定位)
由于粘性定义目前只有火狐和Safari浏览器支持,但是这种效果在实际企业开发中必用。所以我们通常会用JS来实现,以下是完整效果的源码。

<style>
   body{
       margin: 0;
       min-width: 1280px;
  }
   .top{
       height: 70px;
       width: 100%;
       background-color: #000;
  }
   .header{
       height: 100px;
       width:100%;
       background-color: pink;
       /* position: sticky; 兼容问题
      position: -webkit-sticky; */
       top:0;
       text-align: center;
       line-height: 100px;
  }
   .container{
       width: 1280px;
       margin:20px auto;
  }/*代码来自-艾编程-清心*/
   .container .main{
       width:1000px;
       min-height: 2000px;
       background-color: #ddd;
       float:left;
  }
   .container .siderbar{
       width:250px;
       float:right;
  }
   .container .siderbar .item{
       height: 200px;
       background-color: khaki;
       margin-bottom:20px;
  }
   .container .siderbar .ceiling{
       height: 200px;
       width: 250px;
       background-color: tomato;
       /* position: sticky;
      position: -webkit-sticky; */
  }
</style>
<body>
   <div class="top"></div>
   <div class="header"></div> <!--吸附块-->
   <div class="container">
       <div class="main"></div>
       <div class="siderbar">
           <div class="item"></div>
           <div class="item"></div>
           <div class="ceiling"></div> <!--吸附块-->
       </div>
   </div>
   <script>
       var header=document.querySelector('.header');
       var ceiling=document.querySelector('.ceiling');
       var _top=header.offsetTop;/*元素与浏览器顶部距离*/
       var _top2=ceiling.offsetTop-header.clientHeight-110;//这里要记得减掉header高度和与顶部高度,因为header在前,定位后不占空间
       console.log(_top2)
       window.onscroll=function(){
           var scrollTop=document.documentElement.scrollTop || document.body.scrollTop;
           console.log(scrollTop)
           scrollTop>=_top?(header.style.position='fixed'):(header.style.position='relative');
           if(scrollTop>=_top2){/*代码来自-艾编程-清心*/
               ceiling.style.position='fixed';/*设置固定定位*/
               ceiling.style.top="110px";/*top值*/
          }else{
               ceiling.style.position='relative';
               ceiling.style.top='0px';
          }
      }
   </script>
</body>
为帮助到一部分同学不走弯路,真正达到一线互联网大厂前端项目研发要求,首次实力宠粉,打造了《30天挑战学习计划》,内容如下:
HTML/HTML5,CSS/CSS3,JavaScript,真实企业项目开发,云服务器部署上线,从入门到精通
- PC端项目开发(1个)
- 移动WebApp开发(2个)
- 多端响应式开发(1个)
共4大完整的项目开发 !一行一行代码带领实践开发,实际企业开发怎么做我们就是怎么做。从学习一开始就进入工作状态,省得浪费时间。
从学习一开始就同步使用 Git 进行项目代码的版本的管理,Markdown 记录学习笔记,包括真实大厂项目的开发标准和设计规范,命名规范,项目代码规范,SEO优化规范
从蓝湖UI设计稿 到 PC端,移动端,多端响应式开发项目开发
- 真机调试,云服务部署上线;
- Linux环境下 的 Nginx 部署,Nginx 性能优化;
- Gzip 压缩,HTTPS 加密协议,域名服务器备案,解析;
- 企业项目域名跳转的终极解决方案,多网站、多系统部署;
- 使用 使用 Git 在线项目部署;
这些内容在《30天挑战学习计划》中每一个细节都有讲到,包含视频+图文教程+项目资料素材等。只为实力宠粉,真正一次掌握企业项目开发必备技能,不走弯路 !
过程中【不涉及】任何费用和利益,非诚勿扰 。
如果你没有添加助理老师微信,可以添加下方微信,说明要参加30天挑战学习计划,来自博客园!老师会邀请你进入学习,并给你发放相关资料


 浙公网安备 33010602011771号