docker发布nacos server通过docker-compose(将nacos配置保存到数据中)
- 直接通过docker启动nacos-server
- 简单发布nacos-serve,直接拉取nacos-server镜像,然后启动docker即可
ps如果启动报错,提示内存不够,则修改docker启动参数
eg: docker run --name nacos -d -p 8848:8848 -e JVM_XMS=256m -e JVM_XMX=256m -e MODE=standalone nacos/nacos-server:latest
不过多解释参数含义。 - 启动后查看服务是否正常使用即可,docker ps -a | grep nacos 查询是否有该服务。
- 如果有问题docker logs nacos查询报错信息。
- 通过docker-compose启动,包含mysql配置设置
- 在此不去解读docker-compose的使用,提供配置信息
- 文件结构
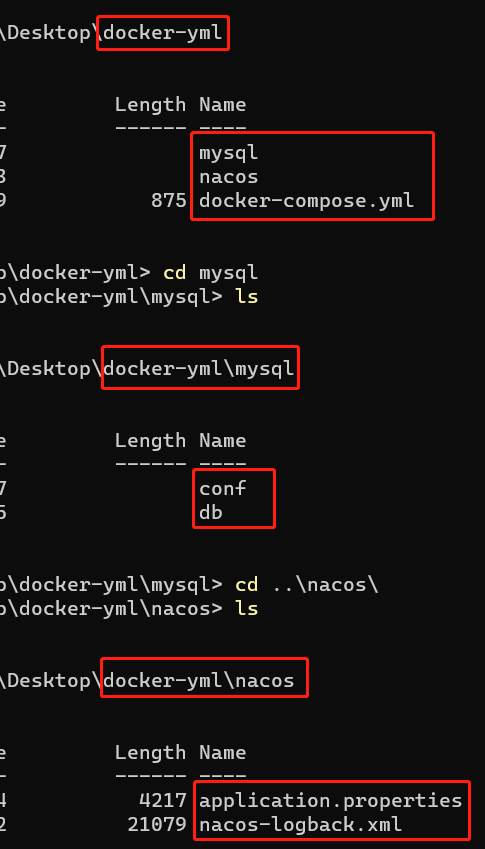
- docker-compose.yml配置信息
version: '2'
services:
  nacos:
    image: nacos/nacos-server
    ports:
      - 8848:8848
    container_name: nacos
    environment:
      - JVM_XMS=256m
      - JVM_XMX=256m
      - MODE=standalone
    #挂载配置
    volumes:
      - ./nacos:/home/nacos/conf
    depends_on:
      - db
    # network_mode: bridge
    # networks:
    #   - default
    #   - outside
    # command: -e JVM_XMS=256m -e JVM_XMX=256m --env MODE=standalone
  db:
    environment:
      MYSQL_ROOT_PASSWORD: "root1111"
      MYSQL_USER: "user"
      MYSQL_PASSWORD: "user1111"
      MYSQL_DATABASE: "nacos"
    image: "docker.io/mysql:latest"
    restart: always
    container_name: "mysql8.0"
    volumes:
      - "./mysql/db:/var/lib/mysql"
      - "./mysql/conf/:/etc/my.cnf"
    ports:
      - "23306:3306"
# networks:
#   outside:
#     external: true
application.properties配置信息
使用nacos自带的配置信息即可,需要注意的是需要打开mysql的配置,
以及jdbc的url配置host要配置成docker-compose.yml中的services.db属性中的container_name,这一点比较重要。 View Code
#*************** Spring Boot Related Configurations ***************#
### Default web context path:
server.servlet.contextPath=/nacos
### Default web server port:
server.port=8848

#*************** Network Related Configurations ***************#
### If prefer hostname over ip for Nacos server addresses in cluster.conf:
# nacos.inetutils.prefer-hostname-over-ip=false

### Specify local server's IP:
# nacos.inetutils.ip-address=


#*************** Config Module Related Configurations ***************#
### If user MySQL as datasource:
spring.datasource.platform=mysql

### Count of DB:
db.num=1

### Connect URL of DB:
db.url.0=jdbc:mysql://mysql8.0:3306/nacos?characterEncoding=utf8&connectTimeout=1000&socketTimeout=3000&autoReconnect=true
db.user=root
db.password=root1111


#*************** Naming Module Related Configurations ***************#
### Data dispatch task execution period in milliseconds:
# nacos.naming.distro.taskDispatchPeriod=200

### Data count of batch sync task:
# nacos.naming.distro.batchSyncKeyCount=1000

### Retry delay in milliseconds if sync task failed:
# nacos.naming.distro.syncRetryDelay=5000

### If enable data warmup. If set to false, the server would accept request without local data preparation:
# nacos.naming.data.warmup=true

### If enable the instance auto expiration, kind like of health check of instance:
# nacos.naming.expireInstance=true


### If enable the empty service auto clean, services with an empty instance are automatically cleared
nacos.naming.empty-service.auto-clean=false
### The empty service cleanup task delays startup time in milliseconds
nacos.naming.empty-service.clean.initial-delay-ms=60000
### The empty service cleanup task cycle execution time in milliseconds
nacos.naming.empty-service.clean.period-time-ms=20000


#*************** CMDB Module Related Configurations ***************#
### The interval to dump external CMDB in seconds:
# nacos.cmdb.dumpTaskInterval=3600

### The interval of polling data change event in seconds:
# nacos.cmdb.eventTaskInterval=10

### The interval of loading labels in seconds:
# nacos.cmdb.labelTaskInterval=300

### If turn on data loading task:
# nacos.cmdb.loadDataAtStart=false


#*************** Metrics Related Configurations ***************#
### Metrics for prometheus
#management.endpoints.web.exposure.include=*

### Metrics for elastic search
management.metrics.export.elastic.enabled=false
#management.metrics.export.elastic.host=http://localhost:9200

### Metrics for influx
management.metrics.export.influx.enabled=false
#management.metrics.export.influx.db=springboot
#management.metrics.export.influx.uri=http://localhost:8086
#management.metrics.export.influx.auto-create-db=true
#management.metrics.export.influx.consistency=one
#management.metrics.export.influx.compressed=true


#*************** Access Log Related Configurations ***************#
### If turn on the access log:
server.tomcat.accesslog.enabled=true

### The access log pattern:
server.tomcat.accesslog.pattern=%h %l %u %t "%r" %s %b %D %{User-Agent}i

### The directory of access log:
server.tomcat.basedir=


#*************** Access Control Related Configurations ***************#
### If enable spring security, this option is deprecated in 1.2.0:
#spring.security.enabled=false

### The ignore urls of auth, is deprecated in 1.2.0:
nacos.security.ignore.urls=/,/error,/**/*.css,/**/*.js,/**/*.html,/**/*.map,/**/*.svg,/**/*.png,/**/*.ico,/console-fe/public/**,/v1/auth/**,/v1/console/health/**,/actuator/**,/v1/console/server/**

### The auth system to use, currently only 'nacos' is supported:
nacos.core.auth.system.type=nacos

### If turn on auth system:
nacos.core.auth.enabled=false

### The token expiration in seconds:
nacos.core.auth.default.token.expire.seconds=18000

### The default token:
nacos.core.auth.default.token.secret.key=SecretKey012345678901234567890123456789012345678901234567890123456789

### Turn on/off caching of auth information. By turning on this switch, the update of auth information would have a 15 seconds delay.
nacos.core.auth.caching.enabled=false


#*************** Istio Related Configurations ***************#
### If turn on the MCP server:
nacos.istio.mcp.server.enabled=false
- 拉取镜像,docker-componse pull
- 启动项目,docker-componse up -d
重启,docker-compose.exe up -d --force-recreate - 启动后访问http://127.0.0.1:8848/nacos 用户名密码默认是nacos 查看nacos是否正常,连接mysql是否正常,
- mysql启动后需要自建表结构,将nacos提供的建表sql执行即可,当然这个地方可以优化成启动mysql的镜像的时候将建表语句通过脚本的方式执行,这样是最好的。
- 测试添加一个配置data_id后,mysql中config_info是否有数据


 浙公网安备 33010602011771号