spring基于xml的IOC环境搭建
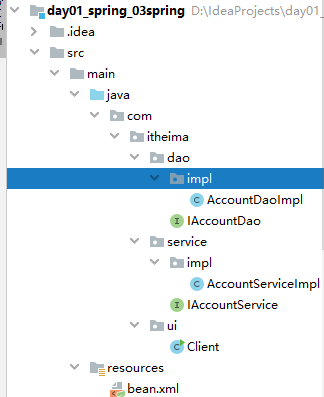
1.首先新建一个maven项目,我的项目中的内容如下:
IAccountService接口:
package com.itheima.service;
//账户业务层接口
public interface IAccountService {
    //模拟保存用户
    public void saveAccount();
}
AccountServiceImpl类:
package com.itheima.service.impl;

import com.itheima.dao.IAccountDao;
import com.itheima.dao.impl.AccountDaoImpl;
import com.itheima.service.IAccountService;
//账户的业务实现层
public class AccountServiceImpl implements IAccountService {
    private IAccountDao accountDao=new AccountDaoImpl();
    //模拟保存账户
    public void saveAccount() {
      accountDao.saveAccount();
    }
}
IAccountDao接口:
package com.itheima.dao;

public interface IAccountDao {
    public void saveAccount();
}
IAccountDaoImpl类:
package com.itheima.dao.impl;

import com.itheima.dao.IAccountDao;

public class AccountDaoImpl implements IAccountDao {
    public void saveAccount() {
        System.out.println("save account...");
    }
}
Client类:
package com.itheima.ui;

import com.itheima.service.IAccountService;
import com.itheima.service.impl.AccountServiceImpl;

//模拟一个表现层的客户端
public class Client {
    public static void main(String[] args) {
        IAccountService accountService=new AccountServiceImpl();
            accountService.saveAccount();
        }

    }
2.在pom.xml中加入依赖:
<dependencies>

        <dependency>
            <groupId>org.springframework</groupId>
            <artifactId>spring-context</artifactId>
            <version>5.0.2.RELEASE</version>
        </dependency>

    </dependencies>
3.在resources下新建bean.xml文件

4.在springframework文档中-core-搜索(Ctr+F)-输入xmlns-赋值最前面一段:
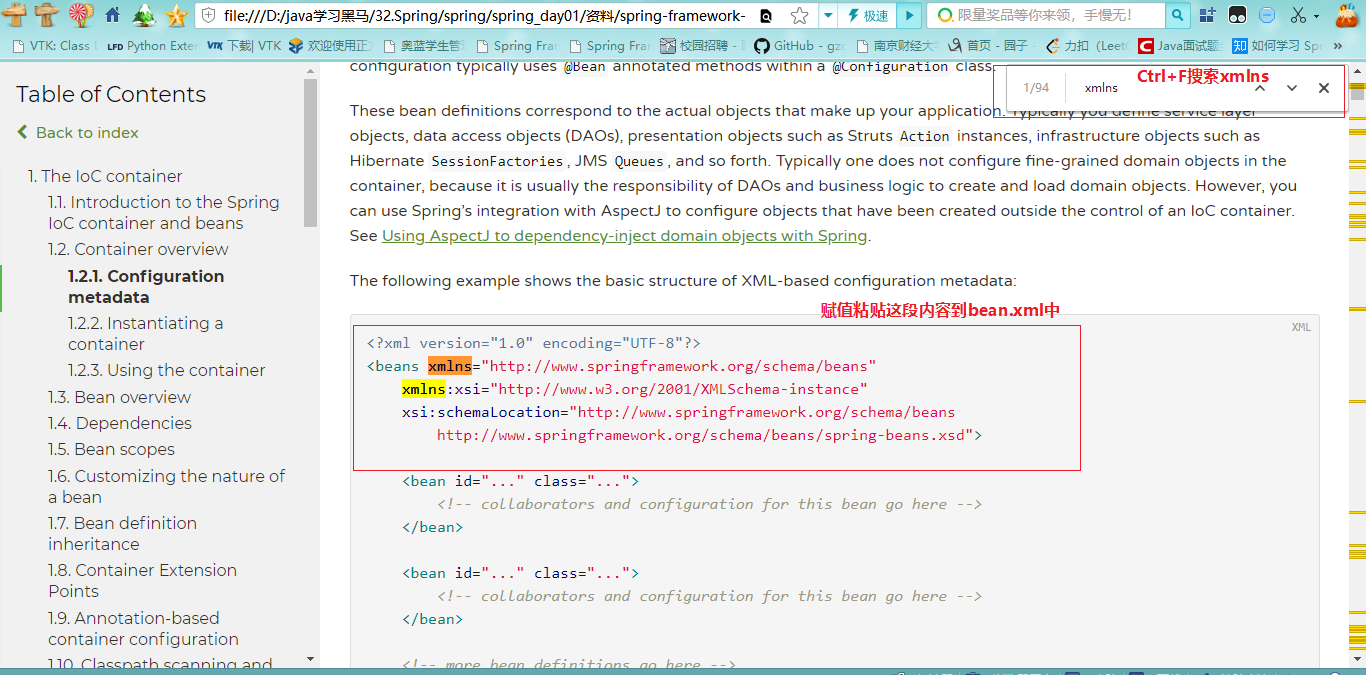
<?xml version="1.0" encoding="UTF-8"?>
<beans xmlns="http://www.springframework.org/schema/beans"
       xmlns:xsi="http://www.w3.org/2001/XMLSchema-instance"
       xsi:schemaLocation="http://www.springframework.org/schema/beans
        http://www.springframework.org/schema/beans/spring-beans.xsd">
<!--    把对象的创建交给spring来管理-->
    <bean id="accountService" class="com.itheima.service.impl.AccountServiceImpl"></bean>
    <bean id="accountDao" class="com.itheima.dao.impl.AccountDaoImpl"></bean>
</beans>
5.用spring来获取对象:
package com.itheima.ui;

import com.itheima.dao.IAccountDao;
import com.itheima.service.IAccountService;
import com.itheima.service.impl.AccountServiceImpl;
import org.springframework.context.ApplicationContext;
import org.springframework.context.support.ClassPathXmlApplicationContext;

//模拟一个表现层的客户端
//获取spring的IOC核心容器,并根据id获取对象
public class Client {
    public static void main(String[] args) {
        //1.获取核心容器对象
        ApplicationContext ac=new ClassPathXmlApplicationContext("bean.xml");
        //2.根据id获取对象
       IAccountService accountService =(IAccountService) ac.getBean("accountService");
        IAccountDao accountDao=(IAccountDao)ac.getBean("accountDao",IAccountDao.class);
        System.out.println(accountService);
        System.out.println(accountDao);
//        IAccountService accountService=new AccountServiceImpl();
//            accountService.saveAccount();
        }

    }
6.结果如下:


 浙公网安备 33010602011771号