

CentOS7 DHCP 服务搭建
一、实验环境
1、VMware12、俩台Linux(Ser 和 Client )、DHCP安装包。
二、操作流程
1、安装DHCP
2、配置DHCP的配置文件: /etc/dhcp/dhcpd.conf
3、测试服务
三、实操如下
1、# yum -y install dhcp* //安装DHCP,注意要带上* 在Ser上操作。
2、# vim /etc/sysconfig/network-scripts/ifcfg-ens33-1 //在Ser上配置网络IP地址,一般都是ens33
3、网络IP设置如下:
HWADDR=00:0C:29:03:EA:35
TYPE=Ethernet
PROXY_METHOD=none
BROWSER_ONLY=no
BOOTPROTO=static //改为static,表示静态地址
IPADDR=192.168.1.20 //改为和subnet 同网段的地址(此地址最好选择range之外的地址)
PREFIX=24 //改为和网路IP地址对应的子网掩码
GATEWAY=192.168.1.1 //注意:此处网关必须设置和DHCP作用域里面的网关相同
DNS1=8.8.8.8 //DNS设置正常的就可以
DEFROUTE=yes
IPV4_FAILURE_FATAL=no
IPV6INIT=yes
IPV6_AUTOCONF=yes
IPV6_DEFROUTE=yes
IPV6_FAILURE_FATAL=no
IPV6_ADDR_GEN_MODE=stable-privacy
NAME=ens33
UUID=2d5fde3e-2e83-49af-b7d7-f326fc3a7001
ONBOOT=yes //保证网卡处于yes 启动状态
⏩按键esc 输入:wq 保存退出。
#systemctl restart network //重启网卡 (建议重启系统)
4、配置DHCP的配置文件: vim /etc/dhcp/dhcpd.conf
打开配置文件按照提示 #cp /usr/share/doc/dhcp*/dhcpd.conf.example /etc/dhcp/dhcpd.conf //用示例文件覆盖配置文件
#vim /etc/dhcp/dhcpd.conf //正式开始编辑配置文件,加底色的保留,其他的全部dd
#
# Sample configuration file for ISC dhcpd
#
option domain-name "example.org"; //作用域名
option domain-name-servers ns1.example.org, ns2.example.org; //DNS
max-lease-time 7200; //最大租约时间
#ddns-update-style none;
# network, the authoritative directive should be uncommented.
#authoritative;
# have to hack syslog.conf to complete the redirection).
# DHCP server to understand the network topology.
} //声明网络拓扑
range 10.254.239.10 10.254.239.20;
option routers rtr-239-0-1.example.org, rtr-239-0-2.example.org;
}
# which we don't really recommend.
range dynamic-bootp 10.254.239.40 10.254.239.60;
option broadcast-address 10.254.239.31;
}
subnet 10.5.5.0 netmask 255.255.255.224 { //作用域网段
range 10.5.5.26 10.5.5.30; //地址池范围
option domain-name-servers ns1.internal.example.org; //DNS
option domain-name "internal.example.org"; //作用域名
option routers 10.5.5.1; //网关,Ser上面配置的网关和此网关要一致
option broadcast-address 10.5.5.31; //广播地址
default-lease-time 600; //默认租约时间
max-lease-time 7200; //最大租约时间
} //创建一个子网地址池
# host statements. If no address is specified, the address will be
# allocated dynamically (if possible), but the host-specific information
# will still come from the host declaration.
hardware ethernet 0:0:c0:5d:bd:95;
filename "vmunix.passacaglia";
server-name "toccata.fugue.com";
}
# should not also be listed as being available for dynamic assignment.
# Hosts for which fixed IP addresses have been specified can boot using
# BOOTP or DHCP. Hosts for which no fixed address is specified can only
# be booted with DHCP, unless there is an address range on the subnet
# to which a BOOTP client is connected which has the dynamic-bootp flag
# set.
host fantasia {
hardware ethernet 08:00:07:26:c0:a5;
fixed-address fantasia.fugue.com;
}
# based on that. The example below shows a case where all clients
# other clients get addresses on the 10.0.29/24 subnet.
match if substring (option vendor-class-identifier, 0, 4) = "SUNW";
}
subnet 10.17.224.0 netmask 255.255.255.0 {
option routers rtr-224.example.org;
}
subnet 10.0.29.0 netmask 255.255.255.0 {
option routers rtr-29.example.org;
}
pool {
allow members of "foo";
range 10.17.224.10 10.17.224.250;
}
pool {
deny members of "foo";
}
}
⏩按键esc 输入:wq 保存退出。
#systemctl start dhcpd //启动DHCP服务
5、测试地址分发
首先将俩台虚拟系统Ser 和 Client 的网卡配置在同一个虚拟网络环境中,如下图
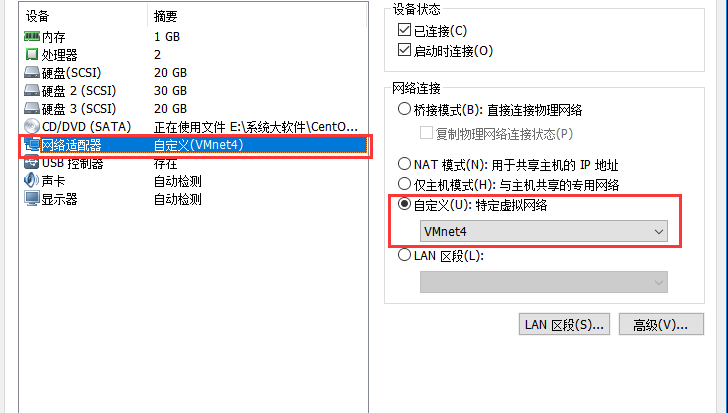
然后在Client 上 修改网卡配置文件,BOOTPROTO=dhcp 删除静态地址后保存 重启网卡(也重启电脑)
同样在Client 上安装DHCP服务
验证如下:
ifconfig 查看获取情况
route -n //查看路由信息
也可以在Ser上执行status 命令
#systemctl status dhcpd

 浙公网安备 33010602011771号