springboot自学之路
springboot
1.springboot简介
1.1 spring是什么?
spring是一种轻量级的非入侵式框架
spring是为了简化企业级开发的复杂性来设计的
1.2 Spring是如何简化Java开发的
为了降低Java开发的复杂性,Spring采用了以下4种关键策略:
1、基于POJO的轻量级和最小侵入性编程,所有东西都是bean;
2、通过IOC,依赖注入(DI)和面向接口实现松耦合;
3、基于切面(AOP)和惯例进行声明式编程;
4、通过切面和模版减少样式代码,RedisTemplate,SqlSessionTemplate;
1.3 什么是springboot
学过javaweb的同学就知道,开发一个web应用,从最初开始接触Servlet结合Tomcat, 跑出一个Hello Wolrld程序,是要经历特别多的步骤;后来就用了框架Struts,再后来是SpringMVC,到了现在的SpringBoot,过一两年又会有其他web框架出现;你们有经历过框架不断的演进,然后自己开发项目所有的技术也在不断的变化、改造吗?建议都可以去经历一遍;
言归正传,什么是SpringBoot呢,就是一个javaweb的开发框架,和SpringMVC类似,对比其他javaweb框架的好处,官方说是简化开发,约定大于配置, you can "just run",能迅速的开发web应用,几行代码开发一个http接口。
所有的技术框架的发展似乎都遵循了一条主线规律:从一个复杂应用场景 衍生 一种规范框架,人们只需要进行各种配置而不需要自己去实现它,这时候强大的配置功能成了优点;发展到一定程度之后,人们根据实际生产应用情况,选取其中实用功能和设计精华,重构出一些轻量级的框架;之后为了提高开发效率,嫌弃原先的各类配置过于麻烦,于是开始提倡“约定大于配置”,进而衍生出一些一站式的解决方案。
是的这就是Java企业级应用->J2EE->spring->springboot的过程。
随着 Spring 不断的发展,涉及的领域越来越多,项目整合开发需要配合各种各样的文件,慢慢变得不那么易用简单,违背了最初的理念,甚至人称配置地狱。Spring Boot 正是在这样的一个背景下被抽象出来的开发框架,目的为了让大家更容易的使用 Spring 、更容易的集成各种常用的中间件、开源软件;
Spring Boot 基于 Spring 开发,Spirng Boot 本身并不提供 Spring 框架的核心特性以及扩展功能,只是用于快速、敏捷地开发新一代基于 Spring 框架的应用程序。也就是说,它并不是用来替代 Spring 的解决方案,而是和 Spring 框架紧密结合用于提升 Spring 开发者体验的工具。Spring Boot 以约定大于配置的核心思想,默认帮我们进行了很多设置,多数 Spring Boot 应用只需要很少的 Spring 配置。同时它集成了大量常用的第三方库配置(例如 Redis、MongoDB、Jpa、RabbitMQ、Quartz 等等),Spring Boot 应用中这些第三方库几乎可以零配置的开箱即用。
简单来说就是SpringBoot其实不是什么新的框架,它默认配置了很多框架的使用方式,就像maven整合了所有的jar包,spring boot整合了所有的框架 。
Spring Boot 出生名门,从一开始就站在一个比较高的起点,又经过这几年的发展,生态足够完善,Spring Boot 已经当之无愧成为 Java 领域最热门的技术。
Spring Boot的主要优点:
- 为所有Spring开发者更快的入门
- 开箱即用,提供各种默认配置来简化项目配置
- 内嵌式容器简化Web项目
- 没有冗余代码生成和XML配置的要求
1.4 springboot 缺点
- 将现有或传统的 Spring Framework 项目转换为 Spring Boot 应用程序是一个非常困难和耗时的过程。它仅适用于全新 Spring 项目。
- 使用简单,学习成本高,精通难。
2. 第一个springboot程序
2.1 分析pom文件
<?xml version="1.0" encoding="UTF-8"?>
<project xmlns="http://maven.apache.org/POM/4.0.0" xmlns:xsi="http://www.w3.org/2001/XMLSchema-instance"
         xsi:schemaLocation="http://maven.apache.org/POM/4.0.0 https://maven.apache.org/xsd/maven-4.0.0.xsd">
    <modelVersion>4.0.0</modelVersion>
    <!--父依赖-->
    <parent>
        <groupId>org.springframework.boot</groupId>
        <artifactId>spring-boot-starter-parent</artifactId>
        <version>2.3.4.RELEASE</version>
        <relativePath/> <!-- lookup parent from repository -->
    </parent>
    <groupId>com.iandf</groupId>
    <artifactId>hello_world</artifactId>
    <version>0.0.1-SNAPSHOT</version>
    <name>hello_world</name>
    <description>Demo project for Spring Boot</description>

    <properties>
        <java.version>1.8</java.version>
    </properties>

    <dependencies>
        <!--web场景启动器自动配置了dispatcherServlet internalResourceViewResolver 内嵌了tomcat -->
        <dependency>
            <groupId>org.springframework.boot</groupId>
            <artifactId>spring-boot-starter-web</artifactId>
        </dependency>
        <!-- springboot单元测试 -->
        <dependency>
            <groupId>org.springframework.boot</groupId>
            <artifactId>spring-boot-starter-test</artifactId>
            <scope>test</scope>
            <exclusions>
                <exclusion>
                    <groupId>org.junit.vintage</groupId>
                    <artifactId>junit-vintage-engine</artifactId>
                </exclusion>
            </exclusions>
        </dependency>
    </dependencies>

    <build>
        <plugins>
            <!-- 打包插件 -->
            <plugin>
                <groupId>org.springframework.boot</groupId>
                <artifactId>spring-boot-maven-plugin</artifactId>
            </plugin>
        </plugins>
    </build>

</project>
2.2 第一个例子做完的疑问。
-
starter是什么?我们何如去使用这些 starter?
-
Tomcat的内嵌是如何完成
-
使用了web对应的 starter, springmvc是如何自动装配?
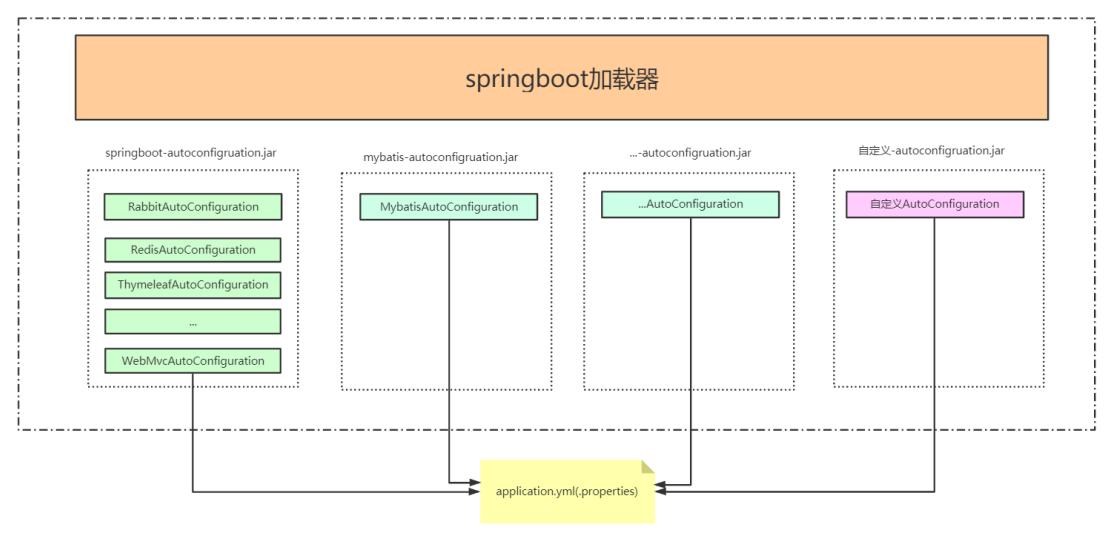
自动导入的包内会有spring-boot-autoconfigure-2.3.4.RELEASE.jar这个jar包包含了spring.factories文件,在这个文件中会有所有的对应的注解需要导入的配置文件名,以EnableAutoConfiguration为例子,有127个配置文件,前5个如下所示
org.springframework.boot.autoconfigure.EnableAutoConfiguration=\
org.springframework.boot.autoconfigure.admin.SpringApplicationAdminJmxAutoConfiguration,\
org.springframework.boot.autoconfigure.aop.AopAutoConfiguration,\
org.springframework.boot.autoconfigure.amqp.RabbitAutoConfiguration,\
org.springframework.boot.autoconfigure.batch.BatchAutoConfiguration,\
org.springframework.boot.autoconfigure.cache.CacheAutoConfiguration,\
@Target(ElementType.TYPE) @Retention(RetentionPolicy.RUNTIME) @Documented @Inherited @AutoConfigurationPackage @Import(AutoConfigurationImportSelector.class) public @interface EnableAutoConfiguration { 。。。。。 }@Import(AutoConfigurationImportSelector.class)根据你配置的启动器啥的进行筛选,如果你只配了mvc那么最终只会有23个配置文件加入项目
protected AutoConfigurationEntry getAutoConfigurationEntry(AnnotationMetadata annotationMetadata) { if (!isEnabled(annotationMetadata)) { return EMPTY_ENTRY; } AnnotationAttributes attributes = getAttributes(annotationMetadata); List<String> configurations = getCandidateConfigurations(annotationMetadata, attributes); configurations = removeDuplicates(configurations); Set<String> exclusions = getExclusions(annotationMetadata, attributes); checkExcludedClasses(configurations, exclusions); configurations.removeAll(exclusions); configurations = getConfigurationClassFilter().filter(configurations); fireAutoConfigurationImportEvents(configurations, exclusions); return new AutoConfigurationEntry(configurations, exclusions); } -
我们如何来配置我们自定义话的相关内容。
-
springboot如何配置包扫描器的
spring配置注解如下,课件base-package也是要在配置文件中注册的(@AutoConfigurationPackage就是完成这部动作)
<?xml version="1.0" encoding="UTF-8"?>
<beans xmlns="http://www.springframework.org/schema/beans"
    xmlns:xsi="http://www.w3.org/2001/XMLSchema-instance"
    xmlns:context="http://www.springframework.org/schema/context"
    xsi:schemaLocation="http://www.springframework.org/schema/beans
        https://www.springframework.org/schema/beans/spring-beans.xsd
        http://www.springframework.org/schema/context
        https://www.springframework.org/schema/context/spring-context.xsd">

    <context:component-scan base-package="org.example"/>

</beans>
在springboot中使用EnableAutoConfiguration注解上的@AutoConfigurationPackage就是有@SpringBootApplication注解的类所在的包,springboot会扫描这个包下的全部注解
源码分析
@Override
public void registerBeanDefinitions(AnnotationMetadata metadata, BeanDefinitionRegistry registry) {
    //先以反射的方式获取包名,再在beans文件中配置base-package
   register(registry, new PackageImports(metadata).getPackageNames().toArray(new String[0]));
}
先以反射的方式获取包名

   ```java‘
   PackageImports(AnnotationMetadata metadata) {
      AnnotationAttributes attributes = AnnotationAttributes
            .fromMap(metadata.getAnnotationAttributes(AutoConfigurationPackage.class.getName(), false));
      List<String> packageNames = new ArrayList<>();
      for (String basePackage : attributes.getStringArray("basePackages")) {
         packageNames.add(basePackage);
      }
      for (Class<?> basePackageClass : attributes.getClassArray("basePackageClasses")) {
         packageNames.add(basePackageClass.getPackage().getName());
      }
      if (packageNames.isEmpty()) {
      		//获取包名
         packageNames.add(ClassUtils.getPackageName(metadata.getClassName()));
      }
      this.packageNames = Collections.unmodifiableList(packageNames);
}
在beans文件中配置base-package( <context:component-scan base-package="org.example"/>)
public static void register(BeanDefinitionRegistry registry, String... packageNames) {
    //判断有没有bean的定义
   if (registry.containsBeanDefinition( )) {
      BeanDefinition beanDefinition = registry.getBeanDefinition(BEAN);
      ConstructorArgumentValues constructorArguments = beanDefinition.getConstructorArgumentValues();
      constructorArguments.addIndexedArgumentValue(0, addBasePackages(constructorArguments, packageNames));
   }
   else {
       //创建bean的定义,注册bean
      GenericBeanDefinition beanDefinition = new GenericBeanDefinition();
      beanDefinition.setBeanClass(BasePackages.class);
      beanDefinition.getConstructorArgumentValues().addIndexedArgumentValue(0, packageNames);
      beanDefinition.setRole(BeanDefinition.ROLE_INFRASTRUCTURE);
   registry.registerBeanDefinition(BEAN, beanDefinition);
   }
}
**NOTE: **先添加配置文件,然后注册beans,添加包扫描器
2.3. 自动配置浅析
springboot 扫描当前 classpath 下所有的 jar 包,筛选出来。EnableAutoConfiguration 下的所有自动配置类注入到 spring 容器中,完成自动的 bean 的配置。
3. 热部署
3.1 热部署简介
在实际开发过程中,每次修改代码就得将项目重启,重新部署,对于一些大型应用来说,重启时间需要花费大量的时间成本。对于一个后端开发者来说,重启过程确实很难受啊。在Java 开发领域,热部署一直是一个难以解决的问题,目前的 Java 虚拟机只能实现方法体的修改热部署,对于整个类的结构修改,仍然需要重启虚拟机,对类重新加载才能完成更新操作。下面我们就看看对于简单的类修改的热部署怎么实现。
3.2 热部署原理
深层原理是使用了两个 ClassLoader,一个 Classloader 加载那些不会改变的类(第三方Jar 包),另一个 ClassLoader 加载会更改的类,称为 restart ClassLoader,这样在有代码更改的时候,原来的 restart ClassLoader 被丢弃,重新创建一个 restart ClassLoader,由于需要加载的类相比较少,所以实现了较快的重启时间。
3.3 springboot的devtools工具包
devtools 会监听 classpath 下的文件变动,并且会立即重启应用(发生在保存时机),java 类文件热部署(类文件修改后不会立即生效),实现对属性文件的热部署。devtools 可以实现页面热部署(页面修改后会立即生效,这个可以直接在application.properties 文件中配置 spring.thymeleaf.cache=false 来实现,后面讲到)。
当我们修改了类文件后,idea 不会自动编译,需要通过 ctrl+F9 来触发。
3.4 热部署的排除
默认情况下,/META-INF/maven,/META-INF/resources,/resources,/static,/templates,/public 这些文件夹下的文件修改不会使应用重启,但是会重新加载(devtools 内嵌了一个LiveReload server,当资源发生改变时,浏览器刷新)。
-
我们在 resources/static 目录下创建 tx.js 文件每次发生修改后的并不重启,而是采用livereload 的方式。
-
同时我们可以根据自己的意愿来设置想要排除的资源,在application.properties里配置
spring.devtools.restart.exclude=static/**,public/**
4. boot 的属性配置文件
4.1 配置文件位置
springboot 启动会扫描以下位置的 application.properties 或者 application.yml 文件作为 Spring boot 的默认配置文件
–file:./config/
–file:./ 项目的跟路径,如果当前的项目有父工程,配置文件要放在父工程 的根路径
–classpath:/config/
–classpath:/
优先级由高到底,高优先级的配置会覆盖低优先级的配置;
SpringBoot 会从这四个位置全部加载主配置文件;互补配置;
如果我们的配置文件名字不叫 application.properties 或者 application.yml,可以通过以下参数来指定配置文件的名字,myproject 是配置文件名
$ java -jar myproject.jar --spring.config.name=myproject
我们同时也可以指定其他位置的配置文件来生效
$ java -jar myproject.jar
--spring.config.location=classpath:/default.properties,classpath:/override.properties
4.2 yaml配置文件
4.2.1 yaml简介
yml 是 YAML(YAML Ain't Markup Language)语言的文件,以数据为中心,比 properties、xml 等更适合做配置文件。
- yml 和 xml 相比,少了一些结构化的代码,使数据更直接,一目了然。
- 相比 properties 文件更简洁
4.2.2 yaml 语法
以空格的缩进程度来控制层级关系。空格的个数并不重要,只要左边空格对齐则视为同一个层级。且大小写敏感。支持字面值,对象,数组三种数据结构,也支持复合结构。
- 字面值:字符串,布尔类型,数值,日期。字符串默认不加引号,单引号会转义特殊字符。日期格式支持 yyyy/MM/dd HH:mm:ss
- 对象:由键值对组成,形如 key:(空格)value 的数据组成。冒号后面的空格是必须要有的,每组键值对占用一行,且缩进的程度要一致,也可以使用行内写法:
- 数组:由形如 -(空格)value 的数据组成。短横线后面的空格是必须要有的,每组数据占用一行,且缩进的程度要一致,也可以使用行内写法: [1,2,...n]
- 复合结构:上面三种数据结构任意组合
4.2.3 yaml 的运用
创建一个 Spring Boot 的全局配置文件 application.yml,配置属性参数。主要有字符串,带特殊字符的字符串,布尔类型,数值,集合,行内集合,行内对象,集合对象这几种常用的数据格式。
yaml:
  level:
    str: 1231231\n黄
    specialStr: "1231231\n黄"
    num: 123
    DNum: 123.1
    date: 2020/9/20 17:44
    stringlist:
      - aa
      - bb
      - cc
    users:
      - name: iandf
        sex: 男
      - name: ht
        sex: 女
    maps: {key1: value1,key2: value2}
    set: [1,2,3]
创建实体类 YamlEntity.java 获取配置文件中的属性值,通过注解@ConfigurationProperties获取配置文件中的指定值并注入到实体类中。
@Component
@ConfigurationProperties(prefix = "yaml.level")
@Data
public class YamlTest {
    private String str;
    private String specialStr;
    private int num;
    private double DNum;
    private Date date;
    private List<String> stringlist = new ArrayList<>();
    private List<User> users = new ArrayList<>();
    private Map<String,String> maps = new HashMap<>();
    private Set<String> set = new HashSet<>();
}
@Data
public class User {
    private String name;
    private String sex;
}
测试
@RestController
public class YamlController {
    public final YamlTest yamlTest;
    public YamlController(YamlTest yamlTest) {
        this.yamlTest = yamlTest;
    }
    @RequestMapping("/yaml")
    public YamlTest yaml(){
        System.out.println(yamlTest);
        return yamlTest;
    }

}
测试无误
4.2.4 总结
- 字符串可以不加引号,若加双引号则输出特殊字符,若不加或加单引号则转义特殊字符;
- 数组类型,短横线后面要有空格;对象类型,冒号后面要有空格;
- YAML 是以空格缩进的程度来控制层级关系,但不能用 tab 键代替空格,大小写敏感;
- yaml 的缺点是可读性比较差
4.3 利用yaml文件进行属性绑定(使用java类的set方法)
前面讲了 yaml 的语法和绑定注入给实体类,那我们平时在工作中多数是在通过实体类来写 yaml 的配置。属性的绑定我们必须要提供 set 方法。
@Component
@ConfigurationProperties("acme")
@Data
public class AcmeProperties {
    private boolean enabled;
    private InetAddress remoteAddress;
    private final Security security = new Security();
    @Data
    public static class Security {
        private String username;
        private String password;
        private List<String> roles = new ArrayList<>(Collections.singleton("USER"));
    }
}
为了让当前的实体类能在配置文件中有对应的提示,我们需要引入如下的依赖
<dependency>
    <groupId>org.springframework.boot</groupId>
    <artifactId>spring-boot-configuration-processor</artifactId>
    <optional>true</optional>
</dependency>
加完依赖后通过 Ctrl+F9 来使之生效。这样再使用yaml进行配置的时候就可以有提示
通过java类来写yaml文件
acme:
  enabled: true
  remote-address: 192.168.121.23
  security:
    roles: [iandf,hh,hy]
    password: 123
    username: iandf
测试
@RestController
public class YamlController {
    @Autowired
    public AcmeProperties acmeProperties;

    @RequestMapping("/yaml-bind-pro")
    public AcmeProperties yaml(){
        System.out.println(acmeProperties);
        return acmeProperties;
    }
}
测试无误
4.4 利用yaml文件进行属性绑定(使用java类的构造方法)
编写的yaml文件和上一个小节一样,只是我们要使用构造方法把配置文件的信息注入到java对象中
@ConfigurationProperties("acme")
@ConstructorBinding
@AllArgsConstructor
@NoArgsConstructor
@Data
public class AcmeProperties {
    private boolean enabled;
    private InetAddress remoteAddress;
    private Security security;

    @AllArgsConstructor
    @NoArgsConstructor
    @Data
    public static class Security {
        private String username;
        private String password;
        private List<String> roles;
    }
}
测试类
@RestController
@EnableConfigurationProperties(AcmeProperties.class)
public class YamlController {
    @Autowired
    public AcmeProperties acmeProperties;

    @RequestMapping("/yaml-bind-con")
    public AcmeProperties yaml(){
        System.out.println(acmeProperties);
        return acmeProperties;
    }
}
**NOTE: **
要使用构造函数绑定,必须使用@EnableConfigurationProperties 或配置属性扫描启用类。不能对由常规 Spring 机制创建的 Bean 使用构造函数绑定(例如@Component Bean、通过@Bean 方法创建的 Bean 或使用@Import 加载的 Bean)
测试成功。在属性绑定的案例中我们同样也可以使用@EnableConfigurationProperties,此时不需要提供@Component
如果一个配置类只配置@ConfigurationProperties 注解,而没有使用@Component,那么在 IOC容器中是获取不到 properties 配置文件转化的 bean。说白了 @EnableConfigurationProperties 相当于把使用 @ConfigurationProperties 的类进行了启用注入。
4.5 @ConfigurationProperties 校验
每当使用 Spring 的@Validated 注释对@ConfigurationProperties 类进行注释时,Spring Boot 就会尝试验证它们。你可以用 JSR-303 javax.validation 直接在配置类上的约束注释。为此,请确保类路径上有一个兼容的 JSR-303 实现,此处我们用的是 hibernate 的实现,然后将约束注释添加到字段中
-
引入依赖
<dependency> <groupId>org.hibernate</groupId> <artifactId>hibernate-validator</artifactId> <version>5.2.0.Final</version> </dependency> -
在属性类上加入注解(还有@email,@max注解等等)
@ConfigurationProperties("validation") @Component @Validated @Data public class PropertiesValidation { @NotNull private String name; @Valid private School school = new School(); @Data class School { @NotNull private String name; } } -
编写yaml文件
validation:
  name: iandf
#  school:
#    name: iandf
NOTE:
要想使 validation 总是被触发在内嵌的属性上的话(自己创建的对象实例),那这个属性必须加上 @Valid 注解才能使关联的类中的validation 生效
4.5 @ConfigurationProperties vs. @Value
-
松散绑定在@value 是被限制的
如果您确实想使用@Value,建议引用属性名(kebab case 只使用小写字母,既是羊肉串模式)。这允许 Spring Boot 使用与放松 binding@ConfigurationProperties时相同的逻辑。例如,@Value(“${demo.item-price})将匹配 demo.item-price 和 demo.itemPrice, 其他模式不能匹配。
-
元数据支持
我们在@ConfigurationProperties 方式可以生成元数据(在target/classes/META-INF/spring-configuration-metadata.json里面),目的是给我们提供提示和属性的描述。但是在@value 里面是没有的。@Value 适合单个的属性注入
-
spEL 在@ConfigurationProperties 中是不能支持的。在@Value 中可以支持。如:@Value("#{12*3}")
-
@Value 复杂类型不可注入,会有启动报错。
4.6 多种yaml配置文件的解决
4.6.1 第一种方法
我们可以通过多样性的文档来解决多环境的需求。在一个 yml 中我们可以把文档划分成多个块
acme:
  enabled: true
  remote-address: 192.168.121.23
  security:
    roles: [iandf,hh,hy]
    password: 123
    username: iandf
spring:
  profiles: dev
---
acme:
  enabled: true
  remote-address: 192.168.121.24
  security:
    roles: [iandf,hh,hy]
    password: 123
    username: iandf
spring:
  profiles: test
---
acme:
  enabled: true
  remote-address: 192.168.121.26
  security:
    roles: [iandf,hh,hy]
    password: 123
    username: iandf
spring:
  profiles: pro
通过运行的时候在run configurations配置运行环境

4.6.2 第二种方法
创建多个application-xxx.yaml文件,例如:
application-dev.yaml
application-pro.yaml
application-test.yaml
在文件中分别写不同的配置然后一样在run configurations配置运行环境
5. springboot的自动配置
5.1 java中的spi-service provider interface
SPI 的全名为 Service Provider Interface.大多数开发人员可能不熟悉,因为这个是针对厂商或者插件的。在 java.util.ServiceLoader 的文档里有比较详细的介绍。简单的总结下 java SPI 机制的思想。我们系统里抽象的各个模块,往往有很多不同的实现方案。面向的对象的设计里,我们一般推荐模块之间基于接口编程,模块之间不对实现类进行硬编码。一旦代码里涉及具体的实现类,就违反了可拔插的原则,如果需要替换一种实现,就需要修改代码。为了实现在模块装配的时候能不在程序里动态指明,这就需要一种服务发现机制。
java SPI 就是提供这样的一个机制:为某个接口寻找服务实现的机制。有点类似 IOC 的思想,就是将装配的控制权移到程序之外,在模块化设计中这个机制尤其重要。
5.2 spi代码测试
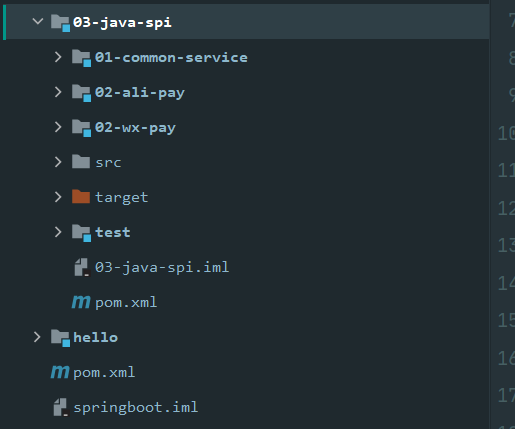
- 提供一个公共的支付接口common-pay
- 提供两个模块实现common-pay里面的规范
- 在两个具体实现模块的resource文件夹下创建一个文件,文件名是指明实现哪个接口(全路径),文件中的内容是实现接口的具体类(全路径)
注意事项
1、当服务提供者提供了接口的一种具体实现后,在 jar 包的 META-INF/services 目录下
创建一个以“接口全路径名”为命名的文件,内容为实现类的全限定名;
2、接口实现类所在的 jar 包放在主程序的 classpath 中;
3、主程序通过 java.util.ServiceLoder 动态装载实现模块,它通过扫描 META-INF/services
目录下的配置文件找到实现类的全限定名,把类加载到 JVM;
4、SPI 的实现类必须携带一个不带参数的构造方法;
5.3 源码实现
5.3.1 引入springboot源码
在github上下载2.1.13的源码,下载完成后导入到idea中,导入完成之后使用clean install -DskipTests -Pfast命令构建项目
构建完成之后,我们写一个parse-code项目让项目跑起来
5.3.2 Spring Factories 实现原理
spring-core 包里定义了 SpringFactoriesLoader 类,这个类实现了检索 META-INF/spring.factories文件,并获取指定接口的配置的功能。在这个类中定义了两个对外的方法:
和之前的spi扫描META-INF/services下的文件类似,也是为了解耦
public static final String FACTORIES_RESOURCE_LOCATION = "META-INF/spring.factories";
关键源码分析,springboot是如何
public static List<String> loadFactoryNames(Class<?> factoryClass, @Nullable ClassLoader classLoader) {
   //获取接口的名字,这里是org.springframework.context.ApplicationContextInitializer
   String factoryClassName = factoryClass.getName();
   //loadSpringFactories(classLoader):获得所有配置类,并且根据接口名字来获得
   //getOrDefault(factoryClassName, Collections.emptyList())加载完所有的结果集根据factoryClassName进行过滤得到	//应该加载的配置类
   return loadSpringFactories(classLoader).getOrDefault(factoryClassName, Collections.emptyList());
}
	private static Map<String, List<String>> loadSpringFactories(@Nullable ClassLoader classLoader) {
        //在缓存之中申请result存放配置类
		MultiValueMap<String, String> result = cache.get(classLoader);
		if (result != null) {
			return result;
		}

		try {
            //FACTORIES_RESOURCE_LOCATION:"META-INF/spring.factories"
            //在 classpath 下的所有 jar 包中查找 META-INF/spring.factories 文件
			Enumeration<URL> urls = (classLoader != null ?
					classLoader.getResources(FACTORIES_RESOURCE_LOCATION) :
					ClassLoader.getSystemResources(FACTORIES_RESOURCE_LOCATION));
			result = new LinkedMultiValueMap<>();
            //遍历urls拿到所有的接口和实现类
			while (urls.hasMoreElements()) {
				URL url = urls.nextElement();
				UrlResource resource = new UrlResource(url);
                //properties有该url下的spring.factories中所有的接口及实现类,多个实现类以 , 形式隔开
				Properties properties = PropertiesLoaderUtils.loadProperties(resource);
                //遍历properties把多个实现类切割开来储存在result中
				for (Map.Entry<?, ?> entry : properties.entrySet()) {
					String factoryClassName = ((String) entry.getKey()).trim();
					for (String factoryName : StringUtils.commaDelimitedListToStringArray((String) entry.getValue())) {
						result.add(factoryClassName, factoryName.trim());
					}
				}
			}
            //将结果集存入缓存
			cache.put(classLoader, result);
			return result;
		}
		catch (IOException ex) {
			throw new IllegalArgumentException("Unable to load factories from location [" +
					FACTORIES_RESOURCE_LOCATION + "]", ex);
		}
	}
获取到所有应该加载的自动配置类的名字之后,根据反射获取到他们的所有实例,加入到spring容器中
5.3.3 AutoConfigurationImportSelector筛选自动配置类
-
进入springbootApplication
@SpringBootConfiguration//把启动类作为配置类 @EnableAutoConfiguration//开启自动配置类的创建 @ComponentScan(excludeFilters = { @Filter(type = FilterType.CUSTOM, classes = TypeExcludeFilter.class), @Filter(type = FilterType.CUSTOM, classes = AutoConfigurationExcludeFilter.class) }) public @interface SpringBootApplication { -
进入EnableAutoConfiguration
@AutoConfigurationPackage//设置自动配置类的扫描包 @Import(AutoConfigurationImportSelector.class)//自动配置类的引入选择器 public @interface EnableAutoConfiguration { String ENABLED_OVERRIDE_PROPERTY = "spring.boot.enableautoconfiguration"; -
进入AutoConfigurationImportSelector在里面实现自动配置类的筛选
protected AutoConfigurationEntry getAutoConfigurationEntry(
      AutoConfigurationMetadata autoConfigurationMetadata,
      AnnotationMetadata annotationMetadata) {
   if (!isEnabled(annotationMetadata)) {
      return EMPTY_ENTRY;
   }
   //获取EnableAutoConfiguration的注解属性 exclude  excludeName
   AnnotationAttributes attributes = getAttributes(annotationMetadata);
   //到缓存之中获取自动配置的类名
   List<String> configurations = getCandidateConfigurations(annotationMetadata, attributes);
   //排除重复的自动配置类
   configurations = removeDuplicates(configurations);
   //根据attributes排除自动配置类
   Set<String> exclusions = getExclusions(annotationMetadata, attributes);
   checkExcludedClasses(configurations, exclusions);
   configurations.removeAll(exclusions);
   //用你导入的启动类来过滤掉没有引用的自动配置类,
   configurations = filter(configurations, autoConfigurationMetadata);
   fireAutoConfigurationImportEvents(configurations, exclusions);
   return new AutoConfigurationEntry(configurations, exclusions);
}
5.3.4 自动配置类是怎么工作的
以 HttpEncodingAutoConfiguration(Http 编码自动配置)为例解释自动配置原理;
@Configuration//声明成配置类
//指定启动类ConfigurationProperties功能,将配置文件对应的值和HttpProperties中的属性绑定起来,将HttpProperties加入ioc容器之中
@EnableConfigurationProperties(HttpProperties.class)
//SpringApplication中指定了类型this.webApplicationType = WebApplicationType.deduceFromClasspath();
//判断当前应用是不是web应用
@ConditionalOnWebApplication(type = ConditionalOnWebApplication.Type.SERVLET)
//判断当前项目中有没有CharacterEncodingFilter类
@ConditionalOnClass(CharacterEncodingFilter.class)
//判断配置文件中是否存在某个配置 spring.http.encoding.enabled;如果不存在,判断也是成立的
//matchIfMissing = true:即使我们配置文件中不配置 spring.http.encoding.enabled=true,也是默认生效的;
@ConditionalOnProperty(prefix = "spring.http.encoding", value = "enabled", matchIfMissing = true)
public class HttpEncodingAutoConfiguration {
   //该属性可以通过有参构造与配置文件中的类映射
   private final HttpProperties.Encoding properties;
   //只有一个有参构造器的情况下,参数的值就会从容器中拿
   public HttpEncodingAutoConfiguration(HttpProperties properties) {
      this.properties = properties.getEncoding();
   }

   @Bean////给容器中添加一个组件,这个组件的某些值需要从 properties 中获取
   @ConditionalOnMissingBean//判断这个容器中没有CharacterEncodingFilter时才将该bean加入ioc容器
   public CharacterEncodingFilter characterEncodingFilter() {
      CharacterEncodingFilter filter = new OrderedCharacterEncodingFilter();
      filter.setEncoding(this.properties.getCharset().name());
      filter.setForceRequestEncoding(this.properties.shouldForce(Type.REQUEST));
      filter.setForceResponseEncoding(this.properties.shouldForce(Type.RESPONSE));
      return filter;
   }
    .....
}
5.3.5 @Conditional 派生注解
作用:必须是@Conditional 指定的条件成立,才给容器中添加组件,配置配里面的所有内容才生效;
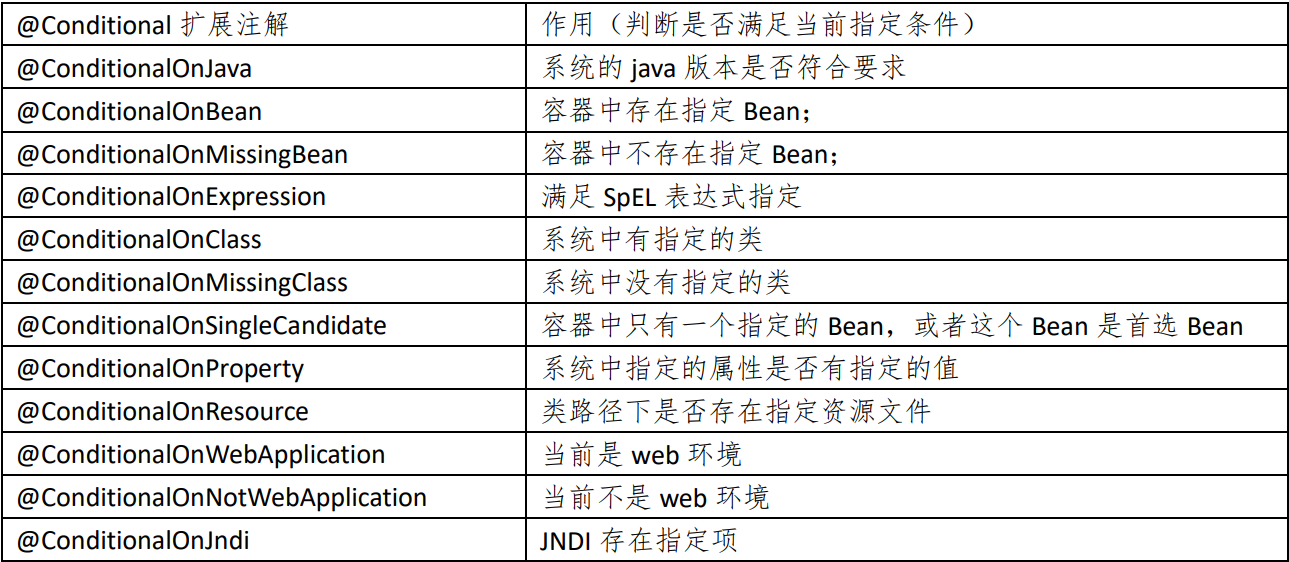
自动配置类必须在一定的条件下才能生效;
精髓:
- SpringBoot 启动会加载大量的自动配置类
- 我们看我们需要的功能有没有 SpringBoot 默认写好的自动配置类;
- 我们再来看这个自动配置类中到底配置了哪些组件;(只要我们要用的组件有,我们就不需要再来配置了)
- 给容器中自动配置类添加组件的时候,会从 properties 类中获取某些属性。我们就可以在配置文件中指定这些属性
6. Springboot 数据源自动配置
数据源的配置
引入 jdbc 的依赖和 springboot 的应用场景
<dependency>
   <groupId>org.springframework.boot</groupId>
   <artifactId>spring-boot-starter-jdbc</artifactId>
</dependency>

<dependency>
   <groupId>mysql</groupId>
   <artifactId>mysql-connector-java</artifactId>
</dependency>
让我们使用 yaml 方式配置,创建 application.yaml 在默认情况下, 数据库连接可以使用 DataSource 池进行自动配置
默认 Hikari 可用, Springboot 将使用它
我们可以自己指定数据源配置,通过 type 来选取使用哪种数据源
spring:
  datasource:
    driver-class-name: com.mysql.cj.jdbc.Driver
    url: jdbc:mysql://localhost:3306/boot_demo?useUnicode=true&characterEncoding=utf8&useSSL=true&&useJDBCCompliantTimezoneShift=true&useLegacyDatetimeCode=false&server
      Timezone=UTC&serverTimezone=GMT%2B8
    username: root
    password: 123456
    type: com.alibaba.druid.pool.DruidDataSource
    # type: org.apache.commons.dbcp2.BasicDataSource
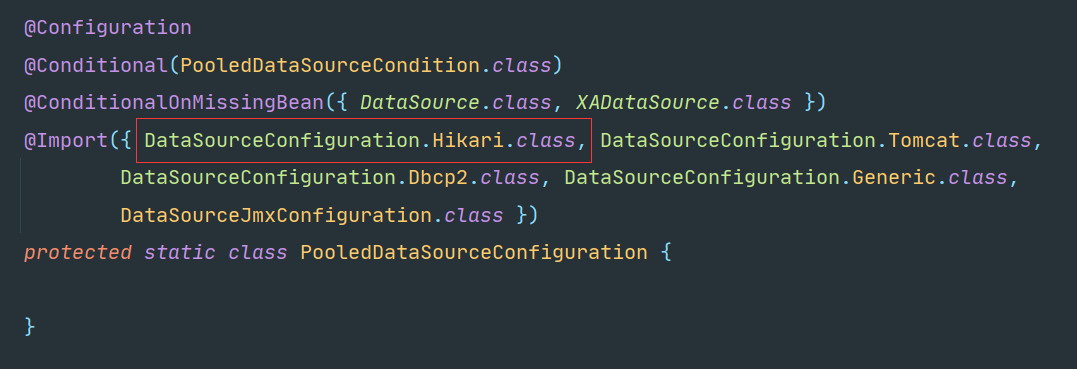
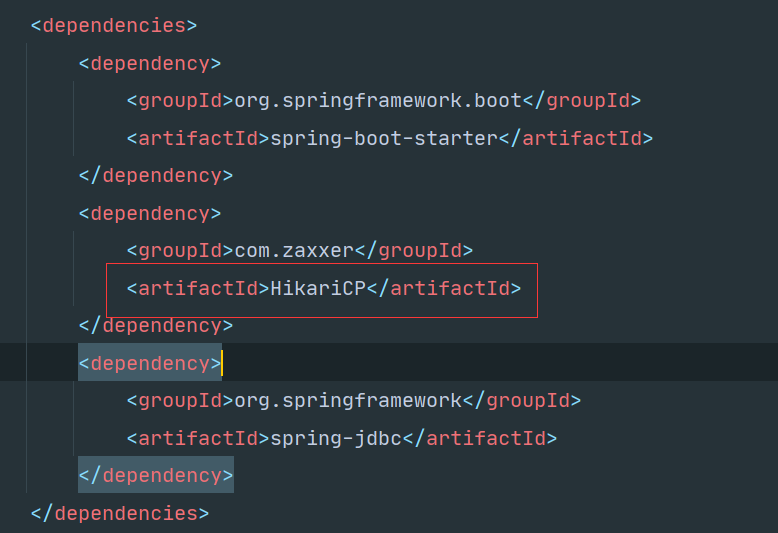
点开 starter-jdbc 我们可以看到 Hikari 是默认的数据源
配置指定的数据源druid
-
导入相关依赖
<dependency> <groupId>com.alibaba</groupId> <artifactId>druid</artifactId> <version>1.0.9</version> </dependency> <dependency> <groupId>log4j</groupId> <artifactId>log4j</artifactId> <version>1.2.15</version> </dependency> -
编写一个配置类,将datasource与yaml文件绑定,并将其注入到IOC容器之中
@Configuration public class DataSourceConfiguration { @Bean @ConfigurationProperties(value = "spring.datasource") public DataSource getDataSource(){ return new DruidDataSource(); } } -
修改type
type=com.alibaba.druid.pool.DruidDataSource -
话可以配置一些自定义的参数
initialSize: 5
minIdle: 5
maxActive: 20
maxWait: 60000
timeBetweenEvictionRunsMillis: 60000
minEvictableIdleTimeMillis: 300000
validationQuery: SELECT 1 FROM DUAL
testWhileIdle: true
testOnBorrow: false
testOnReturn: false
poolPreparedStatements: true
filters: stat,wall,log4j
maxPoolPreparedStatementPerConnectionSize: 20
useGlobalDataSourceStat: true
connectionProperties: druid.stat.mergeSql=true;druid.stat.slowSqlMillis=500
jdbcTemplate 自动配置
-
创建数据库boot_demo和表tx_users
-
测试
@RequestMapping("/query") public List<Map<String, Object>> query(){ List<Map<String, Object>> maps = jdbcTemplate.queryForList("select * from tx_user"); return maps; } -
测试无误
JdbcTemplateAutoConfiguration自动配置类源码
@Configuration
@ConditionalOnClass({ DataSource.class, JdbcTemplate.class })
@ConditionalOnSingleCandidate(DataSource.class)
@AutoConfigureAfter(DataSourceAutoConfiguration.class)
@EnableConfigurationProperties(JdbcProperties.class)
public class JdbcTemplateAutoConfiguration {

   @Configuration
   static class JdbcTemplateConfiguration {

      private final DataSource dataSource;

      private final JdbcProperties properties;

      JdbcTemplateConfiguration(DataSource dataSource, JdbcProperties properties) {
         this.dataSource = dataSource;
         this.properties = properties;
      }

      @Bean
      @Primary
      @ConditionalOnMissingBean(JdbcOperations.class)
      public JdbcTemplate jdbcTemplate() {
         JdbcTemplate jdbcTemplate = new JdbcTemplate(this.dataSource);
         JdbcProperties.Template template = this.properties.getTemplate();
         jdbcTemplate.setFetchSize(template.getFetchSize());
         jdbcTemplate.setMaxRows(template.getMaxRows());
         if (template.getQueryTimeout() != null) {
            jdbcTemplate
                  .setQueryTimeout((int) template.getQueryTimeout().getSeconds());
         }
         return jdbcTemplate;
      }
   }
}
7. mybatis自动配置
7.1 boot 整合 mybatis 注解版
-
导入相关依赖
<dependencies> <!--mysql驱动--> <dependency> <groupId>mysql</groupId> <artifactId>mysql-connector-java</artifactId> </dependency> <!--mybatis厂商提供的自动配置包--> <!--mybatis-start中有jdbc-start所以不需要重复导入--> <dependency> <groupId>org.mybatis.spring.boot</groupId> <artifactId>mybatis-spring-boot-starter</artifactId> <version>1.3.1</version> </dependency> <!--druid数据源 和 日志--> <dependency> <groupId>com.alibaba</groupId> <artifactId>druid</artifactId> <version>1.0.9</version> </dependency> <dependency> <groupId>log4j</groupId> <artifactId>log4j</artifactId> <version>1.2.17</version> </dependency> </dependencies> -
使用tx_user表创建实体类
-
编写mapper,你也可以在application类上直接加入mapperscan这样所有的mapper都不用加@Mapper(@MapperScan("com.iandf.mapper"))
@Mapper public interface UserMapper { @Select("select * from tx_user") List<User> selectAll(); } -
controller测试
@Autowired
public UserMapper userMapper;

@RequestMapping("/selectAll")
public List<User> selectAll(){
    List<User> users = userMapper.selectAll();
    System.out.println(users);
    return users;
}
7.2 在boot中使用 MyBatis settings
以mapUnderscoreToCamelCase(是否开启驼峰命名自动映射,即从经典数据库列名 A_COLUMN 映射到经典 Java 属性名 aColumn。)
查看自动配置类可以知道所有的settings都在Configuration类中,可以通过ConfigurationCustomizer来自定义Configuration
public interface ConfigurationCustomizer {

  /**
   * Customize the given a {@link Configuration} object.
   * @param configuration the configuration object to customize
   */
  void customize(Configuration configuration);

}
所以创建一个配置类MybatisConfig,并将ConfigurationCustomizer的实现类注入到IOC容器之中
@Configuration
public class MybatisConfig {
    @Bean
    public ConfigurationCustomizer setConfiguration(){
        return new ConfigurationCustomizer() {
            @Override
            public void customize(org.apache.ibatis.session.Configuration configuration) {
                configuration.setMapUnderscoreToCamelCase(true);
            }
        };
    }
}
7.3 使用配置文件整合mybatis
直接在yaml文件中配置settings,使用mapper.xml文件写sql语句
-
导入依赖
-
编写实体来
-
编写接口
-
在resource/mapper文件夹下编写XxxMapper.xml文件
<?xml version="1.0" encoding="UTF-8" ?> <!DOCTYPE mapper PUBLIC "-//mybatis.org//DTD Mapper 3.0//EN" "http://mybatis.org/dtd/mybatis-3-mapper.dtd"> <mapper namespace="com.iandf.mapper.UserMapper"> <select id="selectAll" resultType="user"> select * from tx_user </select> </mapper> -
在yaml文件中配置相关属性
#mybatis配置 mybatis: configuration: map-underscore-to-camel-case: true mapper-locations: classpath:mapper/*.xml type-aliases-package: com.iandf.model -
controller进行测试
@Autowired
public UserMapper userMapper;

@RequestMapping("/selectAll")
public List<User> selectAll(){
    List<User> users = userMapper.selectAll();
    System.out.println(users);
    return users;
}
7.4 mybatis配置-sessionFactory
原生的mybatis-spring中是这样配置的,也可以使用xml配置
@Bean
public SqlSessionFactory sqlSessionFactory() throws Exception {
    SqlSessionFactoryBean sessionFactoryBean = new SqlSessionFactoryBean();
    sessionFactoryBean.setDataSource(dataSource());
    return sessionFactoryBean.getObject();
}
使用 SqlSessionFactoryBean来创建sqlsessionFactory对象
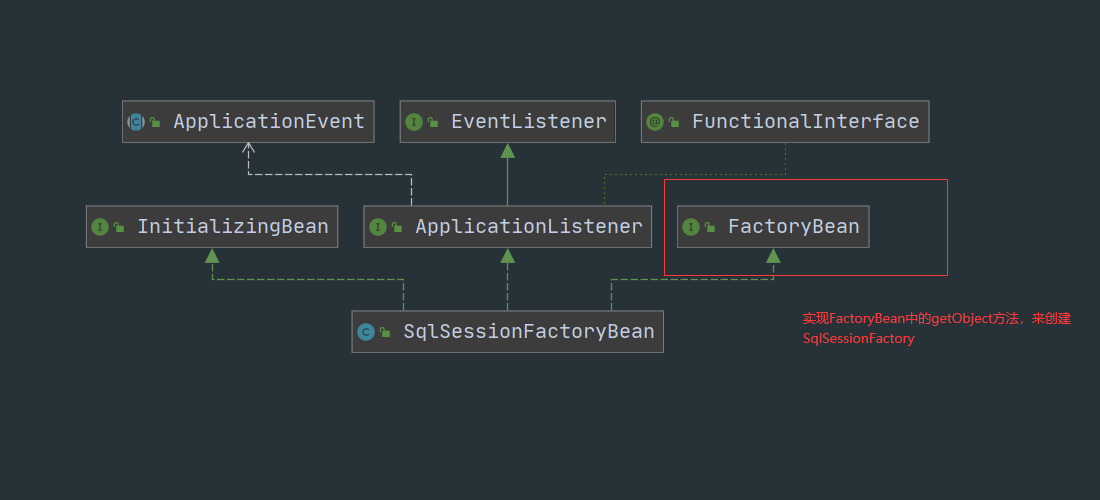
getObject 调用 afterPropertiesSet() 调用 buildSqlSessionFactory();
buildSqlSessionFactory 方法返回 return this.sqlSessionFactoryBuilder.build(configuration);
7.4 mybatis配置-Mapper对象
原生的mybatis-spring中有两种配置形式,也可以使用xml配置
方式一:使用MapperFactoryBean
@Bean
public UserMapper userMapper() throws Exception {
    MapperFactoryBean<UserMapper> factoryBean = new MapperFactoryBean<>(UserMapper.class);
    sqlSessionFactory().getConfiguration().addMapper(UserMapper.class);
    factoryBean.setSqlSessionFactory(sqlSessionFactory());
    return factoryBean.getObject();
}
方式二使用SqlSessionTemplate
@Bean
public UserMapper userMapper() throws Exception {
sqlSessionFactory().getConfiguration().addMapper(UserMapper.class);
SqlSessionTemplate sqlSessionTemplate = new SqlSessionTemplate(sqlSessionFactory());
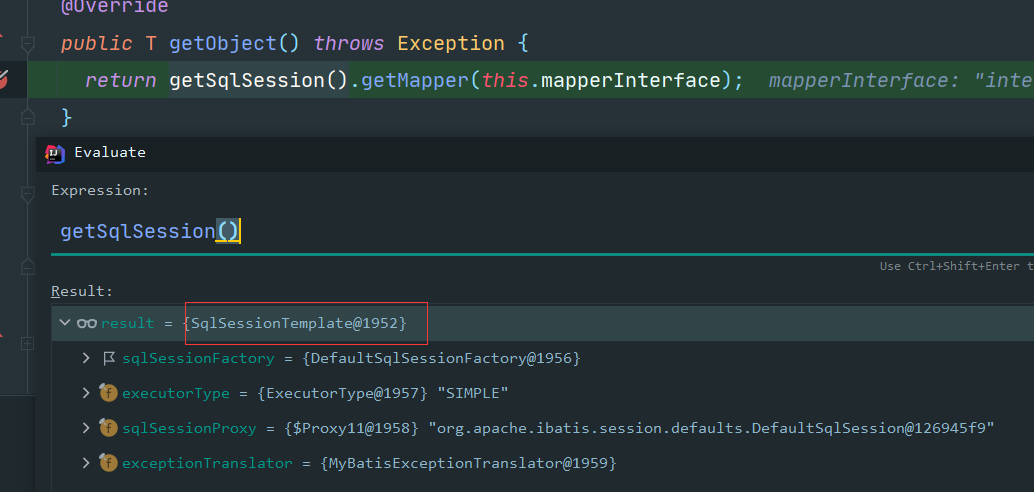
return sqlSessionTemplate.getMapper(UserMapper.class);
}
由Debug所知其实两者都是一样的, factoryBean.getObject()实际上也是调用了sqlSessionTemplate.getMapper(xxx)
8. Web开发静态资源处理
8.1 通过自动配置类看看静态资源处理的规则
SpringBoot中,SpringMVC的web配置都在 WebMvcAutoConfiguration 这个配置类里面;
在WebMvcAutoConfigurationAdapter这个内部类中可以看到以下源码
@Override
public void addResourceHandlers(ResourceHandlerRegistry registry) {
    //如果自己定义了staticPathPattern就不走下面流程
   if (!this.resourceProperties.isAddMappings()) {
      logger.debug("Default resource handling disabled");
      return;
   }
   Duration cachePeriod = this.resourceProperties.getCache().getPeriod();
   CacheControl cacheControl = this.resourceProperties.getCache().getCachecontrol().toHttpCacheControl();
   if (!registry.hasMappingForPattern("/webjars/**")) {
       //通过localhost:8080/webjars/**访问的静态资源都放在路径classpath:/META-INF/resources/webjars/下
      customizeResourceHandlerRegistration(registry.addResourceHandler("/webjars/**")
            .addResourceLocations("classpath:/META-INF/resources/webjars/")
            .setCachePeriod(getSeconds(cachePeriod)).setCacheControl(cacheControl));
   }
   String staticPathPattern = this.mvcProperties.getStaticPathPattern();
   if (!registry.hasMappingForPattern(staticPathPattern)) {
       /*通过localhost:8080/**访问的静态资源都放在路径{ "classpath:/META-INF/resources/",
			"classpath:/resources/", "classpath:/static/", "classpath:/public/" }下*/
      customizeResourceHandlerRegistration(registry.addResourceHandler(staticPathPattern)
            .addResourceLocations(getResourceLocations(this.resourceProperties.getStaticLocations()))
            .setCachePeriod(getSeconds(cachePeriod)).setCacheControl(cacheControl));
   }
}
以上是源码分析,那我们下面来一些例子验证一下
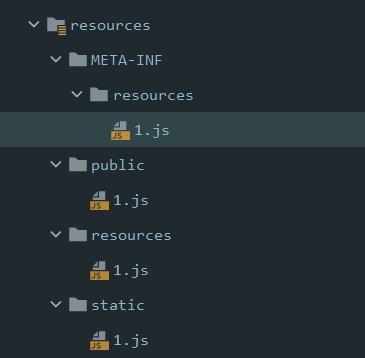
能访问成功,且通过测试得到了静态资源加载的优先级:
- META-INF/resources/
- resource
- static
- public
前面源码中还出现了webjars
什么是webjars
Webjars本质就是以jar包的方式引入我们的静态资源 , 我们以前要导入一个静态资源文件,直接导入即可。
使用SpringBoot需要使用Webjars,我们可以去搜索一下:网站:https://www.webjars.org
要使用jQuery,我们只要要引入jQuery对应版本的pom依赖即可!
<dependency>
    <groupId>org.webjars</groupId>
    <artifactId>jquery</artifactId>
    <version>3.5.1</version>
</dependency>
看一下依赖库结构
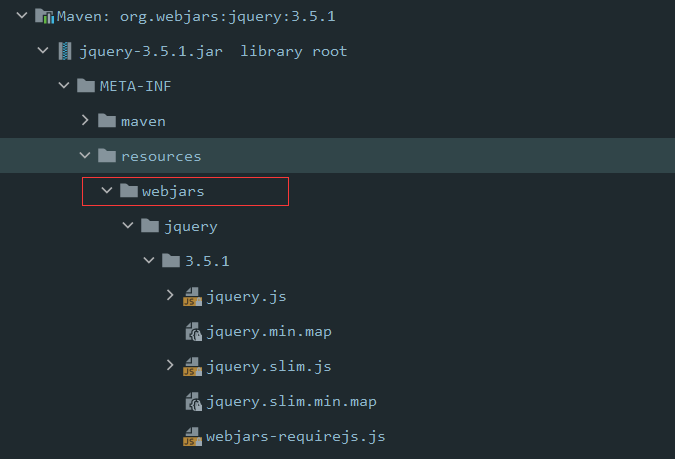
访问http://localhost:8080/webjars/jquery/3.5.1/jquery.js成功
8.2 自定义资源配置路径
通过上面的源码知道如果自定义配置路径那么通过localhost:8080/**访问的静态资源处理规则就会失效
spring.mvc.static-path-pattern=classpath:/iandf/
8.3 定制首页
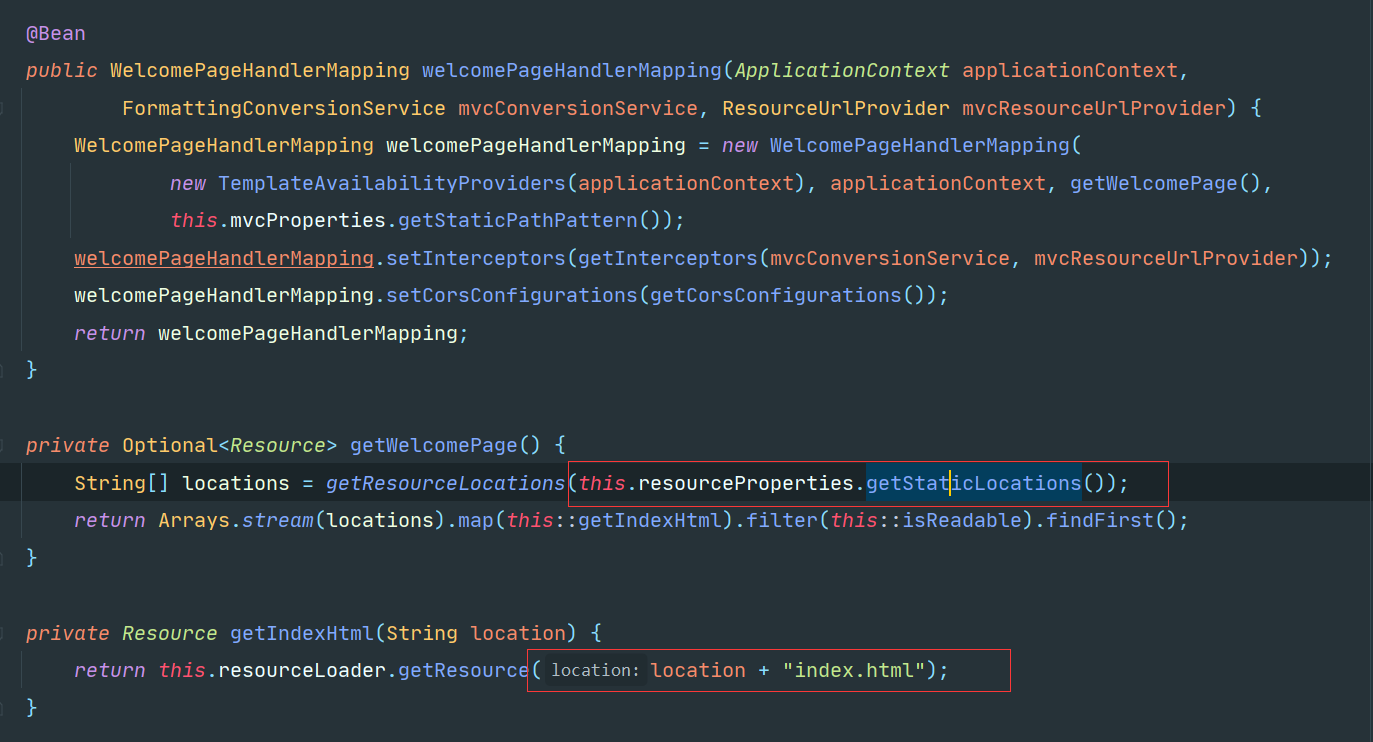
**结论: **所以我可以将index.html文件放在StaticLocation中来自定义首页
9. Thymeleaf模板引擎
前端交给我们的页面,是html页面。如果是我们以前开发,我们需要把他们转成jsp页面,jsp好处就是当我们查出一些数据转发到JSP页面以后,我们可以用jsp轻松实现数据的显示,及交互等。
jsp支持非常强大的功能,包括能写Java代码,但是呢,我们现在的这种情况,SpringBoot这个项目首先是以jar的方式,不是war,像第二,我们用的还是嵌入式的Tomcat,所以呢,他现在默认是不支持jsp的。
那不支持jsp,如果我们直接用纯静态页面的方式,那给我们开发会带来非常大的麻烦,那怎么办呢?
SpringBoot推荐你可以来使用模板引擎:
模板引擎,我们其实大家听到很多,其实jsp就是一个模板引擎,还有用的比较多的freemarker,包括SpringBoot给我们推荐的Thymeleaf,模板引擎有非常多,但再多的模板引擎,他们的思想都是一样的,什么样一个思想呢我们来看一下这张图:
模板引擎的作用就是我们来写一个页面模板,比如有些值呢,是动态的,我们写一些表达式。而这些值,从哪来呢,就是我们在后台封装一些数据。然后把这个模板和这个数据交给我们模板引擎,模板引擎按照我们这个数据帮你把这表达式解析、填充到我们指定的位置,然后把这个数据最终生成一个我们想要的内容给我们写出去,这就是我们这个模板引擎,不管是jsp还是其他模板引擎,都是这个思想。只不过呢,就是说不同模板引擎之间,他们可能这个语法有点不一样。Thymeleaf模板引擎是一个高级语言的模板引擎,他的这个语法更简单。而且功能更强大。
9.1 引入Thymeleaf
对于springboot来说,什么事情不都是一个start的事情
Thymeleaf 官网:https://www.thymeleaf.org/
Thymeleaf 在Github 的主页:https://github.com/thymeleaf/thymeleaf
Spring官方文档:找到我们对应的版本
https://docs.spring.io/spring-boot/docs/2.2.5.RELEASE/reference/htmlsingle/#using-boot-starter
引入start
<dependency>
    <groupId>org.springframework.boot</groupId>
    <artifactId>spring-boot-starter-thymeleaf</artifactId>
</dependency>
9.2 Thymeleaf源码分析和测试
查看自动配置类可以知道将html文件放入/templates/文件夹下即可
@ConfigurationProperties(prefix = "spring.thymeleaf")
public class ThymeleafProperties {

   private static final Charset DEFAULT_ENCODING = StandardCharsets.UTF_8;

   public static final String DEFAULT_PREFIX = "classpath:/templates/";

   public static final String DEFAULT_SUFFIX = ".html";
代码测试
@RequestMapping("/test")
public String test(){
    return "test";
}
templates/test.html
<!DOCTYPE html>
<html lang="en">
<head>
    <meta charset="UTF-8">
    <title>Title</title>
</head>
<body>
<h1>测试页面</h1>
</body>
</html>
测试无误
10. MVC自动配置原理
10.1 官网阅读
The auto-configuration adds the following features on top of Spring’s defaults:
-
Inclusion of
ContentNegotiatingViewResolverandBeanNameViewResolverbeans.- 包含视图解析器
-
Support for serving static resources, including support for WebJars (covered later in this document)).
-
Automatic registration of
Converter,GenericConverter, andFormatterbeans.- 自动注册了Converter
- 转换器,这就是我们网页提交数据到后台自动封装成为对象的东西,比如把"1"字符串自动转换为int类型
- Formatter:【格式化器,比如页面给我们了一个2019-8-10,它会给我们自动格式化为Date对象】
-
Support for
HttpMessageConverters(covered later in this document).- // SpringMVC用来转换Http请求和响应的的,比如我们要把一个User对象转换为JSON字符串,可以去看官网文档解释;
-
Automatic registration of
MessageCodesResolver(covered later in this document).- // 定义错误代码生成规则的
-
Static
index.htmlsupport. -
Custom
Faviconsupport (covered later in this document). -
Automatic use of a
ConfigurableWebBindingInitializerbean (covered later in this document).- // 初始化数据绑定器:帮我们把请求数据绑定到JavaBean中!
If you want to keep those Spring Boot MVC customizations and make more MVC customizations (interceptors, formatters, view controllers, and other features), you can add your own @Configuration class of type WebMvcConfigurer but without @EnableWebMvc.
10.2 以ViewResolver为例子看源码
ContentNegotiatingViewResolver 内容协商视图解析器
@Bean
@ConditionalOnBean(ViewResolver.class)
@ConditionalOnMissingBean(name = "viewResolver", value = ContentNegotiatingViewResolver.class)
public ContentNegotiatingViewResolver viewResolver(BeanFactory beanFactory) {
   ContentNegotiatingViewResolver resolver = new ContentNegotiatingViewResolver();
   resolver.setContentNegotiationManager(beanFactory.getBean(ContentNegotiationManager.class));
   // ContentNegotiatingViewResolver uses all the other view resolvers to locate
   // a view so it should have a high precedence
    // ContentNegotiatingViewResolver使用所有其他视图解析器来定位视图,因此它应该具有较高的优先级
   resolver.setOrder(Ordered.HIGHEST_PRECEDENCE);
   return resolver;
}
@Override
@Nullable
public View resolveViewName(String viewName, Locale locale) throws Exception {
   RequestAttributes attrs = RequestContextHolder.getRequestAttributes();
   Assert.state(attrs instanceof ServletRequestAttributes, "No current ServletRequestAttributes");
   List<MediaType> requestedMediaTypes = getMediaTypes(((ServletRequestAttributes) attrs).getRequest());
   if (requestedMediaTypes != null) {
   		//获取所有的候选视图
      List<View> candidateViews = getCandidateViews(viewName, locale, requestedMediaTypes);
      //拿到最好的那个视图
      View bestView = getBestView(candidateViews, requestedMediaTypes, attrs);
      if (bestView != null) {
         return bestView;
      }
   }
   ...
}
我们继续点进去看,他是怎么获得候选的视图的呢?
getCandidateViews中看到他是把所有的视图解析器拿来,进行while循环,挨个解析!
for (ViewResolver viewResolver : this.viewResolvers) {
   View view = viewResolver.resolveViewName(viewName, locale);
   。。。
}
所以得出结论:ContentNegotiatingViewResolver 这个视图解析器就是用来组合所有的视图解析器的
由springmvc可知视图解析器应该在dispactherServlet中初始化,在DispatcherServlet类中找到该方法
private void initViewResolvers(ApplicationContext context) {
   this.viewResolvers = null;

   if (this.detectAllViewResolvers) {
      // Find all ViewResolvers in the ApplicationContext, including ancestor contexts.
      Map<String, ViewResolver> matchingBeans =
            BeanFactoryUtils.beansOfTypeIncludingAncestors(context, ViewResolver.class, true, false);
      if (!matchingBeans.isEmpty()) {
         this.viewResolvers = new ArrayList<>(matchingBeans.values());
         // We keep ViewResolvers in sorted order.
         AnnotationAwareOrderComparator.sort(this.viewResolvers);
      }
   }
所以想自定义一个视图解析器就必须实现ViewResolver接口并将它放入IOC容器之中
由前面阅读官方文档可知,想要在原有的自动配置类上扩展视图解析器,须有以下步骤:
- own
@Configurationclass是WebMvcConfigurer类型的 - 实现ViewResolver接口的类
- 并将它的实例放入IOC容器之中
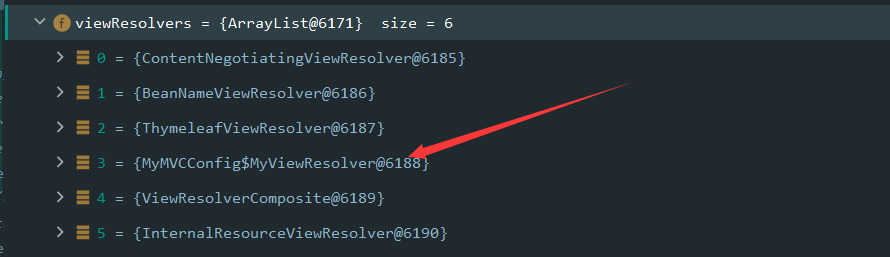
10.3 代码测试~自定义视图解析器
自定义视图解析器
@Configuration
public class MyMVCConfig implements WebMvcConfigurer {
    @Bean
    public ViewResolver myViewResolver(){
        return new MyViewResolver();
    }

    public static class MyViewResolver implements ViewResolver{

        @Override
        public View resolveViewName(String viewName, Locale locale) throws Exception {
            return null;
        }
    }
}
在DispactherServlet的doDispatch上断点调试得到dispactherServlet实例中有自定义的视图解析器
10.4 修改自动配置
这么多的自动配置,原理都是一样的,通过这个WebMVC的自动配置原理分析,我们要学会一种学习方式,通过源码探究,得出结论;这个结论一定是属于自己的,而且一通百通。
SpringBoot的底层,大量用到了这些设计细节思想,所以,没事需要多阅读源码!得出结论;
SpringBoot在自动配置很多组件的时候,先看容器中有没有用户自己配置的(如果用户自己配置@bean),如果有就用用户配置的,如果没有就用自动配置的;
如果有些组件可以存在多个,比如我们的视图解析器,就将用户配置的和自己默认的组合起来!
我们自定义的WebConfiguration是怎么生效的呢?
WebMvcAutoConfiguration中有一个WebMvcAutoConfigurationAdapter适配器他导入了一个类EnableWebMvcConfiguration
EnableWebMvcConfiguration继承了DelegatingWebMvcConfiguration源码如下
@Configuration(proxyBeanMethods = false)
public class DelegatingWebMvcConfiguration extends WebMvcConfigurationSupport {

   private final WebMvcConfigurerComposite configurers = new WebMvcConfigurerComposite();


   @Autowired(required = false)
   public void setConfigurers(List<WebMvcConfigurer> configurers) {
      if (!CollectionUtils.isEmpty(configurers)) {
          //添加所有的WebMvcConfigurer
         this.configurers.addWebMvcConfigurers(configurers);
      }
   }
10.5 配置ViewController
在MyMVCConfig重写addViewControllers方法
@Override
public void addViewControllers(ViewControllerRegistry registry) {
    registry.addRedirectViewController("/iandf","/test");
}
测试成功:访问http://localhost:8080/iandf自动跳转到http://localhost:8080/iandf
提出问题:为什么会自动配置到WebMvcConfig
所有的自己盘配置的MVCConfig都归DelegatingWebMvcConfiguration管
public class DelegatingWebMvcConfiguration extends WebMvcConfigurationSupport {

   private final WebMvcConfigurerComposite configurers = new WebMvcConfigurerComposite();


   @Autowired(required = false)
   public void setConfigurers(List<WebMvcConfigurer> configurers) {
      if (!CollectionUtils.isEmpty(configurers)) {
          //添加所有自定义的Mvc配置类
         this.configurers.addWebMvcConfigurers(configurers);
      }
   }
从类中看到这个方法 就可以知道我们配置的ViewControllers已经生效了
@Override
protected void addViewControllers(ViewControllerRegistry registry) {
    //交给WebMvcConfigurerComposite实例去添加registry
   this.configurers.addViewControllers(registry);
}
点进addViewControllers可以看到
@Override
public void addViewControllers(ViewControllerRegistry registry) {
    //遍历自定义的WebMvcConfigurer,将自定义的ViewControllers配置进去
   for (WebMvcConfigurer delegate : this.delegates) {
      delegate.addViewControllers(registry);
   }
}
所以得出结论:所有的WebMvcConfiguration都会被作用,不止Spring自己的配置类,我们自己的配置类当然也会被调用;
10.6 全面接管SpringMVC
官方文档:
If you want to take complete control of Spring MVCyou can add your own @Configuration annotated with @EnableWebMvc.
全面接管即:SpringBoot对SpringMVC的自动配置不需要了,所有都是我们自己去配置!
测试
我们看下如果我们全面接管了SpringMVC了,我们之前SpringBoot给我们配置的静态资源映射一定会无效,我们可以去测试一下;
给配置类加上注解:@EnableWebMvc,在static文件夹下添加index.html
然后访问http://localhost:8080/失效
原理:
@EnableWebMvc导入了一个类@Import(DelegatingWebMvcConfiguration.class)
DelegatingWebMvcConfiguration继承了WebMvcConfigurationSupport
public class DelegatingWebMvcConfiguration extends WebMvcConfigurationSupport
再来看WebMvcAutoConfiguration类上有一个注解@ConditionalOnMissingBean(WebMvcConfigurationSupport.class)
所以如果我们的配置类上有@EnableWebMvc那么WebMvcAutoConfiguration就不会失效
11. EMS(没有集成数据库)
11.1 准备工作
- 数据准备
- css、html等导入
11.2 自定义首页
index.thml已经放入templates包中,如果要访问需导入templates依赖
<dependency>
    <groupId>org.springframework.boot</groupId>
    <artifactId>spring-boot-starter-thymeleaf</artifactId>
</dependency>
自定义一个ViewController来控制首页的跳转
@Configuration
public class MyMvcConfig implements WebMvcConfigurer {
    //注册首页跳转
    @Override
    public void addViewControllers(ViewControllerRegistry registry) {
        registry.addViewController("/").setViewName("index");
    }
}
所有页面的静态资源按照thymeleaf语法修改后,测试无误
访问链接@{}形式能根据你自己配的server.servlet.context-path=/xxx自动修改访问静态资源的链接,极其方便
@{/css/bootstrap.min.css}
11.3 页面国际化
1. 准备工作
先在IDEA中统一设置properties的编码问题!

2. 编写配置文件
抽取页面需要显示的国际化页面消息,编写国际化配置文件
-
我们在resources资源文件下新建一个i18n目录,存放国际化配置文件
-
右键添加ResourceBundle
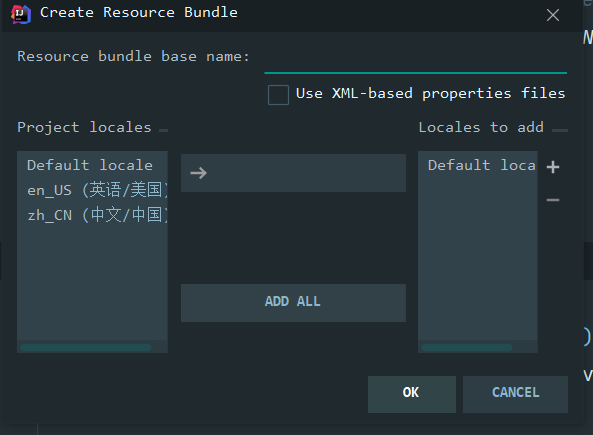
-
在里面添加配置信息
-
在application.properties中写明国际化配置文件的位置
spring.messages.basename=i18n.login -
在html文件中按thymeleaf的语法修改需要配置的地方
-
测试无误
3. 配置文件生效原理
我们去看一下SpringBoot对国际化的自动配置!这里又涉及到一个类:MessageSourceAutoConfiguration
里面有一个方法,这里发现SpringBoot已经自动配置好了管理我们国际化资源文件的组件 ResourceBundleMessageSource;
@Bean
public MessageSource messageSource(MessageSourceProperties properties) {
   ResourceBundleMessageSource messageSource = new ResourceBundleMessageSource();
   if (StringUtils.hasText(properties.getBasename())) {
        // 设置国际化文件的基础名(去掉语言国家代码的)就是我们在配置文件中编写好的
      messageSource.setBasenames(StringUtils
            .commaDelimitedListToStringArray(StringUtils.trimAllWhitespace(properties.getBasename())));
   }
   if (properties.getEncoding() != null) {
      messageSource.setDefaultEncoding(properties.getEncoding().name());
   }
   messageSource.setFallbackToSystemLocale(properties.isFallbackToSystemLocale());
   Duration cacheDuration = properties.getCacheDuration();
   if (cacheDuration != null) {
      messageSource.setCacheMillis(cacheDuration.toMillis());
   }
   messageSource.setAlwaysUseMessageFormat(properties.isAlwaysUseMessageFormat());
   messageSource.setUseCodeAsDefaultMessage(properties.isUseCodeAsDefaultMessage());
   return messageSource;
}
4. 自定义LocaleResolver
在Spring中有一个国际化的Locale (区域信息对象);里面有一个叫做LocaleResolver (获取区域信息对象)的解析器!
我们去我们webmvc自动配置文件,寻找一下!看到SpringBoot默认配置:
@Bean
//配置文件中没有id为localeResolver的bean时生效,否则不生效
@ConditionalOnMissingBean
@ConditionalOnProperty(prefix = "spring.mvc", name = "locale")
public LocaleResolver localeResolver() {
    // 容器中没有就自己配,有的话就用用户配置的(在配置文件中配置的)
   if (this.mvcProperties.getLocaleResolver() == WebMvcProperties.LocaleResolver.FIXED) {
      return new FixedLocaleResolver(this.mvcProperties.getLocale());
   }
     // 接收头国际化分解
   AcceptHeaderLocaleResolver localeResolver = new AcceptHeaderLocaleResolver();
   localeResolver.setDefaultLocale(this.mvcProperties.getLocale());
   return localeResolver;
}
看一下AcceptHeaderLocaleResolver这个类,根据这个类自己编写LocaleResolver
@Override
public Locale resolveLocale(HttpServletRequest request) {
    //获取默认的locale
   Locale defaultLocale = getDefaultLocale();
   if (defaultLocale != null && request.getHeader("Accept-Language") == null) {
      return defaultLocale;
   }
    //requestLocale根据请求头带来的区域信息获取Locale进行国际化
   Locale requestLocale = request.getLocale();
   List<Locale> supportedLocales = getSupportedLocales();
   if (supportedLocales.isEmpty() || supportedLocales.contains(requestLocale)) {
      return requestLocale;
   }
   Locale supportedLocale = findSupportedLocale(request, supportedLocales);
   if (supportedLocale != null) {
      return supportedLocale;
   }
   return (defaultLocale != null ? defaultLocale : requestLocale);
}
那假如我们现在想点击链接让我们的国际化资源生效,就需要让我们自己的Locale生效!
我们去自己写一个自己的LocaleResolver,可以在链接上携带区域信息!
修改一下前端页面的跳转连接:
<a class="btn btn-sm" th:href="@{/index.html(l='zh_CN')}" >中文</a>
<a class="btn btn-sm" th:href="@{/index.html(l='en_US')}" >English</a>
自定义MyLocaleResolver
public class MyLocaleResolver implements LocaleResolver {
    @Override
    public Locale resolveLocale(HttpServletRequest request) {
        //获默认的locale
        String language = request.getParameter("l");
        Locale locale = Locale.getDefault(); // 如果没有获取到就使用系统默认的
        //如果请求链接不为空
        if (!StringUtils.isEmpty(language)){
            //分割请求参数
            String[] split = language.split("_");
            //国家,地区
            locale = new Locale(split[0],split[1]);
        }
        return locale;
    }

    @Override
    public void setLocale(HttpServletRequest request, HttpServletResponse response, Locale locale) {

    }
}
在配置文件中注入MyLocaleResolver
@Bean
public LocaleResolver localeResolver(){
    return new MyLocaleResolver();
}
NOTE :
这里的方法名就只能是localeResolver才能生效,因为WebMvcAutoConfiguration中localeResolver上有注解@ConditionalOnMissingBean。只有配置文件中有这个id为localeResolver的bean时才会不生效
11.4 登录功能
@Controller
public class LoginController {
    @RequestMapping("/user/login")
    public String login(HttpSession session,String username, String password, Model model){
        if ("admin".equals(username)&&"123".equals(password)){
            session.setAttribute("loginUser",username);
            //隐藏真正的路径,通过ViewController来转发到真正的页面
            return "redirect:/main";
        }
        else {
            model.addAttribute("msg","用户名或者密码错误");
            return "index";
        }

    }
}
由于没有登录不能访问首页,所以需要用一个拦截器
public class LoginInterceptor implements HandlerInterceptor {
    @Override
    public boolean preHandle(HttpServletRequest request, HttpServletResponse response, Object handler) throws Exception {
        HttpSession session = request.getSession();
        Object loginUser = session.getAttribute("loginUser");
        if (loginUser == null) {
            request.setAttribute("msg","请先登录,再访问");
            request.getRequestDispatcher("/index.html").forward(request,response);
            return false;
        }
        return true;
    }
}
在MCVConfig里面配置LoginInterceptor
@Override
public void addInterceptors(InterceptorRegistry registry) {
    registry.addInterceptor(new LoginInterceptor()).addPathPatterns("/**")
            .excludePathPatterns("/","/index.html","/user/login","/css/**","/img/**","/js/**");
}
11.5 展示员工信息
-
提取公共模块:顶部导航栏和底部导航栏
- 将侧边栏和导航栏的代码提到commons.html中
- th:fragment="sidebar"
- 在需要的地方嵌入
- th:replace="~{commons/commons::sidebar(active='list.html')}"
- 将侧边栏和导航栏的代码提到commons.html中
-
展示员工信息
-
编写controller
-
@Controller
public class EmployeeController {
    @Autowired
    public EmployeeDao employeeDao;

    @RequestMapping("/user/getAll")
    public String getAll(Model model){
        Collection<Employee> employees = employeeDao.getAll();
        model.addAttribute("emps",employees);
        return "list";
    }
}
-
-
在list.html中展示
-
<table class="table table-striped table-sm">
   <thead>
      <tr>
         <th>id</th>
         <th>lastName</th>
         <th>email</th>
         <th>gender</th>
         <th>department</th>
         <th>birth</th>
         <th>modify</th>
      </tr>
   </thead>
   <tbody >
      <tr th:each="employee:${emps}">
         <td th:text="${employee.getId()}"></td>
         <td th:text="${employee.getLastName()}"></td>
         <td th:text="${employee.getEmail()}"></td>
         <td th:text="${employee.getGender()}==0?'女':'男'"></td>
         <td th:text="${employee.getDepartment().getDepartmentName()}"></td>
         <td th:text="${#dates.format(employee.getBirth(),'yyyy-MM-dd HH:mm:ss')}"></td>
         <td>
            <a class="btn btn-sm btn-primary">编辑</a>
            <a class="btn btn-sm btn-danger">删除</a>
         </td>
      </tr>
   </tbody>
</table>
-
-
11.6 添加员工信息
-
跳转到添加页面
-
编写Controller
@GetMapping("/emp") public String toAddPage(Model model){ //获取部门信息传给他 Collection<Department> departments = departmentDao.getDepartment(); model.addAttribute("departments",departments); return "emp/add"; } -
add.html
<!DOCTYPE html> <!-- saved from url=(0052)http://getbootstrap.com/docs/4.0/examples/dashboard/ --> <html lang="en" xmlns:th="http://www.thymeleaf.org"> <head> <meta http-equiv="Content-Type" content="text/html; charset=UTF-8"> <meta name="viewport" content="width=device-width, initial-scale=1, shrink-to-fit=no"> <meta name="description" content=""> <meta name="author" content=""> <title>Dashboard Template for Bootstrap</title> <!-- Bootstrap core CSS --> <link th:href="@{/css/bootstrap.min.css}" rel="stylesheet"> <!-- Custom styles for this template --> <link th:href="@{/css/dashboard.css}" rel="stylesheet"> <style type="text/css"> /* Chart.js */ @-webkit-keyframes chartjs-render-animation { from { opacity: 0.99 } to { opacity: 1 } } @keyframes chartjs-render-animation { from { opacity: 0.99 } to { opacity: 1 } } .chartjs-render-monitor { -webkit-animation: chartjs-render-animation 0.001s; animation: chartjs-render-animation 0.001s; } </style> </head> <body> <div th:replace="~{commons/commons::navbar}"></div> <div class="container-fluid"> <div class="row"> <div th:replace="~{commons/commons::sidebar(active='list.html')}"></div> <main role="main" class="col-md-9 ml-sm-auto col-lg-10 pt-3 px-4"> <form class="form-horizontal" th:action="@{/emp}" method="post"> <div class="form-group"> <label class="col-sm-2 control-label">名字</label> <div class="col-sm-10"> <input type="text" class="form-control" placeholder="张三" name="lastName"> </div> </div> <div class="form-group"> <label class="col-sm-2 control-label">邮件</label> <div class="col-sm-10"> <input type="email" class="form-control" placeholder="1234567456@qq.com" name="email"> </div> </div> <div class="form-group"> <label class="col-sm-2 control-label">性别</label> <div class="col-sm-offset-2 col-sm-10"> <label> <input type="radio" name="gender" checked value="1"> 男 </label> <label> <input type="radio" name="gender" value="0"> 女 </label> </div> </div> <div class="form-group"> <label class="col-sm-2 control-label">部门</label> <div class="col-sm-10"> <select class="form-control" name="department.id"> <option th:each="dept:${departments}" th:text="${dept.getDepartmentName()}" th:value="${dept.getId()}"></option> </select> </div> </div> <div class="form-group"> <label class="col-sm-2 control-label">生日</label> <div class="col-sm-10"> <input type="text" class="form-control" placeholder="2000/11/11" name="birth"> </div> </div> <div class="form-group"> <div class="col-sm-offset-2 col-sm-10"> <button class="btn btn-sm btn-success" type="submit">添加</button> </div> </div> </form> </main> </div> </div> <!-- Bootstrap core JavaScript ================================================== --> <!-- Placed at the end of the document so the pages load faster --> <script type="text/javascript" src="asserts/js/jquery-3.2.1.slim.min.js"></script> <script type="text/javascript" src="asserts/js/popper.min.js"></script> <script type="text/javascript" src="asserts/js/bootstrap.min.js"></script> <!-- Icons --> <script type="text/javascript" src="asserts/js/feather.min.js"></script> <script> feather.replace() </script> <!-- Graphs --> <script type="text/javascript" src="asserts/js/Chart.min.js"></script> <script> var ctx = document.getElementById("myChart"); var myChart = new Chart(ctx, { type: 'line', data: { labels: ["Sunday", "Monday", "Tuesday", "Wednesday", "Thursday", "Friday", "Saturday"], datasets: [{ data: [15339, 21345, 18483, 24003, 23489, 24092, 12034], lineTension: 0, backgroundColor: 'transparent', borderColor: '#007bff', borderWidth: 4, pointBackgroundColor: '#007bff' }] }, options: { scales: { yAxes: [{ ticks: { beginAtZero: false } }] }, legend: { display: false, } } }); </script> </body> </html> -
编写controller 获取前端传过来的数据,重定向到getAll,刷新数据
@PostMapping("/emp") public String toAddPage(Employee employee){ //获取部门信息传给他 employeeDao.save(employee); return "redirect:/getAll"; } -
测试无误
-
11.7 修改成员
-
update.html
<!DOCTYPE html> <!-- saved from url=(0052)http://getbootstrap.com/docs/4.0/examples/dashboard/ --> <html lang="en" xmlns:th="http://www.thymeleaf.org"> <head> <meta http-equiv="Content-Type" content="text/html; charset=UTF-8"> <meta name="viewport" content="width=device-width, initial-scale=1, shrink-to-fit=no"> <meta name="description" content=""> <meta name="author" content=""> <title>Dashboard Template for Bootstrap</title> <!-- Bootstrap core CSS --> <link th:href="@{/css/bootstrap.min.css}" rel="stylesheet"> <!-- Custom styles for this template --> <link th:href="@{/css/dashboard.css}" rel="stylesheet"> <style type="text/css"> /* Chart.js */ @-webkit-keyframes chartjs-render-animation { from { opacity: 0.99 } to { opacity: 1 } } @keyframes chartjs-render-animation { from { opacity: 0.99 } to { opacity: 1 } } .chartjs-render-monitor { -webkit-animation: chartjs-render-animation 0.001s; animation: chartjs-render-animation 0.001s; } </style> </head> <body> <div th:replace="~{commons/commons::navbar}"></div> <div class="container-fluid"> <div class="row"> <div th:replace="~{commons/commons::sidebar(active='list.html')}"></div> <main role="main" class="col-md-9 ml-sm-auto col-lg-10 pt-3 px-4"> <form class="form-horizontal" th:action="@{/updateEmp}" method="post"> <input type="hidden" name="id" th:value="${emp.getId()}" > <div class="form-group"> <label class="col-sm-2 control-label">名字</label> <div class="col-sm-10"> <input type="text" class="form-control" name="lastName" th:value="${emp.getLastName()}"> </div> </div> <div class="form-group"> <label class="col-sm-2 control-label">邮件</label> <div class="col-sm-10"> <input type="email" class="form-control" th:value="${emp.getEmail()}" name="email"> </div> </div> <div class="form-group"> <label class="col-sm-2 control-label">性别</label> <div class="col-sm-offset-2 col-sm-10"> <label> <input th:checked="${emp.getGender()==1}" type="radio" name="gender" checked value="1"> 男 </label> <label> <input th:checked="${emp.getGender()==0}" type="radio" name="gender" value="0"> 女 </label> </div> </div> <div class="form-group"> <label class="col-sm-2 control-label">部门</label> <div class="col-sm-10"> <select class="form-control" name="department.id"> <option th:selected="${emp.getDepartment().getId()==dept.getId()}" th:each="dept:${departments}" th:text="${dept.getDepartmentName()}" th:value="${dept.getId()}"></option> </select> </div> </div> <div class="form-group"> <label class="col-sm-2 control-label">生日</label> <div class="col-sm-10"> <input th:value="${#dates.format(emp.getBirth(),'yyyy/MM/dd')}" type="text" class="form-control" name="birth"> </div> </div> <div class="form-group"> <div class="col-sm-offset-2 col-sm-10"> <button class="btn btn-sm btn-success" type="submit">修改</button> </div> </div> </form> </main> </div> </div> <!-- Bootstrap core JavaScript ================================================== --> <!-- Placed at the end of the document so the pages load faster --> <script type="text/javascript" src="asserts/js/jquery-3.2.1.slim.min.js"></script> <script type="text/javascript" src="asserts/js/popper.min.js"></script> <script type="text/javascript" src="asserts/js/bootstrap.min.js"></script> <!-- Icons --> <script type="text/javascript" src="asserts/js/feather.min.js"></script> <script> feather.replace() </script> <!-- Graphs --> <script type="text/javascript" src="asserts/js/Chart.min.js"></script> <script> var ctx = document.getElementById("myChart"); var myChart = new Chart(ctx, { type: 'line', data: { labels: ["Sunday", "Monday", "Tuesday", "Wednesday", "Thursday", "Friday", "Saturday"], datasets: [{ data: [15339, 21345, 18483, 24003, 23489, 24092, 12034], lineTension: 0, backgroundColor: 'transparent', borderColor: '#007bff', borderWidth: 4, pointBackgroundColor: '#007bff' }] }, options: { scales: { yAxes: [{ ticks: { beginAtZero: false } }] }, legend: { display: false, } } }); </script> </body> </html> -
跳转到update.html页面的方法
-
@GetMapping("/toUpdate/{id}")
public String toUpdatePage(@PathVariable("id")Integer id,Model model){
    //获取需要修改的员工和部门信息传给他
    Employee employee = employeeDao.getEmployeeById(id);
    model.addAttribute("emp",employee);
    Collection<Department> departments = departmentDao.getDepartment();
    model.addAttribute("departments",departments);
    return "emp/update";
}
-
-
将修改好的信息添加到Dao层,在返回getAll刷新页面
@PostMapping("/updateEmp")
public String updateEmp(Employee employee){
    employeeDao.save(employee);
    return "redirect:/getAll";
}
11.8 删除员工信息以及处理404
-
跳转到controller
<a class="btn btn-sm btn-danger" th:href="@{/delete/}+${emp.getId()}">删除</a> -
controller方法
@GetMapping("/delete/{id}") public String delete(@PathVariable("id")Integer id){ employeeDao.delete(id); return "redirect:/getAll"; } -
把404.html页面放在error文件夹下即可生效
12. springsecurity
12.1 简介
在 Web 开发中,安全一直是非常重要的一个方面。安全虽然属于应用的非功能性需求,但是应该在应用开发的初期就考虑进来。如果在应用开发的后期才考虑安全的问题,就可能陷入一个两难的境地:一方面,应用存在严重的安全漏洞,无法满足用户的要求,并可能造成用户的隐私数据被攻击者窃取;另一方面,应用的基本架构已经确定,要修复安全漏洞,可能需要对系统的架构做出比较重大的调整,因而需要更多的开发时间,影响应用的发布进程。因此,从应用开发的第一天就应该把安全相关的因素考虑进来,并在整个应用的开发过程中。
市面上存在比较有名的:Shiro,Spring Security !
这里需要阐述一下的是,每一个框架的出现都是为了解决某一问题而产生了,那么Spring Security框架的出现是为了解决什么问题呢?
首先我们看下它的官网介绍:Spring Security官网地址
Spring Security is a powerful and highly customizable authentication and access-control framework. It is the de-facto standard for securing Spring-based applications.
Spring Security is a framework that focuses on providing both authentication and authorization to Java applications. Like all Spring projects, the real power of Spring Security is found in how easily it can be extended to meet custom requirements
Spring Security是一个功能强大且高度可定制的身份验证和访问控制框架。它实际上是保护基于spring的应用程序的标准。
Spring Security是一个框架,侧重于为Java应用程序提供身份验证和授权。与所有Spring项目一样,Spring安全性的真正强大之处在于它可以轻松地扩展以满足定制需求
从官网的介绍中可以知道这是一个权限框架。想我们之前做项目是没有使用框架是怎么控制权限的?对于权限 一般会细分为功能权限,访问权限,和菜单权限。代码会写的非常的繁琐,冗余。
怎么解决之前写权限代码繁琐,冗余的问题,一些主流框架就应运而生而Spring Scecurity就是其中的一种。
Spring 是一个非常流行和成功的 Java 应用开发框架。Spring Security 基于 Spring 框架,提供了一套 Web 应用安全性的完整解决方案。一般来说,Web 应用的安全性包括用户认证(Authentication)和用户授权(Authorization)两个部分。用户认证指的是验证某个用户是否为系统中的合法主体,也就是说用户能否访问该系统。用户认证一般要求用户提供用户名和密码。系统通过校验用户名和密码来完成认证过程。用户授权指的是验证某个用户是否有权限执行某个操作。在一个系统中,不同用户所具有的权限是不同的。比如对一个文件来说,有的用户只能进行读取,而有的用户可以进行修改。一般来说,系统会为不同的用户分配不同的角色,而每个角色则对应一系列的权限。
对于上面提到的两种应用情景,Spring Security 框架都有很好的支持。在用户认证方面,Spring Security 框架支持主流的认证方式,包括 HTTP 基本认证、HTTP 表单验证、HTTP 摘要认证、OpenID 和 LDAP 等。在用户授权方面,Spring Security 提供了基于角色的访问控制和访问控制列表(Access Control List,ACL),可以对应用中的领域对象进行细粒度的控制。
12.2 实战测试
1. 实验环境搭建
-
新建一个初始的springboot项目web模块,thymeleaf模块
-
导入静态资源
welcome.html |views |level1 1.html 2.html 3.html |level2 1.html 2.html 3.html |level3 1.html 2.html 3.html Login.html -
controller跳转
@Controller public class RouteController { @RequestMapping({"/","/index"}) public String index(){ return "index"; } @RequestMapping("/toLogin") public String login(){ return "views/login"; } @RequestMapping("/level1/{id}") public String level1(@PathVariable("id") int id){ return "views/level1/"+id; } @RequestMapping("/level2/{id}") public String level2(@PathVariable("id") int id){ return "views/level2/"+id; } @RequestMapping("/level3/{id}") public String level3(@PathVariable("id") int id){ return "views/level3/"+id; } } -
测试实验环境是否OK!
2. 认识SpringSecurity
Spring Security 是针对Spring项目的安全框架,也是Spring Boot底层安全模块默认的技术选型,他可以实现强大的Web安全控制,对于安全控制,我们仅需要引入 spring-boot-starter-security 模块,进行少量的配置,即可实现强大的安全管理!
记住几个类:
- WebSecurityConfigurerAdapter:自定义Security策略
- AuthenticationManagerBuilder:自定义认证策略
- @EnableWebSecurity:开启WebSecurity模式
Spring Security的两个主要目标是 “认证” 和 “授权”(访问控制)。
“认证”(Authentication)
身份验证是关于验证您的凭据,如用户名/用户ID和密码,以验证您的身份。
身份验证通常通过用户名和密码完成,有时与身份验证因素结合使用。
“授权” (Authorization)
授权发生在系统成功验证您的身份后,最终会授予您访问资源(如信息,文件,数据库,资金,位置,几乎任何内容)的完全权限。
这个概念是通用的,而不是只在Spring Security 中存在。
3. 认证和授权
目前,我们的测试环境,是谁都可以访问的,我们使用 Spring Security 增加上认证和授权的功能
-
引入 Spring Security 模块
<dependency> <groupId>org.springframework.boot</groupId> <artifactId>spring-boot-starter-security</artifactId> </dependency> -
编写 Spring Security 配置类
参考官网:https://spring.io/projects/spring-security
@EnableWebSecurity // 开启WebSecurity模式 public class SecurityConfig extends WebSecurityConfigurerAdapter { @Override protected void configure(HttpSecurity http) throws Exception { } } -
定制请求的授权规则
@Override protected void configure(HttpSecurity http) throws Exception { // 定制请求的授权规则 // 首页所有人可以访问 http.authorizeRequests().antMatchers("/").permitAll() .antMatchers("/level1/**").hasRole("vip1") .antMatchers("/level2/**").hasRole("vip2") .antMatchers("/level3/**").hasRole("vip3"); } -
测试一下:发现除了首页都进不去了!因为我们目前没有登录的角色,因为请求需要登录的角色拥有对应的权限才可以!
-
在configure()方法中加入以下配置,开启自动配置的登录功能!
// 开启自动配置的登录功能 // /login 请求来到登录页 // /login?error 重定向到这里表示登录失败 http.formLogin(); -
测试一下:发现,没有权限的时候,会跳转到登录的页面!
-
定义认证规则,重写configure(AuthenticationManagerBuilder auth)方法
//定义认证规则 @Override protected void configure(AuthenticationManagerBuilder auth) throws Exception { //在内存中定义,也可以在jdbc中去拿.... //Spring security 5.0中新增了多种加密方式,也改变了密码的格式。 //要想我们的项目还能够正常登陆,需要修改一下configure中的代码。我们要将前端传过来的密码进行某种方式加密 //spring security 官方推荐的是使用bcrypt加密方式。 auth.inMemoryAuthentication().passwordEncoder(new BCryptPasswordEncoder()) .withUser("kuangshen").password(new BCryptPasswordEncoder().encode("123456")).roles("vip2","vip3") .and() .withUser("root").password(new BCryptPasswordEncoder().encode("123456")).roles("vip1","vip2","vip3") .and() .withUser("guest").password(new BCryptPasswordEncoder().encode("123456")).roles("vip1","vip2"); } -
测试,发现,登录成功,并且每个角色只能访问自己认证下的规则!搞定
4. 权限控制和注销
//注销
//注销成功后跳转到首页
http.logout().logoutSuccessUrl("/");
<a class="item" th:href="@{/logout}">
   <i class="address card icon"></i> 注销
</a>
前端的href必须是/logout否则需要自己重定义
添加需求:用户没有登录的时候,导航栏上只显示登录按钮,用户登录之后,导航栏可以显示登录的用户信息及注销按钮!还有就是,比如kuangshen这个用户,它只有 vip2,vip3功能,那么登录则只显示这两个功能,而vip1的功能菜单不显示!这个就是真实的网站情况了!该如何做呢?
我们需要结合thymeleaf中的一些功能,让thymeleaf和springSecurity整合
sec:authorize="isAuthenticated()":是否认证登录!来显示不同的页面
-
添加依赖
<dependency> <groupId>org.thymeleaf.extras</groupId> <artifactId>thymeleaf-extras-springsecurity5</artifactId> <version>3.0.4.RELEASE</version> </dependency> -
导入命名空间
xmlns:sec="http://www.thymeleaf.org/thymeleaf-extras-springsecurity5" -
修改导航栏,增加认证判断
<div class="right menu"> <!--如果未登录--> <div sec:authorize="isAuthenticated()"> <a class="item" th:href="@{/logout}"> 用户名:<span sec:authentication="principal.username"></span> 角色:<span sec:authentication="principal.authorities"></span> <i class="address card icon"></i> 注销 </a> </div> <!--如果已登录--> <div sec:authorize="!isAuthenticated()"> <!--未登录--> <a class="item" th:href="@{/toLogin}"> <i class="address card icon"></i> 登录 </a> </div> </div> -
角色功能块认证
<div class="column" sec:authorize="hasRole('vip1')"> <div class="ui raised segment"> <div class="ui"> <div class="content"> <h5 class="content">Level 1</h5> <hr> <div><a th:href="@{/level1/1}"><i class="bullhorn icon"></i> Level-1-1</a></div> <div><a th:href="@{/level1/2}"><i class="bullhorn icon"></i> Level-1-2</a></div> <div><a th:href="@{/level1/3}"><i class="bullhorn icon"></i> Level-1-3</a></div> </div> </div> </div> </div> -
权限控制和注销搞定!
5. 自定义登陆页面和记住我
-
在刚才的登录页配置后面指定 loginpage以及提交的用户名和密码的name属性、点击登陆需要走的请求
http.formLogin() .usernameParameter("username") .passwordParameter("password") .loginPage("/toLogin") .loginProcessingUrl("/login");// 登陆表单提交请求 -
login.html 配置提交请求及方式,方式必须为post:
-
* <ul> * <li>/login GET - the login form</li> * <li>/login POST - process the credentials and if valid authenticate the user</li> * <li>/login?error GET - redirect here for failed authentication attempts</li> * <li>/login?logout GET - redirect here after successfully logging out</li> * </ul> -
<form th:action="@{/login}" method="post">
-
-
在登录页增加记住我的多选框
<input type="checkbox" name="remember"> 记住我 -
后端验证处理!新增了一个cookie: remember-me
//定制记住我的参数! http.rememberMe().rememberMeParameter("remember"); -
测试,OK
总结:使用springsecurity,我们可以不用改之前的代码来实现授权与认证的功能,他的启动器里面就包含了aop的包,由此可见他是以aop的方式实现的。
13. swagger
13.1 简介
前后端分离
- 前端 -> 前端控制层、视图层
- 后端 -> 后端控制层、服务层、数据访问层
- 前后端通过API进行交互
- 前后端相对独立且松耦合
产生的问题
- 前后端集成,前端或者后端无法做到“及时协商,尽早解决”,最终导致问题集中爆发
解决方案
- 首先定义schema [ 计划的提纲 ],并实时跟踪最新的API,降低集成风险
Swagger
- 号称世界上最流行的API框架
- Restful Api 文档在线自动生成器 => API 文档 与API 定义同步更新
- 直接运行,在线测试API
- 支持多种语言 (如:Java,PHP等)
- 官网:https://swagger.io/
13.2 springboot 集成swagger
-
新建工程
-
导入依赖
<dependency> <groupId>io.springfox</groupId> <artifactId>springfox-swagger-ui</artifactId> <version>2.9.2</version> </dependency> <!-- https://mvnrepository.com/artifact/io.springfox/springfox-swagger2 --> <dependency> <groupId>io.springfox</groupId> <artifactId>springfox-swagger2</artifactId> <version>2.9.2</version> </dependency> -
编写配置类,启动swagger2
@Configuration @EnableSwagger2//开启swagger2 public class SwaggerConfig { } -
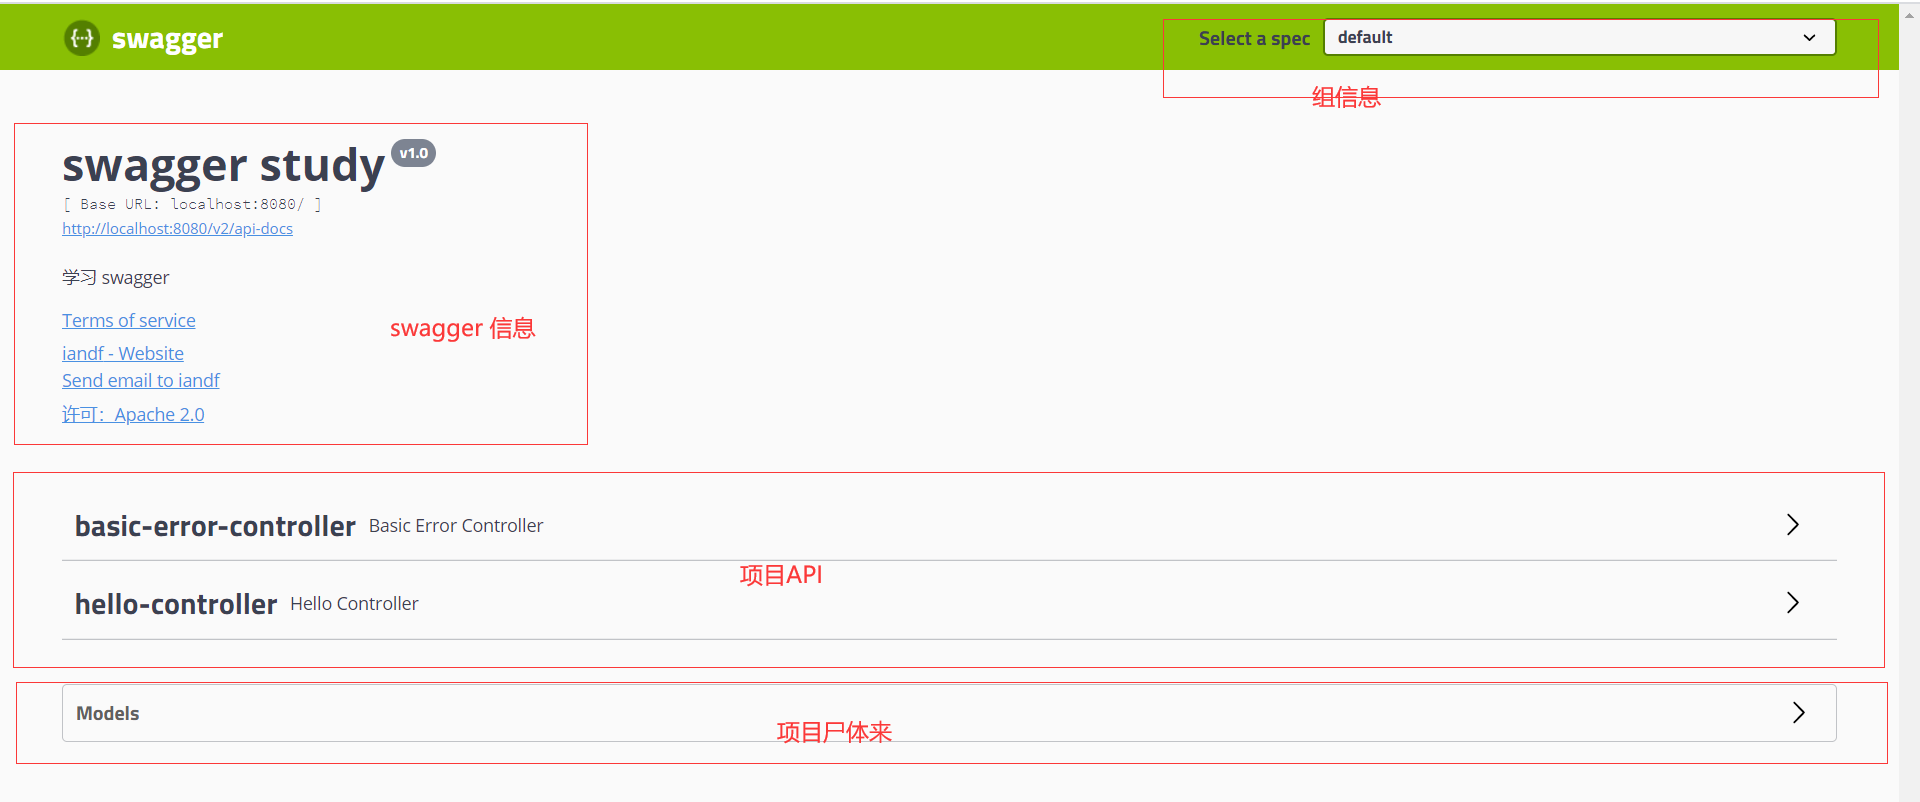
自定义一些信息,如文档名字,作者信息,项目描述等,最主要的类就是docket
public class SwaggerConfig { @Bean public Docket docket(){ return new Docket(new DocumentationType("swagger", "2.0")).apiInfo(apiInfo()); } private ApiInfo apiInfo(){ Contact contact = new Contact("iandf", "xxx", "1289557927@qq.com"); return new ApiInfo("swagger study"//标题 , "学习 swagger "//项目描述 ,"v1.0" , "组织的链接" , contact//作者信息 , "许可:Apache 2.0" , "http://www.apache.org/licenses/LICENSE-2.0" , new ArrayList()); } } -
访问http://localhost:8080/swagger-ui.html#/测试
13.3 swagger配置扫描接口
需要在建造者模式的条件下进行配置
/*
basePackage:扫描指定包下的request handlers
 any:   Any RequestHandler
 none:  No RequestHandler
 withClassAnnotation: 匹配提供的注解和类上的注解一致的类中的所有请求
 withMethodAnnotation: 匹配提供的注解和f方法上的注解一致的类中的所有请求
 */
配置完扫描接口后还可通过path进一步过滤request handlers
.select()//进入建造者模式
.apis(RequestHandlerSelectors.basePackage("com.iandf.swagger.controller"))
//paths:过滤请求
.paths(PathSelectors.ant("/iandf/**"))
需求:在开发中使用swagger,在项目发布后关闭swagger
-
判断当前项目环境是不是开发环境~dev test
Profiles profiles = Profiles.of("dev", "test"); //匹配是否是当前项目使用的配置文件 boolean flag = environment.acceptsProfiles(profiles); -
设置swagger是否可用
.enable(flag)
13.4 配置分组
-
如果没有配置分组,默认是default。通过groupName()方法即可配置分组
.groupName("iandf") -
如何配置多个分组?配置多个分组只需要配置多个docket即可
@Bean
public Docket docket1(){
   return new Docket(DocumentationType.SWAGGER_2).groupName("group1");
}
@Bean
public Docket docket2(){
   return new Docket(DocumentationType.SWAGGER_2).groupName("group2");
}
@Bean
public Docket docket3(){
   return new Docket(DocumentationType.SWAGGER_2).groupName("group3");
}
13.5 实体类配置
只要这个实体在请求接口的返回值上(即使是泛型),都能映射到实体项中
@RequestMapping("/getUser")
public User getUser(){
   return new User();
}
13.6 常用注解
| Swagger注解 | 简单说明 |
|---|---|
| @Api(tags = "xxx模块说明") | 作用在模块类上 |
| @ApiModel("xxxPOJO说明") | 作用在模型类上:如VO、BO |
| @ApiModelProperty(value = "xxx属性说明",hidden = true) | 作用在类方法和属性上,hidden设置为true可以隐藏该属性 |
| @ApiParam("xxx参数说明") | 作用在参数、方法和字段 |
| @ApiOperation("xxx接口说明") | 作用在request handler接口方法上 |
14 任务
14.1 异步任务
异步处理还是非常常用的,比如我们在网站上发送邮件,后台会去发送邮件,此时前台会造成响应不动,直到邮件发送完毕,响应才会成功,所以我们一般会采用多线程的方式去处理这些任务。
代码测试
-
在主程序中添加注解 @EnableAsync
-
创建AsynService 在需要异步执行的方法上加 **@Async **注解
@Service public class AsynService { @Async public void asynTest(){ try { Thread.sleep(3000);//模拟处理时间比较长的任务 } catch (InterruptedException e) { e.printStackTrace(); } System.out.println("异步任务完成"); } } -
编写controller测试
@RestController public class AsynController { @Autowired public AsynService asynService; @GetMapping("/test") public String test(){ asynService.asynTest(); return "ok"; } } -
测试结果:访问localhost:8080/test 秒进,控制台隔三秒之后输出异步任务完成
14.2 定时任务
项目开发中经常需要执行一些定时任务,比如需要在每天凌晨的时候,分析一次前一天的日志信息,Spring为我们提供了异步执行任务调度的方式,提供了两个接口。
- TaskExecutor接口
- TaskScheduler接口
两个注解:
- @EnableScheduling
- @Scheduled
cron表达式:cron表达式使用
代码测试
-
在主程序上开启异步任务 即 添加 @EnableScheduling 注解
-
ScheduleService 在需要定时执行的方法上添加 @Scheduled 注解
@Service public class ScheduleService { @Scheduled(cron = "0/2 * * * * ?") public void scheduleTest(){ System.out.println("你被执行了"); } } -
测试结果:每隔两秒执行一次scheduleTest方法
15 邮件发送
由javaweb阶段学习知道邮件发送步骤如下:
- 创建session对象,需要配置程序的环境信息,用的那个邮箱,用户名,密码,这一步就相当于登录邮箱
- SMTP server host. For instance,
smtp.qq.com. - Login user of the SMTP server
- Login password of the SMTP server.
- SMTP server host. For instance,
- 创建transport对象,用来发送邮件的
- 创建message :写邮件
- 发送邮件
- 有可能还需要一下额外的配置信息 如:SSL加密啥的
Springboot发送邮件步骤如下:
- 邮件发送需要引入spring-boot-start-mail
- SpringBoot 自动配置MailSenderAutoConfiguration
- 定义MailProperties内容,配置在application.yml中
- 自动装配JavaMailSender
- 测试邮件发送
源码分析
发送邮件的核心类是MailSenderPropertiesConfiguration 里面想IOC容器中注入了JavaMailSenderImpl这个bean,用来发送邮件
还配置了环境信息:smtp服务器,用户名,密码
@Bean
@ConditionalOnMissingBean(JavaMailSender.class)
JavaMailSenderImpl mailSender(MailProperties properties) {
   JavaMailSenderImpl sender = new JavaMailSenderImpl();
   applyProperties(properties, sender);
   return sender;
}

private void applyProperties(MailProperties properties, JavaMailSenderImpl sender) {
   sender.setHost(properties.getHost());
   if (properties.getPort() != null) {
      sender.setPort(properties.getPort());
   }
   sender.setUsername(properties.getUsername());
   sender.setPassword(properties.getPassword());
   sender.setProtocol(properties.getProtocol());
   if (properties.getDefaultEncoding() != null) {
      sender.setDefaultEncoding(properties.getDefaultEncoding().name());
   }
   if (!properties.getProperties().isEmpty()) {
      sender.setJavaMailProperties(asProperties(properties.getProperties()));
   }
}
使用springboot发送QQ邮件
-
导入依赖
<dependency> <groupId>org.springframework.boot</groupId> <artifactId>spring-boot-starter-mail</artifactId> </dependency> -
填写配置信息,定义环境信息
spring: mail: host: smtp.qq.com username: 1289557927@qq.com password: glknkoukvlfmgbei properties: {mail.smtp.ssl.enable: true} -
测试发送邮件
@Autowired private JavaMailSenderImpl sender; @Test void contextLoads() throws MessagingException { //通过JavaMailSenderImpl实例获取mimeMessage MimeMessage mimeMessage = sender.createMimeMessage(); //使用MimeMessageHelper来填写邮件,multiPart:true 表示允许携带附件 MimeMessageHelper helper = new MimeMessageHelper(mimeMessage,true); helper.setSubject("来自iandf的一封信"); helper.setText("<h1>千里之行,始于脚下!</h1>",true); helper.setTo("1289557927@qq.com"); helper.setFrom("1289557927@qq.com"); //添加附件 helper.addAttachment("1.jpg",new File("C:\\Users\\IANDF\\Desktop\\430681199803279335.jpg")); //发送邮件 sender.send(mimeMessage); } -
测试结果发送成功
发送邮件步骤如下

 浙公网安备 33010602011771号