centos7搭建WIKI confluence
|
Wiki系统属于一种人类知识网格系统,可以在Web的基础上对Wiki文本进行浏览、创建、更改,而且创建、更改、发布的代价远比HTML文本小;同时Wiki系统还支持面向社群的协作式写作,为协作式写作提供必要帮助;最后,Wiki的写作者自然构成了一个社群,Wiki系统为这个社群提供简单的交流工具。与其它超文本系统相比,Wiki有使用方便及开放的特点,所以Wiki系统可以帮助我们在一个社群内共享某领域的知识。 开始搭建前,下载安装所需软件包
一.环境准备:confluence的运行是依赖java环境的,也就是说需要安装jdk并且要是1.7以上版本,如下: yum install java :安装命令 java -version :查看版本 二.安装mysql,centos7为mariadb
进行mariadb的初始配置: mysql_secure_installation 三.数据库安装完成后为confluence创建对应的数据库、用户名、密码,如下:
四.安装及破解confluence
通过上图,我们可以很明显的看出confluence安装到了/opt/atlassian/confluence和/var/atlassian/application-data/confluence目录下,并且confluence监听的端口是8090。 confluence的主要配置文件,存放在/opt/atlassian/confluence/conf/server.xml文件中,如下: 现在访问confluence ,如下: 点击start setup下一步,保存server ID 准备破解: 4.破解confluence 复制上述截图中的Server ID,然后关闭confluence,使用如下命令: /etc/init.d/confluence stop 然后切换到/opt/atlassian/confluence/confluence/WEB-INF/lib目录下,删除atlassian-extras开头的jar6个文件,如下: cd /opt/atlassian/confluence/confluence/WEB-INF/lib ll |grep atlassian-extra |wc –l rm -fr atlassian-extra* 解压破解包,然后把里面的atlassian-extras-3.2.jar、Confluence-5.6.6-language-pack-zh_CN.jar、mysql-connector-java-5.1.39-bin.jar三个jar文件复制到/opt/atlassian/confluence/confluence/WEB-INF/lib目录下,如下: 其中atlassian-extras-3.2.jar文件是和license相关的,Confluence-5.6.6-language-pack-zh_CN.jar是confluence中文语言包,而mysql-connector-java-5.1.39-bin.jar是confluence连接mysql数据库相关的jar包。 最后要启动confluence,使用如下命令:/etc/init.d/confluence start 注意:在windows下运行该破解jar包,windows需安装java环境 如下: 把上述复制的Server ID粘贴进去,然后点击.gen。如下: 将破解文件复制到confluence中进行破解: 破解成功后下一步选择mysql数据库进行下一步: 选择direct JDBC并下一步: 输入为confluence创建的账号密码,点击下一步后等待: Actual ResultsConfluence fails to start, and the below exception is thrown: 2017-07-07 14:03:18,634 WARN [C3P0PooledConnectionPoolManager[identityToken->z8kfsx9p8k5ul21q6rg1z|5ca418bc]-HelperThread-#1] [mchange.v2.resourcepool.BasicResourcePool] log Having failed to acquire a resource, com.mchange.v2.resourcepool.BasicResourcePool@45c5dcf5 is interrupting all Threads waiting on a resource to check out. Will try again in response to new client requests.2017-07-07 14:03:18,634 WARN [C3P0PooledConnectionPoolManager[identityToken->z8kfsx9p8k5ul21q6rg1z|5ca418bc]-HelperThread-#2] [mchange.v2.resourcepool.BasicResourcePool] log com.mchange.v2.resourcepool.BasicResourcePool$ScatteredAcquireTask@6b4b037e -- Acquisition Attempt Failed!!! Clearing pending acquires. While trying to acquire a needed new resource, we failed to succeed more than the maximum number of allowed acquisition attempts (30). Last acquisition attempt exception:java.sql.SQLException: Unknown system variable 'storage_engine'
NotesThis will trigger in practise due to the sessionVariable parameter being applied by default by the Confluence installer when initially running MySQL 5.6 and then leaving the parameter in the confluence.cfg.xml file when upgrading to MySQL 5.7 Workaround
Example:
The following connection URL in confluence.cfg.xml needs to change from this:
数据库初始化完毕后,会跳转到如下界面,初始化一个空的站点 如下: 配置管理员账号密码:
Confluence安装完毕后,如下: 重新访问:ip+8090 confluence登陆后的界面如下:
至此wiki confluence安装完毕OpenVPN 设置账号密码登录前面我们介绍了openvpn使用秘钥的方式登录,每次创建新用户的时候需要创建一个证书,并且需要将证书在发给使用的人员。个人觉得比较麻烦,特意查阅了一下openvpn配置账户密码登录的方式。
OpenVPN 设置账号密码登录
前面我们是使用openvpn 秘钥的方式登录,这种登录安全性比较高。但是运维操作起来比较麻烦,如果有ldap的也推荐使用ldap集成openvpn。但是这里我们偷个懒,通过设置账号密码的方式连接vpn CentOS 7 搭建OpenVPN服务器鉴于春节假期,大家方便在家进行值守,所以临时整理了一份openvpn文档,分享给大家。文章主要介绍在CentOS 7 服务器上安装与配置OpenVPN服务器,以及如何编写客户端连接到新建立的OpenVPN服务器上所需的配置文件。 274588
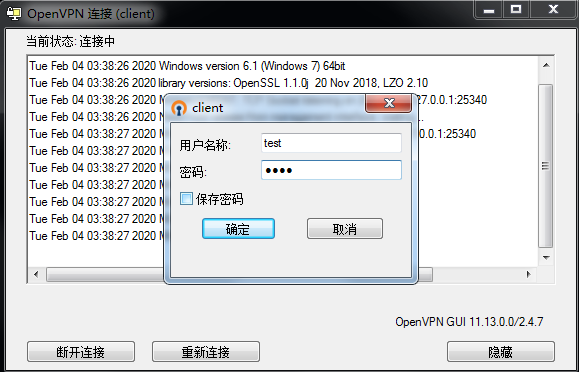
配置OpenVPN首先我们需要编写一个用户认证的脚本 (脚本是由openvpn官网提供的) vim /etc/openvpn/checkpsw.sh #!/bin/sh############################################################ checkpsw.sh (C) 2004 Mathias Sundman ## This script will authenticate OpenVPN users against# a plain text file. The passfile should simply contain# one row per user with the username first followed by# one or more space(s) or tab(s) and then the password.PASSFILE="/etc/openvpn/psw-file"LOG_FILE="/etc/openvpn/openvpn-password.log"TIME_STAMP=`date "+%Y-%m-%d %T"`###########################################################if [ ! -r "${PASSFILE}" ]; then echo "${TIME_STAMP}: Could not open password file \"${PASSFILE}\" for reading." >> ${LOG_FILE} exit 1fiCORRECT_PASSWORD=`awk '!/^;/&&!/^#/&&$1=="'${username}'"{print $2;exit}' ${PASSFILE}`if [ "${CORRECT_PASSWORD}" = "" ]; then echo "${TIME_STAMP}: User does not exist: username=\"${username}\", password=\"${password}\"." >> ${LOG_FILE} exit 1fiif [ "${password}" = "${CORRECT_PASSWORD}" ]; then echo "${TIME_STAMP}: Successful authentication: username=\"${username}\"." >> ${LOG_FILE} exit 0fiecho "${TIME_STAMP}: Incorrect password: username=\"${username}\", password=\"${password}\"." >> ${LOG_FILE}exit 1接下来给脚本执行权限 chmod 755 /etc/openvpn/checkpsw.sh现在我们配置用户密码文件 cat /etc/openvpn/psw-file abcdocker 123456abc 123456test test#前面为用户名,后面为密码。 中间使用空格分开接下来我们需要openvpn的server.conf cat >>/etc/openvpn/server.conf<<EOFscript-security 3auth-user-pass-verify /etc/openvpn/checkpsw.sh via-env #指定用户认证脚本username-as-common-nameverify-client-cert noneEOF#在service.conf最后一行添加接下来我们需要修改 接下来我们重启一下openvpn即可 [root@vpn ~]# ps -ef|grep openvpnroot 54047 53844 0 14:38 pts/0 00:00:00 grep --color=auto openvpn[root@vpn ~]# /usr/local/openvpn/sbin/openvpn --daemon --config /etc/openvpn/server.conf然后我们导出client.ovpn,从新启动客户端就可以了
|


 浙公网安备 33010602011771号