Cortex M3 - STM32 Developing with GCC Tools
Developing with GCC tools
In order to get a working binary, there is a series tools involved during code development. Several tools are necessary to compile simple applications. These are: compiler, assembler, linker and binary generator. Each of them does it own task in a chain process. When you start compiling your project normally there is a linker invoked, which with correct parameters links libraries, object files.
Once executable is generated, then binary image generator creates binary image (.bin or .hex) that can be uploaded to MCU. We won’t go in to details right now as this will be more convenient to do in later code examples. Lets get directly to code writing part which is very important for linker and tasks before main() routine.
Linker script
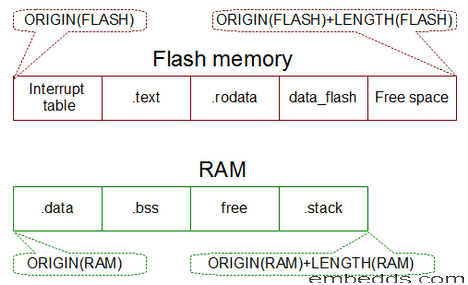
Practically speaking, linker script is a file that defines microcontroller specific features like memory map, memory sections, stack location and size. It may also contain application specific information if needed. Usually linker scripts are already written and can be found along example projects. So once set up there is no need to write them each time a new project is started, unless some modifications or additions are needed. Lets look at some key features of linker script.
First of all we need to describe memory blocks and size of microcontroller. There is a MEMORY command used. Further we are going to work with STM32 Discovery kit where STM32F100RB microcontroller is used which has 128KB of Flash and 8KB of SRAM. So first we define our memory types:
|
1
2
3
4
5
|
MEMORY{RAM(rwx):
ORIGIN =0x20000000,LENGTH
=8KFLASH(rx):
ORIGIN =0x8000000,LENGTH
=128K} |
where “rwx” means rewritable and executable, “rx” – read only and executable memory. Executable is meant that code can be run from this memory. In ARM program can be executed directly from Flash or RAM memory. ORIGIN points to start address of memory region and Length defines size of particular memory type.
Each memory type is also divided in memory sections where different type of data is stored. One section is needed for variables, another for constants, code, stack, heap and so on. So we need to show linker how to divide memories in to section. For this command SECTIONS is used. First of all we need to define section where program code will be stored. This section is called .text:
|
1
2
3
4
5
6
7
8
9
10
11
12
|
SECTIONS{.text:{.=ALIGN(4);KEEP(*(.interrupt_vector))*(.text)*(.text*)*(.rodata)*(.rodata*).=ALIGN(4);}>
FLASH |
where . = ALIGN(4); indicates that section is aligned to the 4 byte boundary; KEEP(*(.interrupt_vector)) means that for this section optimization must be skipped during linking; .text indicates program code section; .rodata – space for storing constants; >FLASH means that sections are located in FLASH memory. You can add even more sections if needed. Dot indicates current address. So next we need to remember last used address by assigning this to variable:
|
1
|
_data_flash
= .; |
Now we can continue with next section – .data. This section usually is located in RAM memory and contains static data when variables have initially defined values.
|
1
2
3
4
5
6
7
8
9
|
.data
: AT ( _data_flash ){.
= ALIGN(4);_data_begin
= .;*(.data)*(.data*).
= ALIGN(4);_data_end
= .;}
> RAM |
Here we are using saved flash address AT ( _data_flash ) where we can find initial constants stored in flash that has to be loaded to RAM. This will be done by startup code. For now we create .data location where our constants will be loaded.
Next section is .bss. This is where undefined/uninitialized variables and globals will be stored.
|
1
2
3
4
5
6
7
8
9
10
11
|
.bss:{_bss_begin=.;__bss_start__=_bss_begin;*(.bss)*(.bss*)*(COMMON).=ALIGN(4);_bss_end=.;__bss_end__=_bss_end;}>
RAM |
.bss section usually goes right after .data section.
And finally we need to define stack.
|
1
2
3
4
5
6
7
8
|
_stack_size
 = 1024;
stack_end
= ORIGIN(RAM)+LENGTH(RAM);_stack_begin
= _stack_end - _stack_size;.
= _stack_begin;._stack
:{.
= . + _stack_size;}
> RAM |
Stack size can be changed or even expanded to end of RAM. But then linker won’t have a chance to warn about shortage of stack memory. Anyway there is lots of variants of defining sections so we won’t go much in to details.
Last thing to tell linker is where program has to start after reset. So we use simple line:
|
1
|
ENTRY(handler_reset); |
This means that before main() program we need to initialize variables – copy constants from Flash to RAM, initialize stack and do other stuff if needed. Initialization is done in startup code. This part will be left for another post. Right now we’ve done following:
I won’t give final working linker script as it must go along with start-up code which will be discussed next.


