day69:Vue:组件化开发&Vue-Router&Vue-client
目录
组件化开发
1.什么是组件?
2.而在网页中实现一个功能,需要使用html定义功能的内容结构,使用css声明功能的外观样式,还要使用js来定义功能的特效,因此就产生了把一个功能相关的[HTML、css和javascript]代码封装在一起组成一个整体的代码块封装模式,我们称之为“组件”。
3.所以,组件就是一个html网页中的功能,一般就是一个标签,标签中有自己的html内容结构,css样式和js特效。
4.这样,前端人员就可以在开发时,只需要书写一次代码,随处引入即可使用。
5.我们在进行vue开发的时候,还记得我们自己创建的vm对象吗,这个vm对象我们称为一个大组件,根组件(页面上叫Root),在一个网页的开发中,根据网页上的功能区域我们又可以细分成其他组件,或称为子组件

2.局部组件
局部组件三步走:声子、挂子、用子,即声明子组件、挂载子组件、使用子组件
<!DOCTYPE html>
<html lang="zh-CN">
<head>
    <title>html</title>
    <meta charset="UTF-8">
</head>
<body>

    <div id="app">
        <div class="header">
            这是头部{{ appmsg }}
        </div>
        <Sonapp/> <!-- 3.使用子组件 -->
    </div>

</body>
<script src="vue.js"></script>
<script>
    let Sonapp = {
        data(){ // 注意:组件中必须写成函数形式
            return {
                'sonappmsg':'hello Sonapp!'
            }
        },
        template:`
         <div class="content">
                内容部分{{sonappmsg}}
            </div>
        `
    };

    let vm = new Vue({
        el:'#app',
        data(){
            return{
                'appmsg':'hello app!',
            }
        },
        components:{
            Sonapp, // 2.挂载子组件
        }

    })
</script>
</html>
3.全局组件
局部组件使用时需要挂载,全局组件使用时不需要挂载。
局部组件就在某个局部使用的时候,全局组件是大家公用的,或者说每个页面都有这么一个功能的时候,在哪里可能都会用到的时候。
<!DOCTYPE html>
<html lang="zh-CN">
<head>
    <title>html</title>
    <meta charset="UTF-8">
</head>
<body>

    <div id="app">
        <Addnum></Addnum> <!-- 使用全局组件 -->
    </div>

</body>
<script src="vue.js"></script>
<script>

    Vue.component("Addnum",{
        data(){
            return{
                num:1
            }
        },
        template:`
        <div><input type="text" v-model="num"><button @click="num+=1">点击</button></div>
        `
    })

    let vm =new Vue({
        el:'#app',
        data:{
            // 全局组件不需要挂载
        }
    })
</script>
</html>
4.父组件向子组件传值
<!DOCTYPE html>
<html lang="zh-CN">
<head>
    <title>html</title>
    <meta charset="UTF-8">
</head>
<body>

    <div id="show">
        <h1>hello !</h1>
        <Father></Father>
    </div>

</body>
<script src="vue.js"></script>
<script>
   let Son = {
       data(){
           return{
               sonmsg:'这是子组件信息'
           }
       },
       template:`
              <div class="Son">
                <h1>{{sonmsg}}</h1>
                 <h2>子组件Template</h2>
                 <h2>{{ xx }}</h2>
        </div>
       `,
       props:['xx'] // 1.在子组件中使用prop属性声明
   };
   let Father ={
       data(){
           return{
               msg:'这是father组件',
               num:100,
           }
       },
       template:`

       <div class="nav">

                <h1 style="color:blue;">{{Msg}}---{{num}}</h1>
                <!--
                <Naver xx="xiaobei"></Naver> 静态传值
                <Naver :xx="num"></Naver>  动态传值
                -->

                <Son :xx="num"></Son>

        </div>

       `,
       components:{
           Son,
       }
   };
   let vm = new Vue({
       el:'#show',
       data(){
           return{

           }
       },
       components: {
           Father,
       }
   })
</script>
</html>
父组件向子组件传值,其实大致可以分为两步:
1
声明了prop属性有xx之后,在子组件就可以使用xx了
let Son = {
    data(){
        return{
            sonmsg:'这是子组件信息'
        }
    },
    template:`
<div class="Son">
<h1>{{sonMsg}}</h1>
<h2>子组件Template</h2>
<h2>{{ xx }}</h2>
</div>
`,
    props:['xx'] // 1.在子组件中使用prop属性声明
2.父组件要定义自定义的属性
let father ={
       data(){
           return{
               msg:'这是father组件',
               num:100,
           }
       },
       template:`
       <div class="nav">

                <h1 style="color:blue;">{{Msg}}---{{num}}</h1>
                <Son xx="xiaobei"></Son> // 静态传值
                <Son :xx="num"></Son>  // 动态传值

        </div>
       `
   }
5.子组件往父组件传值
子组件往父组件传值,分三步。
第一步:
所以第一步就是在父组件使用子组件的地方加上自定义事件
第二步:在父组件中定义自定义事件对应的方法。方法需要写参数,用来接收子组件传递过来的参数
第三步:
step1.就是在父组件使用子组件的地方加上自定义事件
 let App = {

     ......
        //1. 父组件使用子组件的地方加上自定事件
        // <Naver @fatherHandler="fuckSon"></Naver>
        template:
         `
          <div class="nav">

                <h1 style="color:blue;">{{Msg}}---子组件的num为:{{xx}}</h1>

                <Naver @fatherHandler="fuckSon"></Naver>
        </div>

        `,
      ......
step2.在父组件中定义自定义事件对应的方法
 let App = {
       ......
            // 2  在父组件中定义自定义事件对应的方法,方法需要写参数,用来接收子组件传递过来的数据
            fuckSon(val){
                this.xx = val;
            }
      ......
        }


    };
step3.子组件中调用方法来实现传值动作emit
 let Naver = {
      ......

        methods:{
            zouni(){
                //
                console.log(this);
                // 3 子组件中调用$emit方法,来实现传值动作 $emit(父组件自定义事件名称,数据)
                this.$emit('fatherHandler',this.sonNum);
      ......
            }
        }

    };
所有代码如下所示:
<!DOCTYPE html>
<html lang="en">
<head>
    <meta charset="UTF-8">
    <title>Title</title>
</head>
<body>

<div id="app">
    <h1>你好</h1>
    <App></App>
</div>


</body>
<script src="vue.js"></script>
<script>
    // 1 声明子组件  声子
    let Naver = {
        data(){
            return {
                navMsg:'这是顶部导航栏',
                sonNum:80,
            }
        },

        template:
         `
          <div class="Naver">
                <h1>{{navMsg}}</h1>
                <button @click="zouni">走你</button>

        </div>

        `,
        methods:{
            zouni(){
                //
                console.log(this);
                // 3 子组件中调用$emit方法,来实现传值动作 $emit(父组件自定义事件名称,数据)
                this.$emit('fatherHandler',this.sonNum);

            }
        }

    };

    let App = {
        data(){
            return {
                Msg:'这是App组件',
                num:100,
                xx:'',
            }
        },
        //1. 父组件使用子组件的地方加上自定事件
        // <Naver @fatherHandler="fuckSon"></Naver>
        template:
         `
          <div class="nav">

                <h1 style="color:blue;">{{Msg}}---子组件的num为:{{xx}}</h1>

                <Naver @fatherHandler="fuckSon"></Naver>
        </div>

        `,
        components:{
            Naver,
        },
        methods:{
            // 2  在父组件中定义自定义事件对应的方法,方法需要写参数,用来接收子组件传递过来的数据
            fuckSon(val){
                this.xx = val;
            }

        }


    };


    let  vm = new Vue({
        el:'#app',
        data(){
            return {

            }
        },
        // 2 挂载子组件  挂子
        components:{
            // 挂载组件的简写形式
            App,
            // Naver,

        }


    })


</script>
</html>
6.平行组件传值

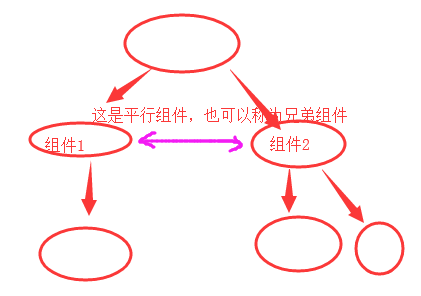
平行组件传值,需要在最外层声明一个公交车bus,通过上车和下车的动作来进行平行组件的传值功能。
平行组件传值,大致分为三步:
第一步:声明一个bus的Vue对象
第二步:假设是T1组件往T2组件传值,那么在T1的method中需要执行一个bus.$emit('name',this.t1num)
第三步:在T2组件中需要执行一个bus.$on('name',(val))=>
<!DOCTYPE html>
<html lang="en">
<head>
    <meta charset="UTF-8">
    <title>Title</title>
</head>
<body>

<div id="app">
    <h1>你好</h1>
    <App></App>
    <div class="t1"></div>
</div>


</body>
<script src="vue.js"></script>
<script>
    // 1.声明公交车对象
    let bus = new Vue();

    Vue.component('T1',{
        data(){
            return {
                t1Msg:'我是t1组件',
                t1Num:120,
            }
        },
        template:`
            <div class="t1">
                <h3>{{t1Msg}}</h3>
                <button @click="zouni">走你</button>
            </div>
        `,
        methods:{
            zouni(){
                // 2.通过公交车将t1的值传送出去
              bus.$emit('kkk',this.t1Num);
            }
        }
    });
    Vue.component('T2',{
        data(){
            return {
                t2Msg:'我是t2组件',
                t2Num:130,
                t1msg:'',
            }
        },
        template:`
            <div class="t1">
                <h3>{{t2Msg}}</h3>
                <h3>t1组件传递过来的数据:{{t1msg}}</h3>
            </div>
        `,
        created(){
            // 3.通过公交车将t1传送的值接收过来
            bus.$on('kkk', (val) => {
                console.log(this);
                this.t1msg = val;
            });

        },

    });


    let App = {
        data(){
            return {
                Msg:'这是App组件',
                num:100,
                xx:'',
            }
        },
        template:
         `
          <div class="nav">

                <h1 style="color:blue;">{{Msg}}---子组件的num为:{{xx}}</h1>
                <T1></T1>
                <T2></T2>

        </div>

        `,

        methods:{
            }

        }


    };


    let  vm = new Vue({
        el:'#app',
        data(){
            return {
            }
        },

        components:{
            App,
        }


    });
    console.log(vm);


</script>
</html>
Vue-Router的使用
1.Vue-Router的介绍
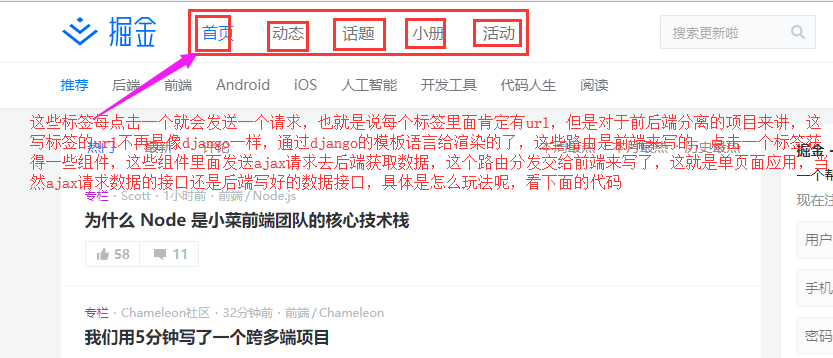
为什么要使用单页面应用呢?因为传统的路由跳转,如果后端资源过多,会导致页面出现'白屏现象',所以我们希望让前端来做路由,
在某个生命周期的钩子函数中,发送ajax来请求数据,进行数据驱动,之前比如我们用django的MTV模式,我们是将后端的数据全部渲染给了模板,然后模板再发送给前端进行浏览器页面的渲染,一下将所有的数据都给了页面,
而我们现在使用vue,我可以在组件的钩子函数中发送对应的ajax请求去获取对应的数据,而不是一下子就把数据都放到页面上了,单页面应用给我们提供了很多的便利。

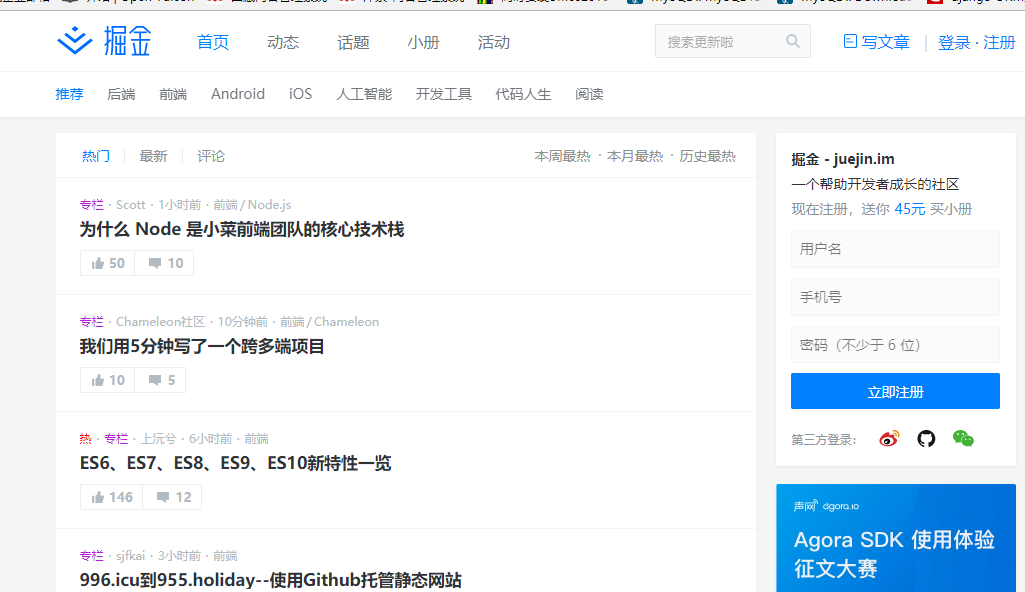
那么解释一下什么是单页应用,看下图:(react、angular也都是做单页面应用,很多大型的网站像网易云音乐,豆瓣等都是react写的单页面应用)

2.Vue-Router的简单操作
一共分五步
0.在HTML中写router-link和router-view
router-link相当于a href
router-view:<router-view> 是用来渲染通过路由映射过来的组件,当路径更改时,<router-view> 中的内容也会发生更改
1.定义组件。
2.定义路由routes.将路径和组件联系起来。
3.创建 VueRouter对象,然后将routes配置传到对象中
4.创建和挂载根实例。
<!DOCTYPE html>
<html lang="en">
<head>
    <meta charset="UTF-8">
    <title>Title</title>
</head>
<body>

<div id="app">
    <h1>你好</h1>
    <App></App>

</div>


</body>
<script src="vue.js"></script>
<script src="vue-router.js"></script>
<script>

    // 1.定义两个路由组件
    let Home = {
        data(){
            return {
                msg:'这是home页面'
            }
        },
        template:`
        <div class="home">
            <h1>{{msg}}</h1>

        </div>
        `
    };

     let Course = {
        data(){
            return {
                msg:'这是Course页面'
            }
        },
        template:`
        <div class="course">
            <h1>{{msg}}</h1>

        </div>
        `
    };


    let App = {
        data(){
            return {
                Msg:'这是App组件',
                num:100,
                xx:'',
            }
        },
        template:
         `
          <div class="nav">
      // 0.在html中定义router-link和router-view
                <router-link to="/home">首页</router-link>
                <router-link to="/course">课程页</router-link>

                <router-view></router-view>

        </div>

        `,

        methods:{
            }

        }


    };
    // 2.定义路由
    const routes = [
        {path:'/home', component:Home},
        {path:'/course', component:Course},
    ];

    // 3.创建VueRouter对象,然后传routes配置
    let router = new VueRouter({
        routes,
    })


    let  vm = new Vue({
        el:'#app',
        router, // 4.挂载router
        data(){
            return {

            }
        },

        components:{

            App,

        }


    });
    console.log(vm);


</script>
</html>
Vue自动化工具:Vue-Client(脚手架)
1.Vue-Client的安装
1.安装nvm
nvm是一个开源的node版本管理器,通过它,你可以下载任意版本的node.js,还可以在不同版本之间切换使用。
sudo apt-get update
sudo apt install curl
curl -o- https://raw.githubusercontent.com/creationix/nvm/v0.34.0/install.sh | bash
source ~/.bashrc
2.安装node.js
使用nvm的相关命令安装node。
安装命令
# 查看官方提供的可安装node版本
nvm ls-remote

# 安装执行版本的node,例如:nvm install v10.15.2
nvm install <version>

# 卸载node版本,例如:nvm uninstall v10.15.2
nvm uninstall <version>

# 查看已安装的node列表
nvm ls

# 切换node版本,例如:nvm use v10.15.2
nvm use <version>

# 设置默认版本,如果没有设置,则开机时默认node是没有启动的。
nvm alias default v10.15.2

# 查看当前使用的版本
nvm current
3.npm
npm(node package manager)是nodejs的包管理器,用于node插件管理(包括安装、卸载、管理依赖等)。
安装了node以后,就自动安装了npm[不一定是最新版本]
查看npm版本
npm --version
4.Vue-cli的安装
使用前面已经安装好的node版本,进行安装。注意一旦安装以后,以后这个vue-li最好契合当前node版本。
也就是说,运行接下来安装的vue-cli时,最好运行的就是本次跑的node版本。
如果回头切换到其他版本node来运行vue-cli,有可能因为版本不兼容出现不必要的bug。
安装命令
npm install -g @vue/cli
npm install -g @vue/cli-init  # vue2.x版本需要安装桥接工具

# 安装完成可以查看版本
vue -V
2.如何生成vue项目目录
// 生成一个基于 webpack 模板的新项目
vue init webpack 项目名

例如:
vue init webpack myproject


// 启动开发服务器 ctrl+c 停止服务
cd myproject
npm run dev           # 运行这个命令就可以启动node提供的测试http服务器
3.vue项目的目录结构
├── build/      # 项目部署时需要用到
├── config/     # 配置文件
├── index.html
├── node_modules/    # 项目运行的依赖库存储目录[非常大]
├── package.json     # 项目运行需要的依赖库记录配置
├── src/
│   ├── App.vue      # 父级组件
│   ├── assets/      # 静态资源目录,图片存放在这里
│   ├── components/  # 单文件组件保存目录
│   └── main.js      # 项目入口文件
└── static/          # 静态资源目录,所有的测试时用的,但是不需要交给线上服务器的css,js等文件放在这个目录
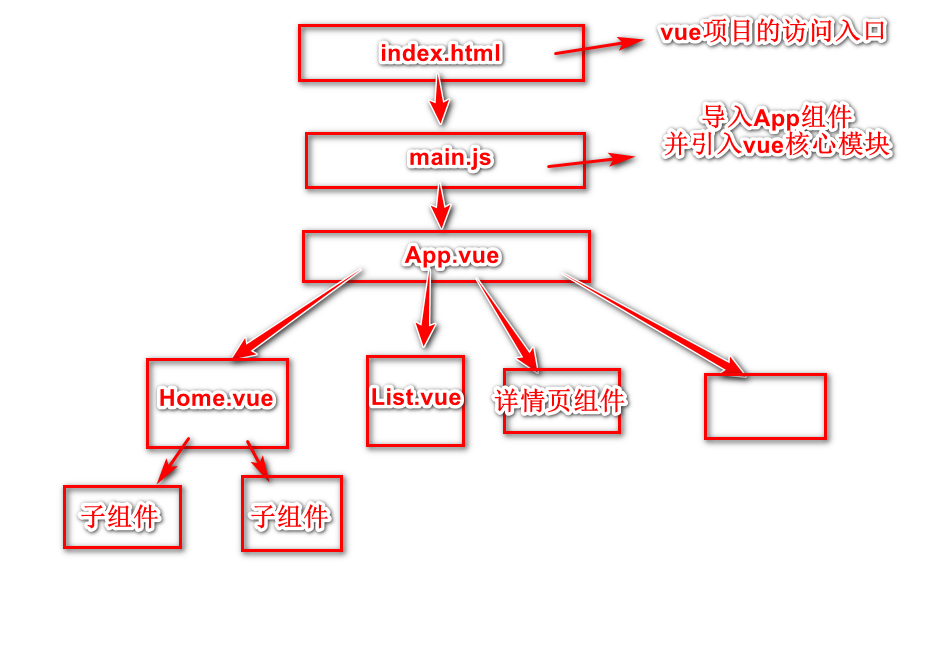
4.vue项目的执行流程图

5.vue项目各个文件的内容详情
src/router/index.js
这个文件用来配置路由规则
import Vue from 'vue' // 引入vue对象
import Router from 'vue-router' // 导入包中的vue-router  接受vueRouter对象
import HelloWorld from '@/components/HelloWorld' // @代表src文件夹


Vue.use(Router) // 使用一下vueRouter对象

export default new Router({ // 抛出对象 以供后面的文件引入
  routes: [
    {
      path: '/', // 路径
      component: HelloWorld  // 路径所匹配的组件
    }
  ]
})
src/App.vue
app组件是所有你自己定义的组件的父组件,它起到一个代理的作用,我们将自己定义的组件都挂载到app组件上
app组件在template中要写router-view让渲染路由映射的组件显示在上边。
<template> <!-- 写html代码 -->
  <div id="app">

    <router-view/> <!-- 渲染路由映射的组件 -->
  </div>
</template>

<script> // 写js代码
export default {
  name: 'App'
}
</script>

<style> /* css代码 */
#app {

}
</style>
src/main.js
main.js为整个vue项目的入口文件
做的事情:
1.实例化vue对象
2.挂载父组件app
3.挂载路由规则router
import Vue from 'vue'
import App from './App'
import router from './router'

Vue.config.productionTip = false

/* eslint-disable no-new */
new Vue({
  el: '#app', // 圈地,限定范围为app
  router,// 挂载路由规则
  components: { App }, // 在Vue对象上挂载父组件app
  template: '<App/>'
})
index.html
<!DOCTYPE html>
<html>
  <head>
    <title>vueproday70</title>
  </head>
  <body>
    <div id="app"></div> <!-- 在vue中圈的那块地在这儿 -->
    <!-- built files will be auto injected -->
  </body>
</html>
src/components/Helloworld.vue
所有自己定义的组件都写到components中,helloword.vue只是作为一个示例。
<template>
  <div class="hello">

  </div>
</template>

<script>
export default { // 抛出对象 供其他文件去调用
  name: 'HelloWorld',
  data () {
    return {
      msg: 'Welcome to Your Vue.js App'
    }
  }
}
</script>


<style scoped> /* 在style后添加scoped代表这个样式只能在这个组件中使用,如果不加的话代表这个样式在全局都可以使用 */

</style>
6.总结
index.js是 用来配置路由规则
index.html 圈地,圈的是App的那块地,div id =app 用户访问的界面就是这个界面
main.js 导入App组件,导入Vue对象,导入index.js已经定义好的路由规则
实例化vue对象,将父组件app挂载到vue对象上
将router路由规则挂载到vue对象上
helloworld.vue 自己定义的组件 里面是html css js 写完组件之后要挂载到父组件app上
App.vue 父组件App,将自己写的组件挂载到app组件上

