Android控件介绍
1. 介绍
Android控件大多位于android.widget, android.view.View为他们的父类
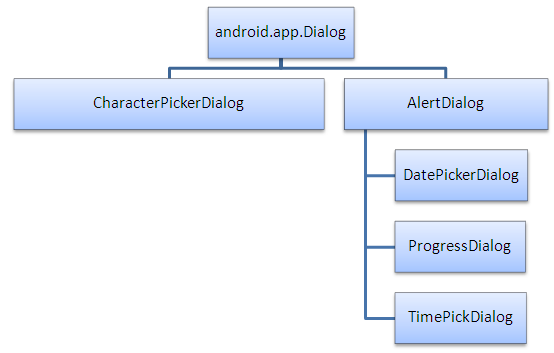
对于Dialog系列, android.app.Dialog为父类
Android的原生控件, 一般是在res/layout下的xml文件中声明
然后在Activity通过使用super.setContentView(R.layout.layout_name)来加载layout
在Activity中获取控件的引用使用super.findViewById(R.id.widget_id), 然后接可以使用这个引用对控件进行操作(添加监听, 设置内容).
值得提出的是, 上一篇文章中的Layout(LinearLayout, TableLayout, RelativeLayout, …)都是控件.
2. 控件关系
View子类结构图:

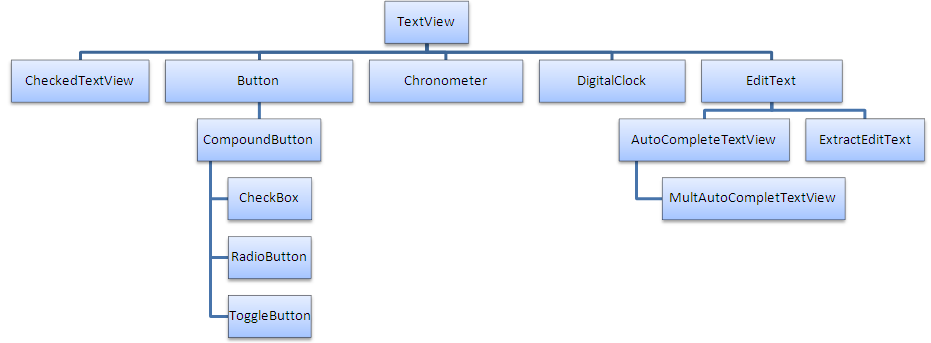
TextView子类结构:

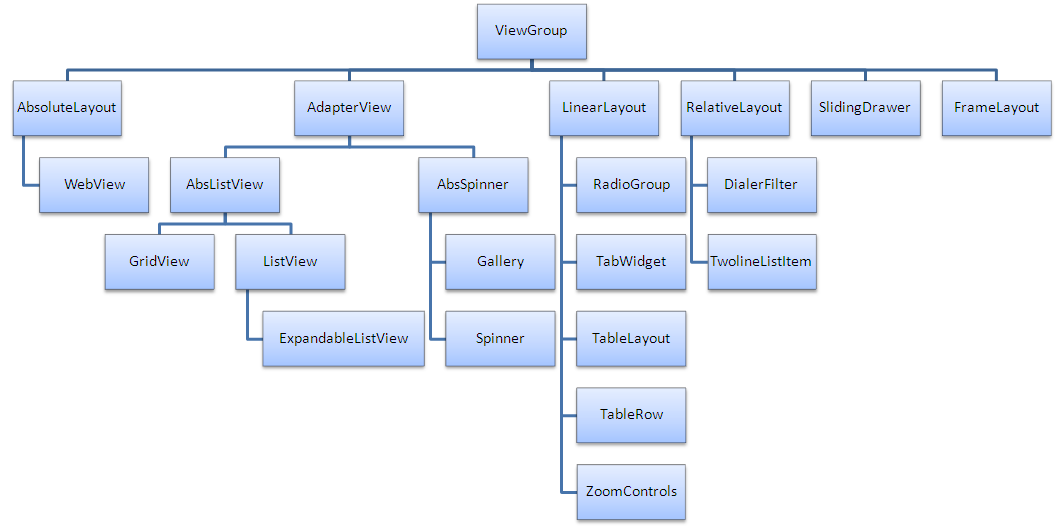
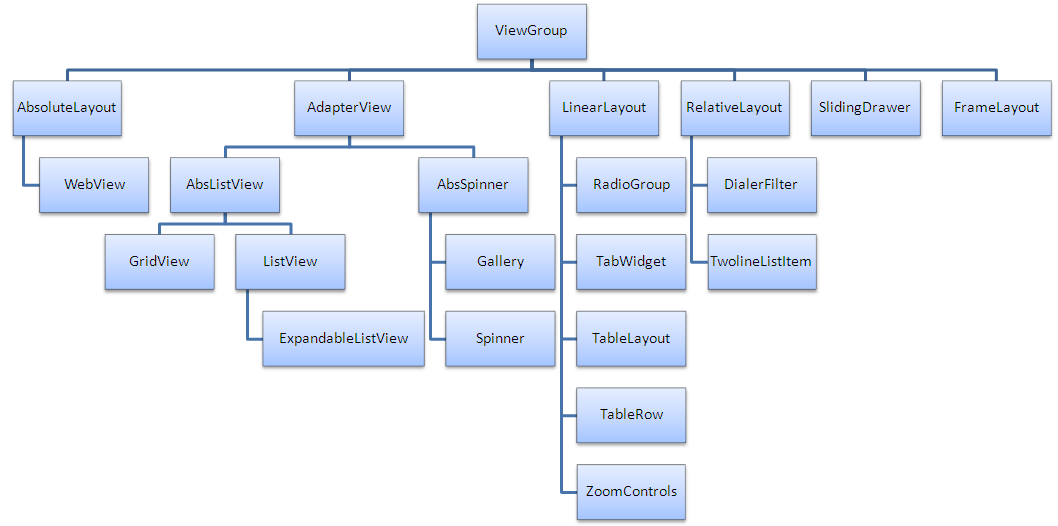
ViewGroup子类结构图:

FrameLayout子类结构:

android.app.Dialog子类结构:

3. 基本控件
3.1 文本类控件
常用文本类控件如下:
3.2 按钮类控件
Button                   按钮
ImageButton              图片按钮
ToggleButton             开关按钮
RadioButton/RadioGroup   单选按钮
CheckBox                 复选按钮
3.3 图片类控件
ImageView 负责显示图片
3.4 进度条控件
ProgressBar              显示进度条, 不可拖动
SeekBar                  拖动条
RatingBar                星级评分条
3.5 时间类控件
TextClock                文本时钟
AnalogClock              模拟时钟
Chronometer              计时器
DatePicker               日期选择器
TimePicker               时间选择器
CalendarView             日期视图
3.6 提示&对话框控件
Toast                    消息提示框
Notification             状态栏通知
AlertDialog              对话框
ProgressDialog           进度条对话框
4. 布局类控件
4.1 基本布局类控件
详细信息参考<Activity布局>
4.2 适配器布局类控件
该类控件需要Adapter(BaseAdapter, ArrayAdapter, SimpleAdapter)来配合使用
ListView                 列表视图
ExpandableListView       可折叠的列表
GridView                 网格视图
Spinner                  列表选项框
ViewFlipper              翻转视图
Gallery                  画廊视图
下面是关于ListView的简单使用方法
<!-- activity_main.xml -->
<?xml version="1.0" encoding="utf-8"?>
<LinearLayout xmlns:android="http://schemas.android.com/apk/res/android"
    xmlns="http://schemas.android.com/apk/res-auto"
    xmlns:tools="http://schemas.android.com/tools"
    android:layout_width="match_parent"
    android:layout_height="match_parent"
    android:orientation="vertical"
    tools:context="com.lineto.testlistview.MainActivity">
    <ListView
        android:id="@+id/listview"
        android:layout_width="match_parent"
        android:layout_height="wrap_content">
    </ListView>
</LinearLayout>

<!-- layout_item,xml -->
<?xml version="1.0" encoding="utf-8"?>
<LinearLayout xmlns:android="http://schemas.android.com/apk/res/android"
    android:orientation="horizontal"
    android:paddingLeft="10dp"
    android:paddingTop="2dp"
    android:paddingRight="10dp"
    android:layout_width="match_parent"
    android:layout_height="match_parent">
    <TextView
        android:id="@+id/name"
        android:width="180dp"
        android:textSize="10pt"
        android:layout_width="wrap_content"
        android:layout_height="wrap_content"
        />
    <TextView
        android:id="@+id/ip"
        android:textSize="10pt"
        android:layout_width="wrap_content"
        android:layout_height="wrap_content"
        />
</LinearLayout>
/* MainActivity.java */public class MainActivity extends AppCompatActivity { @Override protected void onCreate(Bundle savedInstanceState) { super.onCreate(savedInstanceState); setContentView(R.layout.activity_main); ListView listView = (ListView)findViewById(R.id.listview); ArrayList<HashMap<String, String>> list = new ArrayList<HashMap<String, String>>(); String[] stringsName = {"Jerry", "Penny", "Jimmy"}; String[] stringsIp = {"192.169.0.1", "192.168.1.1", "192.168.2.1"}; for (int i = 0; i < stringsName.length; i++) { HashMap<String, String> map = new HashMap<String, String>(); map.put("name", stringsName[i]); map.put("ip", stringsIp[i]); list.add(map); } SimpleAdapter simpleAdapter = new SimpleAdapter(this, list, R.layout.layout_item, new String[]{"name", "ip"}, new int[]{R.id.name, R.id.ip}); listView.setAdapter(simpleAdapter); listView.setOnItemClickListener(new AdapterView.OnItemClickListener() { @Override public void onItemClick(AdapterView<?> parent, View view, int position, long id) { Adapter adapter = parent.getAdapter(); HashMap<String, String> map = (HashMap<String, String>) adapter.getItem(position); Toast toast = Toast.makeText(MainActivity.this, map.get("name") + "-" + map.get("ip"), Toast.LENGTH_SHORT); toast.show(); } }); } }
4.3 滚动条控件
ScrollView 可滚动的布局容器


