

Spring
第一章:初识Spring框架
一、Spring的原理解释
1、什么事Spring框架,有什么作用
举个例子,当我们有用户个类,在测试方法中要 用到该类的实例化对象,这时候得new一个对象,还要给该对象初识化,当我们用Spring框架后,只需要配置一个xml文件,把初始化数据放在该文件中,这时候在我们测试类里需要用new一个对象时就只需要用特定的系统方法指定哪一条对象语句的id即可,它帮我们new自动new一个对象的同时还帮我们根据xml文件中配置好的初始化数据给新对象初始化,如果只是需要new一个或多个对象这个框架作用不是太明显,但在实际开发中需要new很多个相同对象并且初始化数据也相同,用Spring框架就可以很大程度上提高开发效率。
2、环境准备:
-
先在pom.xml文件中导入Spring基础包和依赖,如果导入依赖失败,滑到最低下查看小技巧-1:
<!--Spring的基础包spring-core--> <dependency> <groupId>org.springframework</groupId> <artifactId>spring-core</artifactId> <version>5.2.8.RELEASE</version> </dependency> <!--Spring的基础包spring-beans --> <dependency> <groupId>org.springframework</groupId> <artifactId>spring-beans</artifactId> <version>5.2.8.RELEASE</version> </dependency> <!--Spring的基础包spring-context --> <dependency> <groupId>org.springframework</groupId> <artifactId>spring-context</artifactId> <version>5.2.8.RELEASE</version> </dependency> <!--Spring的基础包spring-expression --> <dependency> <groupId>org.springframework</groupId> <artifactId>spring-expression</artifactId> <version>5.2.8.RELEASE</version> </dependency> <!--Spring的依赖包commons-logging --> <dependency> <groupId>commons-logging</groupId> <artifactId>commons-logging</artifactId> <version>1.2</version> </dependency> -
在resources目录下新建一个xml文件,名字不限制,一般为applicationContext.xml
且内容如下:(一定是在resources目录下)
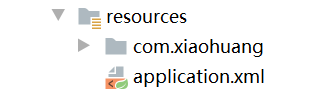
<?xml version="1.0" encoding="UTF-8" ?>
<beans xmlns="http://www.springframework.org/schema/beans"
       xmlns:xsi="http://www.w3.org/2001/XMLSchema-instance"
       xsi:schemaLocation="http://www.springframework.org/schema/beans
       http://www.springframework.org/schema/beans/spring-beans.xsd">

</beans>
二、用法
1、<bean>元素
-
set方法注入:
标签先了解两个属性,name和value,name用来指定类中需要初始化的字段名,value用来指定初始化的数据(注意:name实际是指定set方法的方法名去掉set后剩下的名字,比如一个叫userName的字段它的set方法是:setUserName(String user){return this.userName = userName},这个时候name="userName"其实是setUserName去掉set后变成UserName,然后规定首字母小写的userName,虽然这个时候和字段名一样;一般写set方法命名规则是set加字段名且字段名首字母大写,作者也是为了方便我们书写而特意这样设置的,如果把set方法改成setUserNamedd(String user){return this.userName = userName},这name就要写name="userNamedd") public class HelloSpring { private String userName; private String tall; public void setTall(String tall) { this.tall = tall; } public void setUserName(String userName) { this.userName = userName; } public void showName(){ System.out.println(userName+":"+发现大陆); } }<!--将指定的类配置给Spring,让Spring创建HelloSpring对象的实例--> <bean id="helloSpring" class="com.xiaohuang.xiao.HelloSpring"> <!--为userName属性赋值--> <property name="userName" value="小黄"></property> <!--为tall属性赋值--> <property name="tall" value="发现大陆"></property> </bean>//测试方法 @Test public void HiSpring(){ //初始化spring容器,加载applicationContext.xml配置 ApplicationContext applicationContext = new ClassPathXmlApplicationContext("application.xml"); HiSpring hiSpring = (HiSpring) applicationContext.getBean("helloSpring"); //通过容器获取配置中helloSpring实例 hiSpring.show(); //调用实例的show方法 }//测试结果 小黄:发现大陆 -
构造方法注入:
是当用构造方法实现字段初始化时用要用的元素,其指定赋值的字段的属性有三种:name、index、type,指定初始化数据就只有value, 如果要根据指定构造方法中参数名进行赋值就用name属性,name是指向构造方法参数的名字。
如果要根据构造方法传入参数的顺序赋值,就用index,index指向传参的先后顺序,从0开始代表第一个参数。
如果要根据构造方法中参数类型传递则用type,type指向参数类型,注意如果有多个相同类型的参数,要按先后顺序写,否则会传错。
public class HiSpring {
    private String unserName;
    private int passw;
    public HiSpring(String unserName,int passw){
        this.unserName = unserName;
        this.passw = passw;
    }
    public void show(){
        if(unserName.equals("小黄") && passw == 123){
            System.out.println("登录成功");
        }else System.out.println("登录失败");
    }
}
<!--将指定的类配置给Spring,让Spring创建HiSpring对象的实例--> <bean id="hiSpring1" class="com.xiaohuang.xiao.HiSpring"> <!--根据字段名(set方法名)写法--> <constructor-arg name="unserName" value="小黄"></constructor-arg> <constructor-arg name="passw" value="123"></constructor-arg> </bean> <!--将指定的类配置给Spring,让Spring创建HiSpring对象的实例--> <!--根据参数先后顺序写法--> <bean id="hiSpring2" class="com.xiaohuang.xiao.HiSpring"> <constructor-arg index="0" value="小黄"></constructor-arg> <constructor-arg index="1" value="123"></constructor-arg> </bean> <!--根据参数类型写法--> <bean id="hiSpring3" class="com.xiaohuang.xiao.HiSpring"> <constructor-arg type="java.lang.String" value="小黄"></constructor-arg> <constructor-arg type="int" value="123"></constructor-arg> </bean> <!--混合写法--> <bean id="hiSpring4" class="com.xiaohuang.xiao.HiSpring"> <constructor-arg type="java.lang.String" value="小黄"/></constructor-arg> <constructor-arg index="1" value="123"></constructor-arg> </bean>//测试方法 @Test public void HiSpring(){ //初始化spring容器,加载applicationContext.xml配置 ApplicationContext applicationContext = new ClassPathXmlApplicationContext("application.xml"); HiSpring hiSpring = (HiSpring) applicationContext.getBean("hiSpring4"); //通过容器获取配置中helloSpring实例 hiSpring.show(); //调用实例的show方法 }//测试结果 登录成功
第二章:Spring中的Bean管理
一、了解spring中的层次关系
1、dao层
dao层主要做数据持久层的工作,负责与数据库进行联络的一些任务都封装在此,dao层的设计首先是设计dao层的接口,然后在Spring的配置文件中定义此接口的实现类,就可以在模块中调用此接口来进行数据业务的处理,而不用关心此接口的具体实现类是哪个类,显得结构非常清晰,dao层的数据源配置,以及有关数据库连接参数都在Spring配置文件中进行配置。
2、service层
service层主要负责业务模块的应用逻辑应用设计。同样是首先设计接口,再设计其实现类,接着在Spring的配置文件中配置其实现的关联。这样我们就可以在应用中调用service接口来进行业务处理。service层的业务实,具体要调用已经定义的dao层接口,封装service层业务逻辑有利于通用的业务逻辑的独立性和重复利用性。程序显得非常简洁。
3、controller层
controller层负责具体的业务模块流程的控制,在此层要调用service层的接口来控制业务流程,控制的配置也同样是在Spring的配置文件里进行,针对具体的业务流程,会有不同的控制器。我们具体的设计过程可以将流程进行抽象归纳,设计出可以重复利用的子单元流程模块。这样不仅使程序结构变得清晰,也大大减少了代码量。
4、view层
view层与控制层结合比较紧密,需要二者结合起来协同开发。view层主要负责前台jsp页面的显示。
5、它们之间的关系:
Service层是建立在DAO层之上的,建立了DAO层后才可以建立Service层,而Service层又是在Controller层之下的,因而Service层应该既调用DAO层的接口,又要提供接口给Controller层的类来进行调用,它刚好处于一个中间层的位置。每个模型都有一个Service接口,每个接口分别封装各自的业务处理方法。
二、Spring IOC容器
1、BeanFactory接口
BeanFactory是Spring容器最基本的接口,其用法和ApplicationContext接口差不多,只是要指定.xml配置文件的绝对路径,而ApplicationContext接口指定名就可以。
    @Test
    public void HiSpring(){
        //初始化spring容器,加载applicationContext.xml配置
        BeanFactory beanFactory = new XmlBeanFactory(new FileSystemResource("E:\\文档\\xiaohuang\\src\\main\\resources\\application.xml"));
        HiSpring hiSpring = (HiSpring)beanFactory.getBean("hiSpring4");
        //通过容器获取配置中helloSpring实例
        hiSpring.show();
        //调用实例的show方法
    }
2、ApplicationContext接口
ApplicationContext接口建立在BeanFactory接口基础上,丰富了BeanFactory接口特性。
    @Test
    public void HiSpring(){
        //初始化spring容器,加载applicationContext.xml配置
        ApplicationContext applicationContext = new
                ClassPathXmlApplicationContext("application.xml");
        HiSpring hiSpring = (HiSpring)beanFactory.getBean("hiSpring4");
        //通过容器获取配置中helloSpring实例
        hiSpring.show();
        //调用实例的show方法
    }
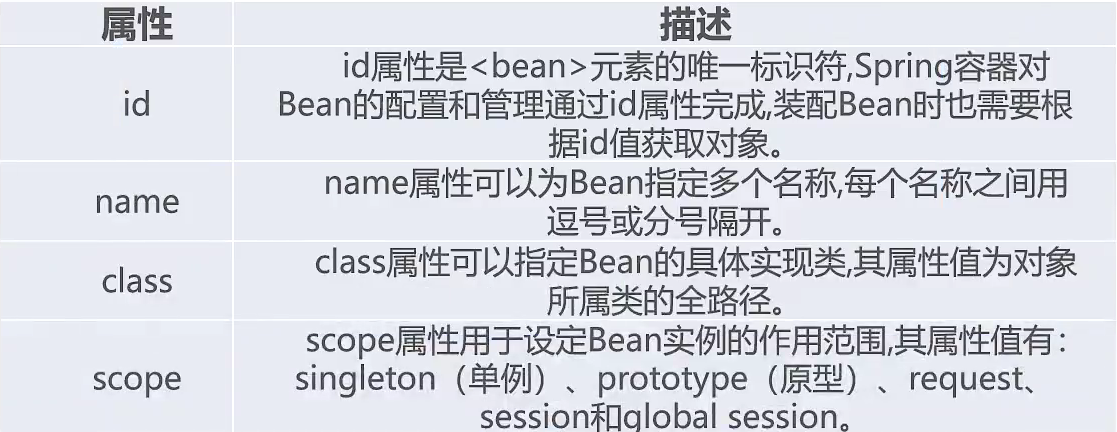
三、Bean的配置
1、元素的属性:
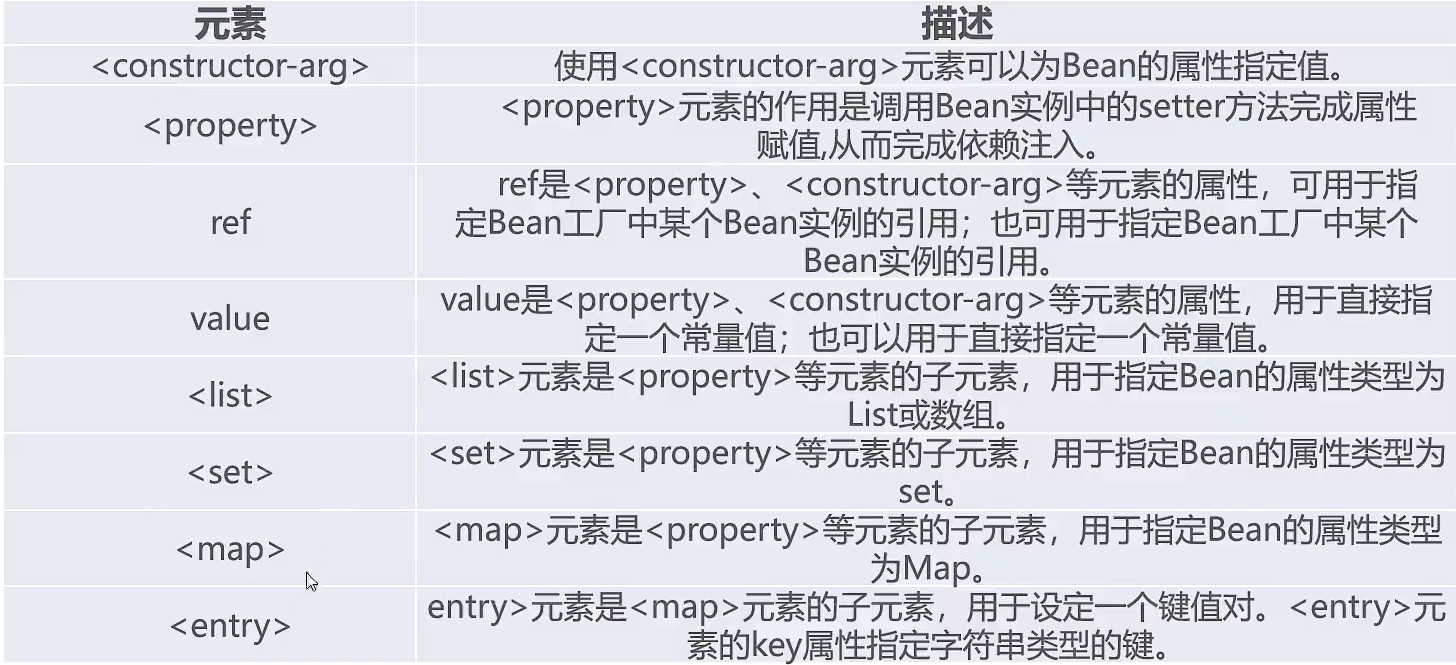
2、子元素:
-
name:也可以为
元素添加唯一标识,一个bean可以有多个标识,但用id只能设置一个 <bean name="user1,user2" class="com.xiaohuang.xiao.User"> <property name="age" value="18"/> <property name="name" value="小黄"/> </bean> -
scope:指定作用域,常用singleton和prototype,其作用看后面的第五点Bean的作用域
<bean id="user1" class="com.xiaohuang.xiao.User" scope="singleton"> <property name="age" value="18"/> <property name="name" value="小黄"/> </bean> -
ref:和value一样为类属性注入值,但注入基本型用value,注入应用类型用ref
<bean name="user1,user2" class="com.xiaohuang.xiao.User" scope="singleton">
    <property name="age" value="18"/>
    <property name="name" value="小黄"/>
</bean>
<bean id="getUser" class="com.xiaohuang.xiao.GetUsers">
    <constructor-arg name="name" value="用户信息"/>
    <constructor-arg name="user" ref="user1"/>
</bean>
四、Bean的实例化
1、构造方法实例化
就是正常用
2、静态工厂实例化
就是根据Java语法可以不实例化一个类就能直接调用该类中的静态方法。
使用场景:当一个类没有set方法和构造方法时,Bean是无法创建对象的,Bean一定是基于构造方法或set方法创建对象,这时候就可以创建一个新类,新类里写一个静态方法,在静态方法里创建该类并返回该类,就可以间接创建该类:
public class Bean1 {
    public void show(){
        System.out.println("我是Bean1");
    }
}
public class MyBean1 {
    public static Bean1 createBean1(){
        return new Bean1();
    }
}
<bean id="bean1" class="com.xiaohuang.xiao.MyBean1" factory-method="createBean1"/>
public void Bean1(){
    ApplicationContext applicationContext = new
            ClassPathXmlApplicationContext("application.xml");
    Bean1 bean1 = (Bean1) applicationContext.getBean("bean1");
    bean1.show();
    System.out.println(bean1);
}
//测试结果
我是Bean1
com.xiaohuang.xiao.Bean1@543788f3
factory-method用来执行class中指定的类里面的静态方法名称,注意这里并没有创建MyBean对象,而是直接电泳MyBean类中的静态方法。
3、实例工厂实例化
上述中如果MyBean中如果不是定义静态方法,
public class Bean1 {
    public void show(){
        System.out.println("我是Bean1");
    }
}
public class MyBean2 {
    public  Bean1 createBean1(){
        return new Bean1();
    }
}
<bean id="myBean2" class="com.xiaohuang.xiao.MyBean2"/>
<bean id="bean2" factory-bean="myBean2" factory-method="createBean1"/>
public void Bean1(){
    ApplicationContext applicationContext = new
            ClassPathXmlApplicationContext("application.xml");
    Bean1 bean1 = (Bean1) applicationContext.getBean("bean2");
    bean1.show();
    System.out.println(bean1);
}
//测试结果
我是Bean1
com.xiaohuang.xiao.Bean1@543788f3
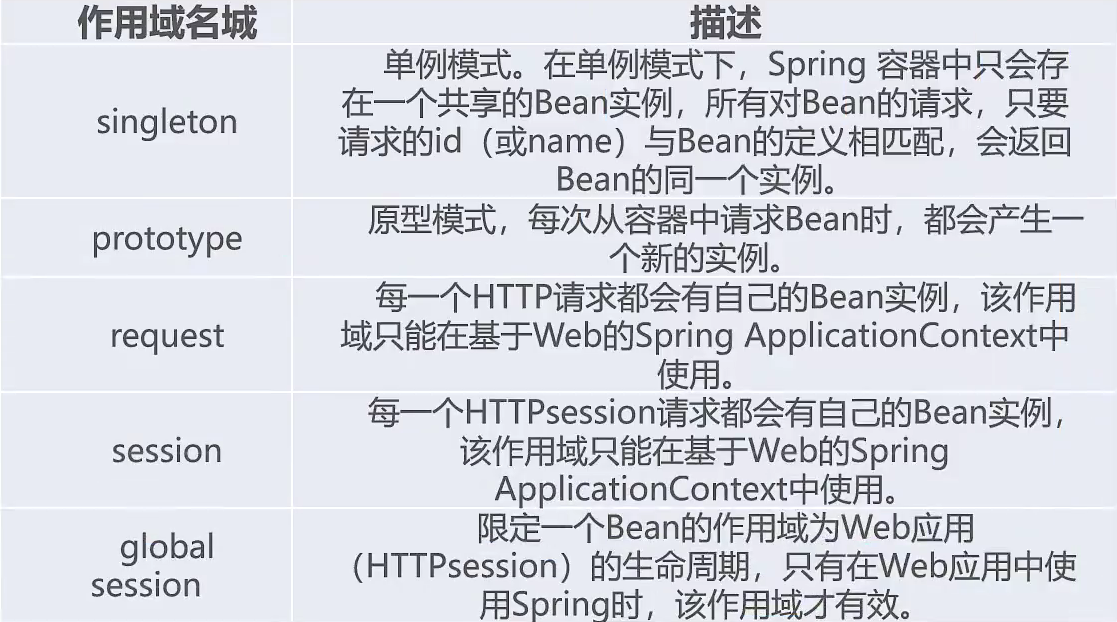
五、Bean的作用域
1、Bean指定的五种作用域
-
singleton:单例模式,在该模式,以后无论创建多少个该对象,其实都是同一个对象,所以创建的并不是对象,而是像C语言的指针一样,指向同一个对象,改变其中一个对象的属性值,其他的对象值也跟着改变。
public class Singleton {
    private String name;

    public String getName() {
        return name;
    }

    public void setName(String name) {
        this.name = name;
    }
}
<bean id="singleton" class="com.xiaohuang.xiao.Singleton" scope="singleton"> <property name="name" value="小黄"/> </bean>@Test public void Singleton1(){ ApplicationContext applicationContext = new ClassPathXmlApplicationContext("application.xml"); Singleton singleton1 = (Singleton) applicationContext.getBean("singleton1"); Singleton singleton2 = (Singleton) applicationContext.getBean("singleton1"); System.out.println(singleton1.getName()); System.out.println(singleton2.getName()); singleton1.setName("竹林小溪"); System.out.println(singleton1.getName()); System.out.println(singleton2.getName()); }//测试结果 小黄 小黄 竹林小溪 竹林小溪 -
prototype: 原型模式,在该原型下,以后创建的对象中,每个对象都是对立的,互不影响。
<bean id="singleton2" class="com.xiaohuang.xiao.Singleton" scope="prototype">
    <property name="name" value="小黄"/>
</bean>
@Test public void Singleton2(){ ApplicationContext applicationContext = new ClassPathXmlApplicationContext("application.xml"); Singleton singleton1 = (Singleton) applicationContext.getBean("singleton2"); Singleton singleton2 = (Singleton) applicationContext.getBean("singleton2"); System.out.println(singleton1.getName()); System.out.println(singleton2.getName()); singleton1.setName("竹林小溪"); System.out.println(singleton1.getName()); System.out.println(singleton2.getName()); }//测试结果 小黄 小黄 竹林小溪 小黄
六、Bean的装配方式
1、基于XML装配
XML装配方式有三种,set注入、构造方法注入和自动注入,前两个学过,自动注入在自动装配讲解
2、基于注解的装配
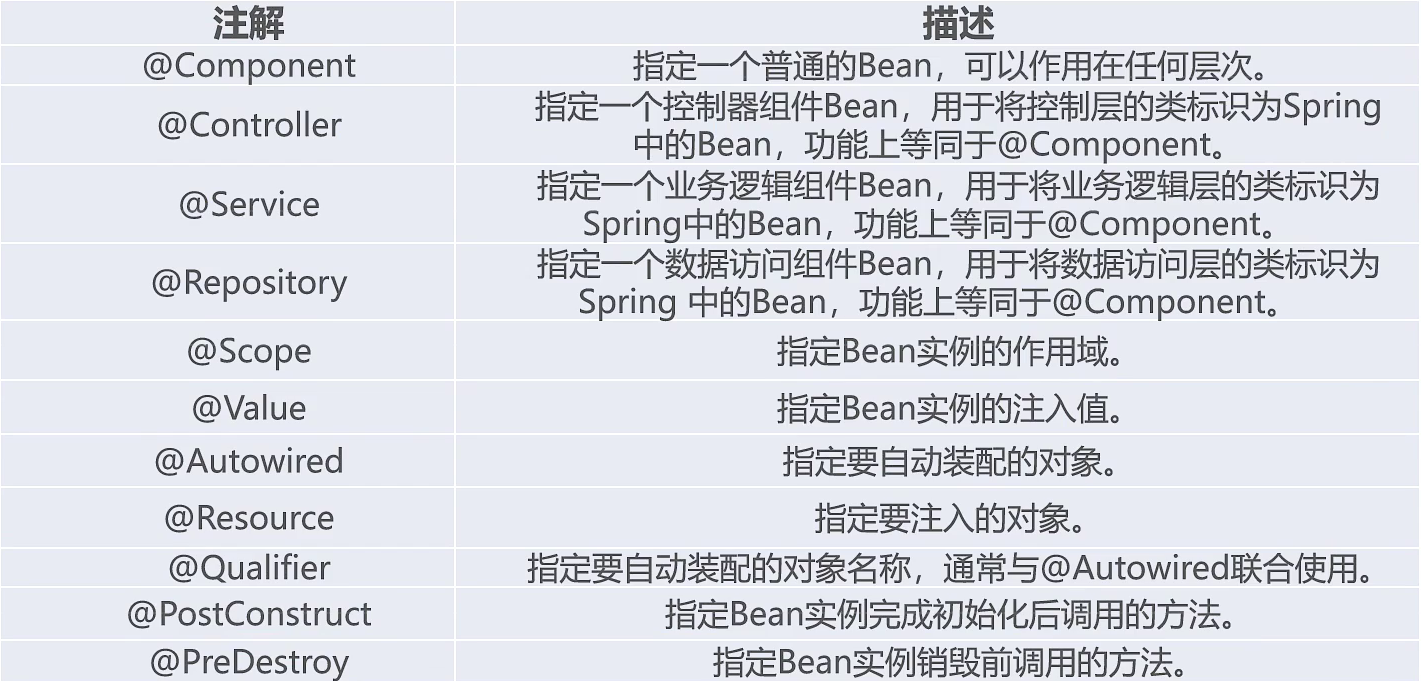
@Component可以代替@Controller、@Service和@Repository,但为了规范和提高辨识度对于不同层次选择用不同注解,另外该基本型赋值用@Value,给应用类型赋值用@Resource(name="dao"):
-
users.class
@Component("users") @Scope("singleton") public class Users { @Value("1") private int id; @Value("竹林小溪") private String name; @Value("18") private int age; ........... get、set方法省略..... } -
实现dao层
@Repository("dao") public class UserDao { public void save(){ ApplicationContext applicationContext = new ClassPathXmlApplicationContext("application.xml"); Users users = (Users) applicationContext.getBean("users"); System.out.println(users); System.out.println("这是dao层"); } } -
实现Service层
@Service("userService") public class UserService { @Resource(name="dao") private UserDao dao; public void save(){ dao.save(); System.out.println("这是Service层"); } } -
实现Controller层
@Controller("userController") public class UserController { @Resource(name="userService") private UserService userService; public void save(){ userService.save(); System.out.println("这是Controller层"); } } -
测试
@Test public void Test1(){ ApplicationContext applicationContext = new ClassPathXmlApplicationContext("application.xml"); UserController userController = (UserController) applicationContext.getBean("userController"); userController.save(); } -
测试结果
Users{id=1, name='竹林小溪', age=18}
这是dao层
这是Service层
这是Controller层

Process finished with exit code 0
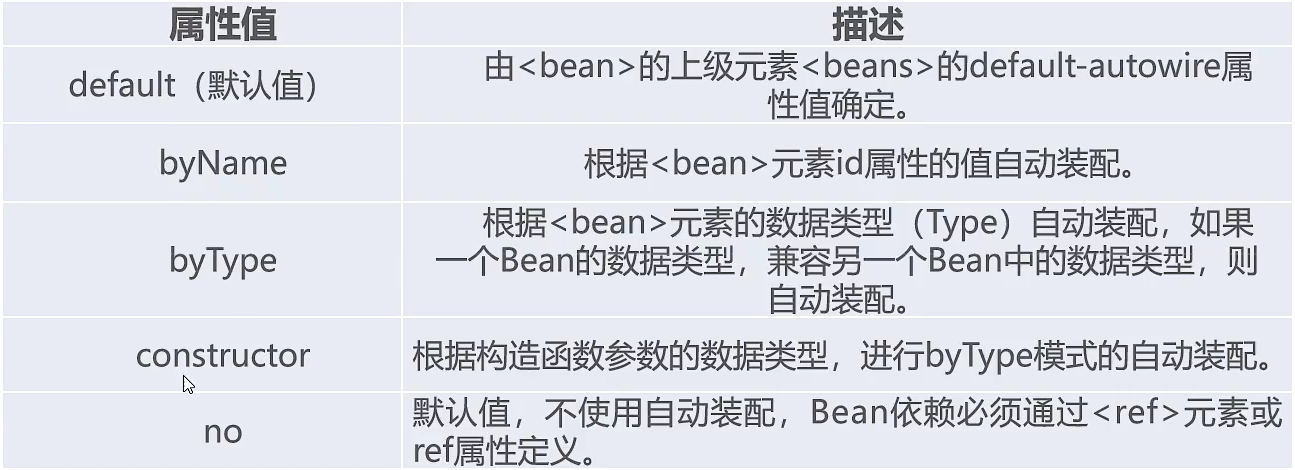
3、自动装配
-
在xml中用自动装配使用autowire=“byName”
使用前:
<bean id="user1" class="com.xiaohuang.xiao.User"> </bean> <bean id="getUser" class="com.xiaohuang.xiao.GetUsers"> <constructor-arg name="user" ref="user1"/> </bean>使用后:
<bean id="user1" class="com.xiaohuang.xiao.User" autowire=“byName”> </bean> <bean id="getUser" class="com.xiaohuang.xiao.GetUsers" autowire=“byName”> </bean> -
在注解中用自动装配用@Autowire,把@Resource(name="dao")替换成@Autowire即可
使用前
@Resource(name="dao")
private UserDao dao;
使用后
@Autowired
private UserDao dao;
注意:使用注解是当被引用的类只有一个Bean是才能用,如果有,如果有bean1、bean2系统就无法标识。
七、Bean的生命周期
只有在单例模式创建的对象才有生命周期,在原型模式Bean只管创建对象,不管理对象的生命周期,用@PostConstruct注解的函数在该对象创建完成时会调用该函数,用@PreDestroy注解的函数在该对象被销毁前会被调用,所以可以用这连个注解获取创建对象后需要获取的数据或者销毁前获取的数据。
销毁容器的所有Bean用:AbstractApplicationContext,如果Bean是使用原型模式创建对象,该对象不会随容器的所有Bean销毁而销毁的,具体销毁容器所有Bean用法为:
AbstractApplicationContext ac = (AbstractApplicationContext)applicationContext;
ac.registerShutdownHook();
案例
@Component("users")
@Scope("singleton")
public class Users {
    @Value("1")
    private int id;
    @Value("竹林小溪")
    private String name;
    @Value("18")
    private  int age;

	...........
	get、set方法省略.....

    @PostConstruct
    public void init(){
        System.out.println("Bean初始化结点的监控方法");
    }
    @PreDestroy
    public void destroy(){
        System.out.println("Bean销毁前调用destroy()方法");
    }

}
@Test
public void Test2(){
    ApplicationContext applicationContext = new
            ClassPathXmlApplicationContext("application.xml");
    Users users = (Users)
            applicationContext.getBean("users");
    System.out.println(users);
    AbstractApplicationContext ac = (AbstractApplicationContext)applicationContext;
    ac.registerShutdownHook();
}
//测试结果
Bean初始化结点的监控方法
Users{id=1, name='竹林小溪', age=18}
Bean销毁前调用destroy()方法
第三章:Spring AOP
一、SpringAOP的实现机制
1、JDK动态代理。
动态代理的理解:有三个类,目标类、为增强目标类中的方法做创建的增强类和动态代理类。按普通的法式,当觉得目标类的方法功能不够时,就要重新修改该方法,给该方法添加新功能。但有一天突然不要新功能了就要原方法的功能,这时候又得改回来。就不方便和不易于维护。所以现在有一个解决方法,就是把要对目标类原方法增强的功能写在一个新类的方法中,然后再创建一个代理类,代理类的功能是把目标类的所有方法功能和新类的所有方法功能进行合并返回一个新类,也称目标类的代理类,该代理类的类型和和目标类型一样,只不过方法中的功能是经过增强的,这时候如果你只是想用原来方法中的功能不要增强的功能,你就直接新建一个目标类对象就行,如果你要用到增强的功能,你就直接新建一个动态代理类对象,让这个这个动态代理对象会合并目标类和增强类的所有方法,同时返回和目标类的类型相同对象,这个对象的方法是经过增强的。
但是动态代理类又是怎么根据目标类代理出一个代理对象的呢?要创建一个和目标类的类型保持一致但方法有是在原基础上增强的的代理对象,就得获取三样东西:目标类对象,目标类的实现接口和代理类的类加载器。
动态代理类必须要继承InvocationHandler接口,并且实现接口中的invoke()方法,在invoke()方法中写下对目标类中的原有方法功能进行增强的方法和记录下目标类中的方法,这就为创建新代理对象提供经过增强后的方法模型,为创建新代理对象做准备。用ClassLoader classLoader = MyProxy.class.getClassLoader();创建一个动态代理类的类加载器。用Class[] classes = userDao.getClass().getInterfaces();获取目标类的接口。用Proxy.newProxyInstance(classLoader,classes,this);就可以创建一个和目标类的类型一致的代理类了。
实现原理:获取到目标类的接口就能知道目标类中方法名,就能创建出和目标类的类型一致的空壳,而获取一个动态代理类的类加载器就能根据动态代理类中的invoke()方法获取到目标方法中的功能和需要增强的功能并用系统提供的Proxy.newProxyInstance进行功能打造封装,就能返回一个增强的代理对象。
//目标类的接口
public interface UserDao {
    public void addUser();
    public void deleteUser();
}
//实现接口的目标类
public class UserDaoImpl implements UserDao {
    @Override
    public void addUser() {
        System.out.println("添加用户");
    }

    @Override
    public void deleteUser() {
        System.out.println("删除用户");
    }
}
//增强所需的功能的增强类
public class MyAspect {
    public void checkPermissions(){
        System.out.println("检查模拟权限...");
    }
    public void log(){
        System.out.println("模拟记录日志");
    }
}
//动态代理类
public class MyProxy implements InvocationHandler {
    private UserDao userDao;

    //创建代理方法
    public Object createProxy(UserDao userDao){
        this.userDao = userDao;
        //类加载器
        ClassLoader classLoader = MyProxy.class.getClassLoader();
        //被代理对象实现的所有接口
        Class[] classes = userDao.getClass().getInterfaces();
        //使用代理类进行增强,返回的是代理对象
        return Proxy.newProxyInstance(classLoader,classes,this);
    }
    @Override
    public Object invoke(Object proxy, Method method, Object[] args) throws Throwable {
        //创建切面对象
        MyAspect myAspect = new MyAspect();
        //前增强
        myAspect.checkPermissions();
        //传入目标类,执行目标类方法,并传入参数
        Object obj = method.invoke(userDao,args);
        //后增强
        myAspect.log();
        return obj;
    }
}
//测试类
public class JDKTest {
    @Test
    public static void main(String[] args) {
        MyProxy jdkProxy = new MyProxy();
        UserDao userDao = new UserDaoImpl();
        UserDao userDao1 = (UserDao)jdkProxy.createProxy(userDao);
        userDao1.addUser();
        userDao1.deleteUser();
    }
}
//测试结果
检查模拟权限...
添加用户
模拟记录日志
检查模拟权限...
删除用户
模拟记录日志

Process finished with exit code 0
2、CGLib动态代理
CGLib动态代理类要实现MethodInterceptor接口,并实现接口中的intercept方法。在intercept方法中实现增强功能。
原理和JDK代理差不多,也是或获取到目标类的类型从而可以打造一个和目标类型一致的空壳,再经过获取动态代理类从而获取动态代理类中的intercept方法知道代理类中方法所需的功能。
和JDK代理方式不同的是CGLib是只需获取目标类的类名就,而JDK要获取目标类所有实现的接口名,所以用JDK方式的目标类必须是实现某个或多个接口的类,也就是所目标类必须有接口才行,而CGLib方式就和有没有接口无关。
//CGLib代理类
public class CGLibProxy implements MethodInterceptor {
    //代理方法
    public Object createProxy(Object target){
        //创建一个动态类对象
        Enhancer enhancer = new Enhancer();
        //确定需要增强的类,设置其父类
        enhancer.setSuperclass(target.getClass());
        //添加回调函数
        enhancer.setCallback(this);
        //返回创建代理对象
        return enhancer.create();
    }

    @Override
    public Object intercept(Object o, Method method, Object[] objects, MethodProxy methodProxy) throws Throwable {
        MyAspect myAspect = new MyAspect();
        myAspect.checkPermissions();
        Object obj = methodProxy.invokeSuper(o,objects);
        myAspect.log();
        return obj;
    }
}
//测试类
public class CGLibTest {
    public static void main(String[] args) {
        CGLibProxy cgLibProxy = new CGLibProxy();
        UserDao userDao = new UserDaoImpl();
        UserDao userDao1 = (UserDao)cgLibProxy.createProxy(userDao);
        userDao1.addUser();
        userDao1.deleteUser();

    }
}
//测试结果
检查模拟权限...
添加用户
模拟记录日志
检查模拟权限...
删除用户
模拟记录日志

Process finished with exit code 0
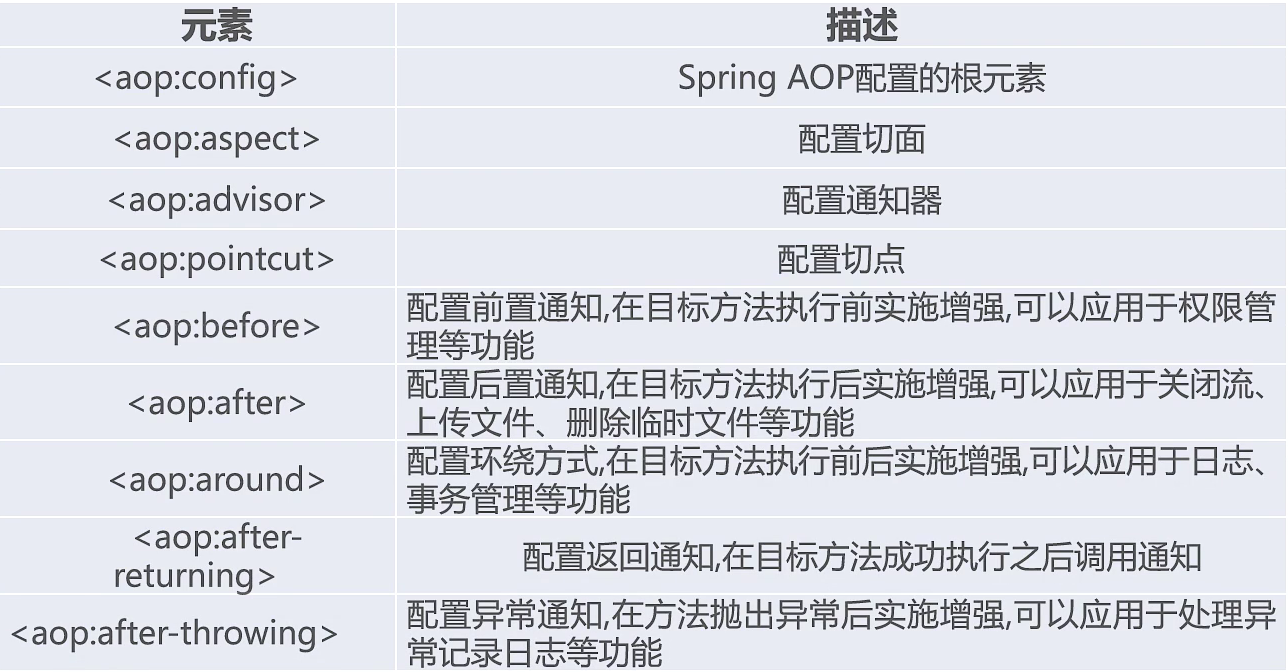
3、基于XML的AOP实现
- Spring AOP的XML元素
-
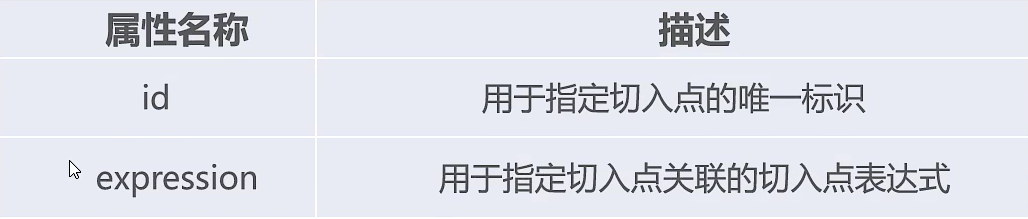
aop:aspect元素的属性
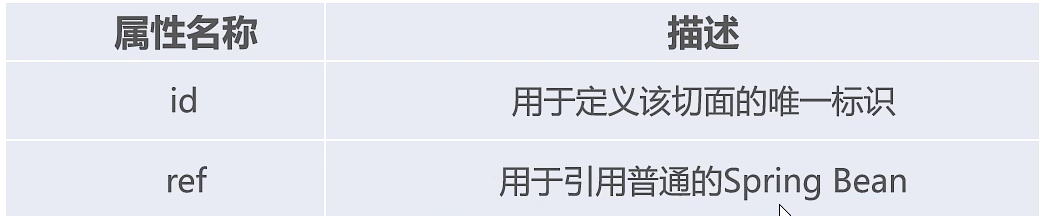
-
aop:aspect元素的属性
-
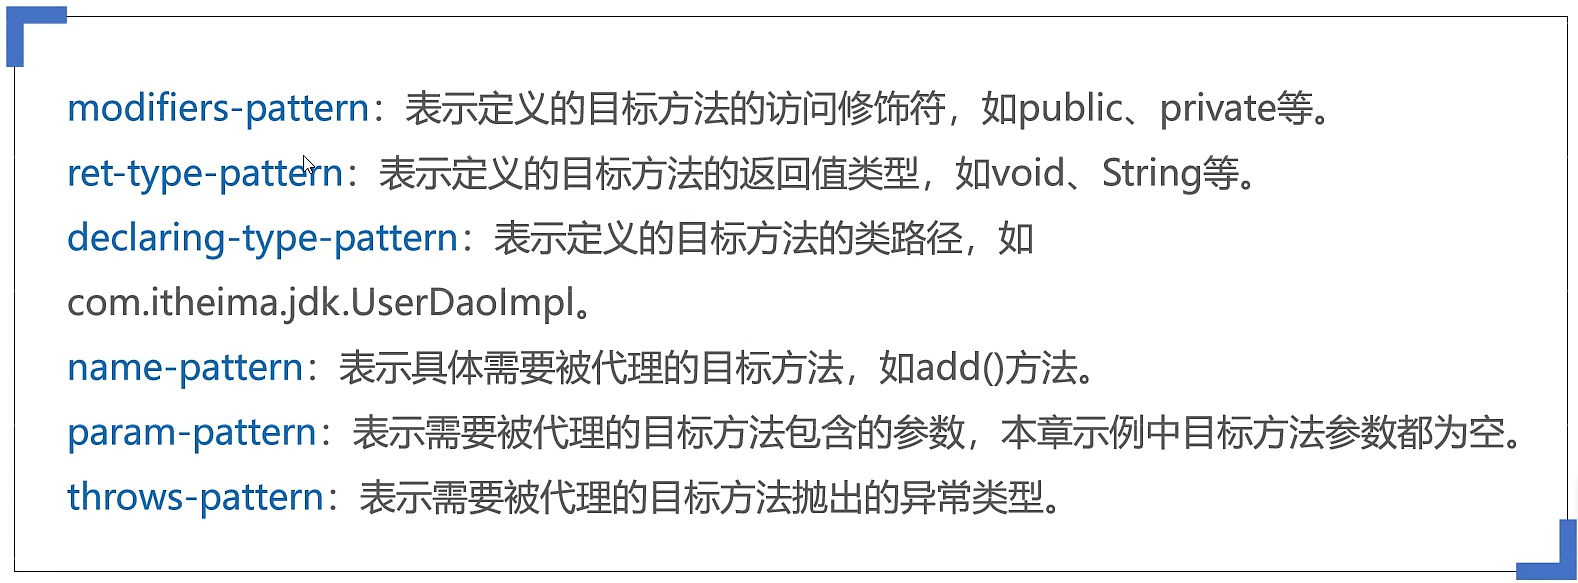
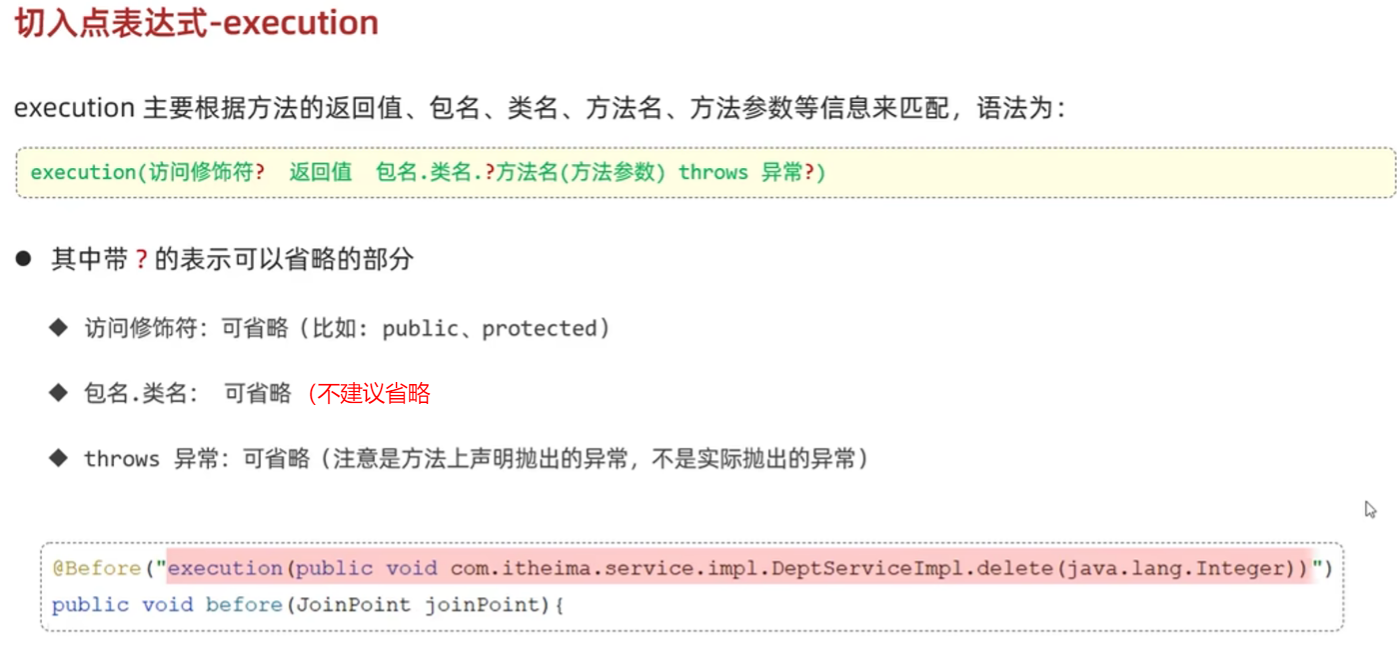
execution表达式个部分参数说明
-
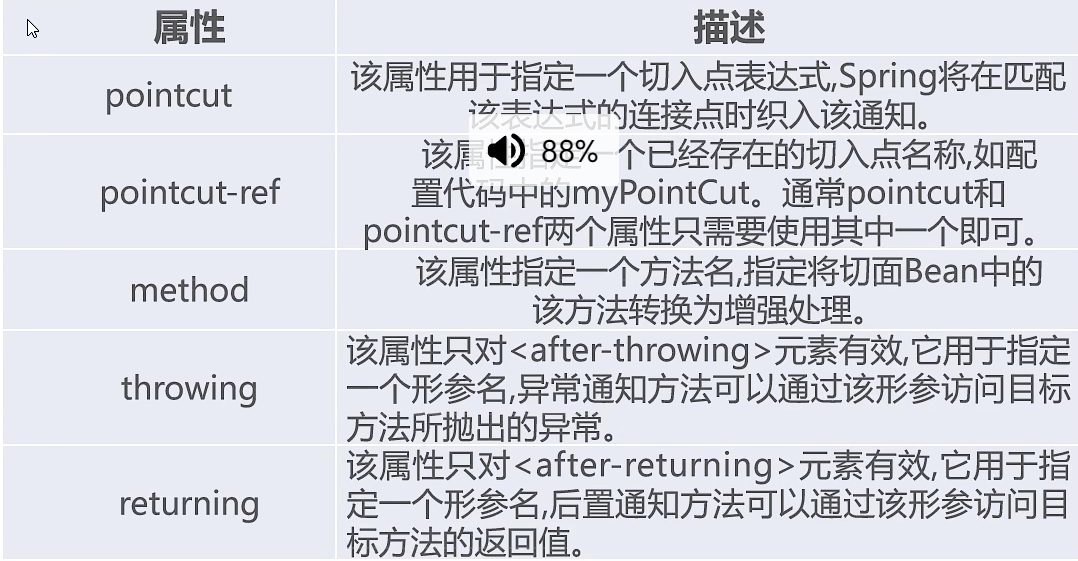
aop:aspect元素的常用属性
-
切入点是指目标类的方法
-
切面是指增强类
    <!--aspectjrt包的依赖-->
    <dependency>
        <groupId>org.aspectj</groupId>
        <artifactId>aspectjrt</artifactId>
        <version>1.9.1</version>
    </dependency>
    <!--aspectjweaver包的依赖-->
    <dependency>
        <groupId>org.aspectj</groupId>
        <artifactId>aspectjweaver</artifactId>
        <version>1.9.6</version>
    </dependency>
//目标类的接口类
public interface UserDao1 {
    public void insert();
    public void delete();
    public void update();
    public void select();
}
//目标类
public class UserDaoImpl1 implements UserDao1 {
    @Override
    public void insert() {
        System.out.println("添加用户信息");
    }

    @Override
    public void delete() {
        System.out.println("删除用户信息");
    }

    @Override
    public void update() {
        System.out.println("修改用户信息");
    }

    @Override
    public void select() {
        System.out.println("查询用户信息");
    }
}
//增强类
public class XmlAspect {
    //前置通知
    public void before(JoinPoint joinPoint){
        System.out.println("这是前置通知");
        System.out.println("目标类是:"+joinPoint.getTarget());
        System.out.println("被织如增强处理的目标方法为:"+joinPoint.getSignature().getName());
    }
    //返回通知:当出现异常时不会执行该方法
    public void afterReturning(JoinPoint joinPoint){
        System.out.println("这是放回通知(方法不出现异常时调用)");
        System.out.println("被织入增强处理的目标方法为:"+joinPoint.getSignature().getName());
    }

    /**
     * 环绕通知:用户指定义通知
     * ProceedingJoinPoint 是 JoinPoint子接口,表示可以执行目标法
     * 1、必须是Object返回值
     * 2、必须接收一个参数,类型为 ProceedingJoinPoint
     * 3、必须throws Throwable
     */
    public Object around(ProceedingJoinPoint point)throws Throwable{
        System.out.println("这是环绕通知之前的部分");
        //表示执行该环绕通知以下的通知
        Object object = point.proceed();
        //当执行完环绕通知以下的通知后就会执行该println语句
        System.out.println("这是环绕通知之后的部分");
        return object;
    }
    //异常通知:方法出现异常才会执行该方法
    public void afterException(){
        System.out.println("异常通知");
    }
    //后置通知:最终通知,无论结果咋样都会执行
    public void after(){
        System.out.println("这是后置通知");
    }
}
<!--applicationXmlProxy.xml-->
<bean id="userDao" class="com.xiaohuang.srpingAop.UserDaoImpl1"/>
<bean id="xmlAspect" class="com.xiaohuang.srpingAop.XmlAspect"/>
<!--配置SpringAOP-->
<aop:config>
	<!--指定切入点-->
    <aop:pointcut id="pointcut" expression="execution(*
    com.xiaohuang.srpingAop.UserDaoImpl1.*(..))"/>
    <!--指定切面-->
    <aop:aspect ref="xmlAspect">
        <aop:before method="before" pointcut-ref="pointcut"/>
        <aop:after-returning method="afterReturning" pointcut-ref="pointcut"/>
        <aop:around method="around" pointcut-ref="pointcut"/>
        <aop:after-throwing method="afterException" pointcut-ref="pointcut"/>
        <aop:after method="after" pointcut-ref="pointcut"/>
    </aop:aspect>
</aop:config>
//测试类
public class TestXml {
    public static void main(String[] args) {
        ApplicationContext context = new
                ClassPathXmlApplicationContext("applicationXmlProxy.xml");
        UserDao1 userDao = context.getBean("userDao", UserDao1.class);
        userDao.delete();
        System.out.println();
        userDao.insert();
        System.out.println();
        userDao.select();
        System.out.println();
        userDao.update();
    }
}
这是前置通知
目标类是:com.xiaohuang.srpingAop.UserDaoImpl1@12d4bf7e
被织如增强处理的目标方法为:delete
这是环绕通知之前的部分
删除用户信息
这是后置通知
这是环绕通知之后的部分
这是放回通知(方法不出现异常时调用)
被织入增强处理的目标方法为:delete

这是前置通知
目标类是:com.xiaohuang.srpingAop.UserDaoImpl1@12d4bf7e
被织如增强处理的目标方法为:insert
这是环绕通知之前的部分
添加用户信息
这是后置通知
这是环绕通知之后的部分
这是放回通知(方法不出现异常时调用)
被织入增强处理的目标方法为:insert

这是前置通知
目标类是:com.xiaohuang.srpingAop.UserDaoImpl1@12d4bf7e
被织如增强处理的目标方法为:select
这是环绕通知之前的部分
查询用户信息
这是后置通知
这是环绕通知之后的部分
这是放回通知(方法不出现异常时调用)
被织入增强处理的目标方法为:select

这是前置通知
目标类是:com.xiaohuang.srpingAop.UserDaoImpl1@12d4bf7e
被织如增强处理的目标方法为:update
这是环绕通知之前的部分
修改用户信息
这是后置通知
这是环绕通知之后的部分
这是放回通知(方法不出现异常时调用)
被织入增强处理的目标方法为:update

Process finished with exit code 0
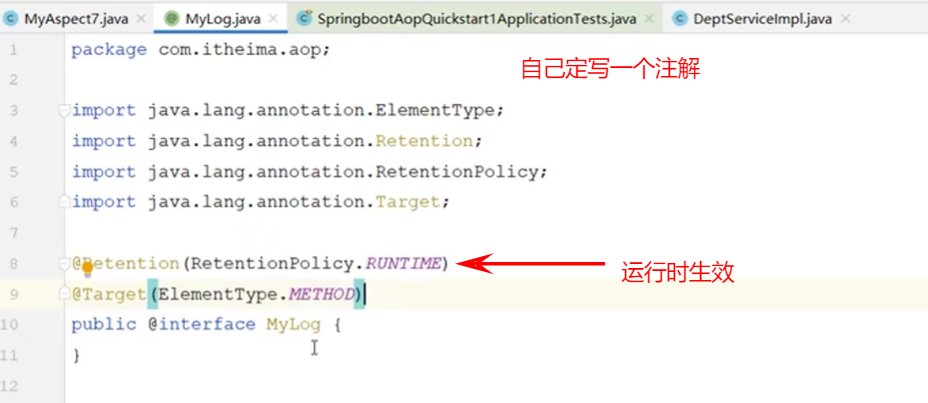
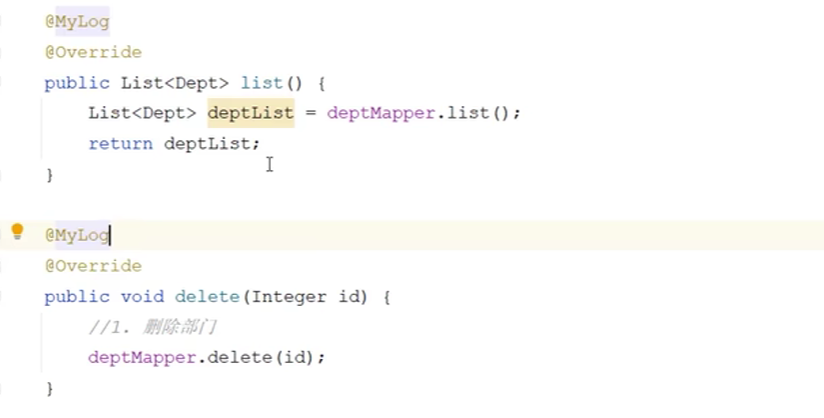
3、基于注解的AOP实现
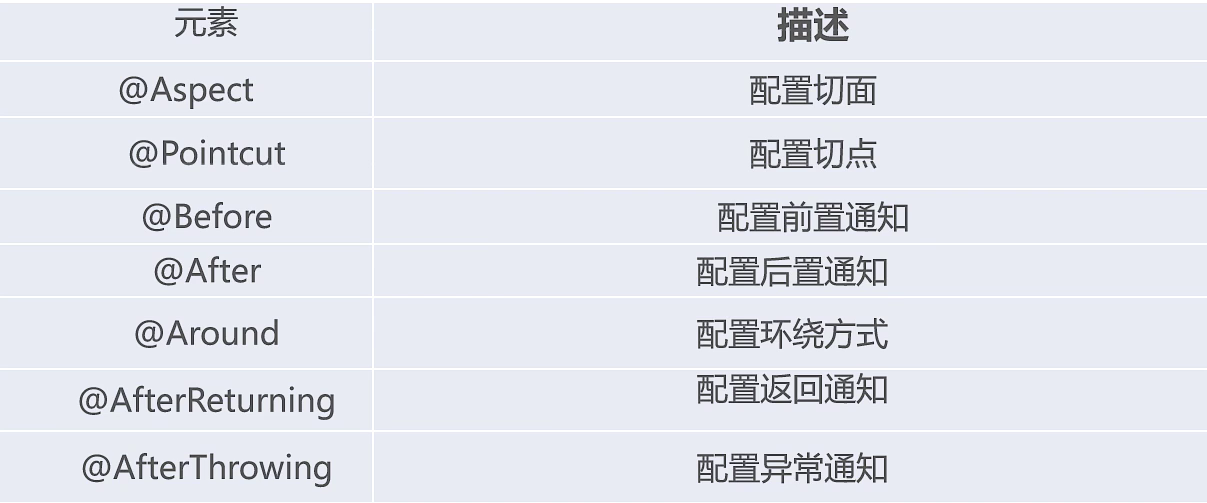
常用注解描述
//增强或切面类
@Aspect
public class AnnoAspect {
//切点
@Pointcut("execution( * com.xiaohuang.srpingAop.UserDaoImpl1.*(..))")
public void pointcut(){
}
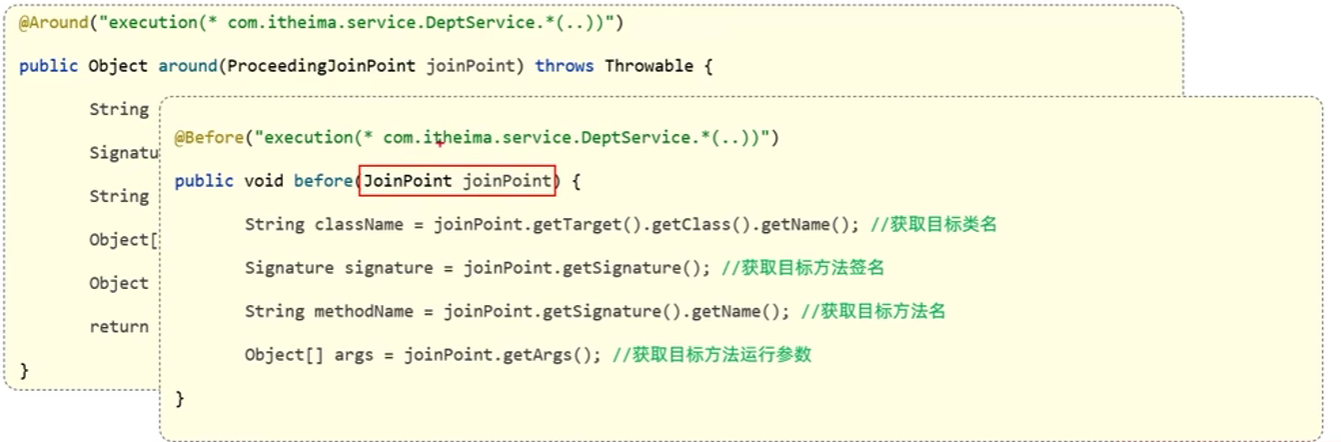
//前置通知
@Before("pointcut()")
public void before(JoinPoint joinPoint){
System.out.println("这是前置通知");
System.out.println("目标类是:"+joinPoint.getTarget());
System.out.println("被织如增强处理的目标方法为:"+joinPoint.getSignature().getName());
}
//放回通知
@AfterReturning("pointcut()")
public void afterReturning(JoinPoint joinPoint){
System.out.println("这是放回通知(方法不出现异常时调用)");
System.out.println("被织入增强处理的目标方法为:"+joinPoint.getSignature().getName());
}
/**
* 环绕通知
* ProceedingJoinPoint 是 JoinPoint子接口,表示可以执行目标法
* 1、必须是Object返回值
* 2、必须接收一个参数,类型为 ProceedingJoinPoint
* 3、必须throws Throwable
*/
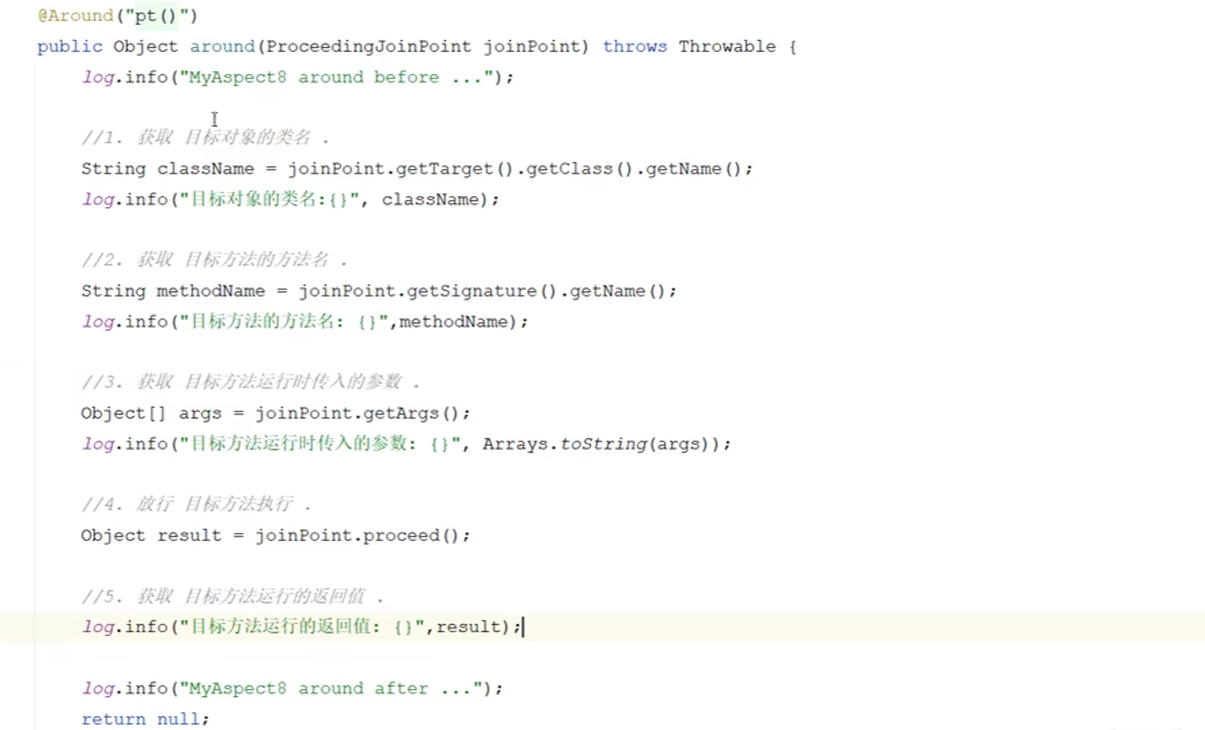
@Around("pointcut()")
public Object around(ProceedingJoinPoint point)throws Throwable{
System.out.println("这是环绕通知之前的部分");
Object object = point.proceed();
System.out.println("这是环绕通知之后的部分");
return object;
}
//异常通知
@AfterThrowing("pointcut()")
public void afterException(){
System.out.println("异常通知");
}
//后置通知
@After("pointcut()")
public void after(){
System.out.println("这是后置通知");
}
}
<!--applicationAnnoProxy.xml-->
<bean id="userDao" class="com.xiaohuang.srpingAop.UserDaoImpl1"/>
<bean id="AnnoAspect" class="com.xiaohuang.srpingAop.AnnoAspect"/>
<!--开启注解的自动代理-->
<aop:aspectj-autoproxy/>
//测试类
public class TestAnno {
    public static void main(String[] args) {
        ApplicationContext context = new
                ClassPathXmlApplicationContext("applicationAnnoProxy.xml");
        UserDao1 userDao = context.getBean("userDao", UserDao1.class);
        userDao.delete();
        System.out.println();
        userDao.insert();
        System.out.println();
        userDao.select();
        System.out.println();
        userDao.update();
    }
}
结果和XML方式一样
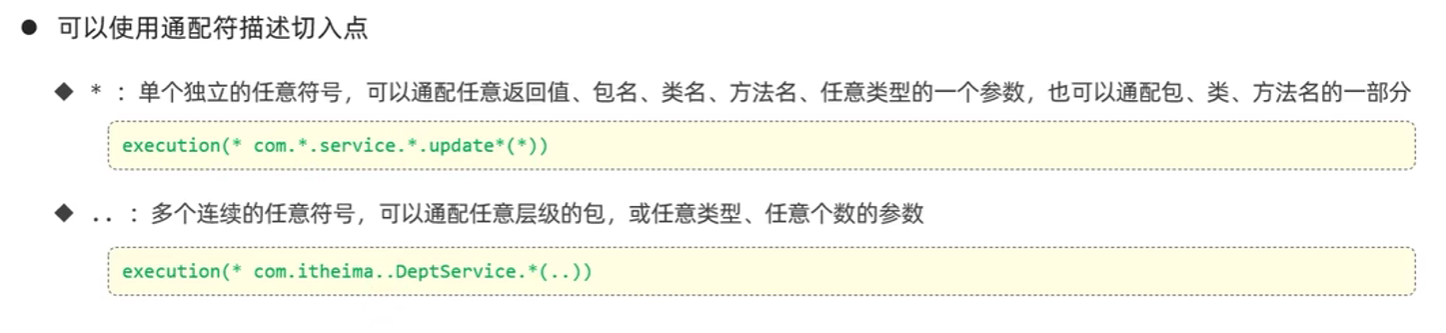
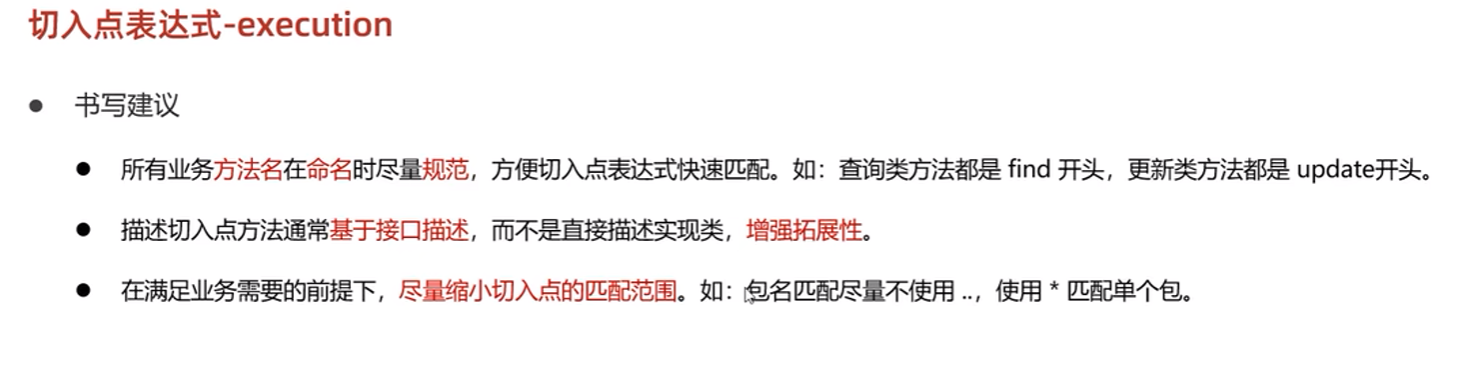
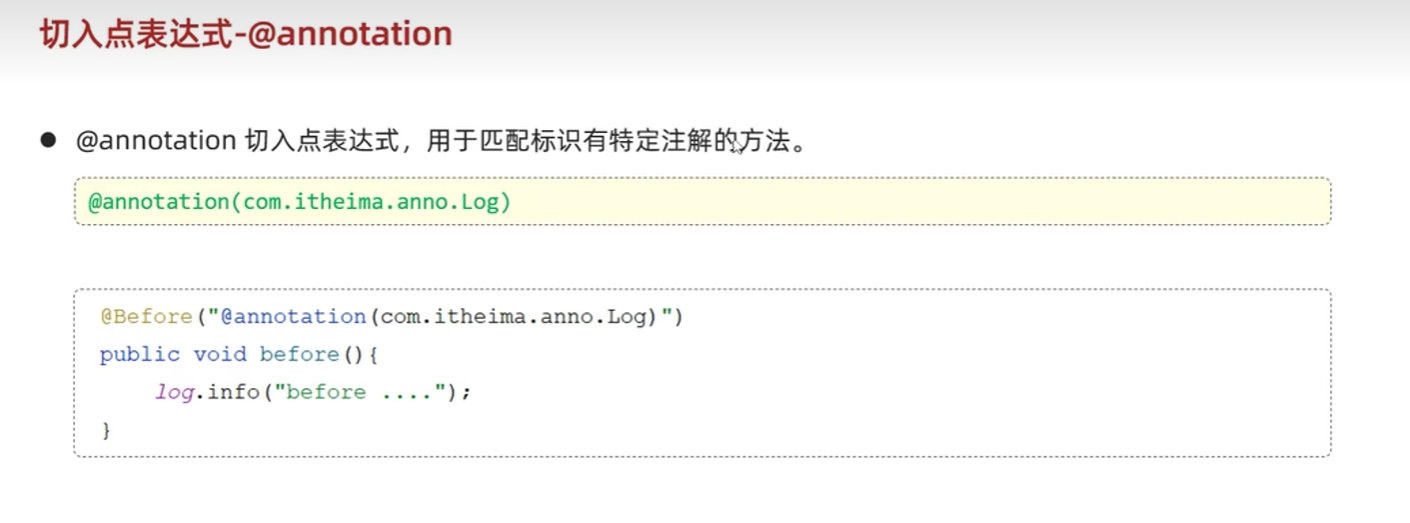
切入点表达式详解
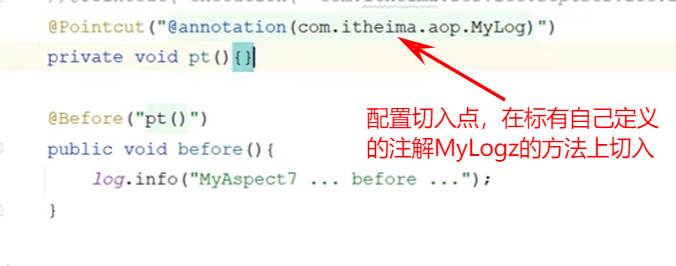
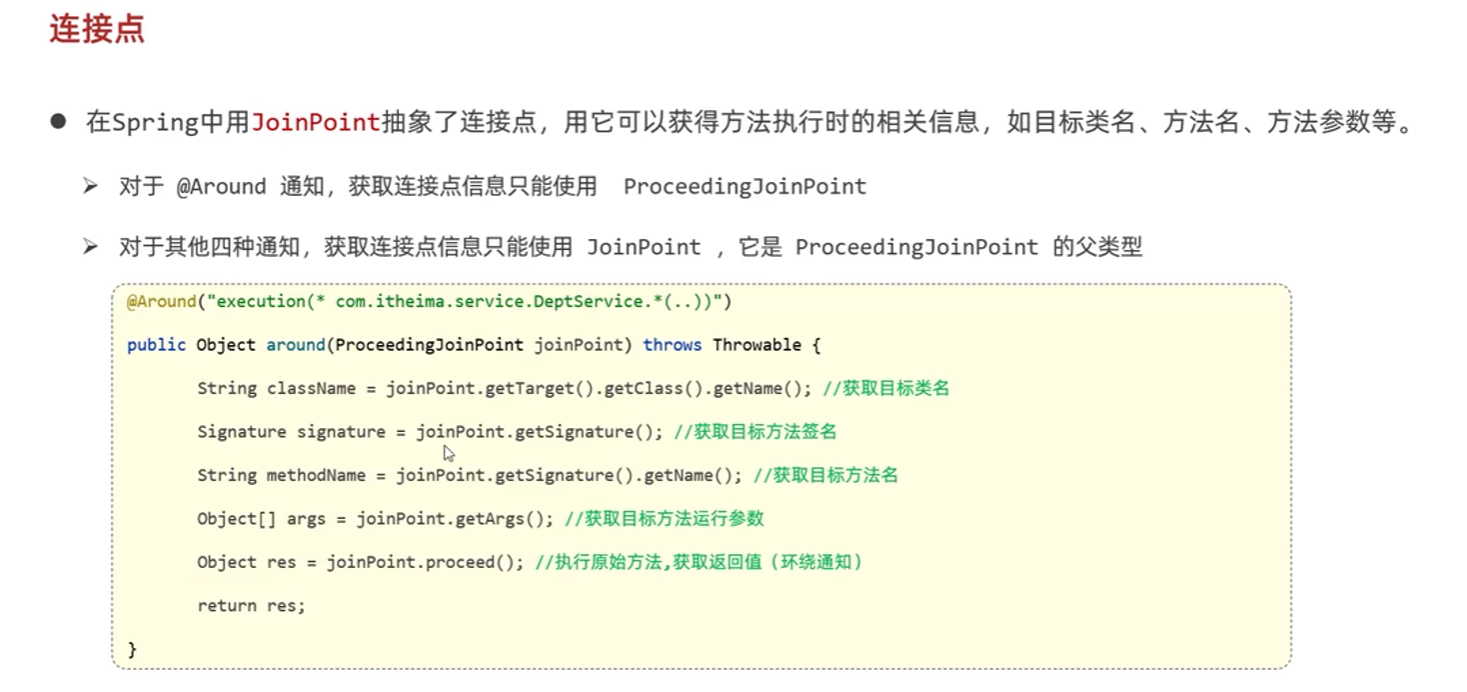
连接点
第四章:Spring的数据库编程
一、Spring JDBC
数据库用于处理持久化业务产生的数据,应用程序在运行过程中经常要操作数据库。一般情况下,数据库的操作由持久层来实现。作为扩展性较强的一站式开发框架,Spring也提供了持久层Spring JDBC:功能,Spring JDBC可以管理数据库连接资源,简化传统JDBC的操作,进而提升程序数据库操作的效率。
1、jdbc Template 概述
针对数据库操作,Spring框架提供了JdbcTemplate类,JdbcTemplate是一个模板类,Spring JDBC中的更高层次的抽象类均在JdbcTemplate模板类的基础上创建。JdbcTemplate提供了操作数据库的基本方法,包括添加、删除、查询和更新。在操作数据库时,JdbcTemplate类简化了传统JDBC中的复杂步骤,这可以让开发人员将更多精力投入到业务逻辑中。
JdbcTemplate:类继承自抽象类JdbcAccessor,同时实现了JdbcOperations接口。抽象类JdbcAccessor提供了一些访问数据库时使用的公共属性,具体如下:
- DataSource:DataSource主要功能是获取数据库连接。在具体的数据操作中,它还提供对数据库连接的缓冲池和分布式事务的支持。
- SQLExceptionTranslator:SQLExceptionTranslator是一个接口,它负责对SQLException异常进行转译工作。
针对数据库操作,Spring框架提供了JdbcTemplate:类,JdbcTemplate是一个模板类,Spring JDBC中的更高层次的抽象类均在JdbcTemplate模板类的基础上创建。JdbcTemplate类提供了操作数据库的基本方法,包括添加、删除、查询和更新。在操作数据库时JdbcTemplate类简化了传统JDBC中的复杂步骤,这可以让开发人员将更多精力投入到业务逻辑中。
2、Spring JDBC 的配置
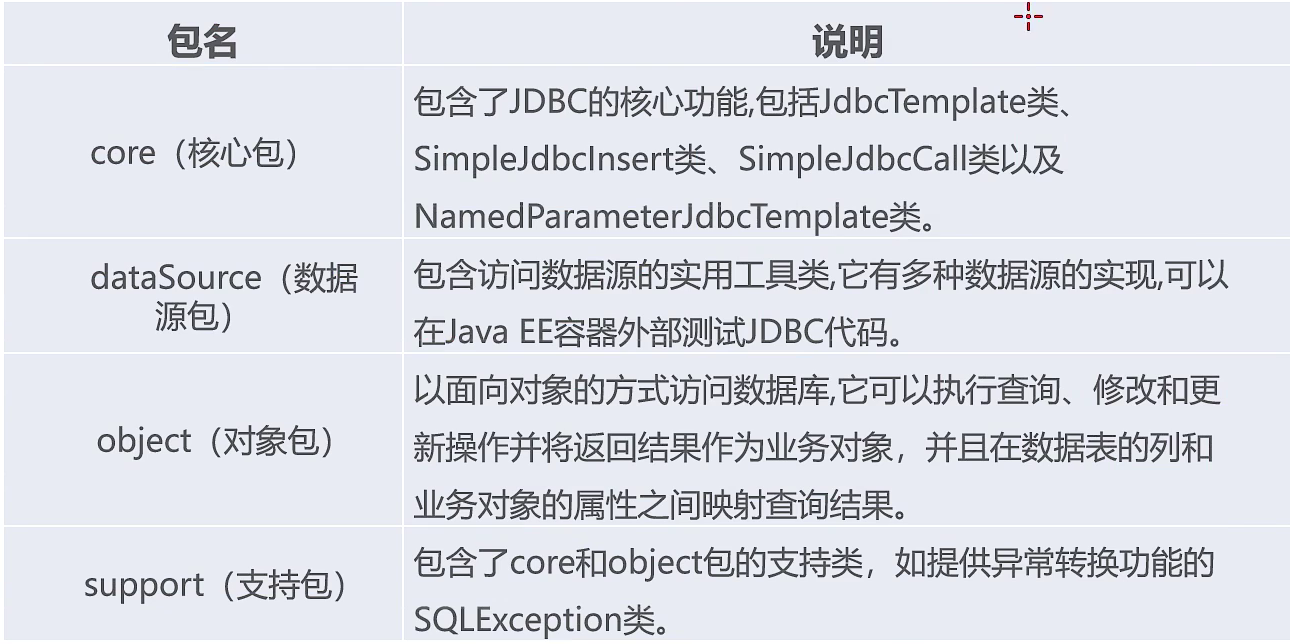
- Spring JDBC 中的4个包说明
- Spring JDBC 依赖
<!--       springJdbc配置         -->
<dependency>
    <groupId>org.springframework</groupId>
    <artifactId>spring-aop</artifactId>
    <version>5.2.8.RELEASE</version>
</dependency>
<dependency>
    <groupId>org.springframework</groupId>
    <artifactId>spring-jdbc</artifactId>
    <version>5.2.10.RELEASE</version>
</dependency>
<dependency>
    <groupId>org.springframework</groupId>
    <artifactId>spring-tx</artifactId>
    <version>5.2.10.RELEASE</version>
</dependency>
- Spring JDBC数据源
<!--1、配置数据源-->
<bean id="dataSource" class="org.springframework.jdbc.datasource.DriverManagerDataSource">
<!--数据库驱动-->
<property name="driverClassName" value="com.mysql.cj.jdbc.Driver"/>
<!--连接数据库的url-->
<property name="url" value="jdbc:mysql://localhost/spring?useUnicode=true&
characterEniding=utf-8&serverTimezone=Asia/Shanghai&useSSL=false"/>
<!--连接数据库的用户名-->
<property name="username" value="root"/>
<!--连接数据库的密码-->
<property name="password" value="root"/>
</bean>
- 配置JDBC模板:默认必须使用数据源
<!--2、配置JDBC模板-->
<bean id="jdbcTemplate" class="org.springframework.jdbc.core.JdbcTemplate">
    <!--默认必须使用数据源-->
    <property name="dataSource" ref="dataSource"/>
</bean>
- 配置事务管理器,依赖于数据源
<!--3、配置事务管理器,依赖于数据源-->
<bean id="transactionManager" class="
        org.springframework.jdbc.datasource.DataSourceTransactionManager">
    <property name="dataSource" ref="dataSource"/>
</bean>
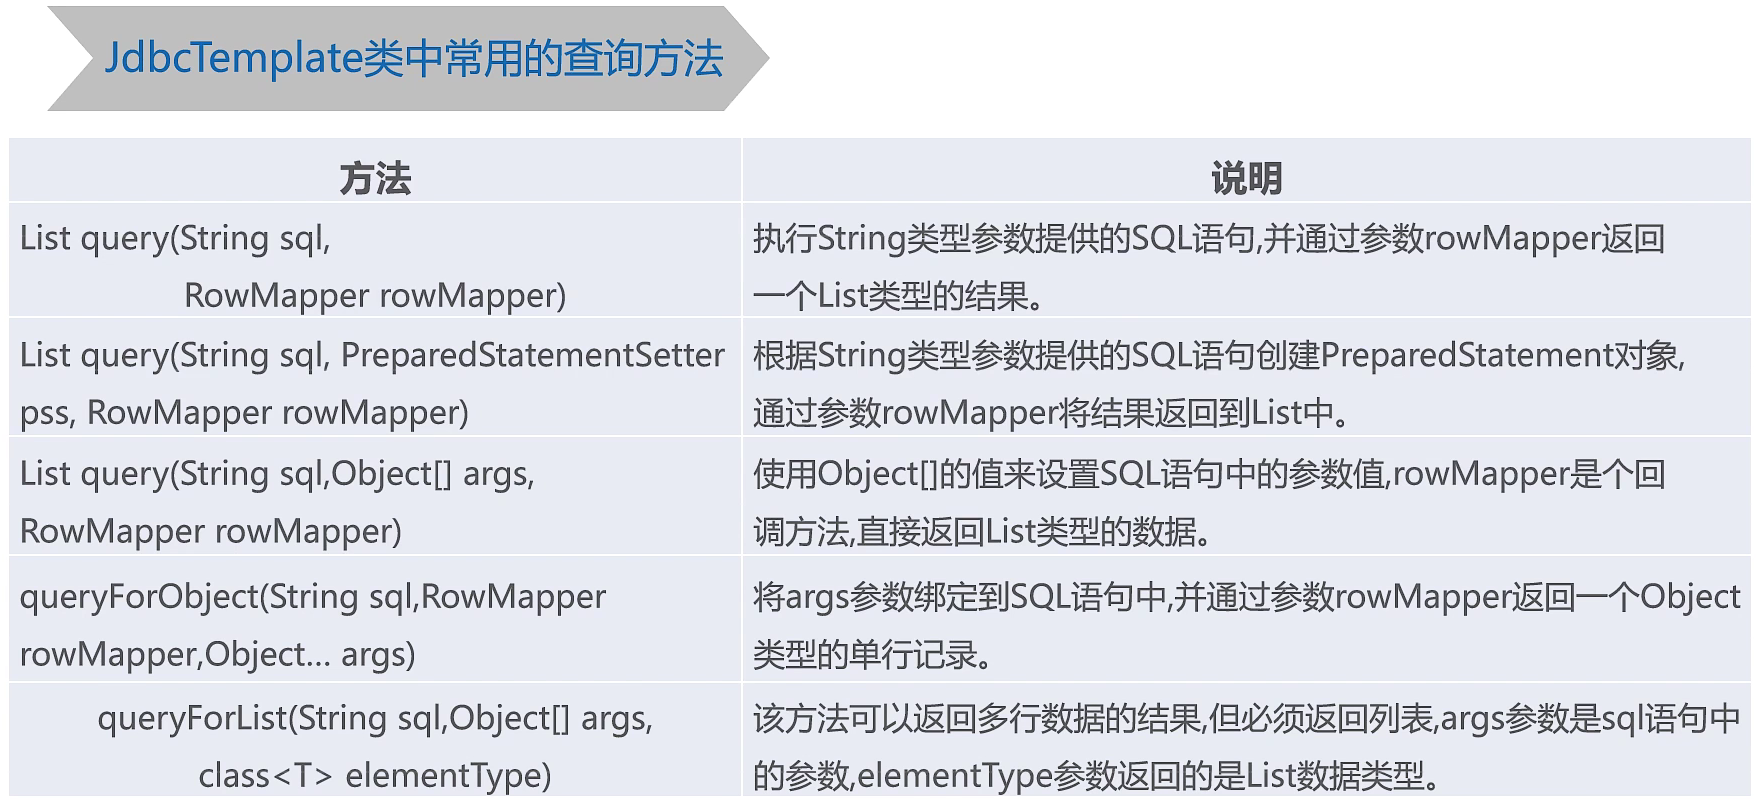
二、Jdbc Template的常用方法
1、execute()方法
ApplicationContext applicationContext =
        new ClassPathXmlApplicationContext("applicationContextJDBC.xml");
JdbcTemplate jdbcTemplate = (JdbcTemplate)applicationContext.getBean("jdbcTemplate");

@Test
public  void execute() {    //建表方法
    jdbcTemplate.execute("create table account(" +
            "id int primary key auto_increment," +
            "username varchar(50)," +
            "balance double)");
    System.out.println("账户account创建成功");
}
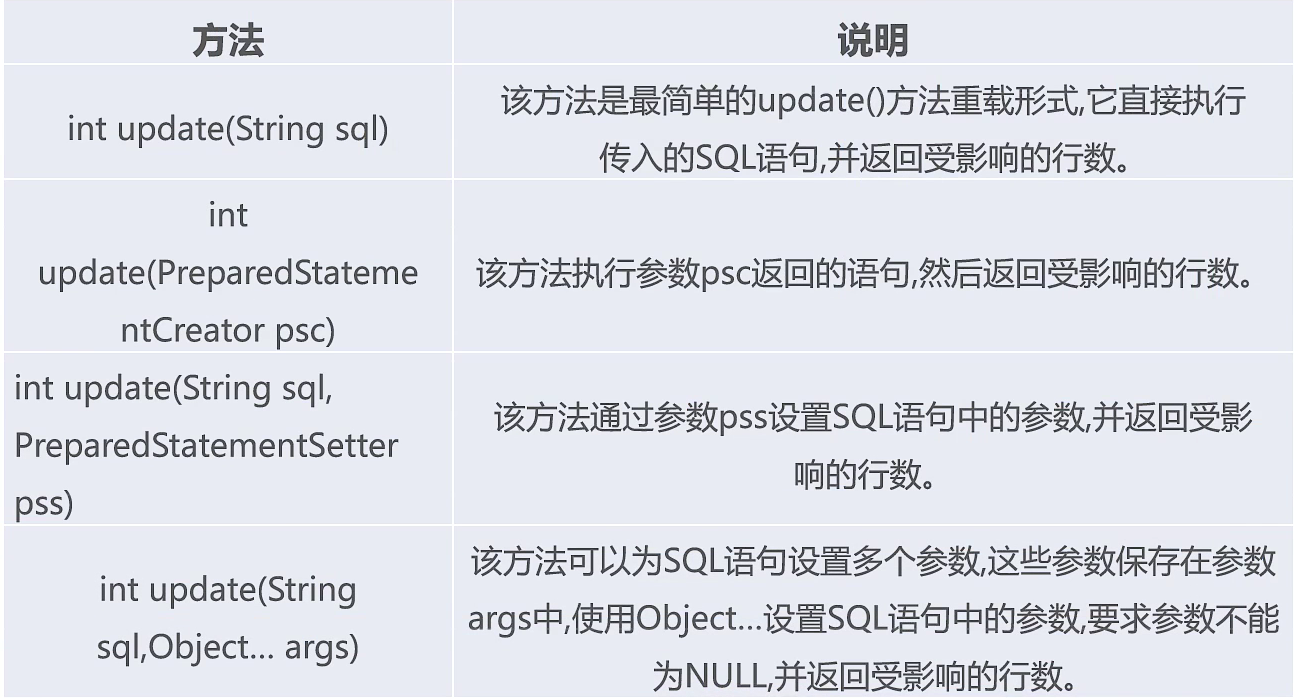
2、update()方法
ApplicationContext applicationContext =
        new ClassPathXmlApplicationContext("applicationContextJDBC.xml");
JdbcTemplate jdbcTemplate = (JdbcTemplate)applicationContext.getBean("jdbcTemplate");

@Test
public void insert(){   //插入方法
    Account account = new Account();
    account.setUsername("小黄");
    account.setBalance(99.5);
    Object[] obj =new  Object[]{
            account.getUsername(),
            account.getBalance()
    };
    String sql = "insert into account(username,balance) value(?,?)";
    System.out.println(jdbcTemplate.update(sql,obj));
}
@Test
public void update(){   //修改方法
    Account account = new Account();
    account.setUsername("小朱");
    account.setBalance(100.00);
    account.setId(2);
    Object[] obj =new  Object[]{
            account.getUsername(),
            account.getBalance(),
            account.getId()
    };
    String sql = "update account set username=?,balance=? where id=?";
    System.out.println(jdbcTemplate.update(sql,obj));
}
@Test
public void delete(){   //删除方法
    Account account = new Account();
    account.setId(3);
    Object[] obj =new  Object[]{
            account.getId()
    };
    String sql = "delete from account where id=?";
    System.out.println(jdbcTemplate.update(sql,obj));
}
3、query()方法
ApplicationContext applicationContext =
        new ClassPathXmlApplicationContext("applicationContextJDBC.xml");
JdbcTemplate jdbcTemplate = (JdbcTemplate)applicationContext.getBean("jdbcTemplate");

@Test
public void selectList(){   //无条件查询所有,返回List
    RowMapper<Account> rowMapper = new BeanPropertyRowMapper<Account>(Account.class);
    List<Account> accountList = new ArrayList<>();
    String sql = "select * from account";
     accountList= jdbcTemplate.query(sql,rowMapper);
    for (Account i: accountList) {
        System.out.println(i);
    }
}
@Test
public void select1(){   //多参数查询,返回List
    RowMapper<Account> rowMapper = new BeanPropertyRowMapper<Account>(Account.class);
    List<Account> accountList = new ArrayList<>();
    Object[] obj = new Object[]{
            1,
            "小黄"
    };
    String sql = "select * from account where id=? and username=?";
    accountList= jdbcTemplate.query(sql,obj,rowMapper);
    System.out.println(accountList);
}
@Test
//单个参数查询,返回指定类型,比如这个指定返回Account,而不是Account集合
public void select2(){
    RowMapper rowMapper = new BeanPropertyRowMapper(Account.class);
    Account account = new Account();
    Object[] obj = new Object[]{
            1
    };
    String sql = "select * from account where id=?";
    account= (Account) jdbcTemplate.queryForObject(sql,obj,rowMapper);
    System.out.println(account);
}
三、Spring 事务管理概述
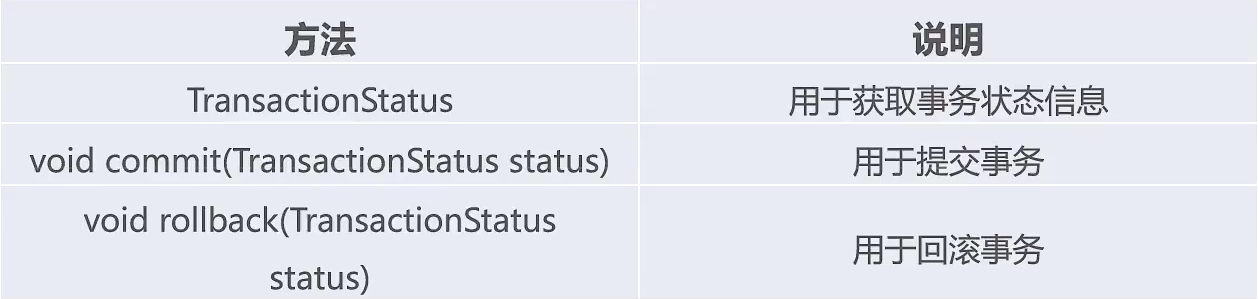
1、事务管理的核心接口
spring-tx-5.2.8.RELEAS依赖包的3个接口**
-
PlatformTransactionManager接口:可以根据属性管理事务。
-
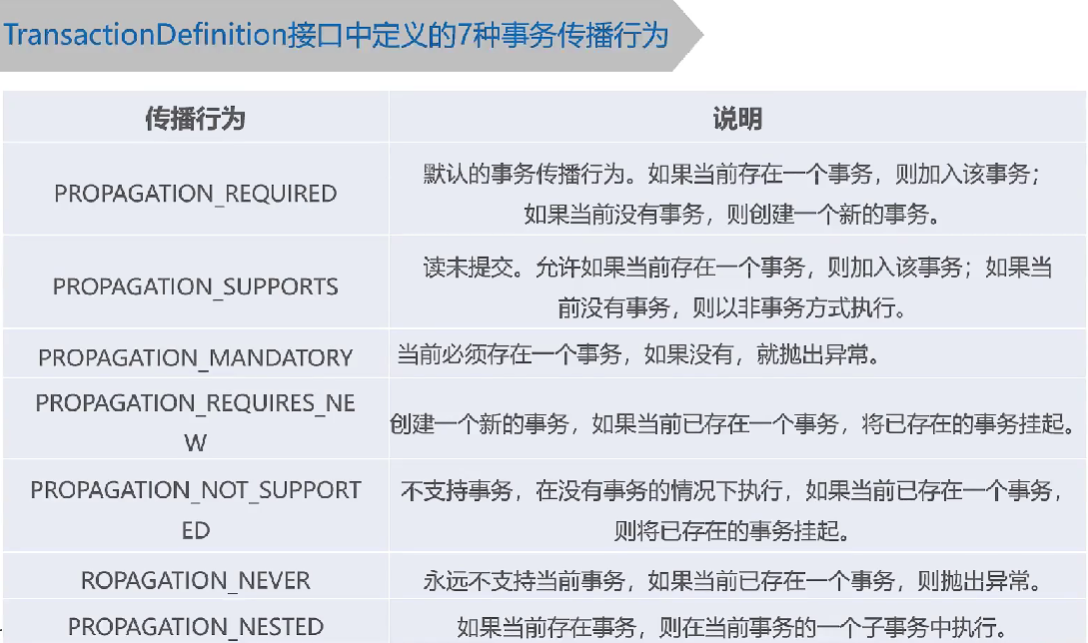
TransactionDefinition:接口:用于定义事务的属性。

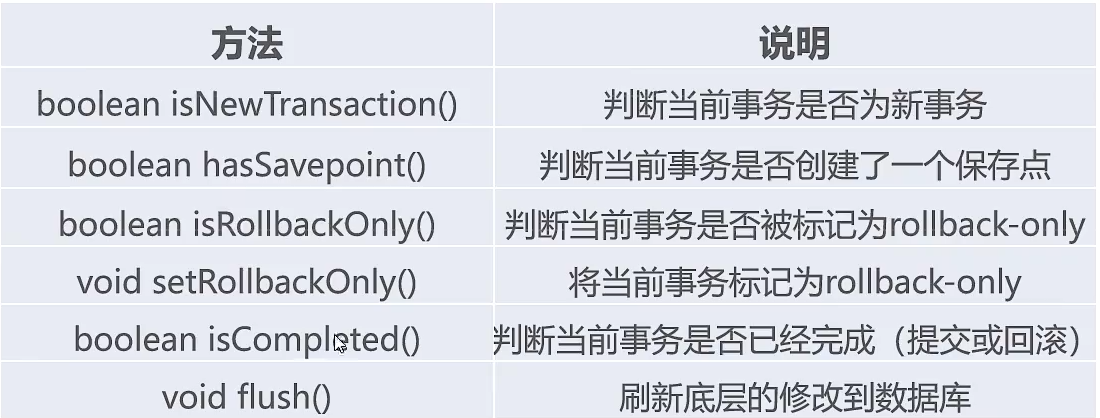
-
TransactionStatus接口:用于界定事务的状态。
2、事务管理的方式
Spring中的事务管理分为两种方式,一种是传统的编程式事务管理,另一种是声明式
事务管理。
编程式事务管理:通过编写代码实现的事务管理,包括定义事务的开始、正常执行后的
事务提交和异常时的事务回滚。
声明式事务管理:通过AOP技术实现的事务管理,其主要思想是将事务管理作为一个
”切面”代码单独编写,然后通过AOP技术将事务管理的“切面”代码植入到业务目标类中。
四、声明式事务管理
导入依赖
<!--           事务管理依赖包              -->
<dependency>
    <groupId>org.aspectj</groupId>
    <artifactId>aspectjweaver</artifactId>
    <version>1.9.6</version>
</dependency>
<dependency>
    <groupId>aopalliance</groupId>
    <artifactId>aopalliance</artifactId>
    <version>1.0</version>
</dependency>
1、基于XML方式的声明事务
基于XML方式的声明式事务管理是通过在配置文件中配置事务规呗则的相关声明来实现
的。在使用XML文件配置声明式事务管理时,首先要引入tx命名空间,在引入tx命名空间之
后,可以使用tx:advice元素来配置事务管理的通知,进而通过Spring AOP实现事务管理.配置tx:advice元素时,通常需要指定id和transaction-manager属性,其中,id属性是配置文件中的唯一标识,transaction-manager属性用于指定事务管理器。除此,之外,tx:advice元素还包含子元素tx:attributes,tx:attributes元素可配置多个tx:method子元素,tx:method子元素主要用于配置事务的属性。

实例:模拟两个用户转账,就要执行两条SQL语句,要求两条SQL语句要么都执行成功,要么都失败不执行,用int i = 1/0;模拟执行时出现异常。当出现异常时结果报java.lang.ArithmeticException: / by zero
配置Xml文件
<?xml version="1.0" encoding="UTF-8"?>
<beans xmlns="http://www.springframework.org/schema/beans"
xmlns:xsi="http://www.w3.org/2001/XMLSchema-instance"
xmlns:aop="http://www.springframework.org/schema/aop"
xmlns:tx="http://www.springframework.org/schema/tx"
xmlns:context="http://www.springframework.org/schema/context"
xsi:schemaLocation="http://www.springframework.org/schema/beans
http://www.springframework.org/schema/beans/spring-beans.xsd
http://www.springframework.org/schema/context
http://www.springframework.org/schema/context/spring-context.xsd
http://www.springframework.org/schema/aop
https://www.springframework.org/schema/aop/spring-aop.xsd
http://www.springframework.org/schema/tx
http://www.springframework.org/schema/tx/spring-tx.xsd">
<!--1、配置数据源-->
<bean id="dataSource" class="org.springframework.jdbc.datasource.DriverManagerDataSource">
<!--数据库驱动-->
<property name="driverClassName" value="com.mysql.cj.jdbc.Driver"/>
<!--连接数据库的url-->
<property name="url" value="jdbc:mysql://localhost/spring?useUnicode=true&
characterEniding=utf-8&serverTimezone=Asia/Shanghai&useSSL=false"/>
<!--连接数据库的用户名-->
<property name="username" value="root"/>
<!--连接数据库的密码-->
<property name="password" value="root"/>
</bean>
<!--2、配置JDBC模板-->
<bean id="jdbcTemplate" class="org.springframework.jdbc.core.JdbcTemplate">
<!--默认必须使用数据源-->
<property name="dataSource" ref="dataSource"/>
</bean>
<!--3、配置事务管理器,依赖于数据源-->
<bean id="transactionManager" class="
org.springframework.jdbc.datasource.DataSourceTransactionManager">
<property name="dataSource" ref="dataSource"/>
</bean>
********** 基于XML方式声明事务 ************
<!--4、编写通知,对事务进行增强,需要编写切入点和具体执行事务的细节-->
<tx:advice id="txAdbice" transaction-manager="transactionManager">
<tx:attributes>
<!--name:* 表示任意方法名称-->
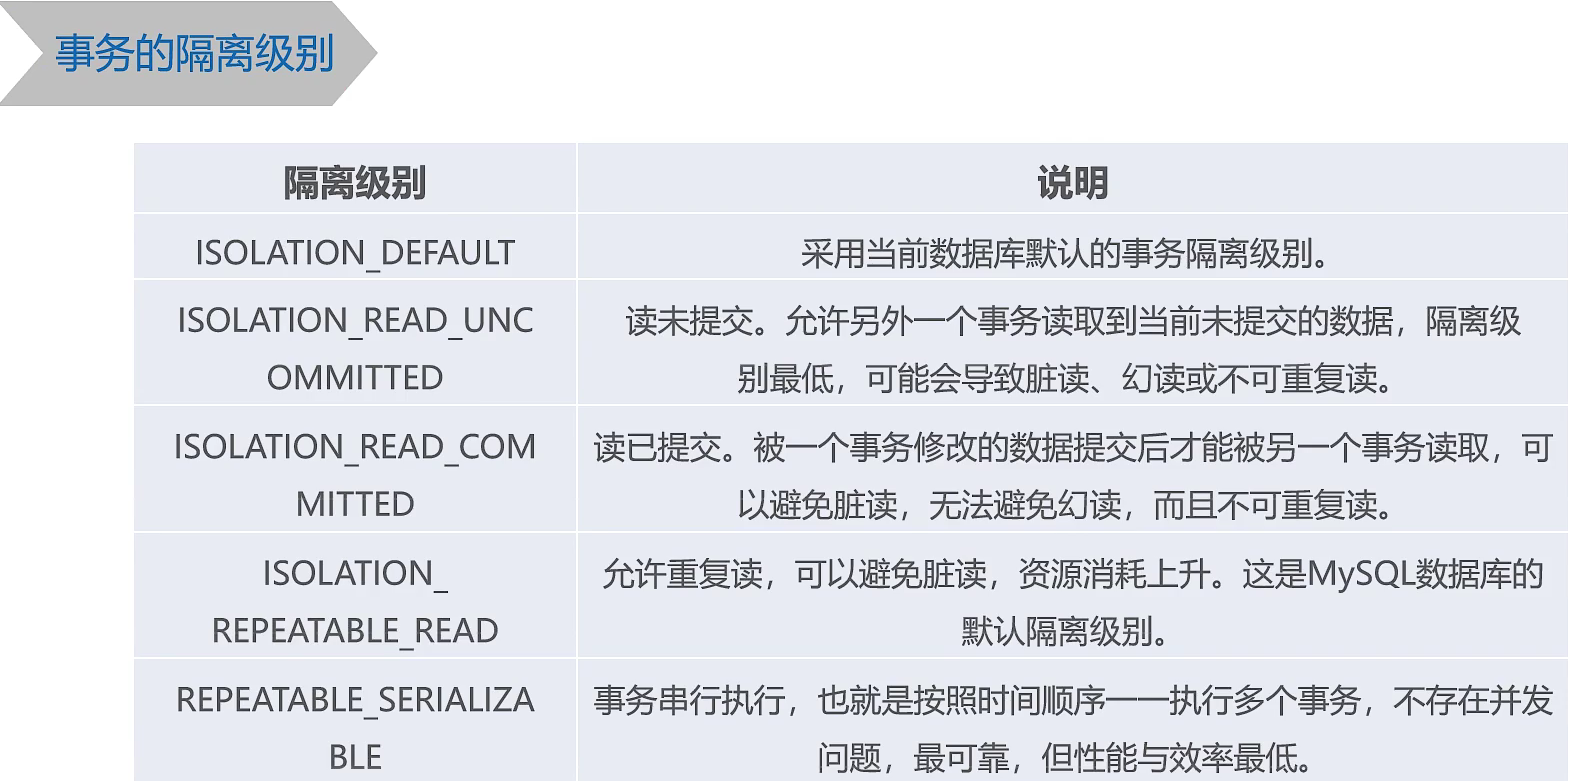
<tx:method name="*" propagation="REQUIRED"
isolation="DEFAULT" read-only="false"/>
</tx:attributes>
</tx:advice>
<!--5、编写AOP,让Spring自动为目标生成代理,需要使用AspectJ表达式-->
<aop:config>
<!--配置切入点-->
<aop:pointcut id="txPointCut"
expression="execution(* com.xiaohuang.srpingAop.*.*(..))"/>
<!--切面:将切入点与通知整合-->
<aop:advisor advice-ref="txAdbice" pointcut-ref="txPointCut"/>
</aop:config>
<!--为accountDao配置Bean-->
<bean id="accountDao" class="com.xiaohuang.srpingAop.AccountDaoImpl">
<!--将jdbcTemplate注入到accountDao实例中-->
<property name="jdbcTemplate" ref="jdbcTemplate"/>
</bean>
</beans>
AccountDao接口
public interface AccountDao {
    public void transfer(String outUser,String inUser,Double money);
}
实现AccountDao接口的AccountDaoImpl类
public class AccountDaoImpl implements AccountDao {
    private JdbcTemplate jdbcTemplate;

    public void transfer(String outUser,String inUser,Double money){
        this.jdbcTemplate.update("update account set balance = balance + ?" +
                "where  username = ?",money,inUser);
        int i = 1/0;
        this.jdbcTemplate.update("update account set balance = balance - ?" +
                "where  username = ?",money,outUser);
    }

    public JdbcTemplate getJdbcTemplate() {
        return jdbcTemplate;
    }

    public void setJdbcTemplate(JdbcTemplate jdbcTemplate) {
        this.jdbcTemplate = jdbcTemplate;
    }
}
测试方法
ApplicationContext applicationContext =
        new ClassPathXmlApplicationContext("applicationContextJDBC.xml");
JdbcTemplate jdbcTemplate = (JdbcTemplate)applicationContext.getBean("jdbcTemplate");

@Test
public void TransactionTest(){
    //创建AccountDao实例
    AccountDao accountDao =
            (AccountDao)applicationContext.getBean("accountDao");
    //调用实例中的转账方法
    accountDao.transfer("小琪","小安",100.0);
}
2、基于注解方式声明事务
实例
配置XML文件
<?xml version="1.0" encoding="UTF-8"?>
<beans xmlns="http://www.springframework.org/schema/beans"
xmlns:xsi="http://www.w3.org/2001/XMLSchema-instance"
xmlns:aop="http://www.springframework.org/schema/aop"
xmlns:tx="http://www.springframework.org/schema/tx"
xmlns:context="http://www.springframework.org/schema/context"
xsi:schemaLocation="http://www.springframework.org/schema/beans
http://www.springframework.org/schema/beans/spring-beans.xsd
http://www.springframework.org/schema/context
http://www.springframework.org/schema/context/spring-context.xsd
http://www.springframework.org/schema/aop
https://www.springframework.org/schema/aop/spring-aop.xsd
http://www.springframework.org/schema/tx
http://www.springframework.org/schema/tx/spring-tx.xsd">
<!--1、配置数据源-->
<bean id="dataSource" class="org.springframework.jdbc.datasource.DriverManagerDataSource">
<!--数据库驱动-->
<property name="driverClassName" value="com.mysql.cj.jdbc.Driver"/>
<!--连接数据库的url-->
<property name="url" value="jdbc:mysql://localhost/spring?useUnicode=true&
characterEniding=utf-8&serverTimezone=Asia/Shanghai&useSSL=false"/>
<!--连接数据库的用户名-->
<property name="username" value="root"/>
<!--连接数据库的密码-->
<property name="password" value="root"/>
</bean>
<!--2、配置JDBC模板-->
<bean id="jdbcTemplate" class="org.springframework.jdbc.core.JdbcTemplate">
<!--默认必须使用数据源-->
<property name="dataSource" ref="dataSource"/>
</bean>
<!--3、配置事务管理器,依赖于数据源-->
<bean id="transactionManager" class="
org.springframework.jdbc.datasource.DataSourceTransactionManager">
<property name="dataSource" ref="dataSource"/>
</bean>
<!--********** 基于注解方式声明事务 ************-->
<tx:annotation-driven transaction-manager="transactionManager"/>
<!--为accountDao配置Bean-->
<bean id="accountDao" class="com.xiaohuang.srpingAop.AccountDaoImpl">
<!--将jdbcTemplate注入到accountDao实例中-->
<property name="jdbcTemplate" ref="jdbcTemplate"/>
</bean>
</beans>
实现AccountDao接口的AccountDaoImpl类
public class AccountDaoImpl implements AccountDao {
private JdbcTemplate jdbcTemplate;
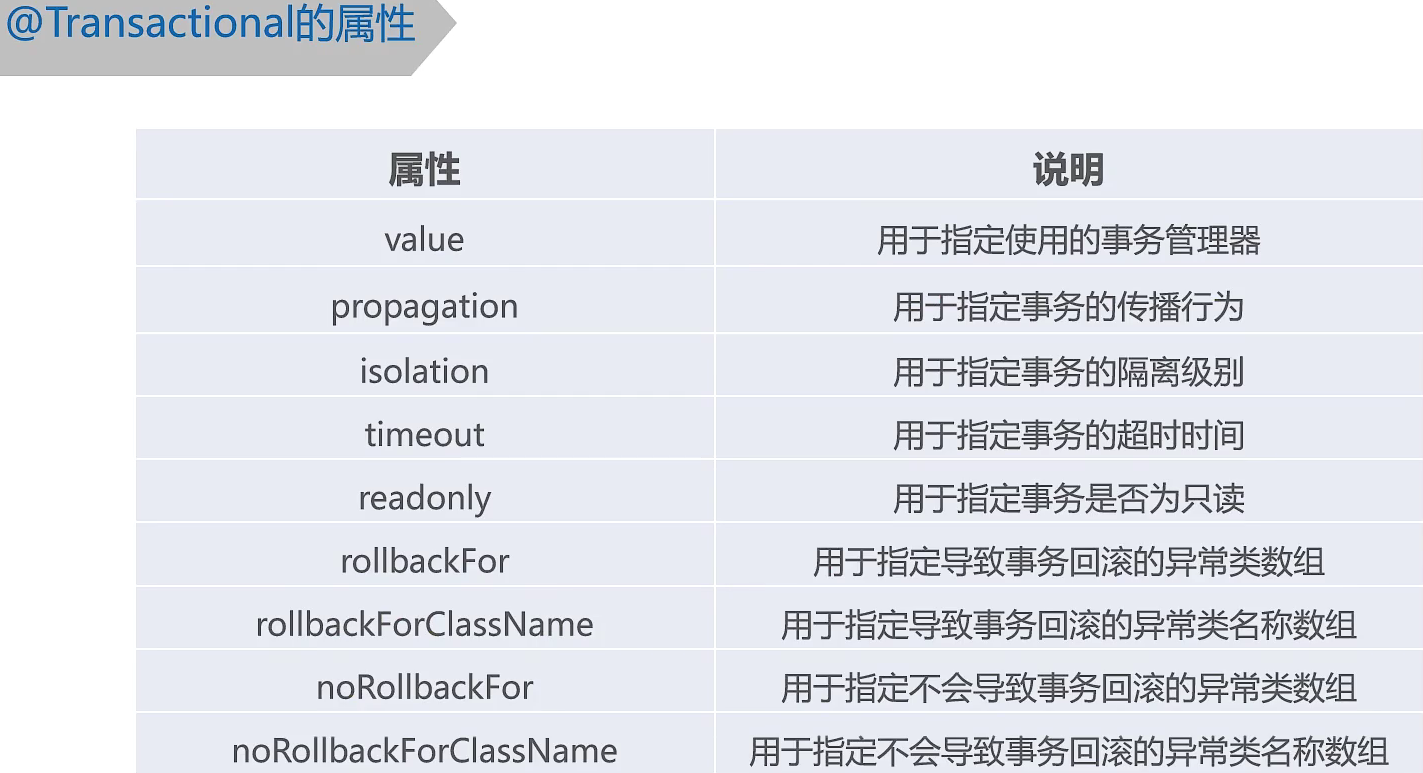
@Transactional(propagation = Propagation.REQUIRED,
isolation = Isolation.DEFAULT,readOnly = false)
public void transfer(String outUser,String inUser,Double money){
this.jdbcTemplate.update("update account set balance = balance + ?" +
"where username = ?",money,inUser);
int i = 1/0;
this.jdbcTemplate.update("update account set balance = balance - ?" +
"where username = ?",money,outUser);
}
public JdbcTemplate getJdbcTemplate() {
return jdbcTemplate;
}
public void setJdbcTemplate(JdbcTemplate jdbcTemplate) {
this.jdbcTemplate = jdbcTemplate;
}
}
测试方法
ApplicationContext applicationContext =
        new ClassPathXmlApplicationContext("applicationContextJDBC.xml");
JdbcTemplate jdbcTemplate = (JdbcTemplate)applicationContext.getBean("jdbcTemplate");

@Test
public void TransactionTest(){
    //创建AccountDao实例
    AccountDao accountDao =
            (AccountDao)applicationContext.getBean("accountDao");
    //调用实例中的转账方法
    accountDao.transfer("小琪","小安",100.0);
}
小技巧
- 因为idea默认的下载位置下载慢或下载不了问题,导致依赖包没法加载,可以把settings.xml文件中的下载路径该为阿里云。settings.xml在安装路径下找,我的安装目录是名为IntelliJ IDEA 2020.1,如:D:\idea的安装目录的上一级\IntelliJ IDEA 2020.1\plugins\maven\lib\maven3\conf\setings.xml ,找到profile
 <profile>
        <id>jdk-1.8</id>
        <activation>
            <activeByDefault>true</activeByDefault>
            <jdk>1.8</jdk>
        </activation>
        <properties>
            <maven.compiler.source>1.8</maven.compiler.source>
            <maven.compiler.target>1.8</maven.compiler.target>
            <maven.compiler.compilerVersion>1.8</maven.compiler.compilerVersion>
        </properties>
    </profile>
 <mirrors>
      <mirror>
          <id>alimaven</id>
          <name>aliyun maven</name>
            <url>http://maven.aliyun.com/nexus/content/groups/public/</url>
          <mirrorOf>central</mirrorOf>
      </mirror>
  </mirrors>


【推荐】国内首个AI IDE,深度理解中文开发场景,立即下载体验Trae
【推荐】编程新体验,更懂你的AI,立即体验豆包MarsCode编程助手
【推荐】抖音旗下AI助手豆包,你的智能百科全书,全免费不限次数
【推荐】轻量又高性能的 SSH 工具 IShell:AI 加持,快人一步
· TypeScript + Deepseek 打造卜卦网站:技术与玄学的结合
· 阿里巴巴 QwQ-32B真的超越了 DeepSeek R-1吗?
· 【译】Visual Studio 中新的强大生产力特性
· 10年+ .NET Coder 心语 ── 封装的思维:从隐藏、稳定开始理解其本质意义
· 【设计模式】告别冗长if-else语句:使用策略模式优化代码结构