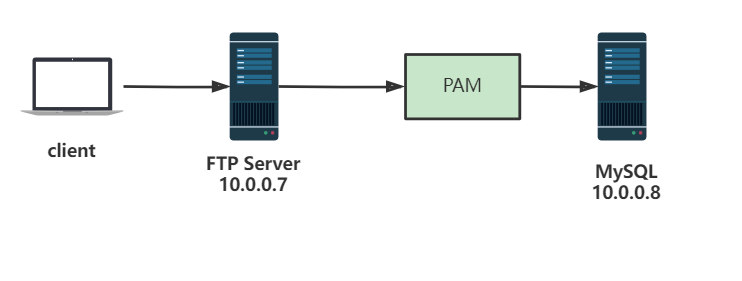
一、配置mysql服务器
1.1 安装mysql
# yum -y install mariadb-server
# systemctl enable --now mariadb.service && systemctl status
1.2 创建数据库支持vsftpd服务
#1创建用于存储虚拟用户的数据库和表
MariaDB [(none)]> create database vsftpd;
MariaDB [vsftpd]> show databases;
+--------------------+
| Database           |
+--------------------+
| information_schema |
| mysql              |
| performance_schema |
| vsftpd             |
+--------------------+
4 rows in set (0.000 sec)
MariaDB [(none)]> use vsftpd
MariaDB [vsftpd]> create table users(id int auto_increment not null primary key,name char(50) binary not null,password char(48) binary not null);
MariaDB [vsftpd]> show tables;
+------------------+
| Tables_in_vsftpd |
+------------------+
| users            |
+------------------+
1 row in set (0.001 sec)

#2添加虚拟用户
MariaDB [vsftpd]> insert into users(name,password) values('xiaoming',password('123456'));
Query OK, 1 row affected (0.002 sec)
MariaDB [vsftpd]> insert into users(name,password) values('xiaohong',password('654321'));
Query OK, 1 row affected (0.004 sec)
MariaDB [vsftpd]> select * from users;
+----+----------+-------------------------------------------+
| id | name     | password                                  |
+----+----------+-------------------------------------------+
|  1 | xiaoming | *6BB4837EB74329105EE4568DDA7DC67ED2CA2AD9 |
|  2 | xiaohong | *2A032F7C5BA932872F0F045E0CF6B53CF702F2C5 |
+----+----------+-------------------------------------------+
2 rows in set (0.001 sec)

#3创建连接数据库的账号
MariaDB [(none)]> grant select on vsftpd.* to vsftpd@'10.0.0.%' identified by "123456";
MariaDB [(none)]> flush privileges;
Query OK, 0 rows affected (0.000 sec)
二、配置FTP服务器
2.1安装vsftpd
# yum -y install vsftpd
2.2 编译安装pam_mysq
# yum -y install vsftpd gcc gcc-c++ make mariadb-devel pam-devel
# wget http://prdownloads.sourceforge.net/pam-mysql/pam_mysql-0.7RC1.tar.gz
# tar xvf pam_mysql-0.7RC1.tar.gz
# cd pam_mysql-0.7RC1/
# ./configure --with-pam-mods-dir=/lib64/security
# make install
# ll /lib64/security/pam_mysql*
-rwxr-xr-x 1 root root    882 Dec 25 22:14 /lib64/security/pam_mysql.la
-rwxr-xr-x 1 root root 141712 Dec 25 22:14 /lib64/security/pam_mysql.so
2.3 创建pam认证所需文件
# cat > /etc/pam.d/vsftpd.mysql << EOF
auth required pam_mysql.so user=vsftpd passwd=123456 host=10.0.0.8 db=vsftpd table=users usercolumn=name passwdcolumn=password crypt=2
account required pam_mysql.so user=vsftpd passwd=123456 host=10.0.0.8 db=vsftpd table=users usercolumn=name passwdcolumn=password crypt=2
EOF
2.4 创建系统用户
# useradd -r -s /sbin/nologin -d /data/ftproot  vuser
# mkdir -pv /data/ftproot/upload
# setfacl -m u:vuser:rwx /data/ftproot/upload
2.5 修改vsftpd配置文件
# vi /etc/vsftpd/vsftpd.conf

guest_enable=YES        #所有系统用户都映射成guest用户
guest_username=vuser    #指定guest用户
pam_service_name=vsftpd.mysql    #添加pam模板
2.6 启动vsftpd服务
# systemctl enable --now vsftpd
三、测试
[root@client ~]#ftp 10.0.0.7
-bash: ftp: command not found
[root@client ~]#yum provides ftp
Loaded plugins: fastestmirror
Loading mirror speeds from cached hostfile
 * base: mirrors.cloud.tencent.com
 * epel: mirrors.cloud.tencent.com
 * extras: mirrors.cloud.tencent.com
ftp-0.17-67.el7.x86_64 : The standard UNIX FTP (File Transfer Protocol) client
Repo        : base
[root@client ~]#yum -y install ftp-0.17-67.el7.x86_64
[root@client ~]#ftp 10.0.0.7
Connected to 10.0.0.7 (10.0.0.7).
220 (vsFTPd 3.0.2)
Name (10.0.0.7:root): xiaoming
331 Please specify the password.
Password:  #123456
230 Login successful.
Remote system type is UNIX.
Using binary mode to transfer files.
#成功登录

[root@client ~]#ftp 10.0.0.7
Connected to 10.0.0.7 (10.0.0.7).
220 (vsFTPd 3.0.2)
Name (10.0.0.7:root): xiaohong
331 Please specify the password.
Password:  #654321
230 Login successful.
Remote system type is UNIX.
Using binary mode to transfer files.
ftp>
#成功登录


