shareJDBC+springboot 实现水平分库分表
1.分别创建两个数据库:db0 和 db1
2.每个库分别创建表:t_user0/t_user1
建表语句如下:两个表格式一致
CREATE TABLE `t_user0` (
  `id` bigint(20) NOT NULL,
  `name` varchar(64) DEFAULT NULL COMMENT '名称',
  `sex` tinyint(1) DEFAULT NULL COMMENT '性别',
  `create_time` timestamp NOT NULL DEFAULT CURRENT_TIMESTAMP ON UPDATE CURRENT_TIMESTAMP COMMENT '创建时间',
  PRIMARY KEY (`id`) USING BTREE
) ENGINE=InnoDB DEFAULT CHARSET=utf8 ROW_FORMAT=DYNAMIC;

CREATE TABLE `t_user1` (
  `id` bigint(20) NOT NULL,
  `name` varchar(64) DEFAULT NULL COMMENT '名称',
  `sex` tinyint(1) DEFAULT NULL COMMENT '性别',
  `create_time` timestamp NOT NULL DEFAULT CURRENT_TIMESTAMP ON UPDATE CURRENT_TIMESTAMP COMMENT '创建时间',
  PRIMARY KEY (`id`) USING BTREE
) ENGINE=InnoDB DEFAULT CHARSET=utf8 ROW_FORMAT=DYNAMIC;
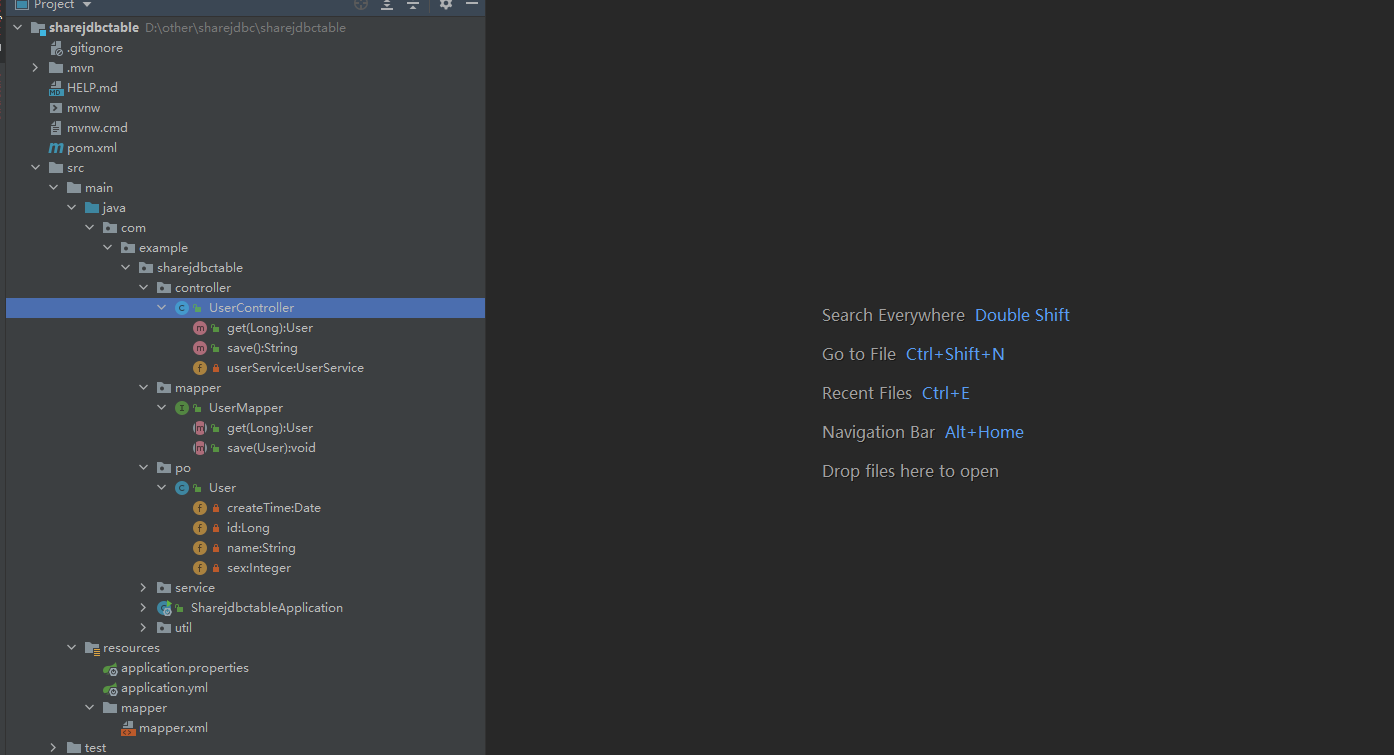
3.建立是springboot项目如下:
4.pom依赖如下:
    <properties>
        <java.version>1.8</java.version>
<!--        3.0.0版本分库失效-->
        <sharding.jdbc.version>3.1.0</sharding.jdbc.version>
        <mybatis.version>1.3.0</mybatis.version>
        <druid.version>1.1.10</druid.version>
        <mysql.version>8.0.19</mysql.version>
    </properties>
    <dependencies>
        <dependency>
            <groupId>org.springframework.boot</groupId>
            <artifactId>spring-boot-starter-web</artifactId>
        </dependency>

        <dependency>
            <groupId>org.springframework.boot</groupId>
            <artifactId>spring-boot-starter-test</artifactId>
            <scope>test</scope>
        </dependency>

        <dependency>
            <groupId>mysql</groupId>
            <artifactId>mysql-connector-java</artifactId>
        </dependency>
        <dependency>
            <groupId>org.mybatis.spring.boot</groupId>
            <artifactId>mybatis-spring-boot-starter</artifactId>
            <version>${mybatis.version}</version>
        </dependency>
        <dependency>
            <groupId>com.alibaba</groupId>
            <artifactId>druid</artifactId>
            <version>${druid.version}</version>
        </dependency>
        <dependency>
            <groupId>io.shardingsphere</groupId>
            <artifactId>sharding-jdbc-spring-boot-starter</artifactId>
        </dependency>
        <dependency>
            <groupId>org.projectlombok</groupId>
            <artifactId>lombok</artifactId>
            <optional>true</optional>
        </dependency>

    </dependencies>
5.yml 设置
mybatis:
  mapper-locations: classpath:mapper/*.xml

# 官网 https://shardingsphere.apache.org/document/current/cn/user-manual/shardingsphere-jdbc/usage/sharding/yaml/
sharding:
  jdbc:
    datasource:
      # 数据源ds0,ds1
      names: ds0,ds1
      ds0:
        type: com.alibaba.druid.pool.DruidDataSource
        driver-class-name: com.mysql.cj.jdbc.Driver
        url: jdbc:mysql://127.0.0.1:3306/db1?useSSL=false&serverTimezone=UTC
        username: root
        password: root
      ds1:
        type: com.alibaba.druid.pool.DruidDataSource
        driver-class-name: com.mysql.cj.jdbc.Driver
        url: jdbc:mysql://127.0.0.1:3306/db0?useSSL=false&serverTimezone=UTC
        username: root
        password: root
    config:
      sharding:
        props:
          sql.show: true
        tables:
          t_user:  #t_user表
            key-generator-column-name: id  #主键
            actual-data-nodes: ds${0..1}.t_user${0..1}    #数据节点,均匀分布
            # 分库策略
            databaseStrategy:
              inline:
                sharding-column: id
                algorithm-expression: ds${id % 2}  #按模运算分配
            table-strategy:  #分表策略
              inline: #行表达式
                sharding-column: sex
                algorithm-expression: t_user${sex % 2}  #按模运算分配
6.雪花算法工具类
public class SnowflakeIdWorker {

    // ==============================Fields===========================================
    /**
     * 开始时间截 (2015-01-01)
     */
    private final long twepoch = 1420041600000L;

    /**
     * 机器id所占的位数
     */
    private final long workerIdBits = 5L;

    /**
     * 数据标识id所占的位数
     */
    private final long datacenterIdBits = 5L;

    /**
     * 支持的最大机器id,结果是31 (这个移位算法可以很快的计算出几位二进制数所能表示的最大十进制数)
     */
    private final long maxWorkerId = -1L ^ (-1L << workerIdBits);

    /**
     * 支持的最大数据标识id,结果是31
     */
    private final long maxDatacenterId = -1L ^ (-1L << datacenterIdBits);

    /**
     * 序列在id中占的位数
     */
    private final long sequenceBits = 12L;

    /**
     * 机器ID向左移12位
     */
    private final long workerIdShift = sequenceBits;

    /**
     * 数据标识id向左移17位(12+5)
     */
    private final long datacenterIdShift = sequenceBits + workerIdBits;

    /**
     * 时间截向左移22位(5+5+12)
     */
    private final long timestampLeftShift = sequenceBits + workerIdBits + datacenterIdBits;

    /**
     * 生成序列的掩码,这里为4095 (0b111111111111=0xfff=4095)
     */
    private final long sequenceMask = -1L ^ (-1L << sequenceBits);

    /**
     * 工作机器ID(0~31)
     */
    private long workerId;

    /**
     * 数据中心ID(0~31)
     */
    private long datacenterId;

    /**
     * 毫秒内序列(0~4095)
     */
    private long sequence = 0L;

    /**
     * 上次生成ID的时间截
     */
    private long lastTimestamp = -1L;

    //==============================Constructors=====================================

    /**
     * 构造函数
     *
     * @param workerId     工作ID (0~31)
     * @param datacenterId 数据中心ID (0~31)
     */
    public SnowflakeIdWorker(long workerId, long datacenterId) {
        if (workerId > maxWorkerId || workerId < 0) {
            throw new IllegalArgumentException(String.format("worker Id can't be greater than %d or less than 0", maxWorkerId));
        }
        if (datacenterId > maxDatacenterId || datacenterId < 0) {
            throw new IllegalArgumentException(String.format("datacenter Id can't be greater than %d or less than 0", maxDatacenterId));
        }
        this.workerId = workerId;
        this.datacenterId = datacenterId;
    }

    // ==============================Methods==========================================

    /**
     * 获得下一个ID (该方法是线程安全的)
     *
     * @return SnowflakeId
     */
    public synchronized long nextId() {
        long timestamp = timeGen();

        //如果当前时间小于上一次ID生成的时间戳,说明系统时钟回退过这个时候应当抛出异常
        if (timestamp < lastTimestamp) {
            throw new RuntimeException(
                    String.format("Clock moved backwards.  Refusing to generate id for %d milliseconds", lastTimestamp - timestamp));
        }

        //如果是同一时间生成的,则进行毫秒内序列
        if (lastTimestamp == timestamp) {
            sequence = (sequence + 1) & sequenceMask;
            //毫秒内序列溢出
            if (sequence == 0) {
                //阻塞到下一个毫秒,获得新的时间戳
                timestamp = tilNextMillis(lastTimestamp);
            }
        }
        //时间戳改变,毫秒内序列重置
        else {
            sequence = 0L;
        }

        //上次生成ID的时间截
        lastTimestamp = timestamp;

        //移位并通过或运算拼到一起组成64位的ID
        return ((timestamp - twepoch) << timestampLeftShift) //
                | (datacenterId << datacenterIdShift) //
                | (workerId << workerIdShift) //
                | sequence;
    }

    /**
     * 阻塞到下一个毫秒,直到获得新的时间戳
     *
     * @param lastTimestamp 上次生成ID的时间截
     * @return 当前时间戳
     */
    protected long tilNextMillis(long lastTimestamp) {
        long timestamp = timeGen();
        while (timestamp <= lastTimestamp) {
            timestamp = timeGen();
        }
        return timestamp;
    }

    /**
     * 返回以毫秒为单位的当前时间
     *
     * @return 当前时间(毫秒)
     */
    protected long timeGen() {
        return System.currentTimeMillis();
    }

    //==============================Test=============================================
}
7.实体类
@Data
@AllArgsConstructor
@NoArgsConstructor
public class User {
    private Long id;
    private String name;
    private Date createTime;
    private Integer sex;

}
8.dao层
@Mapper
public interface UserMapper {
    /**
     * 保存
     */
    void save(User user);

    /**
     * 查询
     * @param id
     * @return
     */
    User get(Long id);

}
9.service层
@Service
public class UserService {

    @Autowired
    private UserMapper userMapper;

    public void save(User user){
        this.userMapper.save(user);
    }

    public User get(Long id){
        User user = this.userMapper.get(id);
        return user;
    }


}
10.controller层
@RestController
@RequestMapping("/user")
public class UserController {

    @Autowired
    private UserService userService;

    @RequestMapping("/save")
    public String save() {
        SnowflakeIdWorker idWorker = new SnowflakeIdWorker(1, 3);
        for (int i = 1; i < 50; i++) {
            User user = new User();
            long id = idWorker.nextId();
         long a= Math.random() > 0.5 ? 1l : 2l;
            user.setId ( id+a);  //此处只为方便显示不同库中不同表,不保证id不重复;仅仅为了更好的测试出效果
            user.setName("test" + i);
            // 1 男 2 女
            user.setSex(Math.random() > 0.5 ? 1 : 2);
            userService.save(user);
        }
        return "success";
    }

    @RequestMapping("/get")
    public User get(Long id) {
        User user = this.userService.get(id);
        return user;
    }

}
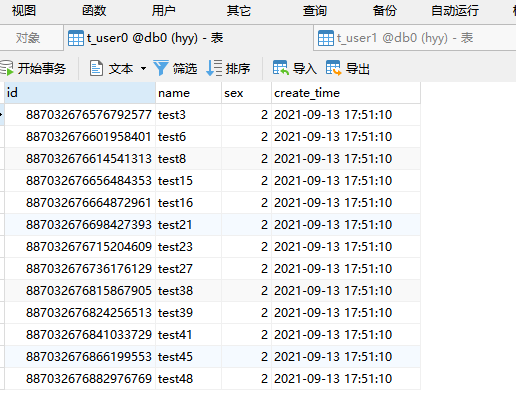
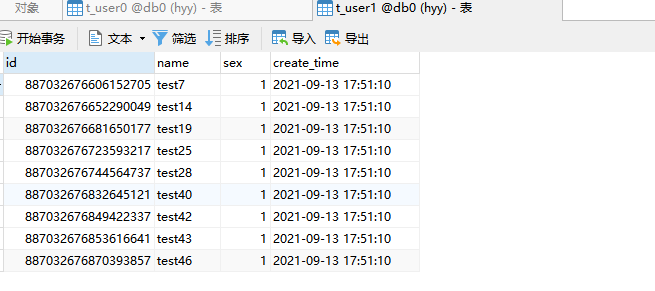
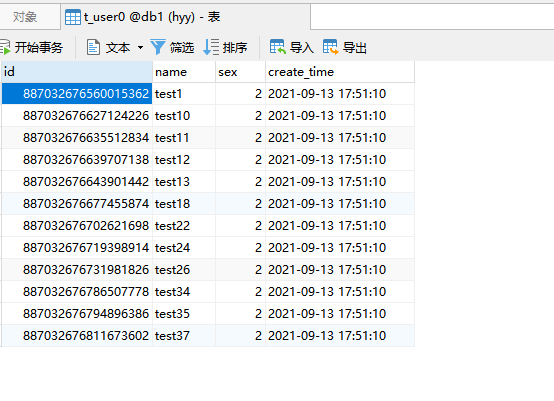
11.测试效果:
db0 数据库:
t_user0表:
t_user1表:
db1 数据库:
t_user0表:
t_user1表:
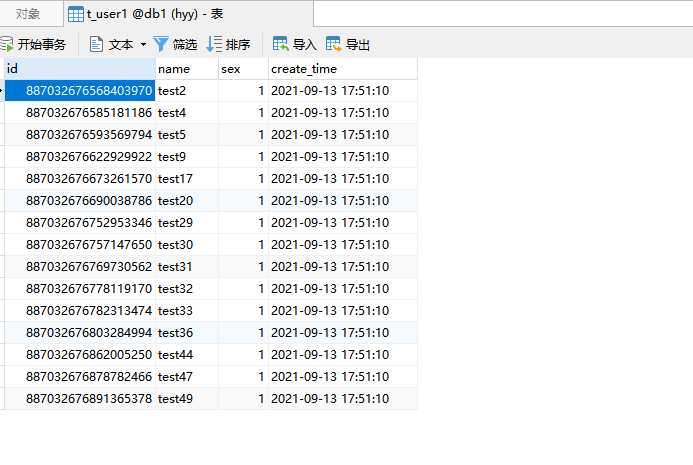
49条数据已经按照需求加入了两个库的四张表中


