
网络编程模型之NIO
1.简单介绍
同步非阻塞,服务器实现模式为一个请求一个线程,即客户端发送的连接请求都会注册到多路复用器上,多路复用器轮询到连接有I/O请求时才启动一个线程进行处理。
2.模型图

3.Buffer缓冲区
a.Buffer在Java NIO的作用
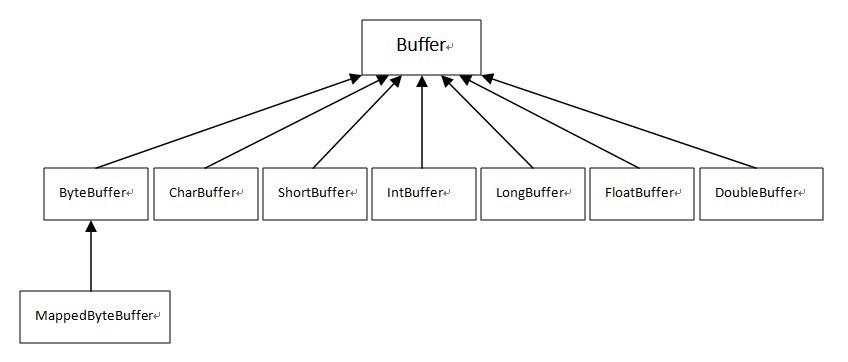
在Java NIO中,缓冲区的作用也是用来临时存储数据,可以理解为是I/O操作中数据的中转站。缓冲区直接为通道(Channel)服务,写入数据到通道或从通道读取数据,这样的操利用缓冲区数据来传递就可以达到对数据高效处理的目的。在NIO中主要有八种缓冲区类(其中MappedByteBuffer是专门用于内存映射的一种ByteBuffer):
b.Buffer的属性
容量(capacity):缓冲区能够容纳的数据元素的最大数量。这一容量在缓冲区创建时被设定,并且永远不能被改变
上界(limit):缓冲区的第一个不能被读或写的元素。或者说,缓冲区中现存元素的计数
位置(position):下一个要被读或写的元素的索引。位置会自动由相应的 get( )和 put( )函数更新
标记(mark):下一个要被读或写的元素的索引。位置会自动由相应的 get( )和 put( )函数更新一个备忘位置。调用 mark( )来设定 mark = postion。调用 reset( )设定 position =mark。标记在设定前是未定义的(undefined)。这四个属性之间总是遵循以下关系:0 <= mark <= position <= limit <= capacity
c.Buffer的简单实例
//Debug可以看出属性变化
public class BufferBasic {
    public static void main(String[] args) {
        //创建一个长度为5,类型为int的buffer
        IntBuffer intBuffer=IntBuffer.allocate(5);
        //向buffer存放数据
        for (int i = 0; i < intBuffer.capacity(); i++) {
            intBuffer.put(i*2);
        }
    }
}
4.NIO通道
java.nio.channels包中的Channel接口的已知实现类:
FileChannel:从文件中读写数据。
DatagramChannel:能通过UDP读写网络中的数据。
SocketChannel:能通过TCP读写网络中的数据。
ServerSocketChannel:可以监听新进来的TCP连接,像Web服务器那样。对每一个新进来的连接都会创建一个SocketChannel。
a. FileChannel
a-1. 从文件中读取信息
/**
 * 在通道中使用buffer读数据
 */
public class FileChannelNIO02 {
    public static void main(String[] args) throws IOException {
        //获取输入流
        File file = new File("f:\\file01.txt");
        FileInputStream fileInputStream = new FileInputStream(file);
        //获取对应的channel
        FileChannel fileChannel=fileInputStream.getChannel();
        //创建缓冲区
        ByteBuffer byteBuffer=ByteBuffer.allocate((int) file.length());
        //将通道数据读取到buffer
        fileChannel.read(byteBuffer);
        //将字节转为字符串
        String str=new String(byteBuffer.array());
        System.out.println(str);
        fileInputStream.close();


    }
}
a-2. 写入数据到文件中
public class FileChannelNIO {
    public static void main(String[] args) throws IOException {
        String str="dcascs";
        //创建一个输出流
        FileOutputStream  fileOutputStream=new FileOutputStream("f:\\file01.txt");
        //获取对应的filechannel
        FileChannel fileChannel=fileOutputStream.getChannel();
        //创建缓冲区
        ByteBuffer byteBuffer=ByteBuffer.allocate(1024);
        //将str放入缓冲区
        byteBuffer.put(str.getBytes());
        //对byteBuffer进行flip;
        byteBuffer.flip();
        //将bytebuffer写入到fileChannel
        fileChannel.write(byteBuffer);
        //关闭流
        fileOutputStream.close();
    }
}
a-3. 数据从文件中读取或者写入到文件中
public class FileChannelNIO03 {
    public static void main(String[] args) throws IOException {
        //获取输入流
        FileInputStream fileInputStream = new FileInputStream("1.txt");
        //获取对应的channel
        FileChannel fileChannel1=fileInputStream.getChannel();
        //创建一个输出流
        FileOutputStream fileOutputStream=new FileOutputStream("2.txt");
        FileChannel fileChanne2= fileOutputStream.getChannel();
        ByteBuffer byteBuffer = ByteBuffer.allocate(512);
        while (true){
            //重置标志位
          //  byteBuffer.clear();
            //循环读取
            int read = fileChannel1.read(byteBuffer);
            System.out.println(read);
            if (read==-1){//表示读完
                break;
            }
            //将buffer数据写入到fileChanne2
            byteBuffer.flip();
            fileChanne2.write(byteBuffer);
        }
        fileInputStream.close();
        fileOutputStream.close();


    }
}
a-4. 使用transferFrom完成拷贝
/**
 * 使用transferFrom完成拷贝
 */
public class FileChannelNIO04 {
    public static void main(String[] args) throws IOException {
        //获取输入流
        FileInputStream fileInputStream = new FileInputStream("f:\\a.jpg");
        FileChannel fileChannel1=fileInputStream.getChannel();
        //创建一个输出流
        FileOutputStream fileOutputStream=new FileOutputStream("f:\\b.jpg");
        FileChannel fileChanne2= fileOutputStream.getChannel();
        //使用transferFrom完成拷贝,将a.jpg拷贝到f盘下,名字为b.jpg
        fileChanne2.transferFrom(fileChannel1,0,fileChannel1.size());
        fileChannel1.close();
        fileChanne2.close();
        fileInputStream.close();
        fileOutputStream.close();
    }
}
a-5. ReadOnlyBuffer 只读模式
//只读
public class ReadOnlyBuffer {
    public static void main(String[] args) {
        //创建一个长度为5,类型为int的buffer
        ByteBuffer buffer= ByteBuffer.allocate(50);
        //向buffer存放数据
        for (int i = 0; i < buffer.capacity(); i++) {
            buffer.put((byte)i);
        }
        //读取转换
        buffer.flip();
        ByteBuffer readOnly=buffer.asReadOnlyBuffer();
        System.out.println(readOnly);
        while (readOnly.hasRemaining()){
            System.out.println(readOnly.get());
        }
    }
}
a-6. MappedByteBuffer 让文件直接在内存(堆外的内存)中进行修改;
/**
 *  MappedByteBuffer直接在堆外内存修改,操作系统不需要拷贝一次
 */
public class MappedByteBufferTest {
    public static void main(String[] args) throws IOException {
        /**
         * RandomAccessFile随机访问文件类
         * rw代表读写模式,不存在则新建
         */
        RandomAccessFile randomAccessFile=new RandomAccessFile("1.txt","rw");
        //获取对应的通道
        FileChannel fileChanne=randomAccessFile.getChannel();
        /**
         * 参数1:读写模式
         * 参数2:修改文件的起始位置
         * 参数3:映射到内存的大小,即文件的字节数
         */
        MappedByteBuffer map = fileChanne.map(FileChannel.MapMode.READ_WRITE, 0, 3);
        /**
         * 修改开始
         * 参数一:修改的起始位置
         * 参数二:该位置要修改成的数据
         */
        map.put(0,(byte)'H');
        randomAccessFile.close();
    }
}
未完待续...............

