
IdentityServer4授权码模式
继上一篇的隐式许可授权模式,这篇会继续实现授权码模式授权
首先修改Config.cs 添加Client
	new Client
			{
				ClientId = "code_client",
					ClientName = "code Auth",
					AllowedGrantTypes = GrantTypes.CodeAndClientCredentials,
					RedirectUris = {
						"https://localhost:7001/signin-oidc", //跳转登录到的客户端的地址
					},
					PostLogoutRedirectUris = {
						"https://localhost:7001/signout-callback-oidc",
					},
					ClientSecrets = {
						new Secret("codeclientsecrets".Sha256())
					},
					AlwaysIncludeUserClaimsInIdToken=true,
					//AlwaysSendClientClaims = true,
					AllowOfflineAccess=true,
					AllowedScopes = {
						"invoice_read",
						IdentityServerConstants.StandardScopes.OpenId,
						IdentityServerConstants.StandardScopes.Profile,
						IdentityServerConstants.StandardScopes.Phone,
						IdentityServerConstants.StandardScopes.Address,
						IdentityServerConstants.StandardScopes.Email,
						IdentityServerConstants.StandardScopes.OfflineAccess,
					},

					//允许将token通过浏览器传递
					AllowAccessTokensViaBrowser = true,
					RequireConsent = false
			}
添加mvc客户端CodeClient
启动端口设置为7001
安装Nuget包
dotnet add pacakage IdentityServer4
注册服务
在startup.cs中ConfigureServices方法添加如下代码:
 services.AddAuthentication(options =>
            {
                options.DefaultScheme = CookieAuthenticationDefaults.AuthenticationScheme;
                options.DefaultChallengeScheme = OpenIdConnectDefaults.AuthenticationScheme;
            }).AddCookie(CookieAuthenticationDefaults.AuthenticationScheme) //使用Cookie作为验证用户的首选方式
                .AddOpenIdConnect(OpenIdConnectDefaults.AuthenticationScheme, options =>
                {
                    options.SignInScheme = CookieAuthenticationDefaults.AuthenticationScheme;
                    options.Authority = "https://localhost:5000"; //授权服务器地址
                        options.RequireHttpsMetadata = false; //暂时不用https
                        options.ClientId = "code_client";
                    options.ClientSecret = "codeclientsecrets";
                    options.ResponseType = "code"; //代表Authorization Code
                        options.SaveTokens = true; //表示把获取的Token存到Cookie中
                        options.GetClaimsFromUserInfoEndpoint = true;
                    options.Scope.Clear();
                    options.Scope.Add("invoice_read");
                    options.Scope.Add(OidcConstants.StandardScopes.OpenId);
                    options.Scope.Add(OidcConstants.StandardScopes.Profile);
                    options.Scope.Add(OidcConstants.StandardScopes.Phone);
                    options.Scope.Add(OidcConstants.StandardScopes.Address);
                    options.Scope.Add(OidcConstants.StandardScopes.Email);
                    options.Scope.Add(OidcConstants.StandardScopes.OfflineAccess);

                });
配置管道
修改startup.cs中Configure方法:
 public void Configure(IApplicationBuilder app, IWebHostEnvironment env)
        {
            if (env.IsDevelopment())
            {
                app.UseDeveloperExceptionPage();
            }
            else
            {
                app.UseExceptionHandler("/Home/Error");
                // The default HSTS value is 30 days. You may want to change this for production scenarios, see https://aka.ms/aspnetcore-hsts.
                app.UseHsts();
            }
            app.UseHttpsRedirection();
            app.UseStaticFiles();
            app.UseRouting();
            app.UseAuthentication();
            app.UseAuthorization();
            app.UseEndpoints(endpoints =>
            {
                endpoints.MapControllerRoute(name: "default", pattern: "{controller=Home}/{action=Index}/{id?}");
            });
        }
HomeController的Privacy添加授权[Authorize]
修改Privacy.cshtml
@using Microsoft.AspNetCore.Authentication

<h2>Claims</h2>

<dl>
    @foreach (var claim in User.Claims)
    {
        <dt>@claim.Type</dt>
        <dd>@claim.Value</dd>
}
</dl>

<h2>Properties</h2>

<dl>
    @foreach (var prop in (await Context.AuthenticateAsync()).Properties.Items)
    {
        <dt>@prop.Key</dt>
        <dd>@prop.Value</dd>
}
</dl>
修改_Layout.cshtml添加以下代码
   @if (User.Identity.IsAuthenticated)
                        {
                            <li class="nav-item">
                                <a class="nav-link text-dark" asp-area="" asp-controller="Home" asp-action="GetAPI">掉用API</a>
                            </li>
                            <li class="nav-item">
                                <a class="nav-link text-dark" asp-area="" asp-controller="Home" asp-action="Logout">退出登录</a>
                            </li>
                        }
修改HomeController.cs
     public IActionResult Logout()
        {
            return SignOut(CookieAuthenticationDefaults.AuthenticationScheme, OpenIdConnectDefaults.AuthenticationScheme);
        }

        /// <summary>
        /// 测试请求API资源(api1)
        /// </summary>
        /// <returns></returns>
        public async Task<IActionResult> getApi()
        {
            var client = new HttpClient();
            var accessToken = await HttpContext.GetTokenAsync(OpenIdConnectParameterNames.AccessToken);
            if (string.IsNullOrEmpty(accessToken))
            {
                return Json(new { msg = "accesstoken 获取失败" });
            }
            client.DefaultRequestHeaders.Authorization = new AuthenticationHeaderValue("Bearer", accessToken);
            var content = await client.GetStringAsync("https://localhost:6000/WeatherForecast");
            return Json(content);
        }
启动并且登录并点击【掉用API】
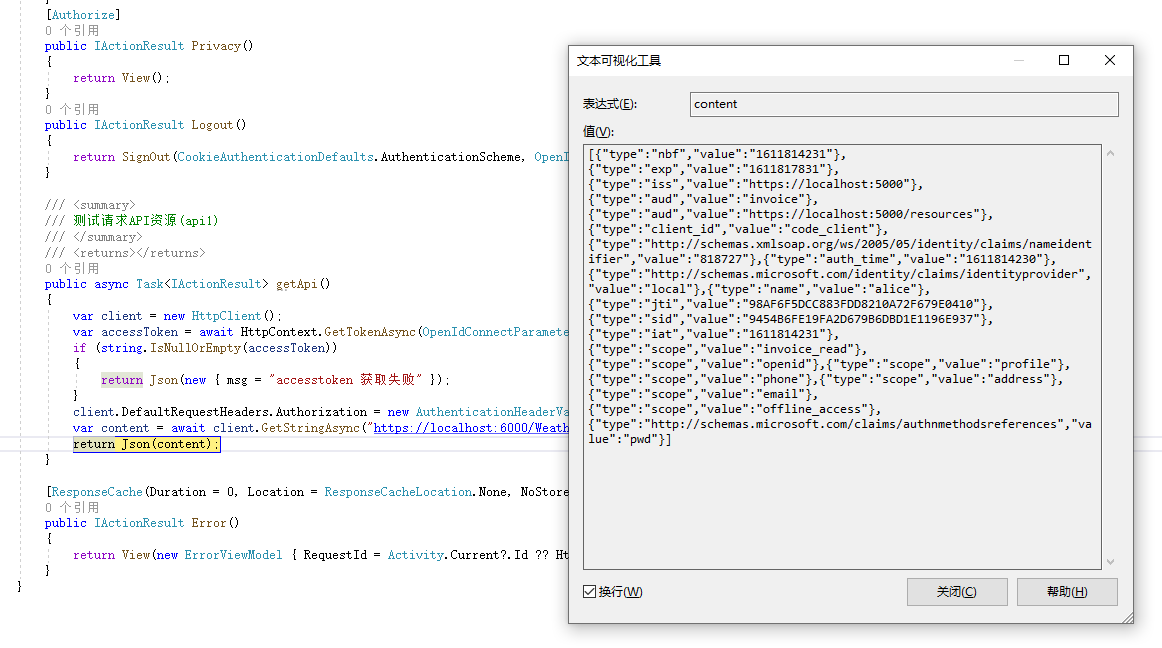
大功告成

 浙公网安备 33010602011771号