
1. Atlas介绍
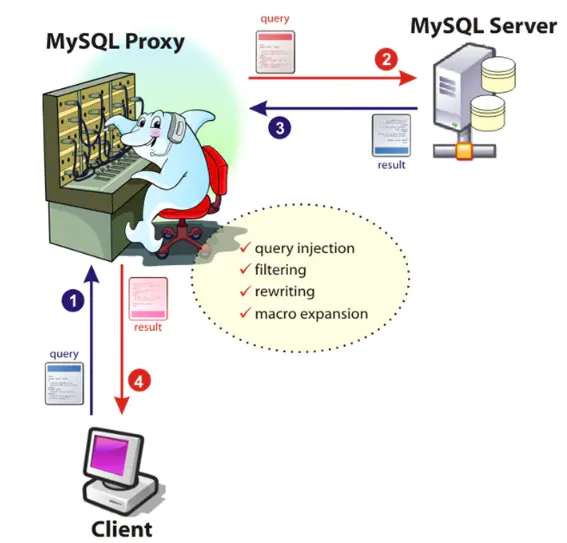
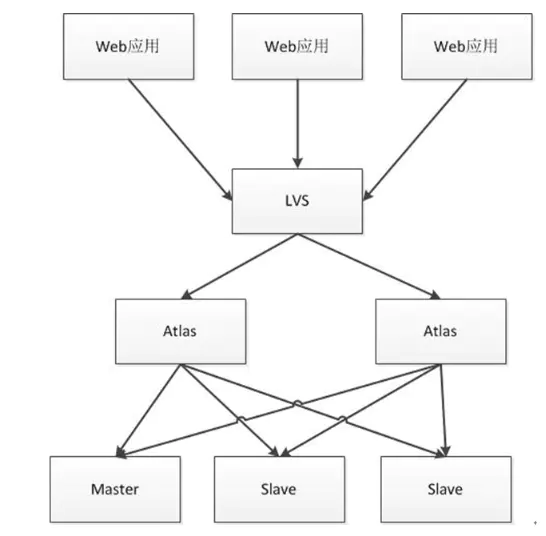
 Atlas是由 Qihoo 360, Web平台部基础架构团队开发维护的一个基于MySQL协议的数据中间层项目。
它是在mysql-proxy 0.8.2版本的基础上,对其进行了优化,增加了一些新的功能特性。
360内部使用Atlas运行的mysql业务,每天承载的读写请求数达几十亿条。
下载地址
https://github.com/Qihoo360/Atlas/releases
注意:
1、Atlas只能安装运行在64位的系统上
2、Centos 5.X安装 Atlas-XX.el5.x86_64.rpm,Centos 6.X安装Atlas-XX.el6.x86_64.rpm。
3、后端mysql版本应大于5.1,建议使用Mysql 5.6以上
2.安装配置
yum install -y Atlas*
cd /usr/local/mysql-proxy/conf
mv test.cnf test.cnf.bak
 vi test.cnf
[mysql-proxy]
admin-username = user
admin-password = pwd
proxy-backend-addresses = 10.0.0.55:3306
proxy-read-only-backend-addresses = 10.0.0.52:3306,10.0.0.53:3306
pwds = repl:3yb5jEku5h4=,mha:O2jBXONX098=
daemon = true
keepalive = true
event-threads = 8
log-level = message
log-path = /usr/local/mysql-proxy/log
sql-log=ON
proxy-address = 0.0.0.0:33060
admin-address = 0.0.0.0:2345
charset=utf8
启动atlas
/usr/local/mysql-proxy/bin/mysql-proxyd test start
ps -ef |grep proxy
3 Atlas功能测试
测试读操作:
mysql -umha -pmha  -h 10.0.0.53 -P 33060
db03 [(none)]>select @@server_id;
测试写操作:
mysql> begin;select @@server_id;commit;
4 生产用户要求
开发人员申请一个应用用户 app( select update insert) 密码123456,要通过10网段登录
1. 在主库中,创建用户
grant select ,update,insert on *.* to app@'10.0.0.%' identified by '123456';
# 所有节点查看
db01 [(none)]>select user,host from mysql.user;
2. 在atlas中添加生产用户
/usr/local/mysql-proxy/bin/encrypt 123456
3. 改配置文件
vim test.cnf
pwds = repl:3yb5jEku5h4=,mha:O2jBXONX098=,app:/iZxz+0GRoA=
/usr/local/mysql-proxy/bin/mysql-proxyd test restart
[root@db03 conf]# mysql -uapp -p123456 -h 10.0.0.53 -P 33060
5 Atlas基本管理
连接管理接口
mysql -uuser -ppwd -h127.0.0.1 -P2345
打印帮助:
mysql> select * from help;
查询后端所有节点信息:
mysql>  SELECT * FROM backends    ;
+-------------+----------------+-------+------+
| backend_ndx | address        | state | type |
+-------------+----------------+-------+------+
|           1 | 10.0.0.55:3306 | up    | rw   |
|           2 | 10.0.0.51:3306 | up    | ro   |
|           3 | 10.0.0.53:3306 | up    | ro   |
+-------------+----------------+-------+------+
3 rows in set (0.00 sec)
动态添加删除节点
REMOVE BACKEND 3;
动态添加节点
ADD SLAVE 10.0.0.53:3306;
保存配置到配置文件
SAVE CONFIG;
6. 自动分表
介绍
使用Atlas的分表功能时,首先需要在配置文件test.cnf设置tables参数。
tables参数设置格式:数据库名.表名.分表字段.子表数量,
比如:
你的数据库名叫school,表名叫stu,分表字段叫id,总共分为2张表,那么就写为school.stu.id.2,如果还有其他的分表,以逗号分隔即可。
7. 关于读写分离建议

MySQL-Router    ---> MySQL官方
ProxySQL         --->Percona
Maxscale         ---> MariaDB


【推荐】国内首个AI IDE,深度理解中文开发场景,立即下载体验Trae
【推荐】编程新体验,更懂你的AI,立即体验豆包MarsCode编程助手
【推荐】抖音旗下AI助手豆包,你的智能百科全书,全免费不限次数
【推荐】轻量又高性能的 SSH 工具 IShell:AI 加持,快人一步