vue-element-admin权限验证,根据不同角色动态生成路由渲染侧边栏
本示例基于vue-admin-template基础模板进行二次开发
在线演示:http://hymhub.gitee.io/vue-element-admin-role
源码地址:https://gitee.com/hymhub/vue-element-admin-rolecode
效果图:

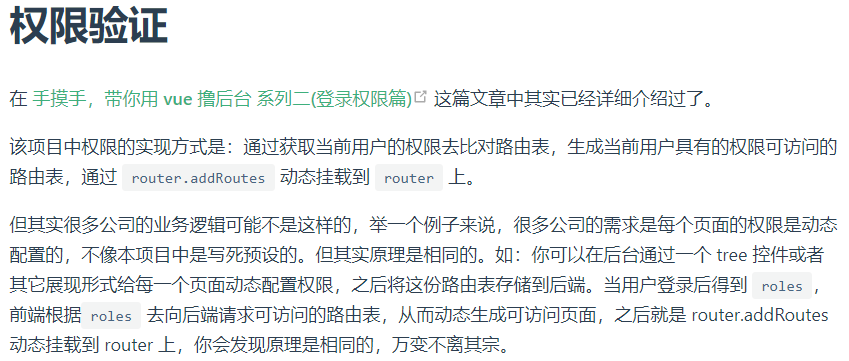
在 前端后台项目 中通常会根据用户登录成功后 根据用户权限动态添加相应路由 及渲染功能菜单,在vue-element-admin官方文档中的实现是前端提前写好异步挂载的总路由表,规定好每个路由能进入的角色,登录成功后端返回角色权限,再比对权限过滤路由动态添加,官方介绍:
再来看vue-element-admin官方主分支的异步路由表代码:
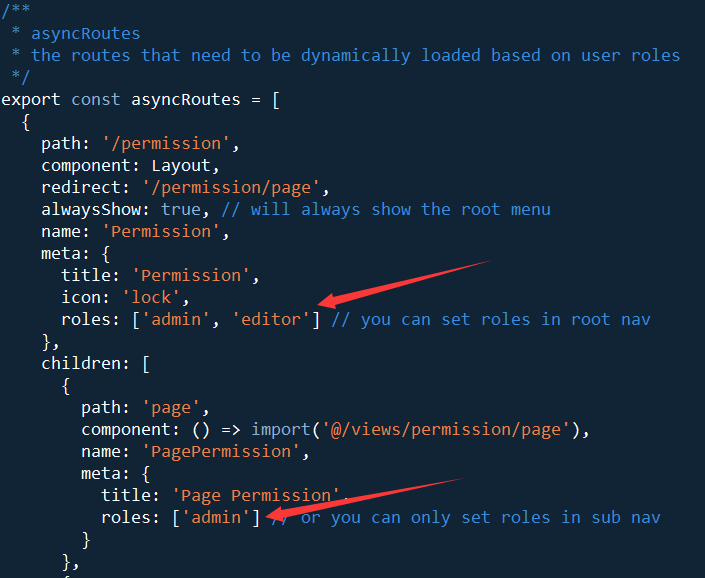
如官方文档所述,官方示例是将权限写死在前端的,主要告诉我们一个实现的思路,当然官方也提到后期可能会增加权限控制面板,期待...

本示例权限验证实现思路
用户登录成功后,我们去获取用户权限,后端通常会返回一个可访问的路由表,前端根据返回的路由表与提前设定的总路由表进行匹配过滤出最终可访问的路由,再使用router.addRoutes 动态挂载,后台返回的路由表,大概长这样:第一种后端返回的路由表格式 ,可以大概看一下长什么样,后面会提到
[
    {
        path: '/',
        children: [
            {
                path: 'dashboard'
            }
        ]
    },
    {
        path: '/example',
        children: [
            {
                path: 'table'
            },
            {
                path: 'tree'
            }
        ]
    },
    {
        path: '/form',
        children: [
            {
                path: 'index'
            }
        ]
    },
    {
        path: '/nested',
        children: [
            {
                path: 'menu1',
                children: [
                    {
                        path: 'menu1-1'
                    },
                    {
                        path: 'menu1-2',
                        children: [
                            {
                                path: 'menu1-2-1'
                            },
                            {
                                path: 'menu1-2-2'
                            }
                        ]
                    },
                    {
                        path: 'menu1-3'
                    }
                ]
            },
            {
                path: 'menu2'
            }
        ]
    },
    {
        path: 'external-link',
        children: [
            {
                path: 'https://panjiachen.github.io/vue-element-admin-site/#/'
            }
        ]
    }
  ]
也可能是这样(第二种后端返回的路由表格式 ,可以大概看一下长什么样,后面会提到):
[
    { path: "/dashboard" },
    { path: "/table" },
    { path: "/example" },
    { path: "/tree" },
    { path: "/editStu/index/:id" },
    { path: "/form" },
    { path: "/menu1" },
    { path: "/menu2" },
    { path: "/menu1-1" },
    { path: "/menu1-2" },
    { path: "/menu1-3" },
    { path: "/menu1-2-1" },
    { path: "/menu1-2-2" },
    { path: "/external" },
]
具体实现
在src/router/index.js中导出asyncRoutes总路由表,里面正常添加路由: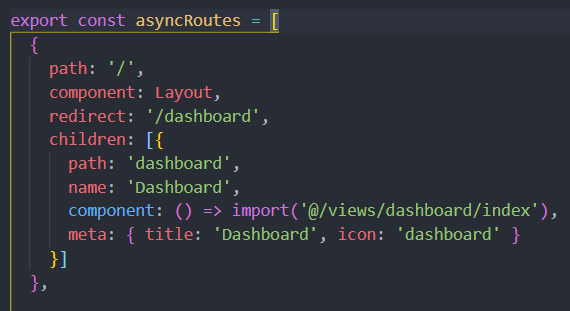
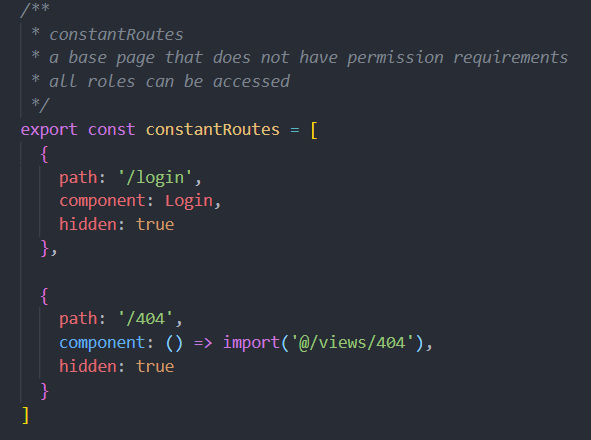
constantRoutes中只保留登录页和404页面,因为登录后会比对总路由表动态挂载路由:
一切从登录开始,在登录按钮点击后触发store仓库中的登录方法,登录成功后设置token并跳转到首页
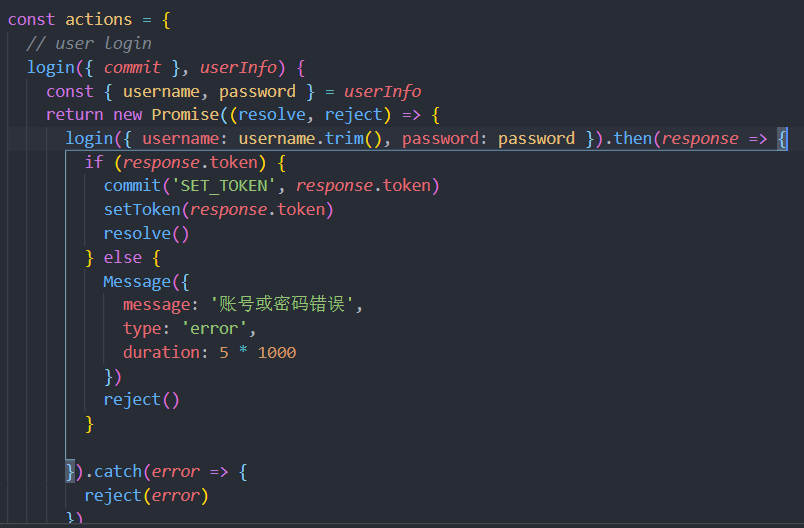
下面配置路由守卫,修改模板中src目录下的permission.js文件,这里最为关键:
// permission.js
import router from './router'
import store from './store'
import NProgress from 'nprogress' // progress bar
import 'nprogress/nprogress.css' // progress bar style
import { getToken } from '@/utils/auth' // get token from cookie
import getPageTitle from '@/utils/get-page-title'
import { asyncRoutes } from '@/router'

NProgress.configure({ showSpinner: false }) // NProgress Configuration

const whiteList = ['/login'] // no redirect whitelist

router.beforeEach(async(to, from, next) => {
  // start progress bar
  NProgress.start()

  // set page title
  document.title = getPageTitle(to.meta.title)

  // determine whether the user has logged in
  const hasToken = getToken()
  if (hasToken) {
    if (to.path === '/login') {
      // if is logged in, redirect to the home page
      next({ path: '/' })
      NProgress.done()
    } else {
      if (store.getters.routes.length === 0) { // 判断当前用户是否已拉取过路由表信息
        store.dispatch('user/getInfo').then(routesMap => { // 拉取路由表
          store.dispatch('permission/generateRoutes', { asyncRoutes, routesMap }).then(addRouters => { // 生成可访问的路由表,asyncRoutes总路由表,routesMap后端返回的路由表,addRouters 过滤后需要动态挂载的路由表
            router.addRoutes(addRouters)
            next({ ...to, replace: true }) // hack方法 确保addRoutes已完成 ,set the replace: true so the navigation will not leave a history record
          })
        }).catch(err => {
          console.log(err);
        });
      } else {
        next() //当有用户权限的时候,说明所有可访问路由已生成 如访问没权限的全面会自动进入404页面
      }
    }
  } else {
    /* has no token*/

    if (whiteList.indexOf(to.path) !== -1) {
      // in the free login whitelist, go directly
      next()
    } else {
      // other pages that do not have permission to access are redirected to the login page.
      next(`/login?redirect=${to.path}`)
      NProgress.done()
    }
  }
})

router.afterEach(() => {
  // finish progress bar
  NProgress.done()
})
上面代码主要修改模板中的导航守卫,判断是否从后台拉取了当前用户可访问的路由表,如果拉取了,则路由放行,如果没拉取,则拉取并进行路由比对过滤出可访问的路由表,最后挂载路由放行
路由比对处理,也就是上面代码中的store.dispatch('permission/generateRoutes'.....
// store/modules/modules/permission.js
import { constantRoutes } from '@/router' //初始路由表,里面包含登录和404页面路由


// 后端返回的嵌套路由表(也就是最开始说的"第一种后端返回的路由表格式")转一维数组(也就是最开始说的"第二种后端返回的路由表格式"),
// 转换后用于与总路由表进行比较,后端若返回一维数组则直接交由下面filterAsyncRoutes处理
function MultidimensionalToOnedimensional(routesMap) {
  const filterRoutesMap = []
  !function fn(routesMap) {
    routesMap.forEach(route => {
      const tmp = {}
      for (const key in route) {
        if (Object.hasOwnProperty.call(route, key)) {
          if (key !== 'children') {
            tmp[key] = route[key]
          } else if (key === 'children') {
            fn(route[key])
          }
        }
      }
      filterRoutesMap.push(tmp)
    })
  }(routesMap)
  return filterRoutesMap
}

// 比对过滤路由表,生成最终可访问的路由表
export function filterAsyncRoutes(routes, filterRoutesMap) {
  const accessedRoutes = [];
  routes.forEach(route => {
    const tmp = {};
    if (filterRoutesMap.some(a => a.path == route.path)) {
      for (const key in route) {
        if (Object.hasOwnProperty.call(route, key)) {
          if (key !== 'children') {
            tmp[key] = route[key];
          } else if (key === 'children') {
            const tmpC = filterAsyncRoutes(route[key], filterRoutesMap);
            (tmpC.length > 0) && (tmp.children = tmpC);
          }
        }
      }
    }
    tmp.path && accessedRoutes.push(tmp)
  });

  return accessedRoutes
}

const getDefaultState = () => {
  return {
    routes: [],
    addRoutes: []
  }
}
const state = getDefaultState;

const mutations = {
  // 设置路由,过滤后的路由表存仓库
  SET_ROUTES: (state, routes) => {
    state.addRoutes = routes
    state.routes = constantRoutes.concat(routes)
    state.routes.push({ path: '*', redirect: '/404', hidden: true }); // 找不到路由或访问无权限路由跳转404,必须放在最后,因为只有找不到才会进入这个条件
  },
// 重置路由,用于退出登录操作
  RESET_STATE: state => {
    Object.assign(state, getDefaultState())
  }
}

const actions = {
  // 生成可访问路由表
  generateRoutes({ commit }, { asyncRoutes, routesMap }) {
    return new Promise(resolve => {
      const filterRoutesMap = MultidimensionalToOnedimensional(routesMap)
      let accessedRoutes = filterAsyncRoutes(asyncRoutes, filterRoutesMap)
      commit('SET_ROUTES', accessedRoutes)
      resolve(accessedRoutes)
    })
  },
  // 重置路由,用于退出登录操作
  resetState({ commit }) {
    return new Promise(resolve => {
      commit('RESET_STATE');
      resolve();
    });
  }
}

export default {
  namespaced: true,
  state,
  mutations,
  actions
}
上面代码主要就是做递归遍历,将后端返回的嵌套路由表(也就是最开始说的"第一种后端返回的路由表格式")转一维数组(也就是最开始说的"第二种后端返回的路由表格式"),
然后再递归遍历总路由表比对后端返回的路由表,生成最终可访问的路由表。
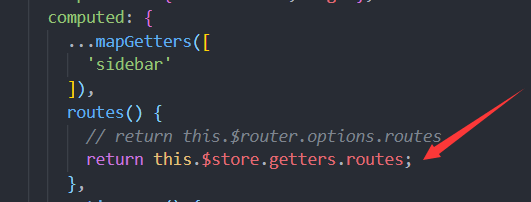
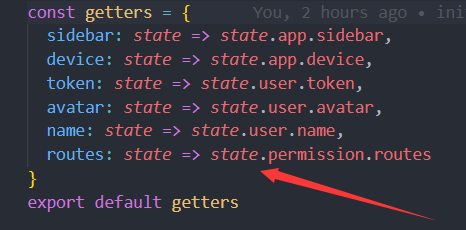
挂载路由后,还需要在src/layout/components/Sidebar/index.vue中的routes方法返回的路由表改成上面store/modules/modules/permission.js中配置的routes用以渲染侧边栏菜单:
src/store/getters.js:
示例完整源码地址:https://gitee.com/hymhub/vue-element-admin-rolecode


