python【第六篇】并发编程
python3最新变化
新增asyncio原生协程(3.5之前不支持原生协程,有yield可自定义,另外还有gevent封装了yield的第三方协程库)
新增ThreadPoolExecutor:封装Threading
新增ProcessPoolExecutor:封装 multiprocessing
本质
python的线程是用的操作系统的原生线程、python的进程也是用的操作系统的原生进程。

原生进程是由操作系统去维护的,python只是通过C代码库去起了一个进程,真正进程的管理还是通过操作系统去完成的。
并发方案
1.须知:io操作不占用cpu,计算占用cpu

2.何时使用他们:

    (1)python单线程:
		优点:单线程开销小简单
		缺点:使用单核,遇到IO密集型或计算密集型串行任务效率极低
		适用:非IO密集型串行任务、非计算密集型串行任务

    (2)python多进程:
		优点:使用多核
		缺点:开销大(复制一份内存、切换)且切换复杂
		适用:不推荐

    (3)python多线程:
		优点:分时间片轮询运行造成同时运行的假象,但效率比计算密集型串行任务还低(python2尤为明显),效率比IO密集型串行任务高(但效率不如协程)
		缺点:使用单核(同一时间只有一个线程在执行)
		适用:IO密集型串行任务

    (4)python协程:
		优点:适用IO密集,相对多线程:总体时间变短,但只有IO时才切换,切换没有多线程频繁,所以并发假象没多线程强
		缺点:使用单核
		适用:IO密集型串行任务

    (5) python协程 + 多进程
		优点:利用多核
		缺点:开销大(复制一份内存、切换)且切换复杂
		适用:IO密集型串行任务

	(6) IO多路复用(推荐,IO密集型任务较为常见)
		优点:默认单线程开销小简单
		缺点:使用单核、编码难度较高
		适用:IO密集型串行任务

	(7) C模块实现多线程
		优点:利用多核
		缺点:编码难度高
		适用:IO密集型串行任务、计算密集型串行任务
Threading
CPython的线程就是C语言中的线程
Threading比Thread封装的更好,功能更强大,因此这里不介绍Thread
线程的特点:线程的生命周期、开始、运行、结束、主线程执行到最后会等待子线程执行结束主线程才结束
线程的退出:进程执行完成、线程的退出方法、python系统退出
常用方法
threading不需要进程的控制来控制线程

成员方法:
	start()  //启动线程
	run()  //在线程开启后执行,可以重写
	join()  //阻塞
	isDaemon()  //判断线程是否随主线程一起结束
	setDaemon()  //设置线程与主线程一起结束
	isAlive(): 返回线程是否活动的。
	getName(): 返回线程名。
	setName(): 设置线程名。

threading模块提供的一些方法:
	threading.currentThread(): 返回当前的线程变量。
	threading.enumerate(): 返回一个包含正在运行的线程的list。正在运行指线程启动后、结束前,不包括启动前和终止后的线程。
	threading.activeCount(): 返回正在运行的线程数量,与len(threading.enumerate())有相同的结果。
设置非阻塞线程


#!/usr/bin/env python
#encoding:utf8

import threading
import time

def hello():
    print 'hello',time.ctime()
    time.sleep(1)

if __name__ == '__main__':
    for i in xrange(5):
        t = threading.Thread(target=hello,args=())
        t.start()
# python test.py
hello Tue Jan 24 16:22:24 2017
hello Tue Jan 24 16:22:24 2017
hello Tue Jan 24 16:22:24 2017
hello Tue Jan 24 16:22:24 2017
hello Tue Jan 24 16:22:24 2017
#!/usr/bin/env python
#encoding:utf8

import threading
import time

def hello():
    print 'hello',time.ctime()
    time.sleep(1)

if __name__ == '__main__':
    for i in xrange(5):
        t = threading.Thread(target=hello,args=())
        t.start()
print 'complete'
# python test.py
hello Tue Jan 24 16:28:13 2017
hello Tue Jan 24 16:28:13 2017
hello Tue Jan 24 16:28:13 2017
hello Tue Jan 24 16:28:13 2017
complete
hello Tue Jan 24 16:28:13 2017
#对于io操作来说,多线程和多进程性能差别不大
#1.通过Thread类实例化

import time
import threading

def get_detail_html(url):
    print("get detail html started")
    time.sleep(2)
    print("get detail html end")


def get_detail_url(url):
    print("get detail url started")
    time.sleep(4)
    print("get detail url end")


#2. 通过继成Thread来实现多线程


class GetDetailHtml(threading.Thread):
    def __init__(self, name):
        super().__init__(name=name)

    def run(self):
        print("get detail html started")
        time.sleep(2)
        print("get detail html end")


class GetDetailUrl(threading.Thread):
    def __init__(self, name):
        super().__init__(name=name)

    def run(self):
        print("get detail url started")
        time.sleep(4)
        print("get detail url end")

if  __name__ == "__main__":
    thread1 = GetDetailHtml("get_detail_html")
    thread2 = GetDetailUrl("get_detail_url")
    start_time = time.time()
    thread1.start()
    thread2.start()

    thread1.join()
    thread2.join()

    #当主线程退出的时候, 子线程kill掉
    print ("last time: {}".format(time.time()-start_time))
设置阻塞线程
当前线程执行完才执行后面的主线程
#!/usr/bin/env python
#encoding:utf8

import threading
import time

def hello():
    print 'hello',time.ctime()
    time.sleep(1)

if __name__ == '__main__':
    for i in xrange(5):
        t = threading.Thread(target=hello,args=())
        t.start()
        t.join()
print 'complete'
# python test.py
hello Tue Jan 24 16:30:13 2017
hello Tue Jan 24 16:30:14 2017
hello Tue Jan 24 16:30:15 2017
hello Tue Jan 24 16:30:16 2017
hello Tue Jan 24 16:30:17 2017
complete
#!/usr/bin/env python
#coding:utf8
import time, threading

def func(name, n):
    for i in xrange(n):
        print name, i
        time.sleep(1)

t1 = threading.Thread(target=func, args=('声音', 3))
t2 = threading.Thread(target=func, args=('画面', 3))

t1.start()
t1.join()
print 666
t2.start()
# python test.py
声音 0
声音 1
声音 2
666
画面 0
画面 1
画面 2
设置守护线程
守护进程:
定义:主线程不等子线程,子线程随着父线程的结束而结束(默认父线程等待子线程执行结束主线程才结束)
适用: 常用于监听
'''
 将线程声明为守护线程,必须在start() 方法调用之前设置,如果不设置为守护线程程序会被无限挂起。

 当我们在程序运行中,执行一个主线程,如果主线程又创建一个子线程,主线程和子线程 就分兵两路,分别运行,那么当主线程完成

 想退出时,会检验子线程是否完成。如果子线程未完成,则主线程会等待子线程完成后再退出。但是有时候我们需要的是只要主线程

 完成了,不管子线程是否完成,都要和主线程一起退出,这时就可以 用setDaemon方法啦
'''
def func(name, n):
    for i in xrange(n):
        print name, i
        time.sleep(1)

t1 = threading.Thread(target=func, args=('声音', 3))
t2 = threading.Thread(target=func, args=('画面', 3))

t1.setDaemon(True)
#t2.setDaemon(True)
t1.start()
t2.start()
print 'complete'
声音 0
画面 0
complete
画面 1
声音 1
声音 2
画面 2
#!/usr/bin/env python
#coding:utf8
import time, threading

def func(name, n):
for i in xrange(n):
print name, i
time.sleep(1)

t1 = threading.Thread(target=func, args=('声音', 3))
t2 = threading.Thread(target=func, args=('画面', 3))

t1.setDaemon(True)
t2.setDaemon(True)
t1.start()
t2.start()
print 'complete'
声音 0
画面 0
complete
import threading
from time import ctime, sleep
import time


def Music(name):
    print("Begin listening to {name}. {time}".format(name=name, time=ctime()))
    sleep(3)
    print("end listening {time}".format(time=ctime()))


def Blog(title):
    print("Begin recording the {title}. {time}".format(title=title, time=ctime()))
    sleep(5)
    print('end recording {time}'.format(time=ctime()))


threads = []

t1 = threading.Thread(target=Music, args=('FILL ME',))
t2 = threading.Thread(target=Blog, args=('python',))

threads.append(t1)
threads.append(t2)

if __name__ == '__main__':

    t1.setDaemon(True)
    t2.setDaemon(True)

    for t in threads:
        t.start()

    print("all over %s" % ctime())
Begin listening to FILL ME. Tue Dec 19 01:05:23 2017
Begin recording the python. Tue Dec 19 01:05:23 2017
all over Tue Dec 19 01:05:23 2017
import threading
from time import ctime, sleep
import time


def Music(name):
    print("Begin listening to {name}. {time}".format(name=name, time=ctime()))
    sleep(3)
    print("end listening {time}".format(time=ctime()))


def Blog(title):
    print("Begin recording the {title}. {time}".format(title=title, time=ctime()))
    sleep(5)
    print('end recording {time}'.format(time=ctime()))


threads = []

t1 = threading.Thread(target=Music, args=('FILL ME',))
t2 = threading.Thread(target=Blog, args=('python',))

threads.append(t1)
threads.append(t2)

if __name__ == '__main__':

    t1.setDaemon(True)
    # t2.setDaemon(True)

    for t in threads:
        t.start()

    print("all over %s" % ctime())
Begin listening to FILL ME. Tue Dec 19 01:06:38 2017
Begin recording the python. Tue Dec 19 01:06:38 2017
all over Tue Dec 19 01:06:38 2017
end listening Tue Dec 19 01:06:41 2017 #主线程等t2等子线程5s,t1子线程3s已经结束,因此设置daemono的子线程如果不是执行时间最长的子线程等于没设置
end recording Tue Dec 19 01:06:43 2017
import threading
from time import ctime, sleep
import time


def Music(name):
    print("Begin listening to {name}. {time}".format(name=name, time=ctime()))
    sleep(3)
    print("end listening {time}".format(time=ctime()))


def Blog(title):
    print("Begin recording the {title}. {time}".format(title=title, time=ctime()))
    sleep(5)
    print('end recording {time}'.format(time=ctime()))


threads = []

t1 = threading.Thread(target=Music, args=('FILL ME',))
t2 = threading.Thread(target=Blog, args=('python',))

threads.append(t1)
threads.append(t2)

if __name__ == '__main__':

    # t1.setDaemon(True)
    t2.setDaemon(True)

    for t in threads:
        t.start()

    print("all over %s" % ctime())
Begin listening to FILL ME. Tue Dec 19 01:07:20 2017
Begin recording the python. Tue Dec 19 01:07:20 2017
all over Tue Dec 19 01:07:20 2017
end listening Tue Dec 19 01:07:23 2017
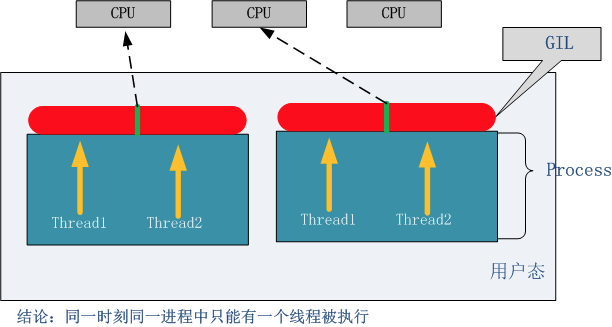
GIL锁
介绍:Python支持多线程,而解决多线程之间数据完整性和状态同步的最简单方法自然就是加锁。 于是有了GIL这把超级大锁,而当越来越多的代码库开发者接受了这种设定后,他们开始大量依赖这种特性(即默认python内部对象是thread-safe的,无需在实现时考虑额外的内存锁和同步操作)。
定义:解释器级别锁,同一进程负责相同数据只能同时被一个线程占用,CPU权限轮询交给所有子线程竞争(那么可能有些线程读取到前面线程还没改完的数据)
弊端:公共数据可能同时被多个线程修改,造成数据破坏
线程释放GIL锁的场景:根据字节码执行的行数、时间片、IO操作
I/O密集型的Python程序要比计算密集型的更好地利用多线程(python核心编程第3版一句话)
import time
import threading


def addNum():
    global num  # 在每个线程中都获取这个全局变量
    print(num)
    time.sleep(1)  # CPU切换属于毫秒级,本线程挂起释放GIL锁,此时CPU执行权限交给其它线程竞争,等下一次GIL锁释放后继续参与CPU执行权限竞争
    num -= 1  # 由于分时间片轮询,因此每个线程到最后都会执行完


num = 100  # 设定一个共享变量

thread_list = []

for i in range(100):
    t = threading.Thread(target=addNum)
    t.start()
    thread_list.append(t)

for t in thread_list:  # 等待所有线程执行完毕
    t.join()

print('Result: ', num)

######### output #############
100
100
100
100
100
100
100
100
100
100
100
100
100
100
100
100
100
100
100
100
100
100
100
100
100
100
100
100
100
100
100
100
100
100
100
100
100
100
100
100
100
100
100
100
100
100
100
100
100
100
100
100
100
100
100
100
100
100
100
100
100
100
100
100
100
100
100
100
100
100
100
100
100
100
100
100
100
100
100
100
100
100
100
100
100
100
100
100
100
100
100
100
100
100
100
100
100
100
100
100
Result:  0

Process finished with exit code 0
import threading
import time


def addNum():
    global num  # 在每个线程中都获取这个全局变量
    print(num)

    time.sleep(0.001)  # 0.001秒可能低于时间片轮询的时间,因此继续向下执行后num -= 1再释放GIL锁给其它线程
    # CPU切换属于毫秒级,本线程挂起释放GIL锁,此时CPU执行权限交给其它线程竞争,等下一次GIL锁释放后继续参与CPU执行权限竞争,
    num -= 1  # 由于分时间片轮询,因此每个线程到最后都会执行完


num = 100  # 设定一个共享变量

thread_list = []

for i in range(100):
    t = threading.Thread(target=addNum)
    t.start()
    thread_list.append(t)

for t in thread_list:  # 等待所有线程执行完毕
    t.join()

print('Result: ', num)
##########output ########
100
100
100
100
95
95
95
95
95
95
95
95
95
95
95
95
95
95
95
95
95
95
95
95
95
95
95
95
95
95
95
95
95
95
95
95
95
95
95
95
95
95
95
95
95
95
95
16
16
16
Result:  0
多线程锁
定义:用户级别锁:保证前面线程对数据读取、写入结束后再允许后面线程轮询(保证读取到前面线程已经改完的数据)
作用:解决GIL锁的弊端(1.GIL锁不能手动控制、2.(控制粒度不细)前面线程对数据读取、写入结束后整个流程未完成后面线程就开始轮询)
弊端:加锁部分为串行操作,不参与多线程的分时操作
Lock同步锁(不推荐)
弊端: acquire后必须release才能再次acquire
import threading
import time


def show():
    global num
    print(num)

    time.sleep(1)
    lock.acquire()
    num -= 1
    lock.release()


thread_list = []
lock = threading.Lock()
num = 100
for i in range(100):
    t = threading.Thread(target=show)
    t.start()
    thread_list.append(t)

for t in thread_list:
    t.join()

print('final num is: %s' % num)
######### output ###################
100
100
100
100
100
100
100
100
100
100
100
100
100
100
100
100
100
100
100
100
100
100
100
100
100
100
100
100
100
100
100
100
100
100
100
100
100
100
100
100
100
100
100
100
100
100
100
100
100
100
100
100
100
100
100
100
100
100
100
100
100
100
100
100
100
100
100
100
100
100
100
100
100
100
100
100
100
100
100
100
100
100
100
100
100
100
100
100
100
100
100
100
100
100
100
100
100
100
100
100
final num is: 0
import threading
import time


class MyThread(threading.Thread):
#    def __init__(self):
#        threading.Thread.__init__(self)

    def run(self):
        global counter
        time.sleep(0.5)
        lock.acquire()  #先锁定
        counter += 1
        print "I am %s, set counter: %s" % (self.name, counter)
        lock.release()  #再释放

if __name__ == '__main__':
    counter = 0
    lock = threading.Lock()
    for i in xrange(200):
        t = MyThread()
        t.start()
import time
import threading

def hello():
    for i in range(5):
        h_lock.acquire()
        print('hello', end=',')
        w_lock.release()

def world():
    for i in range(5):
        w_lock.acquire()
        print('world', time.ctime(),)
        h_lock.release()

h_lock = threading.Lock()
w_lock = threading.Lock()
w_lock.acquire()
t1 = threading.Thread(target=hello, args=())
t2 = threading.Thread(target=world, args=())

t1.start()
t2.start()
####### output #########
hello,world Wed Dec 20 18:57:57 2017
hello,world Wed Dec 20 18:57:57 2017
hello,world Wed Dec 20 18:57:57 2017
hello,world Wed Dec 20 18:57:57 2017
hello,world Wed Dec 20 18:57:57 2017
RLock递归锁(推荐)
定义:说白了就是锁中锁,RLock内部维护着一个Lock和一个counter变量,counter记录了acquire的次数,从而使得资源可以被多次require。直到一个线程所有的acquire都被release,其他的线程才能获得资源。可多次加锁和解锁
作用:解决同步锁的锁中锁带来的死锁问题
对比LOCK:RLOCK可以acquire多次(就这个解决了LOCK多个lock的死锁问题)
import threading,time

def run1():
    print("grab the first part data")
    lock.acquire()
    global num
    num +=1
    lock.release()
    return num
def run2():
    print("grab the second part data")
    lock.acquire()
    global  num2
    num2+=1
    lock.release()
    return num2
def run3():
    lock.acquire()
    res = run1()
    print('--------between run1 and run2-----')
    res2 = run2()
    lock.release()
    print(res,res2)


if __name__ == '__main__':

    num,num2 = 0,0
    lock = threading.RLock()
    for i in range(10):
        t = threading.Thread(target=run3)
        t.start()

while threading.active_count() != 1:
    print(threading.active_count())
else:
    print('----all threads done---')
    print(num,num2)

######### output #################
grab the first part data
--------between run1 and run2-----
grab the second part data
1 1
grab the first part data
--------between run1 and run2-----
grab the second part data
2 2
grab the first part data
--------between run1 and run2-----
grab the second part data
3 3
grab the first part data
--------between run1 and run2-----
grab the second part data
4 4
grab the first part data
--------between run1 and run2-----
grab the second part data
5 5
grab the first part data
--------between run1 and run2-----
grab the second part data
6 6
grab the first part data
--------between run1 and run2-----
grab the second part data
7 7
grab the first part data
--------between run1 and run2-----
grab the second part data
8 8
grab the first part data
--------between run1 and run2-----
grab the second part data
9 9
grab the first part data
--------between run1 and run2-----
grab the second part data
10 10
----all threads done---
10 10
import threading
import time

mutexA = threading.Lock()
mutexB = threading.Lock()


class MyThread(threading.Thread):
    def __init__(self):
        threading.Thread.__init__(self)

    def run(self):
        self.fun1()
        self.fun2()

    def fun1(self):
        mutexA.acquire()  # 如果锁被占用,则阻塞在这里,等待锁的释放

        print("I am %s , get res: %s---%s" % (self.name, "ResA", time.time()))

        mutexB.acquire()  # mutexB释放后线程1的fun2竞争到mutexB,线程2的fun1阻塞
        print("I am %s , get res: %s---%s" % (self.name, "ResB", time.time()))
        mutexB.release()
        mutexA.release()  # mutexA释放后线程2的fun1竞争到mutexA

    def fun2(self):
        mutexB.acquire()  # mutexB释放后线程1的fun2竞争到mutexB
        print("I am %s , get res: %s---%s" % (self.name, "ResB", time.time()))
        time.sleep(0.2)

        mutexA.acquire()  # 睡眠0.2秒后,mutexA释放后线程2的fun1竞争到mutexA,线程1阻塞
        print("I am %s , get res: %s---%s" % (self.name, "ResA", time.time()))
        mutexA.release()

        mutexB.release()


if __name__ == "__main__":

    print("start---------------------------%s" % time.time())

    for i in range(0, 10):
        my_thread = MyThread()
        my_thread.start()

########## output ################
I am Thread-1 , get res: ResA---1513769955.071846
I am Thread-1 , get res: ResB---1513769955.071846
I am Thread-1 , get res: ResB---1513769955.071846
I am Thread-2 , get res: ResA---1513769955.071846
import threading
import time

# mutexA = threading.Lock()
# mutexB = threading.Lock()

Rlock = threading.RLock()


class MyThread(threading.Thread):
    def __init__(self):
        threading.Thread.__init__(self)

    def run(self):
        self.fun1()
        self.fun2()

    def fun1(self):
        Rlock.acquire()  # 如果锁被占用,则阻塞在这里,等待锁的释放

        print("I am %s , get res: %s---%s" % (self.name, "ResA", time.time()))

        Rlock.acquire()  # count=2
        print("I am %s , get res: %s---%s" % (self.name, "ResB", time.time()))
        Rlock.release()  # count-1

        Rlock.release()  # count-1 =0

    def fun2(self):
        Rlock.acquire()  # count=1
        print("I am %s , get res: %s---%s" % (self.name, "ResB", time.time()))
        time.sleep(0.2)

        Rlock.acquire()  # count=2
        print("I am %s , get res: %s---%s" % (self.name, "ResA", time.time()))
        Rlock.release()

        Rlock.release()  # count=0


if __name__ == "__main__":

    print("start---------------------------%s" % time.time())

    for i in range(0, 10):
        my_thread = MyThread()
        my_thread.start()

########### output #############
start---------------------------1513769754.7566423
I am Thread-1 , get res: ResA---1513769754.7566423
I am Thread-1 , get res: ResB---1513769754.7566423
I am Thread-1 , get res: ResB---1513769754.7566423
I am Thread-1 , get res: ResA---1513769754.9667294
I am Thread-2 , get res: ResA---1513769754.9667294
I am Thread-2 , get res: ResB---1513769754.9667294
I am Thread-2 , get res: ResB---1513769754.9667294
I am Thread-2 , get res: ResA---1513769755.174556
I am Thread-4 , get res: ResA---1513769755.174556
I am Thread-4 , get res: ResB---1513769755.174556
I am Thread-4 , get res: ResB---1513769755.174556
I am Thread-4 , get res: ResA---1513769755.375143
I am Thread-6 , get res: ResA---1513769755.375143
I am Thread-6 , get res: ResB---1513769755.375143
I am Thread-6 , get res: ResB---1513769755.375143
I am Thread-6 , get res: ResA---1513769755.5759225
I am Thread-8 , get res: ResA---1513769755.5759225
I am Thread-8 , get res: ResB---1513769755.5759225
I am Thread-8 , get res: ResB---1513769755.5759225
I am Thread-8 , get res: ResA---1513769755.7806442
I am Thread-10 , get res: ResA---1513769755.7806442
I am Thread-10 , get res: ResB---1513769755.7806442
I am Thread-10 , get res: ResB---1513769755.7806442
I am Thread-10 , get res: ResA---1513769755.9907699
I am Thread-5 , get res: ResA---1513769755.9907699
I am Thread-5 , get res: ResB---1513769755.9907699
I am Thread-5 , get res: ResB---1513769755.9907699
I am Thread-5 , get res: ResA---1513769756.200868
I am Thread-9 , get res: ResA---1513769756.200868
I am Thread-9 , get res: ResB---1513769756.200868
I am Thread-9 , get res: ResB---1513769756.200868
I am Thread-9 , get res: ResA---1513769756.4108765
I am Thread-7 , get res: ResA---1513769756.4108765
I am Thread-7 , get res: ResB---1513769756.4108765
I am Thread-7 , get res: ResB---1513769756.4108765
I am Thread-7 , get res: ResA---1513769756.6209362
I am Thread-3 , get res: ResA---1513769756.6209362
I am Thread-3 , get res: ResB---1513769756.6209362
I am Thread-3 , get res: ResB---1513769756.6209362
I am Thread-3 , get res: ResA---1513769756.8310442
import threading
import time

# mutexA = threading.Lock()
# mutexB = threading.Lock()

Rlock = threading.RLock()


class MyThread(threading.Thread):
    def __init__(self):
        threading.Thread.__init__(self)

    def run(self):
        self.fun1()
        self.fun2()

    def fun1(self):
        Rlock.acquire()  # 如果锁被占用,则阻塞在这里,等待锁的释放

        print("I am %s , get res: %s---%s" % (self.name, "ResA", time.time()))

        Rlock.acquire()  # count=2
        print("I am %s , get res: %s---%s" % (self.name, "ResB", time.time()))
        Rlock.release()  # count-1

        Rlock.release()  # count-1 =0

    def fun2(self):
        Rlock.acquire()  # count=1 Rlock的count=0后,线程1比其它线程快(其它线程还没醒),因此继续拿到Rlock
        print("I am %s , get res: %s---%s" % (self.name, "ResB", time.time()))
        # time.sleep(0.2)

        Rlock.acquire()  # count=2
        print("I am %s , get res: %s---%s" % (self.name, "ResA", time.time()))
        Rlock.release()

        Rlock.release()  # count=0


if __name__ == "__main__":

    print("start---------------------------%s" % time.time())

    for i in range(0, 10):
        my_thread = MyThread()
        my_thread.start()

######### output ###########
start---------------------------1513770352.8502424
I am Thread-1 , get res: ResA---1513770352.8502424
I am Thread-1 , get res: ResB---1513770352.8502424
I am Thread-1 , get res: ResB---1513770352.8502424
I am Thread-1 , get res: ResA---1513770352.8502424
I am Thread-2 , get res: ResA---1513770352.8502424
I am Thread-2 , get res: ResB---1513770352.8502424
I am Thread-2 , get res: ResB---1513770352.8502424
I am Thread-2 , get res: ResA---1513770352.8502424
I am Thread-3 , get res: ResA---1513770352.8502424
I am Thread-3 , get res: ResB---1513770352.8502424
I am Thread-3 , get res: ResB---1513770352.8502424
I am Thread-3 , get res: ResA---1513770352.8502424
I am Thread-4 , get res: ResA---1513770352.8502424
I am Thread-4 , get res: ResB---1513770352.8502424
I am Thread-4 , get res: ResB---1513770352.8502424
I am Thread-4 , get res: ResA---1513770352.8502424
I am Thread-5 , get res: ResA---1513770352.8502424
I am Thread-5 , get res: ResB---1513770352.8502424
I am Thread-5 , get res: ResB---1513770352.8502424
I am Thread-5 , get res: ResA---1513770352.8502424
I am Thread-6 , get res: ResA---1513770352.8502424
I am Thread-6 , get res: ResB---1513770352.8502424
I am Thread-6 , get res: ResB---1513770352.8502424
I am Thread-6 , get res: ResA---1513770352.8502424
I am Thread-7 , get res: ResA---1513770352.860248
I am Thread-7 , get res: ResB---1513770352.860248
I am Thread-7 , get res: ResB---1513770352.860248
I am Thread-7 , get res: ResA---1513770352.860248
I am Thread-8 , get res: ResA---1513770352.860248
I am Thread-8 , get res: ResB---1513770352.860248
I am Thread-8 , get res: ResB---1513770352.860248
I am Thread-8 , get res: ResA---1513770352.860248
I am Thread-9 , get res: ResA---1513770352.860248
I am Thread-9 , get res: ResB---1513770352.860248
I am Thread-9 , get res: ResB---1513770352.860248
I am Thread-9 , get res: ResA---1513770352.860248
I am Thread-10 , get res: ResA---1513770352.860248
I am Thread-10 , get res: ResB---1513770352.860248
I am Thread-10 , get res: ResB---1513770352.860248
I am Thread-10 , get res: ResA---1513770352.860248
Semaphore(信号量)
互斥锁 同时只允许一个线程更改数据,而Semaphore是同时允许一定数量的线程更改数据 ,比如厕所有3个坑,那最多只允许3个人上厕所,后面的人只能等里面有人出来了才能再进去。
import threading, time
#_*_coding:utf-8_*_

def run(n):
    semaphore.acquire()
    time.sleep(1)
    print("run the thread: %s\n" % n)
    semaphore.release()


if __name__ == '__main__':

    num = 0
    semaphore = threading.BoundedSemaphore(5)  # 最多允许5个线程同时运行
    for i in range(20):
        t = threading.Thread(target=run, args=(i,))
        t.start()

while threading.active_count() != 1:
    pass  # print threading.active_count()
else:
    print('----all threads done---')
    print(num)

##############################
"D:\Program Files\Python2\python.exe" D:/PythonProject/Socket/Server.py
run the thread: 1
run the thread: 0


run the thread: 2

run the thread: 3
run the thread: 4


run the thread: 6
run the thread: 5
run the thread: 7


run the thread: 8
run the thread: 9


run the thread: 10
run the thread: 12
run the thread: 13
run the thread: 11
run the thread: 14


run the thread: 17
run the thread: 18
run the thread: 19
run the thread: 15
run the thread: 16


----all threads done---
0

Process finished with exit code 0
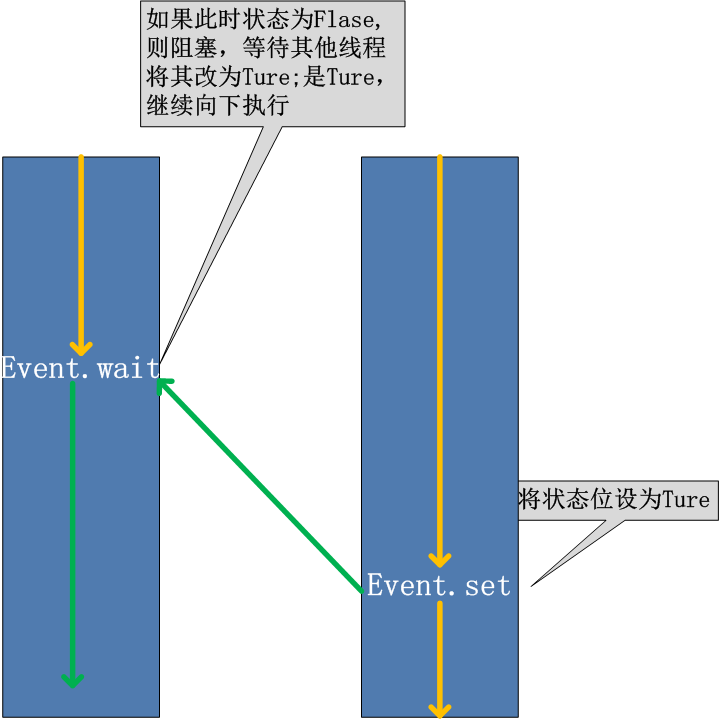
event协调线程运行
threading.Event机制类似于一个线程向其它多个线程发号施令的模式,其它线程都会持有一个threading.Event的对象,这些线程都会等待这个事件的“发生”,如果此事件一直不发生,那么这些线程将会阻塞,直至事件的“发生”。主要是来取代time.sleep(),因为你不知道目标对象要执行多久,所以用event,其实就是类似Flag的概念来精确控制,当然可以自己自定义,但是python提供了就没必要重复造轮子了。
Event对象方法:
    set():设置Event对象内部的信号为真,
    isSet():判断内部信号标志的状态,当Event对象使用set()方法后,isSet()方法返回真
    clear():清除内部信号标志,当使用clear()方法后,isSet()方法就会返回假
    wait():当内部信号为真的时才会执行,如果内部信号为假则会一直等待
#_*_coding:utf-8_*_
import threading
import time
import logging

logging.basicConfig(level=logging.DEBUG, format='(%(threadName)-10s) %(message)s', )


def worker():
    logging.debug('Waiting for redis ready...')
    event.wait()
    logging.debug('redis ready, and connect to redis server and do some work [%s]', time.ctime())
    time.sleep(1)


if __name__ == '__main__':
    event = threading.Event()
    for i in range(2):
        t = threading.Thread(target=worker,)
        t.start()

    logging.debug('first of all, check redis server, make sure it is OK, and then trigger the redis ready event')
    time.sleep(3)  # simulate the check progress
    event.set()

####################################
"D:\Program Files\Python2\python.exe" D:/PythonProject/Socket/Server.py
(Thread-1  ) Waiting for redis ready...
(Thread-2  ) Waiting for redis ready...
(MainThread) first of all, check redis server, make sure it is OK, and then trigger the redis ready event
(Thread-1  ) redis ready, and connect to redis server and do some work [Tue Mar 21 16:18:55 2017]
(Thread-2  ) redis ready, and connect to redis server and do some work [Tue Mar 21 16:18:55 2017]
#_*_coding:utf-8_*_
import threading
import time
import logging

logging.basicConfig(level=logging.DEBUG, format='(%(threadName)-10s) %(message)s', )


def worker():
    while not event.is_set():
        logging.debug('Waiting for redis ready...')
        event.wait(1)
    # logging.debug('Waiting for redis ready...')
    # event.wait()
    logging.debug('redis ready, and connect to redis server and do some work [%s]', time.ctime())
    time.sleep(1)


if __name__ == '__main__':
    event = threading.Event()
    for i in range(2):
        t = threading.Thread(target=worker,)
        t.start()

    logging.debug('first of all, check redis server, make sure it is OK, and then trigger the redis ready event')
    time.sleep(3)  # simulate the check progress
    event.set()
########################
"D:\Program Files\Python2\python.exe" D:/PythonProject/Socket/Server.py
(Thread-1  ) Waiting for redis ready...
(Thread-2  ) Waiting for redis ready...
(MainThread) first of all, check redis server, make sure it is OK, and then trigger the redis ready event
(Thread-1  ) Waiting for redis ready...
(Thread-2  ) Waiting for redis ready...
(Thread-1  ) Waiting for redis ready...
(Thread-2  ) Waiting for redis ready...
(Thread-1  ) Waiting for redis ready...
(Thread-1  ) redis ready, and connect to redis server and do some work [Tue Mar 21 16:34:13 2017]
(Thread-2  ) redis ready, and connect to redis server and do some work [Tue Mar 21 16:34:13 2017]
线程间通信
共享变量
Queue
#通过queue的方式进行线程间同步
from queue import Queue


import time
import threading


def get_detail_html(queue):
    #爬取文章详情页
    while True:
        url = queue.get()
        # for url in detail_url_list:
        print("get detail html started")
        time.sleep(2)
        print("get detail html end")


def get_detail_url(queue):
    # 爬取文章列表页
    while True:
        print("get detail url started")
        time.sleep(4)
        for i in range(20):
            queue.put("http://projectsedu.com/{id}".format(id=i))
        print("get detail url end")


#1. 线程通信方式- 共享变量

if  __name__ == "__main__":
    detail_url_queue = Queue(maxsize=1000)


    thread_detail_url = threading.Thread(target=get_detail_url, args=(detail_url_queue,))
    for i in range(10):
        html_thread = threading.Thread(target=get_detail_html, args=(detail_url_queue,))
        html_thread.start()
    # # thread2 = GetDetailUrl("get_detail_url")
    start_time = time.time()
    # thread_detail_url.start()
    # thread_detail_url1.start()
    #
    # thread1.join()
    # thread2.join()
    detail_url_queue.task_done()
    detail_url_queue.join()

    #当主线程退出的时候, 子线程kill掉
    print ("last time: {}".format(time.time()-start_time))
ThreadPoolExecutor
为什么要线程池
主线程中可以获取某一个线程的状态或者某一个任务的状态,以及返回值
当一个线程完成的时候我们主线程能立即知道
futures可以让多线程和多进程编码接口一致
from concurrent.futures import ThreadPoolExecutor

import time

def get_html(times):
    time.sleep(times)
    print("get page {} success".format(times))
    return times


executor = ThreadPoolExecutor(max_workers=2)
#通过submit函数提交执行的函数到线程池中, submit 是立即返回
task1 = executor.submit(get_html, (3))
task2 = executor.submit(get_html, (2))

#done方法用于判定某个任务是否完成
print(task1.done())
# print(task1.cancel()) # 取消未执行的线程
time.sleep(4)
print(task1.done())
#
# #result方法可以获取task的执行结果
print(task1.result())

########
False
get page 2 success
get page 3 success
True
3
获取执行完成的线程
from concurrent.futures import ThreadPoolExecutor, as_completed

import time

def get_html(times):
    time.sleep(times)
    print("get page {} success".format(times))
    return times


executor = ThreadPoolExecutor(max_workers=2)

#要获取已经成功的task的返回
urls = [3,2,4]
all_task = [executor.submit(get_html, (url)) for url in urls]


for future in as_completed(all_task):
    data = future.result()
    print("get {} page".format(data))

#####
get page 2 success
get 2 page
get page 3 success
get 3 page
get page 4 success
get 4 page
from concurrent.futures import ThreadPoolExecutor

import time

def get_html(times):
    time.sleep(times)
    print("get page {} success".format(times))
    return times

executor = ThreadPoolExecutor(max_workers=2)

#要获取已经成功的task的返回
urls = [3,2,4]

# 通过executor的map获取已经完成的task的值
for data in executor.map(get_html, urls):
    print("get {} page".format(data))

#########
get page 2 success
get page 3 success
get 3 page
get 2 page
get page 4 success
get 4 page
阻塞
from concurrent.futures import ThreadPoolExecutor, wait, FIRST_COMPLETED

import time

def get_html(times):
    time.sleep(times)
    print("get page {} success".format(times))
    return times


executor = ThreadPoolExecutor(max_workers=2)

#要获取已经成功的task的返回
urls = [3,2,4]
all_task = [executor.submit(get_html, (url)) for url in urls]
wait(all_task, return_when=FIRST_COMPLETED)  # 阻塞
print("main")

#########
get page 2 success
main
get page 3 success
get page 4 success
multiprocessing
multiprocessing用法和threading相似
优点:充分利用CPU
#!/usr/bin/python
#enconding:utf8

import multiprocessing
import os
import time

def func(i):
    print 'hello',i,os.getpid(),os.getppid()
    time.sleep(1)

for i in xrange(10):
    p = multiprocessing.Process(target=func,args=(i,))
    p.start()
# python 1.py
hello 0 28294 28293
hello 1 28295 28293
hello 2 28296 28293
hello 3 28297 28293
hello 4 28298 28293
hello 5 28299 28293
hello 6 28300 28293
hello 7 28301 28293
hello 8 28302 28293
hello 9 28303 28293
^Z
[2]+  Stopped                 python 1.py

# ps -ef  | grep 28293
root     28293 28166  0 00:28 pts/0    00:00:00 python 1.py
root     28294 28293  0 00:28 pts/0    00:00:00 python 1.py
root     28295 28293  0 00:28 pts/0    00:00:00 python 1.py
root     28296 28293  0 00:28 pts/0    00:00:00 python 1.py
root     28297 28293  0 00:28 pts/0    00:00:00 python 1.py
root     28298 28293  0 00:28 pts/0    00:00:00 python 1.py
root     28299 28293  0 00:28 pts/0    00:00:00 python 1.py
root     28300 28293  0 00:28 pts/0    00:00:00 python 1.py
root     28301 28293  0 00:28 pts/0    00:00:00 python 1.py
root     28302 28293  0 00:28 pts/0    00:00:00 python 1.py
root     28303 28293  0 00:28 pts/0    00:00:00 python 1.py
root     28305 28166  0 00:28 pts/0    00:00:00 grep 28293
#!/usr/bin/python
#enconding:utf8

import multiprocessing

def func():
    while True:
        pass  #每个进程不结束,服务器炸了

for i in xrange(10):
    p = multiprocessing.Process(target=func,args=())
    p.start()
进程池
为什么需要进程池:启动一个线程消耗很低,启动一个进程,基本等于复制一份主进程的内存,进程池的作用就是限制运行进程的数量
multiprocessing.Pool 很方便地同时自动处理成百上千个并行操作,脚本的复杂度也大大降低
pool = multiprocessing.Pool(process=3)  设置最大进程数,默认值为CPU最大核数
result  = pool.apply_async(func=fargs=(i,))  向进程池提交非阻塞目的请求,但result.get()是阻塞的
pool.close() 等待池中的worker进程执行结束在关闭pool
pool.terminate()  直接关闭pool
pool.join()  等待进程池中的worker进程执行完毕,阻塞主进程。但必须使用在pool.close()或pool.terminate() 之后
#coding:utf-8
from  multiprocessing import Process, Pool
import time


def Foo(i):
    time.sleep(2)
    print('-->exec done:',i+100)

pool = Pool(5)

for i in range(10):
    pool.apply_async(func=Foo, args=(i,),)


print('end')
pool.close()
pool.join()  # 进程池中进程执行完毕后再关闭,如果注释,那么程序直接关闭。
#coding:utf-8

from  multiprocessing import Process, Pool
import time


def Foo(i):
    time.sleep(2)
    return i + 100


def Bar(arg):
    print('-->exec done:', arg)


pool = Pool(5)

for i in range(10):
    pool.apply_async(func=Foo, args=(i,), callback=Bar)
    # pool.apply(func=Foo, args=(i,))

print('end')
pool.close()
pool.join()  # 进程池中进程执行完毕后再关闭,如果注释,那么程序直接关闭。

语法二
进程间通信
from multiprocessing import Process, Queue

def f(q):
    global gl_num
    gl_num += 1


if __name__ == '__main__':
    gl_num = 0
    p = Process(target=f, args=(gl_num,))
    p.start()

    print(gl_num)
    p.join()

#######################
NameError: global name 'gl_num' is not defined
不同进程间内存是不共享的,要想实现两个进程间的数据交换,可以用以下方法:
Queue自带加锁,使用方法跟threading里的queue差不多
from multiprocessing import Process, Queue

def f(q):
    q.put([42, None, 'hello'])

if __name__ == '__main__':
    q = Queue()
    p = Process(target=f, args=(q,))
    p.start()
    print(q.get())    # prints "[42, None, 'hello']"
    p.join()
Pipe
from multiprocessing import Process, Pipe

def f(conn):
    conn.send([42, None, 'hello'])
    conn.close()


if __name__ == '__main__':
    parent_conn, child_conn = Pipe()
    p = Process(target=f, args=(child_conn,))
    p2 = Process(target=f, args=(child_conn,))

    p.start()
    p2.start()
    print(parent_conn.recv())  # prints "[42, None, 'hello']"
    print(parent_conn.recv())  # prints "[42, None, 'hello']"
    p.join()
    p2.join()
######################
[42, None, 'hello']
[42, None, 'hello']
Manager
from multiprocessing import Process, Manager


def f(d, l):
    d[1] = '1'
    d['2'] = 2
    d[0] = None
    l.append(1)
    print(l)


if __name__ == '__main__':
    with Manager() as manager:
        d = manager.dict()

        l = manager.list(range(5))
        p_list = []
        for i in range(10):
            p = Process(target=f, args=(d, l))
            p.start()
            p_list.append(p)
        for res in p_list:
            res.join()
        print('d')
        print(d)
        print('l')
        print(l)
进程锁
from multiprocessing import Process, Lock


def f(l, i):
    #l.acquire()
    try:
        print('hello world', i)
    finally:
        pass
        #l.release()


if __name__ == '__main__':
    lock = Lock()

    for num in range(100):
        Process(target=f, args=(lock, num)).start()

###############################################
('hello world', 2)
('hello world', 1)
('hello world', 3)
('hello world', 0)
('hello world', 4)
('hello world', 5)
('hello world', 6)
('hello world', 7)
('hello world', 8)
('hello world', 11)
('hello world', 10)
('hello world', 12)
('hello world', 13)
('hello world', 9)
('hello world', 14)
('hello world', 15)
('hello world', 16)
('hello world', 17)
('hello world', 18)
('hello world', 19)
('hello world', 22)
('hello world', 23)
('hello world', 21)
('hello world', 24)
('hello world', 20)
('hello world', 25)
('hello world', 27)
('hello world', 28)
('hello world', 26)
('hello world', 29)
('hello world', 30)
('hello world', 31)
('hello world', 32)
('hello world', 33)
('hello world', 34)
('hello world', 37)
('hello world', 38)
('hello world', 36)
('hello world', 39)
('hello world', 35)
('hello world', 40)
('hello world', 41)
('hello world', 42)
('hello world', 43)
('hello world', 44)
('hello world', 45)
('hello world', 46)
('hello world', 47)
('hello world', 48)
('hello world', 49)
('hello world', 52)
('hello world', 53)
('hello world', 51)
('hello world', 54)
('hello world', 50)
('hello world', 55)
('hello world', 56)
('hello world', 58)
('hello world', 59)
('hello world', 57)
('hello world', 60)
('hello world', 61)
('hello world', 63)
('hello world', 62)
('hello world', 64)
('hello world', 66)
('hello world', 67)
('hello world', 65)
('hello world', 68)
('hello world', 69)
('hello world', 70)
('hello world', 71)
('hello world', 72)
('hello world', 73)
('hello world', 76)
('hello world', 77)
('hello world', 78)
('hello world', 75)
('hello world', 79)
('hello world', 74)
('hello world', 82)
('hello world', 83)
('hello world', 84)
('hello world', 81)
('hello world', 85)
('hello world', 80)
('hello world', 88)
('hello world', 89)
('hello world', 90)
('hello world', 87)
('hello world', 91)
('hello world', 86)
('hello world', 94)
('hello world', 95)
('hello world', 93)
('hello world', 96)
('hello world', 92)
('hello world', 97)
('hello world', 99)
('hello world', 98)
from multiprocessing import Process, Lock


def f(l, i):
l.acquire()
try:
print('hello world', i)
finally:
l.release()


if __name__ == '__main__':
lock = Lock()

for num in range(100):
Process(target=f, args=(lock, num)).start()
#####################################
"D:\Program Files\Python2\python.exe" D:/PythonProject/Socket/Server.py
('hello world', 0)
('hello world', 1)
('hello world', 2)
('hello world', 3)
('hello world', 4)
('hello world', 5)
('hello world', 6)
('hello world', 7)
('hello world', 8)
('hello world', 9)
('hello world', 10)
('hello world', 11)
('hello world', 12)
('hello world', 14)
('hello world', 13)
('hello world', 15)
('hello world', 16)
('hello world', 17)
('hello world', 18)
('hello world', 19)
('hello world', 20)
('hello world', 21)
('hello world', 22)
('hello world', 23)
('hello world', 24)
('hello world', 25)
('hello world', 26)
('hello world', 27)
('hello world', 28)
('hello world', 29)
('hello world', 30)
('hello world', 31)
('hello world', 33)
('hello world', 32)
('hello world', 35)
('hello world', 34)
('hello world', 36)
('hello world', 37)
('hello world', 38)
('hello world', 39)
('hello world', 40)
('hello world', 41)
('hello world', 42)
('hello world', 43)
('hello world', 44)
('hello world', 45)
('hello world', 46)
('hello world', 47)
('hello world', 48)
('hello world', 49)
('hello world', 50)
('hello world', 51)
('hello world', 54)
('hello world', 52)
('hello world', 53)
('hello world', 55)
('hello world', 58)
('hello world', 57)
('hello world', 59)
('hello world', 56)
('hello world', 61)
('hello world', 60)
('hello world', 62)
('hello world', 63)
('hello world', 64)
('hello world', 66)
('hello world', 65)
('hello world', 67)
('hello world', 68)
('hello world', 69)
('hello world', 70)
('hello world', 71)
('hello world', 74)
('hello world', 72)
('hello world', 73)
('hello world', 75)
('hello world', 76)
('hello world', 77)
('hello world', 78)
('hello world', 79)
('hello world', 82)
('hello world', 80)
('hello world', 81)
('hello world', 84)
('hello world', 83)
('hello world', 86)
('hello world', 85)
('hello world', 87)
('hello world', 88)
('hello world', 89)
('hello world', 90)
('hello world', 91)
('hello world', 93)
('hello world', 94)
('hello world', 95)
('hello world', 92)
('hello world', 96)
('hello world', 97)
('hello world', 98)
('hello world', 99)

Process finished with exit code 0
Coroutine
线程和进程的操作是由程序触发系统接口,最后的执行者是系统;协程的操作则是程序员。
协程存在的意义:对于多线程应用,CPU通过切片的方式来切换线程间的执行,线程切换时需要耗时(保存状态,下次继续)。协程,则只使用一个线程,在一个线程中规定某个代码块执行顺序。
协程的适用场景:当程序中存在大量不需要CPU的操作时(IO),适用于协程;
python有封装好的协程模块:greenlet(手动切换) gevent(自动切换,封装了greenlet)
greenlet:遇到IO阻塞时要手动切换任务
from greenlet import greenlet
def test1():
    print(12)
    gr2.switch()
    print(34)
    gr2.switch()

def test2():
    print(56)
    gr1.switch()
    print(78)

gr1 = greenlet(test1) #启动一个携程
gr2 = greenlet(test2)
gr1.switch()
###########################
12
56
34
78
gevent :遇到IO阻塞时会自动切换任务
__author__ = "Alex Li"

from urllib import request
import socket
import time
import gevent

from gevent import socket, monkey

monkey.patch_all()  #把当前程序的IO操作做上标记

def f(url):
    print('GET: %s' % url)
    resp = request.urlopen(url)
    data = resp.read()
    print('%d bytes received from %s.' % (len(data),url))

urls = ['https://www.python.org/',
        'https://www.yahoo.com/',
        ]

time_start = time.time()
for url in urls:
    f(url)
print('同步cost',time.time()-time_start)

# async_time_START = time.time()
#
# gevent.joinall(
#     [
#         gevent.spawn(f,'https://www.python.org/'),
#         gevent.spawn(f,'https://www.python.org/'),
#
#     ]
# )
#
# print('同步cost',time.time()-async_time_START)

###########################
GET: https://www.python.org/
47436 bytes received from https://www.python.org/.
GET: https://www.yahoo.com/
415831 bytes received from https://www.yahoo.com/.
同步cost 2.0827739238739014
__author__ = "Alex Li"

from urllib import request
import socket
import time
import gevent

from gevent import socket, monkey

monkey.patch_all()  #把当前程序的IO操作做上标记

def f(url):
    print('GET: %s' % url)
    resp = request.urlopen(url)
    data = resp.read()
    print('%d bytes received from %s.' % (len(data),url))

# urls = ['https://www.python.org/',
#         'https://www.yahoo.com/',
#         ]
#
# time_start = time.time()
# for url in urls:
#     f(url)
# print('同步cost',time.time()-time_start)

async_time_START = time.time()

gevent.joinall(
    [
        gevent.spawn(f,'https://www.python.org/'),
        gevent.spawn(f,'https://www.python.org/'),

    ]
)

print('同步cost',time.time()-async_time_START)
###################################

GET: https://www.python.org/
GET: https://www.python.org/
47436 bytes received from https://www.python.org/.
47436 bytes received from https://www.python.org/.
同步cost 1.0173180103302002
使用gevent
ProcessPoolExecutor
1. 对于耗费cpu的操作,多进程优于多线程
2. 对于io操作来说,多线程优于多进程(但不明显)
CPU密集型任务
import time
from concurrent.futures import ThreadPoolExecutor, as_completed
from concurrent.futures import ProcessPoolExecutor

def fib(n):
    if n<=2:
        return 1
    return fib(n-1)+fib(n-2)

if __name__ == "__main__":
    with ProcessPoolExecutor(3) as executor:
        all_task = [executor.submit(fib, (num)) for num in range(25,40)]
        start_time = time.time()
        for future in as_completed(all_task):
            data = future.result()
            print("exe result: {}".format(data))

        print("last time is: {}".format(time.time()-start_time))

#########
exe result: 75025
exe result: 121393
exe result: 196418
exe result: 317811
exe result: 514229
exe result: 832040
exe result: 1346269
exe result: 2178309
exe result: 3524578
exe result: 5702887
exe result: 9227465
exe result: 14930352
exe result: 24157817
exe result: 39088169
exe result: 63245986
last time is: 32.07160663604736
import time
from concurrent.futures import ThreadPoolExecutor, as_completed
from concurrent.futures import ProcessPoolExecutor

def fib(n):
    if n<=2:
        return 1
    return fib(n-1)+fib(n-2)

if __name__ == "__main__":
    with ThreadPoolExecutor(3) as executor:
        all_task = [executor.submit(fib, (num)) for num in range(25,40)]
        start_time = time.time()
        for future in as_completed(all_task):
            data = future.result()
            print("exe result: {}".format(data))

        print("last time is: {}".format(time.time()-start_time))

########
exe result: 75025
exe result: 121393
exe result: 196418
exe result: 317811
exe result: 514229
exe result: 832040
exe result: 1346269
exe result: 2178309
exe result: 3524578
exe result: 5702887
exe result: 9227465
exe result: 14930352
exe result: 24157817
exe result: 39088169
exe result: 63245986
last time is: 48.206392765045166
IO密集型任务
import time
from concurrent.futures import ThreadPoolExecutor, as_completed

def random_sleep(n):
    time.sleep(n)
    return n

if __name__ == "__main__":
    with ThreadPoolExecutor(3) as executor:
        all_task = [executor.submit(random_sleep, (num)) for num in [2]*30]
        start_time = time.time()
        for future in as_completed(all_task):
            data = future.result()
            print("exe result: {}".format(data))

        print("last time is: {}".format(time.time()-start_time))


#########
exe result: 2
exe result: 2
exe result: 2
exe result: 2
exe result: 2
exe result: 2
exe result: 2
exe result: 2
exe result: 2
exe result: 2
exe result: 2
exe result: 2
exe result: 2
exe result: 2
exe result: 2
exe result: 2
exe result: 2
exe result: 2
exe result: 2
exe result: 2
exe result: 2
exe result: 2
exe result: 2
exe result: 2
exe result: 2
exe result: 2
exe result: 2
exe result: 2
exe result: 2
exe result: 2
last time is: 20.008087396621704
import time
from concurrent.futures import ThreadPoolExecutor, as_completed
from concurrent.futures import ProcessPoolExecutor

def random_sleep(n):
    time.sleep(n)
    return n

if __name__ == "__main__":
    with ProcessPoolExecutor(3) as executor:
        all_task = [executor.submit(random_sleep, (num)) for num in [2]*30]
        start_time = time.time()
        for future in as_completed(all_task):
            data = future.result()
            print("exe result: {}".format(data))

        print("last time is: {}".format(time.time()-start_time))


############
exe result: 2
exe result: 2
exe result: 2
exe result: 2
exe result: 2
exe result: 2
exe result: 2
exe result: 2
exe result: 2
exe result: 2
exe result: 2
exe result: 2
exe result: 2
exe result: 2
exe result: 2
exe result: 2
exe result: 2
exe result: 2
exe result: 2
exe result: 2
exe result: 2
exe result: 2
exe result: 2
exe result: 2
exe result: 2
exe result: 2
exe result: 2
exe result: 2
exe result: 2
exe result: 2
last time is: 20.199034214019775
asyncio
asyncio和gevent一样,前者提供给开发者的接口更丰富,而且前者是python3的原生异步库
尽量使用async和await而不是coroutine装饰器和yield from,因为后者是一种过度方案(基于yield模拟协程的效率不如原生协助)
# 使用asyncio
import asyncio
import time
async def get_html(url):
    print("start get url")
    await asyncio.sleep(2)
    print("end get url")

if __name__ == "__main__":
    start_time = time.time()
    loop = asyncio.get_event_loop()
    tasks = [get_html("http://www.imooc.com") for i in range(10)]
    loop.run_until_complete(asyncio.wait(tasks))
    print(time.time()-start_time)


####输出####
start get url
start get url
start get url
start get url
start get url
start get url
start get url
start get url
start get url
start get url
end get url
end get url
end get url
end get url
end get url
end get url
end get url
end get url
end get url
end get url
2.0027308464050293
import gevent
from gevent import  monkey
monkey.patch_all()  #把当前程序的IO操作做上标记
import time

def get_html(url):
    print("start get url")
    time.sleep(2)
    print("end get url")


if __name__ == "__main__":
    start_time = time.time()
    tasks = [gevent.spawn(get_html, "http://www.imooc.com") for i in range(10)]
    gevent.joinall(tasks)
    print(time.time()-start_time)


##############
start get url
start get url
start get url
start get url
start get url
start get url
start get url
start get url
start get url
start get url
end get url
end get url
end get url
end get url
end get url
end get url
end get url
end get url
end get url
end get url
2.0096302032470703
#获取协程的返回值
import asyncio
import time
from functools import partial
async def get_html(url):
    print("start get url")
    await asyncio.sleep(2)
    return "hy"

def callback(url, future):
    print(url)
    print("send email to hy")

if __name__ == "__main__":
    start_time = time.time()
    loop = asyncio.get_event_loop()
    # get_future = asyncio.ensure_future(get_html("www.cnblogs.com/hyit"))
    task = loop.create_task(get_html("www.cnblogs.com/hyit"))
    task.add_done_callback(partial(callback, "www.cnblogs.com/hyit"))
    loop.run_until_complete(task)
    print(task.result())


#############
start get url
www.cnblogs.com/hyit
send email to hy
hy
#wait 和 gather
import asyncio
import time
async def get_html(url):
    print("start get url")
    await asyncio.sleep(2)
    print("end get url")

if __name__ == "__main__":
    start_time = time.time()
    loop = asyncio.get_event_loop()
    tasks = [get_html("www.cnblogs.com/hyit") for i in range(10)]
    loop.run_until_complete(asyncio.gather(*tasks))
    print(time.time()-start_time)

    #gather和wait的区别
    #gather更加high-level
    # group1 = [get_html("http://projectsedu.com") for i in range(2)]
    # group2 = [get_html("www.cnblogs.com/hyit") for i in range(2)]
    # group1 = asyncio.gather(*group1) # 分组
    # group2 = asyncio.gather(*group2) # 分组
    # group2.cancel() # 取消分组任务
    # loop.run_until_complete(asyncio.gather(group1, group2))
    # print(time.time() - start_time)
#1. loop会被放到future中
#2. 取消future(task)

import asyncio
import time

async def get_html(sleep_times):
    print("waiting")
    await asyncio.sleep(sleep_times)
    print("done after {}s".format(sleep_times))


if __name__ == "__main__":
    task1 = get_html(2)
    task2 = get_html(3)
    task3 = get_html(3)

    tasks = [task1, task2, task3]

    loop = asyncio.get_event_loop()

    try:
        loop.run_until_complete(asyncio.wait(tasks))
    except KeyboardInterrupt as e:
        all_tasks = asyncio.Task.all_tasks()
        for task in all_tasks:
            print("cancel task")
            print(task.cancel())
        loop.stop()
        loop.run_forever()
    finally:
        loop.close()
IO模型
本文讨论的背景是Linux环境下的network IO。
Stevens在文章中一共比较了五种IO Model:

    blocking IO
    nonblocking IO
    IO multiplexing
    signal driven IO(在实际中并不常用,所以我这只提及剩下的四种IO Model。)
    asynchronous IO
再说一下IO发生时涉及的对象和步骤。
对于一个network IO (这里我们以read举例),它会涉及到两个系统对象,一个是调用这个IO的process (or thread),另一个就是系统内核(kernel)。当一个read操作发生时,它会经历两个阶段:

 等待数据准备 (Waiting for the data to be ready)
 将数据从内核拷贝到进程中 (Copying the data from the kernel to the process)
记住这两点很重要,因为这些IO Model的区别就是在两个阶段上各有不同的情况。
阻塞IO
在linux中,默认情况下所有的socket都是blocking,一个典型的读操作流程大概是这样:
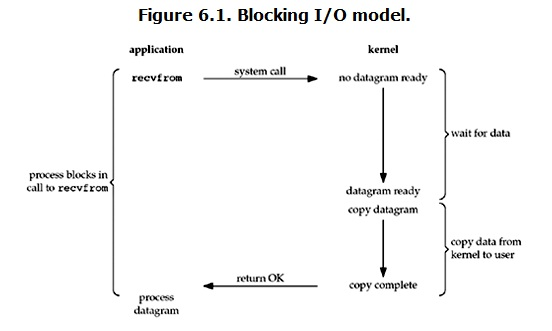
当用户进程调用了recvfrom这个系统调用,kernel就开始了IO的第一个阶段:准备数据。对于network io来说,很多时候数据在一开始还没有到达(比如,还没有收到一个完整的UDP包),这个时候kernel就要等待足够的数据到来。而在用户进程这边,整个进程会被阻塞。当kernel一直等到数据准备好了,它就会将数据从kernel中拷贝到用户内存,然后kernel返回结果,用户进程才解除block的状态,重新运行起来。
所以,blocking IO的特点就是在IO执行的两个阶段都被block了。
非阻塞IO
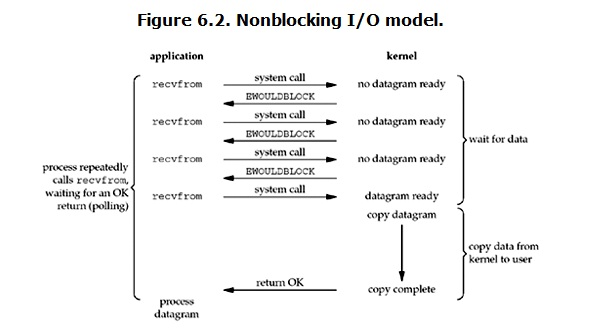
非阻塞的recvfrom系统调用调用之后,进程并没有被阻塞,内核马上返回给进程,如果数据还没准备好,此时会返回一个error。进程在返回之后,可以干点别的事情,然后再发起recvfrom系统调用。重复上面的过程,循环往复的进行recvfrom系统调用。这个过程通常被称之为轮询。轮询检查内核数据,直到数据准备好,再拷贝数据到进程,进行数据处理。需要注意,拷贝数据整个过程,进程仍然是属于阻塞的状态。
优点:能够在等待任务完成的时间里干其他活了(包括提交其他任务,也就是 “后台” 可以有多个任务在同时执行)。

缺点:任务完成的响应延迟增大了,因为每过一段时间才去轮询一次read操作,而任务可能在两次轮询之间的任意时间完成。这会导致整体数据吞吐量的降低。
IO多路复用
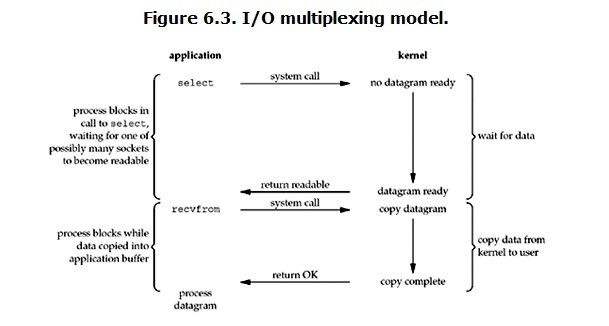
select/epoll的好处就在于单个process就可以同时处理多个网络连接的IO。它的基本原理就是select/epoll这个function会不断的轮询所负责的所有socket,当某个socket有数据到达了,就通知用户进程。
当用户进程调用了select,那么整个进程会被block,而同时,kernel会“监视”所有select负责的socket,当任何一个socket中的数据准备好了,select就会返回。这个时候用户进程再调用read操作,将数据从kernel拷贝到用户进程。
这个图和blocking IO的图其实并没有太大的不同,事实上,还更差一些。因为这里需要使用两个system call (select 和 recvfrom),而blocking IO只调用了一个system call (recvfrom)。但是,用select的优势在于它可以同时处理多个connection。(多说一句。所以,如果处理的连接数不是很高的话,使用select/epoll的web server不一定比使用multi-threading + blocking IO的web server性能更好,可能延迟还更大。select/epoll的优势并不是对于单个连接能处理得更快,而是在于能处理更多的连接。)
在IO multiplexing Model中,实际中,对于每一个socket,一般都设置成为non-blocking,但是,如上图所示,整个用户的process其实是一直被block的。只不过process是被select这个函数block,而不是被socket IO给block。

结论: select的优势在于可以处理多个连接,不适用于单个连接
异步IO
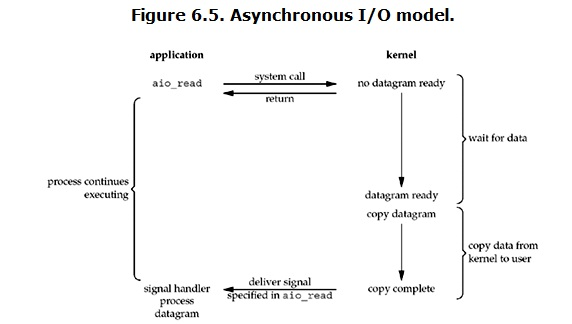
用户进程发起read操作之后,立刻就可以开始去做其它的事。而另一方面,从kernel的角度,当它受到一个asynchronous read之后,首先它会立刻返回,所以不会对用户进程产生任何block。然后,kernel会等待数据准备完成,然后将数据拷贝到用户内存,当这一切都完成之后,kernel会给用户进程发送一个signal,告诉它read操作完成了。
总结
1 阻塞IO:全程阻塞

2 非阻塞IO:
        发送多次系统调用;
     优点:wait for data时无阻塞
        缺点:1 系统调用太多 2 数据不是实时接受的

        两个阶段:wait for data:非阻塞
                  copy data   :阻塞

3 IO多路复用(监听多个连接)

  1 是一个非零整数,不会变
  2 收发数据的时候,对于接收端而言,数据先到内核空间,然后copy到用户空间,同时,内核空间数据清除。

  特点:1 全程(wait for data,copy)阻塞
       2 能监听多个文件描述符
        实现并发

4 异步IO
  全程无阻塞

5 驱动信号

总结:
同步:  阻塞IO  非阻塞IO  io多路复用
异步:  异步IO

 浙公网安备 33010602011771号