Android 之 SimpleAdapter 学习笔记
 要是觉得内容枯燥,您可以点击左下角的播放按钮,让您在音乐的熏陶下愉快的阅读
 本文总字数:4974
•SimpleAdapter简介
simpleAdapter 的扩展性最好,可以定义各种各样的布局出来;
可以放上ImageView(图片),还可以放上Button(按钮),CheckBox(复选框)等等。
准备工作
新建一个项目,选择 Empty Activity 选项;
Android Studio 会自动为我们生成两个文件 MainActivity.java 和 activity_main.xml;
activity_main.xml
<?xml version="1.0" encoding="utf-8"?>
<LinearLayout xmlns:android="http://schemas.android.com/apk/res/android"
    xmlns:app="http://schemas.android.com/apk/res-auto"
    xmlns:tools="http://schemas.android.com/tools"
    android:layout_width="match_parent"
    android:layout_height="match_parent"
    android:orientation="vertical"
    android:padding="10dp">

    <TextView
        android:layout_width="wrap_content"
        android:layout_height="wrap_content"
        android:text="Test Simple Adapter"
        android:textSize="20sp"
        />

    <!--    为 ListView 设置红色的分割线
            并将分割线宽度设置为 2dp      -->
    <ListView
        android:id="@+id/lv_simple_adapter"
        android:layout_width="wrap_content"
        android:layout_height="wrap_content"
        android:layout_marginTop="10dp"
        android:divider="@color/red"
        android:dividerHeight="2dp"
        />
</LinearLayout>
在 res/layout 新建一个 simple_adapter_item.xml 文件;
simple_adapter_item.xml
<?xml version="1.0" encoding="utf-8"?>
<LinearLayout xmlns:android="http://schemas.android.com/apk/res/android"
    android:layout_width="match_parent"
    android:layout_height="match_parent"
    android:padding="10dp"
    android:orientation="horizontal">

    <ImageView
        android:id="@+id/header"
        android:layout_width="100dp"
        android:layout_height="160dp"
        android:scaleType="centerCrop"
        />
    <LinearLayout
        android:layout_width="match_parent"
        android:layout_height="160dp"
        android:orientation="vertical"
        android:layout_marginLeft="10dp">

        <TextView
            android:id="@+id/name"
            android:layout_width="match_parent"
            android:layout_height="wrap_content"
            android:textSize="20sp"
            android:gravity="left"/>
        <TextView
            android:id="@+id/desc"
            android:layout_width="match_parent"
            android:layout_height="wrap_content"
            android:textSize="13sp"
            android:textColor="@color/gray"
            android:gravity="left"/>
    </LinearLayout>
</LinearLayout>
页面布局说明
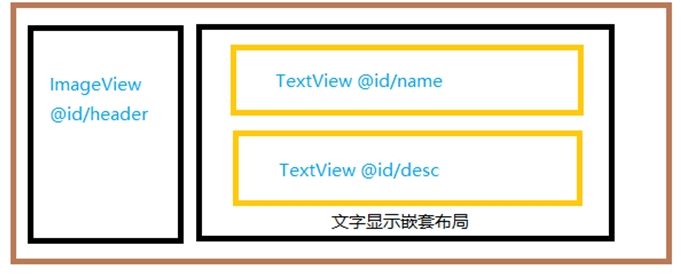
- 整体采用线性布局,并以水平排列。
- 左边第一项定义一个ImageView组件,用来显示图片。
- 右边嵌套一个线性布局,并以垂直排列。
- 嵌套的线性布局里面定义了两个TextView,一个显示名字,一个显示介绍。
simple_adapter_item布局示意图如下:
最后,修改 MainActivity.java 中的代码;
MainActivity.java
public class SimpleAdapterActivity extends AppCompatActivity {

    private ListView listview;
    private String[] name = new String[]{"关羽","孙尚香","娜可露露"};
    private String[] desc = new String[]{
            "暴风雪的远征者,冰凌北地的灾厄之王!\n"+"为我们的永生而战,为我们的不朽而战!\n"+"奉上领地,或者化为冻腐的尘埃!",
            "大小姐驾到,通通闪开!\n"+"来发子弹吗?满足你!\n"+"你,也是本小姐的粉丝吗?",
            "啊里噶多,玛玛哈哈\n"+"萨,特几那赛\n"+"一待!玛玛哈哈"
    };
    private int[] head = new int[]{
            R.drawable.guan_yu,
            R.drawable.sun_shang_xiang,
            R.drawable.na_ke_lu_lu
    };

    @Override
    protected void onCreate(Bundle savedInstanceState) {
        super.onCreate(savedInstanceState);
        setContentView(R.layout.activity_simple_adapter_main);
        SimpleAdapter adapter = new SimpleAdapter(this,getData(),R.layout.simple_adapter_item,new String[]{"name","desc","header"},new int[]{
                R.id.name,R.id.desc,R.id.header
        });

        listview = findViewById(R.id.lv_simple_adapter);
        listview.setAdapter(adapter);
    }

    private List<Map<String,Object>> getData(){

        List<Map<String,Object>> list = new ArrayList<>();

        for(int i = 0;i < name.length;i++){
            Map<String,Object> map = new HashMap<>();
            map.put("name",name[i]);
            map.put("desc",desc[i]);
            map.put("header",head[i]);
            list.add(map);
        }
        return list;
    }
}
说明
- 定义了一个 String 数组 name,用来定义名称。
- 定义了一个 String 数组 desc,用来定义介绍。
- 准备几张图片,拷贝到 drawable 文件夹(网上随便找几张就行),然后定义一个 int 数组,把图片 ID 加进来。
- 定义一个 List<Map<String,Object>>getData() 方法,用来获取列表项。
- 创建一个 SimpleAdapter 对象。
- 设置 ListView 的 Adapter 为刚创建的 simpleAdapter。
使用 simpleAdapter 的数据项一般都是 HashMap 构成的 List,List 的每一节对应 ListView 的每一行。
HashMap 的每个键值数据映射到布局文件中对应id的组件上。
因为系统没有对应的布局文件可用,所以需要我们自己定义一个布局 simple_adapter_item.xml。
SimpleAdapter中参数所表达的意思
new SimpleAdapter(Context context, List<? extends Map<String,?>>data,int resource,String[] from,int[] to);
- Context context : 表示上下文对象,就是要展示 ListView 的 Activity,或者是通过 getApplicationContext() 得到的上下文对象
- List<? extends Map<String,?>>data : 用于在列表中显示的数据,传入的数据必须是 List<? extends Map<String,?>> 的实现类
- 比如 List<Map<String,Object>>
- int resource : ListView 中显示的每行子 View 的资源文件,就是位于 layout 文件夹中的 .xml 布局文件
- String[] from : 表示 Map<String,Object> 中存放的 Key 键值,因为它要通过键值才能找到对应的 Value,也就是布局要显示的内容
- int[] to : 表示要显示出来的 resource 布局文件的 R.id.xx 值,它和 from 中的数据源选项要一一对应
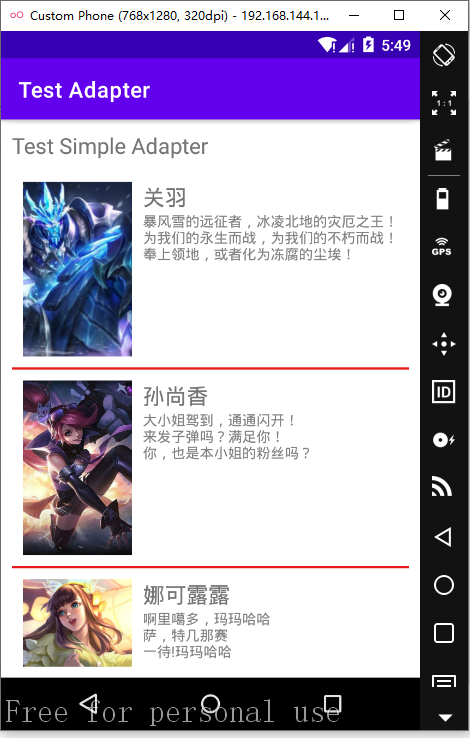
•运行效果
分类:
Android


【推荐】国内首个AI IDE,深度理解中文开发场景,立即下载体验Trae
【推荐】编程新体验,更懂你的AI,立即体验豆包MarsCode编程助手
【推荐】抖音旗下AI助手豆包,你的智能百科全书,全免费不限次数
【推荐】轻量又高性能的 SSH 工具 IShell:AI 加持,快人一步
· 从 HTTP 原因短语缺失研究 HTTP/2 和 HTTP/3 的设计差异
· AI与.NET技术实操系列:向量存储与相似性搜索在 .NET 中的实现
· 基于Microsoft.Extensions.AI核心库实现RAG应用
· Linux系列:如何用heaptrack跟踪.NET程序的非托管内存泄露
· 开发者必知的日志记录最佳实践
· TypeScript + Deepseek 打造卜卦网站:技术与玄学的结合
· Manus的开源复刻OpenManus初探
· AI 智能体引爆开源社区「GitHub 热点速览」
· 从HTTP原因短语缺失研究HTTP/2和HTTP/3的设计差异
· 三行代码完成国际化适配,妙~啊~