

持久化存储
在 Kubernetes 中,Pod 的存储通常通过 Volume 对象来管理。Volume 提供了一种在 Pod 生命周期内持久化数据的机制,并且可以跨容器共享。以下是对 Kubernetes Volume 的详细介绍,包括各种 Volume 类型和它们的用途:
-
-
Pod 生命周期与 Volume:Volume 的数据在 Pod 生命周期内保持持久。如果 Pod 被删除或重新调度到不同的节点,Volume 的数据仍然保留,除非指定的 Volume 类型与 Pod 生命周期绑定(如
emptyDir
- emptyDir: 临时目录,Pod重启时数据丢失。
- hostPath: 将宿主机的文件或目录挂载到Pod中。
- nfs: 使用NFS服务器共享存储。
- persistentVolumeClaim: 使用持久卷声明。
- configMap: 从ConfigMap中获取配置文件。
- secret: 从Secret中获取敏感数据。
- awsElasticBlockStore: AWS的EBS卷。
- azureDisk: Azure的磁盘。
- gcePersistentDisk: Google Cloud的持久磁盘。
数据共享:在同一 Pod 中的多个容器可以共享同一个 emptyDir 卷,实现数据共享。
性能:emptyDir

apiVersion: apps/v1
kind: Pod
metadata:
  name: nginx-emptydir
  labels:
    app: myapp  # Pod 的标签
spec:
  containers:
    - name: nginx
      image: harbor.hiuiu.com/nginx/nginx:1.21.5  # 使用的 NGINX 镜像
      ports:
        - containerPort: 80  # 容器暴露的端口
      volumeMounts:
        - mountPath: /cache  # 容器内部的挂载路径
          name: cache-volume  # 绑定到的卷的名称
  volumes:
    - name: cache-volume
      emptyDir: {}  # 使用 emptyDir 卷,它会在 Pod 生命周期内被创建

#可做资源限制
emptyDir:
  sizeLimit: 500Mi


#查询到pod所在的node和uid后,在目标文件夹下新建文件
cd /var/lib/kubelet/pods/2be38576-c950-44d8-b911-d9dbcf22bf10/volumes/kubernetes.io~empty-dir/cache-volume/


#删除pod后,node下的文件一起被删除
kubectl delete -f emptydir.yaml

将宿主机的某个目录(或文件)挂载到容器中。Pod 内部的容器可以访问这个挂载目录。
宿主机路径必须存在:确保宿主机上的 /mnt/data 目录存在,Kubernetes 需要此目录来挂载。否则,Pod 将无法启动。
安全性:使用 hostPath 卷时要仔细考虑安全性问题。Pod 可能拥有对宿主机某些目录的直接访问权限,这可能导致数据泄露或其他安全风险。
数据一致性:hostPath 卷允许在多个 Pods 之间共享同一个目录或文件,但多 Pod 之间的并发访问可能会导致数据一致性问题,因此在使用时要考虑如何管理并发写操作。
apiVersion: apps/v1
kind: Deployment
metadata:
  name: nginx-deployment
  labels:
    app: nginx-dep
spec:
  replicas: 10  # 指定运行5个副本
  selector:
    matchLabels:
      app: nginx  # 用于选择管理 pods 的标签
  template:
    metadata:
      labels:
        app: nginx  # Pod 的标签,标识此 Pod
    spec:
      containers:
        - name: nginx
          image: harbor.hiuiu.com/nginx/nginx:1.21.5  # 使用的 NGINX 镜像
          ports:
            - containerPort: 80  # 暴露的容器端口
          volumeMounts:
            - mountPath: /usr/share/nginx/html  # 容器内的挂载路径
              name: hostpath-volume  # 绑定到的卷名称
      volumes:
        - name: hostpath-volume
          hostPath:
            path: /data/host  # 宿主机上挂载的路径,需要提前手动创建
            type: DirectoryOrCreate
---
apiVersion: v1
kind: Service
metadata:
  name: my-nodeport
spec:
  type: NodePort
  selector:
    app: nginx
  ports:
    - port: 80
      targetPort: 80
      nodePort: 30007


#node上分别创建index.html文件,通过访问service的ip加端口可以访问到pod

# 将容器中多个目录挂载到真机上
apiVersion: v1
kind: Pod
metadata:
  name: pod-host-dir
  labels:
    app: pod-host-dir
spec:
  containers:
  - name: host-dir-container
    image: harbor.hiuiu.com/nginx/nginx:1.21.5
    volumeMounts:
    - mountPath: /usr/share/nginx/html
      name: nginx-volume
    - mountPath: /var/logs
      name: logs-volume
    - mountPath: /cache
      name: cache-volume
  volumes:
    - name: nginx-volume
      hostPath:
        path: /data/webs
        type: DirectoryOrCreate
    - name: logs-volume
      hostPath:
        path: /data/logs
        type: DirectoryOrCreate
    - name: cache-volume
      hostPath:
        path: /data/cache
        type: DirectoryOrCreate

kubectl apply -f hostPash.yaml
kubectl get pod -o wide
kubectl exec -it pod-host-dir -- /bin/bash
#node节点
apt-get install nfs-common -y

#主节点
apt-get install nfs-kernel-server -y
vim /etc/exports
/data/disk   *(rw,sync,no_root_squash,no_subtree_check)
exports -arv

systemctl restart nfs-kernel-server.service
apiVersion: apps/v1
kind: Deployment
metadata:
  name: nginx-deploy
spec:
  replicas: 5
  selector:
    matchLabels:
      app: nginx
  template:
    metadata:
      labels:
        app: nginx
    spec:
      containers:
        - name: nginx
          image: harbor.hiuiu.com/nginx/nginx:1.21.5
          imagePullPolicy: IfNotPresent
          ports:
            - containerPort: 80
          volumeMounts:
            - mountPath: /usr/share/nginx/html  # 挂载路径
              name: nginx-volume  # 关联的卷名
      volumes:
        - name: nginx-volume  # 卷名称
          nfs:
            server: 192.168.100.204  # NFS 服务器 IP 地址
            path: /data/disk  # NFS 共享路径
            readOnly: false
  strategy:   #指定执行更新时的策略
    type: RollingUpdate  # 更新策略
    rollingUpdate:
      maxSurge: 20%  # 允许增加副本数
      maxUnavailable: 50%  # 允许不在线的副本数
---
apiVersion: v1
kind: Service
metadata:
  name: nginx-nodeport
spec:
  type: NodePort
  selector:
    app: nginx
  ports:
  - port: 90
    targetPort: 80
    nodePort: 30008


创建NFS服务器创建联系文件夹
mkdir -p /data/volume/v{1..5}

vim /etc/exports
/data/volume/v1 *(rw,sync,no_root_squash,no_subtree_check)
/data/volume/v2 *(rw,sync,no_root_squash,no_subtree_check)
/data/volume/v3 *(rw,sync,no_root_squash,no_subtree_check)
/data/volume/v4 *(rw,sync,no_root_squash,no_subtree_check)
/data/volume/v5 *(rw,sync,no_root_squash,no_subtree_check)

exportfs -arv
systemctl restart nfs-kernel-server.service
chmod 777 /data/volume/ -r
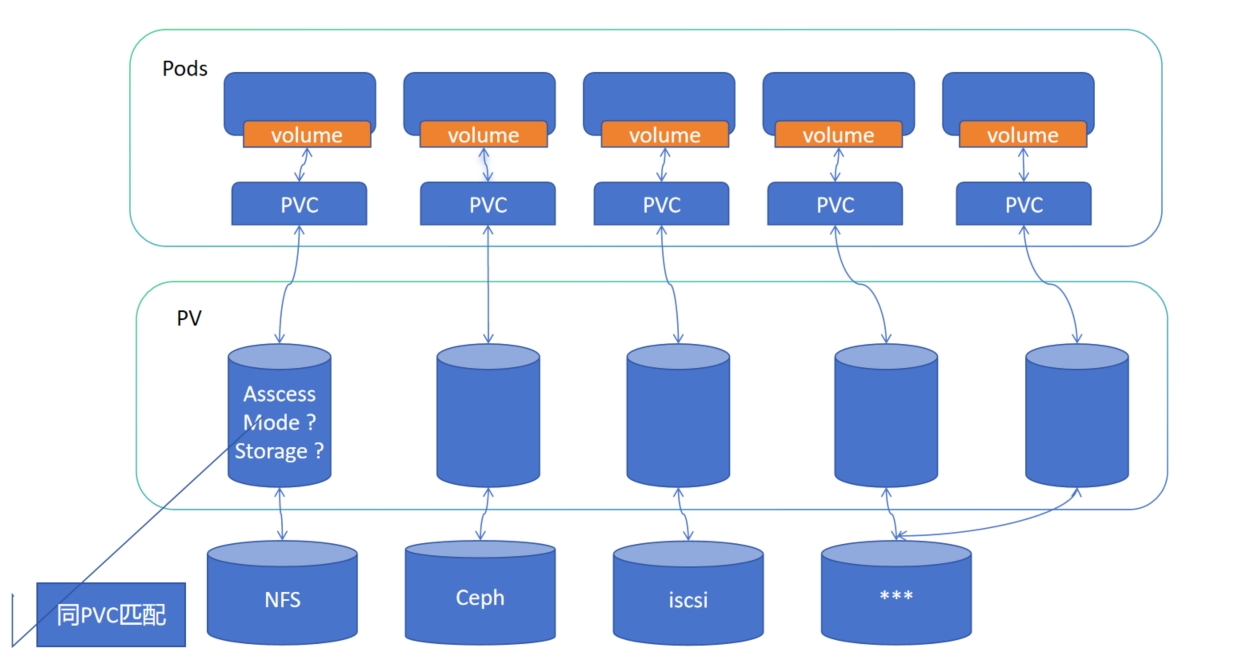
PV、PVC
-
-
PVC 的创建:用户或应用程序创建 PVC,指定所需的存储容量和访问模式。
-
绑定:Kubernetes 控制器会根据 PVC 的要求寻找适合的 PV。如果找到符合条件的 PV,PVC 将与 PV 绑定,用户或应用程序可以通过 PVC 使用 PV 提供的存储资源。
-
使用
-
-
ReadOnlyMany (ROX):允许多个节点以只读模式挂载该存储卷。
-
ReadWriteMany (RWX)
 PVC和pv绑定: 自动匹配并绑定
 # 控制平面中的控制回路监测新的 PVC 对象,寻找与之匹配的 PV (如果可能的话), 并将二者绑定到一起。如果找不到匹配的 PV 卷,PVC 申领会无限期地处于未绑定状态。 当与之匹配的 PV 卷可用时,PVC 申领会被绑定。
    例如,即使某集群上制备了很多 50 Gi 大小的 PV 卷,也无法与请求 100 Gi 大小的存储的 PVC 匹配。当新的 100 Gi PV 卷被加入到集群时, 该 PVC 才有可能被绑定。
 # Pod 将 PVC 申领当做存储卷来使用。集群会检视 PVC 申领,找到所绑定的卷, 并为 Pod 挂载该卷。对于支持多种访问模式的卷, 用户要在 Pod 中以卷的形式使用申领时指定期望的访问模式。
   一旦用户有了申领对象并且该申领已经被绑定, 则所绑定的 PV 卷在用户仍然需要它期间一直属于该用户。 用户通过在 Pod 的 `volumes` 块中包含 `persistentVolumeClaim` 节区来调度 Pod,访问所申领的 PV 卷。
apiVersion: v1
kind: PersistentVolume
metadata:
  name: v1
spec:
  capacity:
    storage: 3Gi
  accessModes: ["ReadOnlyMany"]
  nfs:
    path: /data/volume/v1
    server: 192.168.100.204
---
apiVersion: v1
kind: PersistentVolumeClaim
metadata:
  name: my-pvc
spec:
  accessModes: ["ReadOnlyMany"]
  resources:
    requests:
      storage: 2Gi---
apiVersion: v1
kind: Pod
metadata:
  name: pod-pvc
  labels:
    app: nginx
spec:
  containers:
  - name: nginx
    image: harbor.hiuiu.com/nginx/nginx:1.21.5
    imagePullPolicy: IfNotPresent
    ports:
    - containerPort: 80
    volumeMounts:
    - name: nginx-html
      mountPath: /usr/share/nginx/html
  volumes:
  - name: nginx-html
    persistentVolumeClaim:
      claimName: my-pvc
---
apiVersion: v1
kind: Service
metadata:
  name: nginx-pvc
spec:
  type: NodePort
  selector:
    app: nginx
  ports:
  - port: 90
    targetPort: 80
    nodePort: 30008


apiVersion: v1
kind: ServiceAccount
metadata:
  name: nfs-provisioner
kubectl create clusterrolebinding nfs-provisioner-clusterrolebinding --clusterrole=cluster-admin --serviceaccount=default:nfs-provisioner
#所有节点
apt-get install nfs-kernel-server nfs-common -y

#主节点
vim /etc/exports
/nfs/nfs_pro   *(rw,sync,no_root_squash,no_subtree_check)

exportfs -arv
systemctl restart nfs-kernel-server.service
apiVersion: apps/v1
kind: Deployment
metadata:
  name: nfs-provisioner
spec:
  replicas: 1
  selector:
    matchLabels:
      app: myapp
  strategy:
    type: Recreate
  template:
    metadata:
      labels:
        app: myapp
    spec:
      serviceAccount: nfs-provisioner
      containers:
      - name: nfs-provisioner
        image: registry.cn-beijing.aliyuncs.com/mydlq/nfs-subdir-external-provisioner:v4.0.0
        volumeMounts:
        - name: nfs-client-root
          mountPath: /persistentvolumes
        env:
        - name: PROVISIONER_NAME
          value: example.com/nfs
        - name: NFS_SERVER
          value: 192.168.100.204
        - name: NFS_PATH
          value: /data/nfs_pro
      volumes:
      - name: nfs-client-root
        nfs:
          server: 192.168.100.204
          path: /data/nfs_pro
apiVersion: storage.k8s.io/v1
kind: StorageClass
metadata:
  name: nfs
provisioner: example.com/nfs
parameters:
  server: 192.168.100.204
  path: /data/nfs_pro
  readOnly: "false"
apiVersion: v1
kind: PersistentVolumeClaim
metadata:
  name: test-claim1
spec:
  accessModes: ["ReadWriteMany"]
  resources:
    requests:
      storage: 1Gi
  storageClassName: nfs
apiVersion: v1
kind: Pod
metadata:
  name: read-pod
  labels:
    app: myapp
spec:
  containers:
  - name: read-pod
    image: harbor.hiuiu.com/nginx/nginx:1.21.5
    ports:
      - containerPort: 80
    volumeMounts:
    - name: nfs-pvc
      mountPath: /usr/share/nginx/html
  restartPolicy: Never
  volumes:
  - name: nfs-pvc
    persistentVolumeClaim:
      claimName: test-claim1


【推荐】国内首个AI IDE,深度理解中文开发场景,立即下载体验Trae
【推荐】编程新体验,更懂你的AI,立即体验豆包MarsCode编程助手
【推荐】抖音旗下AI助手豆包,你的智能百科全书,全免费不限次数
【推荐】轻量又高性能的 SSH 工具 IShell:AI 加持,快人一步
· 无需6万激活码!GitHub神秘组织3小时极速复刻Manus,手把手教你使用OpenManus搭建本
· C#/.NET/.NET Core优秀项目和框架2025年2月简报
· Manus爆火,是硬核还是营销?
· 终于写完轮子一部分:tcp代理 了,记录一下
· Qt个人项目总结 —— MySQL数据库查询与断言