Hands-on C++ Game Animation Programming阅读笔记(七)
Chapter 10: Mesh Skinning
Deforming a mesh to match an animated pose is called skinning.
Mesh Skinning是基于Animation Pose,改变Mesh去匹配Pose的过程,可以通过Shader进行GPU Skinning,也可以用CPU进行C++这边的Skinning,我以前还写过一篇文章比较它俩的特点。
本章重点:
- skinned mesh与non-skinned mesh的区别
- 了解整个skinning pipeline
- 实现skeleton类
- 什么是bind pose以及怎么从glTF文件里读取skeleton的bind pose
- 实现skinned mesh类,以及从glTF里读取skinned mesh数据
- 实现GPU蒙皮和CPU蒙皮
Exploring meshes
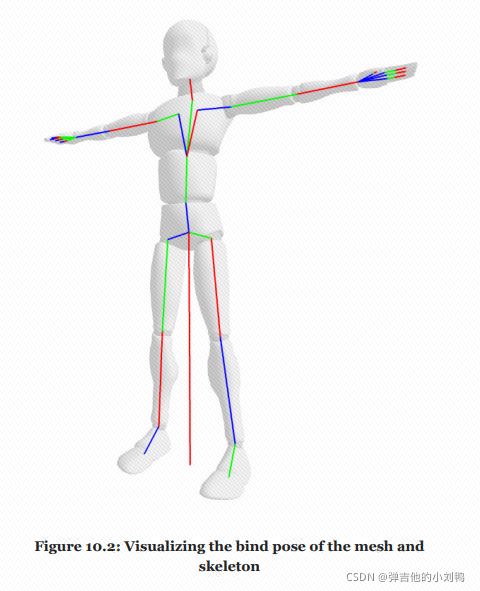
一般模型会自带一个静态的Mesh,这个Mesh一般是T pose或者A pose,当一个模型的Mesh被创建出来的时候,往往也会在mesh里创建一个skeleton,mesh上的每个点都会绑定到skeleton上至少一个的joints上,这个mesh点绑定骨骼的过程叫做rigging,此时的骨骼的pose,会匹配这个模型的静态Mesh,此时模型的Pose(也就是Skeleton对应的Pose)叫做Bind Pose,很多时候,T pose或者A pose就是Bind Pose,如下图所示:

Bind pose与rest pose
很多时候二者是同一个Pose,但是二者实际不是一个东西,不一定是同一个Pose,具体的可以看附录
Understanding skinning
Skinning is the process of specifying which vertex should be deformed by which bone.
有两种Skinning,rigid skinning和smooth skinning,前者的每个vertex只受一个bone影响,后者的每个vertex受多个bone影响。
在处理数据的时候,有两种做法,两种其实都可以,因为Vertex和Bone可以是多对多的交叉关系:
- 由于一个点可能受一块或多块Bone影响,一种是每个Vertex存储其Bone的id
- 另一种则相反,是每块Bone记录它所影响的顶点
本书的做法是,每个顶点存受影响的Bones的信息,也就是第一种做法
就Rigid Skinning而言,由于每个Vertex只受一个Bone影响,所以这里其实可以在Vertex Attribute里把Bone的Id存下来,就类似于顶点pos、normal、texCoord一样,毕竟它的size是固定的(不过像Unity里有的,一个Vertex最多受4个Bone影响,感觉也可以作为Vertex Attribute,无非是四个int值,可以用特殊的int -1代表不受影响,但总之size是固定的)
The vertex transformation pipeline
Space refers to transforming a vertex by a matrix. For example, if you have a projection matrix, it would transform a vertex into NDC space:
- When a mesh is created, all its vertices are in what is called model space.
- A model space vertex is multiplied by the model matrix, which puts it into world space.
- A world space vertex is multiplied by the view matrix to put it into camera space.
- A camera space vertex is multiplied by the projection matrix to move it into NDC space.
skinning过程,还有一个额外的顶点变换,就是把顶点从skin space转换到model space,要加在上面四个步骤的最前面,整体流程如下:
- 加载模型的Mesh,每个顶点存的是Model Space的坐标
- 每个model space的顶点坐标会被转化为skin space(我之前看的书里是,存了个矩阵,这个矩阵可以把顶点从model space转换到对应的bone的bone space,如果受多个bone影响,会分别对应一个矩阵)
- 把每个model space的顶点坐标,再乘以WVP矩阵
Exploring rigid skinning
To skin a mesh, each vertex needs to be multiplied by the inverse bind pose transform of the joint it belongs to.
这里认为,bind pose就是对应的角色的static mesh,上面这句话的重点在inverse bind pose transform of the joint,也就是说,为了把顶点的坐标,从model space下,转换到对应bone的joint space下,需要左乘对应joint的model transform矩阵的逆。
推导一下应该也不难,假设顶点坐标为P,P本来存的是Model Space的坐标,现在有个Joint,其Model Transform矩阵为M,假设顶点在Joint的skin space下的local坐标为L,那么有:
M * L = P
由此可以得到:
L = M.Inverse() * P
所以要把顶点坐标转换到Bone Space(Skin Space)下,只需要乘以Bone的Model矩阵的逆即可。
如果这里的P存储的是World Space的坐标,也是一样的,无非是W * L = P,那就乘以Bone的World Space矩阵的逆即可。根据这个,也可以得到一个结论,如果想把物体A的世界坐标P,改为物体B的Local 坐标,那么左乘B的世界矩阵的逆即可。
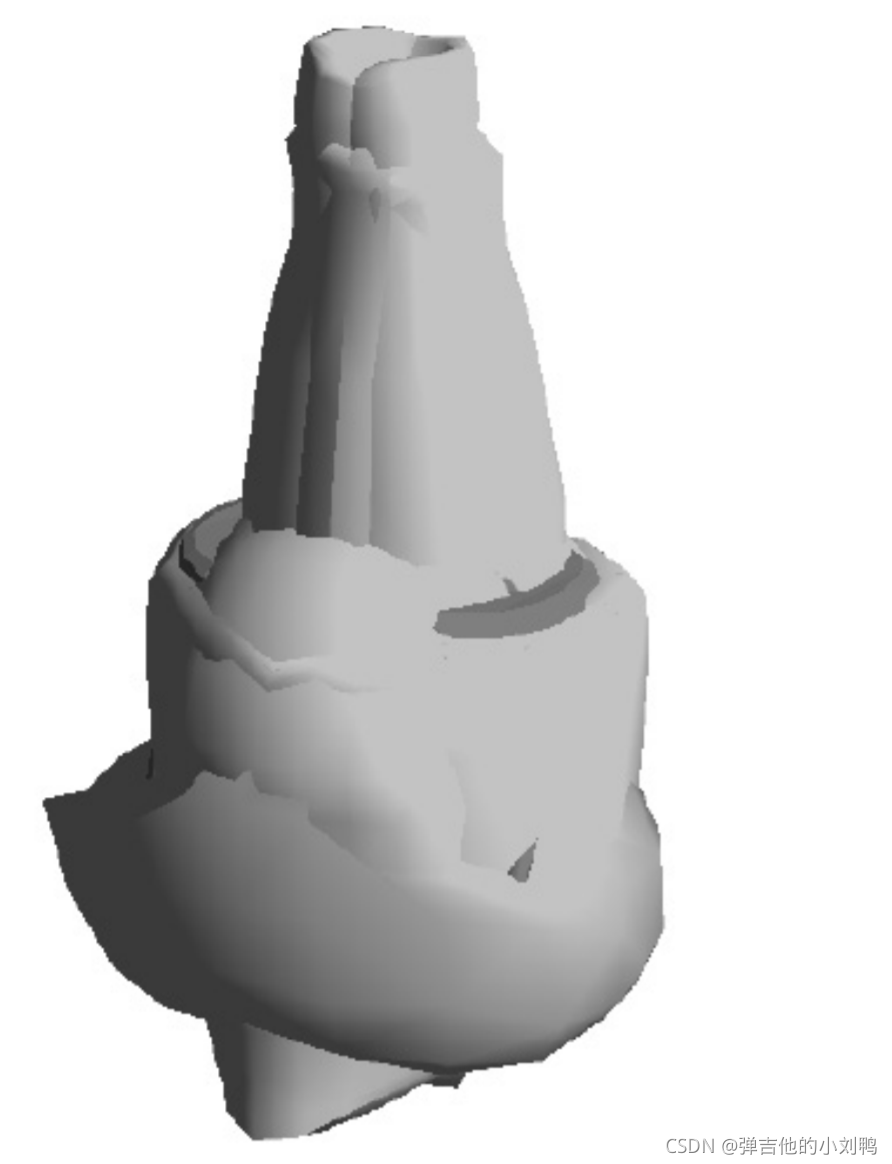
如下图所示是一个错误的Mesh,这种情况下,最常见的错误是Joint的逆矩阵与Animated Pose之间的矩阵顺序乘反了(The most common reason for seeing a mesh such as this is that there has been an error in the multiplication order of the inverse bind pose and animated pose)

The rigid skinning pipeline
如下图所示,一个是static mesh上的点的绘制过程,另一个是动画的dynamic mesh上的点的绘制过程:

Model Space的点-> 转到Bone Space下 -> 再配合Joint Hierarchy算出新的Model Space的点(左乘Joint的Model Transform) -> WVP转换
虽然一通转换,顶点从Model Space还是转回了Model Space,但这个Mesh却是根据Animation Pose进行了deformation(This results in the vertex being in local space again, but it is deformed to the animated pose)。
rigid skinning的缺点
The problem with rigid skinning is bending joints.
像肘关节这种地方的动画,会很不自然,如下图所示:

Exploring smooth skinning
Think of smooth skinning as skinning a mesh multiple times and blending the results.
Generally, after four bones, the influence of each additional bone is not visible. This is convenient as it lets you use the ivec4 and vec4 structs to add influences and weights to vertices. 所以一般都是最多四个
下图展示了这片区域的Mesh,受两块权重为0.5的Bone的影响的结果,左右两边的图分别是只受一个Bone影响,确实很像是两个result的Blend:

这种Blend方法,叫做linear blend skinning (LBS),是目前最常用的实现动画蒙皮的技术。
此时的顶点属性,是这样:
- The position (vec3)
- The normal (vec3)
- The texture coordinate (vec2)
- The joint influences (ivec4)
- The influence weights (vec4)
顺便提一句,glTF里的nodes都是可以有skinned mesh作为attachments的,但是这里为了方便学习,默认glTF里的模型只有一个skinned mesh,而且其默认的位置就是从世界坐标系的0,0开始
Implementing skeletons
The concept of a skeleton is to combine data that is shared between animated models into a single structure.
上一章的内容是实现Pose和Clip类,这里面其实也有skeleton的东西,但是它们都是存的int数组来表示这个joints的数组,比如Pose类是这么存储skeleton的hierarchy的:
std::vector<Transform> mJoints;
std::vector<int> mParents;// 与mJoints一一对应, 每个里存了自己的Parent在数组里的Id
所以这节索性把这玩意儿单独抽象为一个类,那我理解的是,后面的Clip和Pose类是不是也要改,尤其是Pose类?
对于动画里的角色而已,同一个角色可以生成多个Instance,但是其实它们的Bind Pose都是一样的,感觉甚至可以认为这是一个Read-only的共享的东西,除了Bind Pose是共享的,Inverse Bind Pose(也就是它们的逆矩阵),还有Joint的名字,都是共享的,所以这里单独创建了Skeleton对象,用于存储这些共享的东西。
这里的Skeleton不仅仅只是Joint的Hierarchy,还有Bind Pose和Inverse Bind Pose,所以说比前面的Pose类里的俩数组内容丰富得多。一些其他的说法,把这里的Skeleton类叫做Rig或者Armature
感觉Skeleton类应该有以下内容:
std::vector<Transform> mBindPose,表示Joints数组,里面存了BindPosestd::vector<mat4> mInverseBindPose,与上面数组一一对应,里面存了InverseBindPose- 一些API,比如取到什么Joint的Model Trans,也就是一层层算下来的Transform
看了下书里的代码,发现这里的Skeleton的Hierarchy还是基于Pose来存的,既然Pose已经定义好了,没必要自己再写一遍,这是Skeleton类的声明:
#ifndef _H_SKELETON_
#define _H_SKELETON_

#include "Pose.h"
#include "mat4.h"
#include <vector>
#include <string>

class Skeleton
{
protected:
	// Hierarchy的数据其实可以从RestPose或者BindPose里获取
	Pose mRestPose;
	Pose mBindPose;
	// 额外的Skeleton的信息
	std::vector<mat4> mInvBindPose;// 这个数组会基于mBindPose计算得到
	std::vector<std::string> mJointNames;
protected:
	// 计算Inverse矩阵
	void UpdateInverseBindPose();
public:
	Skeleton();
	// 构造函数, 需要一个Pose和joints names
	Skeleton(const Pose& rest, const Pose& bind, const std::vector<std::string>& names);

	void Set(const Pose& rest, const Pose& bind, const std::vector<std::string>& names);

	Pose& GetBindPose();
	Pose& GetRestPose();
	std::vector<mat4>& GetInvBindPose();
	std::vector<std::string>& GetJointNames();
	std::string& GetJointName(unsigned int index);
};

#endif
有点意思,这里的Skeleton本质上就是一个BindPose,还附带了BindPose上的每个Joint的Model矩阵的逆
下面是类实现的代码:
#include "Skeleton.h"

Skeleton::Skeleton() { }

// Ctor
Skeleton::Skeleton(const Pose& rest, const Pose& bind, const std::vector<std::string>& names)
{
	Set(rest, bind, names);
}

// 相当于Init
void Skeleton::Set(const Pose& rest, const Pose& bind, const std::vector<std::string>& names)
{
	mRestPose = rest;
	mBindPose = bind;
	mJointNames = names;
	UpdateInverseBindPose();// Set完更新InverseBindPose
}

void Skeleton::UpdateInverseBindPose()
{
	unsigned int size = mBindPose.Size();//Pose函数提供了Size函数, 返回joints的个数
	mInvBindPose.resize(size);

	for (unsigned int i = 0; i < size; ++i)
	{
		// 获取每个Joint的Global Transform, 转化为矩阵, 取逆存下来
		Transform world = mBindPose.GetGlobalTransform(i);
		mInvBindPose[i] = inverse(transformToMat4(world));
	}
}

Pose& Skeleton::GetBindPose()
{
	return mBindPose;
}

Pose& Skeleton::GetRestPose()
{
	return mRestPose;
}

std::vector<mat4>& Skeleton::GetInvBindPose()
{
	return mInvBindPose;
}

std::vector<std::string>& Skeleton::GetJointNames()
{
	return mJointNames;
}

std::string& Skeleton::GetJointName(unsigned int idx)
{
	return mJointNames[idx];
}
glTF – loading the bind pose
bind pose就是一个Pose,这里需要获取到这个Pose的数据,Pose由俩数组组成,一个代表Joints的Hierarchy,一个代表Joints的LocalTransform。
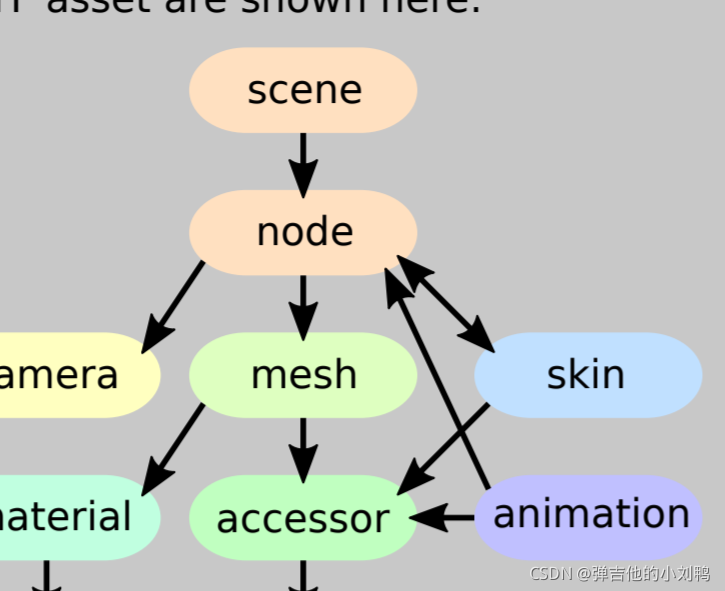
但是glTF里是没有Bind Pose这个概念的,它的各个node的默认Transform是Rest Pose的数据,不一定是Bind Pose数据。不过它有一个skin对象,如下图所示,node记录了它的引用。这个skin里存储了还原Bind Pose的相关信息,skin对象里装了一个矩阵数组,每个矩阵与Skeleton里的一个joint对应,矩阵代表了Joint的WorldTransform的逆矩阵(WorldTransform是模型空间里的,也可叫ModelTransforn):

有了这个数组,就可以创建出自己的Bind Pose了,不过并不是模型里所有的Joints都会绑定到Mesh上,也就是说可能有的皮肤完全不受这个Joint影响,这种情况下,Skin里不会基类他的信息,但是我一个Pose又必须要给每个Joint设置LocalTransform的值,所以这里需要使用前面读进来的Rest Pose作为默认值。
相关代码如下:
Pose LoadBindPose(cgltf_data* data)
{
	// 1. 根据restPose得到一个Transform数组, 每个元素代表Joint的GlobalTransform
	Pose restPose = LoadRestPose(data);
	unsigned int numBones = restPose.Size();
	std::vector<Transform> worldBindPose(numBones);
	for (unsigned int i = 0; i < numBones; ++i)
		worldBindPose[i] = restPose.GetGlobalTransform(i);

	// 2. 遍历每个Skin节点, 这里只有一个模型, 应该只有一个skin对象
	// 基于Skin里的矩阵, 矫正前面得到的Joint的GlobalTransform数组
	unsigned int numSkins = (unsigned int)data->skins_count;
	for (unsigned int i = 0; i < numSkins; ++i)
	{
		// 每个skin节点, 都有一个float数组, 每16个浮点数, 代表一个矩阵
		cgltf_skin* skin = &(data->skins[i]);
		std::vector<float> invBindAccessor;
		GLTFHelpers::GetScalarValues(invBindAccessor, 16, *skin->inverse_bind_matrices);

		unsigned int numJoints = (unsigned int)skin->joints_count;
		for (unsigned int j = 0; j < numJoints; ++j)
		{
			// 读取inverse矩阵, 取逆后转成Transform, 得到世界坐标系下的Trans
			// Read the ivnerse bind matrix of the joint
			float* matrix = &(invBindAccessor[j * 16]);
			mat4 invBindMatrix = mat4(matrix);
			// invert, convert to transform
			mat4 bindMatrix = inverse(invBindMatrix);
			Transform bindTransform = mat4ToTransform(bindMatrix);

			// 基于id, 存到对应的vector的位置上
			cgltf_node* jointNode = skin->joints[j];
			int jointIndex = GLTFHelpers::GetNodeIndex(jointNode, data->nodes, numBones);
			worldBindPose[jointIndex] = bindTransform;
		}
	}


	// 3. 把得到BindPose的GlobalTransform数组, 转换成BindPose的LocalTransform数组
	Pose bindPose = restPose;
	for (unsigned int i = 0; i < numBones; ++i)
	{
		// 3.1 获取该joint的World Transform
		Transform current = worldBindPose[i];

		int p = bindPose.GetParent(i);
		// 如果有parent, 说明其Transform为Local Transform
		if (p >= 0)
		{
			// 3.2 获取该joint的parent的worldTransform
			Transform parent = worldBindPose[p];

			// 3.3 根据俩worldTransform算出相对Parent的Localtransform
			// 要想把A的WorldTrans变为B的LocalTrans, 用Wb.Inverse() * Wa即可
			current = combine(inverse(parent), current);
		}

		bindPose.SetLocalTransform(i, current);
	}

	// 所以说, 这里的Rest Pose里的Joint其实也要转换成Global Transform
	// 否则没有意义, 因为LocalTransform的Parent对应的joint很可能被Bind Pose改变了
	// 这样LocalTransform数据就不对了, 而WorldTransform下, Joint的位置永远是对的

	return bindPose;
}
glTF – loading a skeleton
这里的Skeleton主要就是俩Pose,然后把names收集了一下,目前已经定义好了LoadRestPose和LoadBindPose函数,所以在GLTFLoader.cpp里把从glTF文件里Load Skeleton的函数封装了起来:
Skeleton LoadSkeleton(cgltf_data* data)
{
	return Skeleton(LoadRestPose(data), LoadBindPose(data),	LoadJointNames(data)
);
Mesh类实现
这里的Mesh类主要是为了实现GPU Skinning和CPU Skinning,接口如下:
#ifndef _H_MESH_
#define _H_MESH_

#include "vec2.h"
#include "vec3.h"
#include "vec4.h"
#include "mat4.h"
#include <vector>
#include "Attribute.h"
#include "IndexBuffer.h"
#include "Skeleton.h"
#include "Pose.h"

// 准确的说, 是Mesh和Skinned MeshRenderer的集合, 因为这个Mesh自带Draw函数
class Mesh
{
// CPU上的Static Mesh数据
protected:
	// 都是些顶点属性, 还不如封装一个Vertex类呢
	std::vector<vec3> mPosition;
	std::vector<vec3> mNormal;
	std::vector<vec2> mTexCoord;
	std::vector<vec4> mWeights;
	std::vector<ivec4> mInfluences;
	std::vector<unsigned int> mIndices;
// GPU上的Mesh数据
protected:
	// Attribute类本质就一个int数据(作为Handle), 实际的东西都存在GPU这边
	// 然后Attribute类还有个额外的int, 用于记录GPU这边的数组的size
	Attribute<vec3>* mPosAttrib;
	Attribute<vec3>* mNormAttrib;
	Attribute<vec2>* mUvAttrib;
	Attribute<vec4>* mWeightAttrib;
	Attribute<ivec4>* mInfluenceAttrib;
	IndexBuffer* mIndexBuffer;
protected:
	// 这些数据是只在CPU Skinning里用到的, 是CPU这边的额外保留的一份Copy数据
	// 用作动态的SkinnedMesh(原本的BindPose的Mesh是Static Mesh)
	std::vector<vec3> mSkinnedPosition;
	std::vector<vec3> mSkinnedNormal;
	std::vector<mat4> mPosePalette;// 一个临时对象, 用于Cache从runtime动画的Pose里读取的每个Joint的WorldTransform矩阵
public:
	// 涉及到堆上的操作, 这里居然都开始自己管理了
	Mesh();
	Mesh(const Mesh&);
	Mesh& operator=(const Mesh&);
	~Mesh();

	// 获取顶点属性数组的一些Get函数
	std::vector<vec3>& GetPosition();
	std::vector<vec3>& GetNormal();
	std::vector<vec2>& GetTexCoord();
	std::vector<vec4>& GetWeights();
	std::vector<ivec4>& GetInfluences();
	std::vector<unsigned int>& GetIndices();

	// 实现CPU Skinning的函数, 说实话放到Mesh类里感觉很奇怪, 放到叫SkinnedMeshRenderer这种名字的类里还差不多
	void CPUSkin(Skeleton& skeleton, Pose& pose);
	// 当改变存在CPU这边的顶点属性数据时, 调用此函数同步GPU上的数据
	void UpdateOpenGLBuffers();
	// 这些是干啥的?
	void Bind(int position, int normal, int texCoord, int weight, int influcence);
	void Draw();
	void DrawInstanced(unsigned int numInstances);
	void UnBind(int position, int normal, int texCoord, int weight, int influcence);
};

#endif // !_H_MESH_
下面是具体部分的实现代码:
#include "Mesh.h"
#include "Draw.h"
#include "Transform.h"

Mesh::Mesh()
{
	mPosAttrib = new Attribute<vec3>();
	mNormAttrib = new Attribute<vec3>();
	mUvAttrib = new Attribute<vec2>();
	mWeightAttrib = new Attribute<vec4>();
	mInfluenceAttrib = new Attribute<ivec4>();
	mIndexBuffer = new IndexBuffer();
}

Mesh::Mesh(const Mesh& other)
{
	mPosAttrib = new Attribute<vec3>();
	mNormAttrib = new Attribute<vec3>();
	mUvAttrib = new Attribute<vec2>();
	mWeightAttrib = new Attribute<vec4>();
	mInfluenceAttrib = new Attribute<ivec4>();
	mIndexBuffer = new IndexBuffer();
	*this = other;
}

Mesh& Mesh::operator=(const Mesh& other)
{
	if (this == &other)
		return *this;

	// 同步CPU上的数据
	mPosition = other.mPosition;
	mNormal = other.mNormal;
	mTexCoord = other.mTexCoord;
	mWeights = other.mWeights;
	mInfluences = other.mInfluences;
	mIndices = other.mIndices;

	// 再同步GPU上的数据
	UpdateOpenGLBuffers();
	return *this;
}

Mesh::~Mesh()
{
	delete mPosAttrib;
	delete mNormAttrib;
	delete mUvAttrib;
	delete mWeightAttrib;
	delete mInfluenceAttrib;
	delete mIndexBuffer;
}

// 一堆Get函数用于读取Mesh里对应的顶点属性数组
std::vector<vec3>& Mesh::GetPosition()
{
	return mPosition;
}

std::vector<vec3>& Mesh::GetNormal()
{
	return mNormal;
}

std::vector<vec2>& Mesh::GetTexCoord()
{
	return mTexCoord;
}

std::vector<vec4>& Mesh::GetWeights()
{
	return mWeights;
}

std::vector<ivec4>& Mesh::GetInfluences()
{
	return mInfluences;
}

std::vector<unsigned int>& Mesh::GetIndices()
{
	return mIndices;
}

// 调用各个Attribute的Set函数, 其实就是取对应的数组
// 然后使用glBindBuffer和glBufferData, 上传到GPU
void Mesh::UpdateOpenGLBuffers()
{
	// 把这些数据重新上传到GPU, 上传到GL_ARRAY_BUFFER上
	if (mPosition.size() > 0)
		mPosAttrib->Set(mPosition);
	if (mNormal.size() > 0)
		mNormAttrib->Set(mNormal);
	if (mTexCoord.size() > 0)
		mUvAttrib->Set(mTexCoord);
	if (mWeights.size() > 0)
		mWeightAttrib->Set(mWeights);
	if (mInfluences.size() > 0)
		mInfluenceAttrib->Set(mInfluences);
	if (mIndices.size() > 0)
		mIndexBuffer->Set(mIndices);
}

// 这五个参数叫做Bind slot indices, 其实就是对每个顶点属性, 分别调用
// 	glBindBuffer(GL_ARRAY_BUFFER, mHandle);
//	glEnableVertexAttribArray(slot);
//  glVertexAttribIPointer(slot, 1, GL_INT, 0, (void*)0);// 具体的类型会根据slot对应的类型改变
// 三个函数
void Mesh::Bind(int position, int normal, int texCoord, int weight, int influcence)
{
	// 调用对应Attribute的BindTo函数, 其实就是指定VAO的顶点属性的layout
	if (position >= 0)
		mPosAttrib->BindTo(position);
	if (normal >= 0)
		mNormAttrib->BindTo(normal);
	if (texCoord >= 0)
		mUvAttrib->BindTo(texCoord);
	if (weight >= 0)
		mWeightAttrib->BindTo(weight);
	if (influcence >= 0)
		mInfluenceAttrib->BindTo(influcence);
}

// Mesh类的Draw函数会调用之前写的全局的Draw函数, 其实就是调用
// glDrawArrays(DrawModeToGLEnum(mode), 0, vertexCount)
void Mesh::Draw()
{
	if (mIndices.size() > 0)
		::Draw(*mIndexBuffer, DrawMode::Triangles);
	else
		::Draw(mPosition.size(), DrawMode::Triangles);
}

// Mesh类的DrawInstanced函数会调用全局的DrawInstanced函数, 其实就是调用
// glDrawArraysInstanced(DrawModeToGLEnum(mode), 0, vertexCount, numInstances);
void Mesh::DrawInstanced(unsigned int numInstances)
{
	if (mIndices.size() > 0)
		::DrawInstanced(*mIndexBuffer, DrawMode::Triangles, numInstances);
	else
		::DrawInstanced(mPosition.size(), DrawMode::Triangles, numInstances);
}

// 调用各个Attribute的UnBindFrom函数
// 本质是调用glBindBuffer加上glDisableVertexAttribArray
void Mesh::UnBind(int position, int normal, int texCoord, int weight, int influcence)
{
	if (position >= 0)
		mPosAttrib->UnBindFrom(position);
	if (normal >= 0)
		mNormAttrib->UnBindFrom(normal);
	if (texCoord >= 0)
		mUvAttrib->UnBindFrom(texCoord);
	if (weight >= 0)
		mWeightAttrib->UnBindFrom(weight);
	if (influcence >= 0)
		mInfluenceAttrib->UnBindFrom(influcence);
}
CPU Skinning
CPU Skinning的特点
CPU skinning is useful if the platform you are developing for has a limited number of uniform registers or a small uniform buffer.
当硬件的uniform寄存器较少,或者uniform buffer比较小的时候,适合使用CPU Skinning。使用这种方式时,需要保存两份Animated Mesh,一份是静态的Mesh,也就是Bind Pose下的Mesh,属性为mPosition和mNormal,另一份是动态的Mesh,这里叫做mSkinnedPosition和mSkinnedNormal
它保存了两份Mesh,一份是Bind Pose对应的Static Mesh,一份是动态的Skinned Mesh,它这里用了俩数组来表示:
std::vector<vec3> mPosition;
std::vector<vec3> mSkinnedPosition;
// 注意, 除了顶点坐标, 还有顶点法向量也要保存两份
std::vector<vec3> mNormal;
std::vector<vec3> mSkinnedNormal;
实现CPU Skinning(Matrix Palette)
其实思路很简单,每个Vertex,乘以BindPose里对应的Inverse矩阵,把点转换到Bone Space,然后再左乘该Bone的World Transform即可,然后乘以对应的权重因子,累加即可。
累加的这个矩阵,可以使用在Point和Normal上,这种算法跟GPU Skinning类似,可以说是Matrix Palette算法(算出一个Skin Mat4,类似于调色板)
// pose应该是动起来的人物的pose(为啥这俩参数不是const&)
void Mesh::CPUSkin(Skeleton& skeleton, Pose& pose)
{
	unsigned int numVerts = (unsigned int)mPosition.size();
	if (numVerts == 0)
		return;

	// 设置size
	mSkinnedPosition.resize(numVerts);
	mSkinnedNormal.resize(numVerts);

	// 这个函数会获取Pose里的每个Joint的WorldTransform, 存到mPosePalette这个mat4组成的vector数组里
	pose.GetMatrixPalette(mPosePalette);
	// 获取bindPose的数据
	std::vector<mat4> invPosePalette = skeleton.GetInvBindPose();

	// 遍历每个顶点
	for (unsigned int i = 0; i < numVerts; ++i)
	{
		ivec4& j = mInfluences[i];// 点受影响的四块Bone的id
		vec4& w = mWeights[i];

	    // 矩阵应该从右往左看, 先乘以invPosePalette, 转换到Bone的LocalSpace
	    // 再乘以Pose对应Joint的WorldTransform
		mat4 m0 = (mPosePalette[j.x] * invPosePalette[j.x]) * w.x;
		mat4 m1 = (mPosePalette[j.y] * invPosePalette[j.y]) * w.y;
		mat4 m2 = (mPosePalette[j.z] * invPosePalette[j.z]) * w.z;
		mat4 m3 = (mPosePalette[j.w] * invPosePalette[j.w]) * w.w;

		mat4 skin = m0 + m1 + m2 + m3;

		// 计算最终矩阵对Point和Normal的影响
		mSkinnedPosition[i] = transformPoint(skin, mPosition[i]);
		mSkinnedNormal[i] = transformVector(skin, mNormal[i]);
	}

    // 同步GPU端数据
	mPosAttrib->Set(mSkinnedPosition);
	mNormAttrib->Set(mSkinnedNormal);
}
实现CPU Skinning(使用Matrix先算, 再最后融合)
// 俩input, Pose应该是此刻动画的Pose, 俩应该是const&把
void Mesh::CPUSkin(Skeleton& skeleton, Pose& pose)
{
	// 前面的部分没变
	unsigned int numVerts = (unsigned int)mPosition.size();
	if (numVerts == 0)
		return;

	// 设置size, 目的是填充mSkinnedPosition和mSkinnedNormal数组
	mSkinnedPosition.resize(numVerts);
	mSkinnedNormal.resize(numVerts);

	// 之前这里是获取输入的Pose的WorldTrans的矩阵数组和BindPose里的InverseTrans矩阵数组
	// 但这里直接获取BindPose就停了
	// const Pose&?
	Pose& bindPose = skeleton.GetBindPose();

	// 同样遍历每个顶点
	for (unsigned int i = 0; i < numVerts; ++i)
	{
		ivec4& joint = mInfluences[i];
		vec4& weight = mWeights[i];

		// 之前是矩阵取Combine, 现在是算出来的点和向量, 再最后取Combine
		// 虽然Pose里Joint存的都是LocalTrans, 但是重载的[]运算符会返回GlobalTrans
		Transform skin0 = combine(pose[joint.x], inverse(bindPose[joint.x]));
		vec3 p0 = transformPoint(skin0, mPosition[i]);
		vec3 n0 = transformVector(skin0, mNormal[i]);

		Transform skin1 = combine(pose[joint.y], inverse(bindPose[joint.y]));
		vec3 p1 = transformPoint(skin1, mPosition[i]);
		vec3 n1 = transformVector(skin1, mNormal[i]);

		Transform skin2 = combine(pose[joint.z], inverse(bindPose[joint.z]));
		vec3 p2 = transformPoint(skin2, mPosition[i]);
		vec3 n2 = transformVector(skin2, mNormal[i]);

		Transform skin3 = combine(pose[joint.w], inverse(bindPose[joint.w]));
		vec3 p3 = transformPoint(skin3, mPosition[i]);
		vec3 n3 = transformVector(skin3, mNormal[i]);
		mSkinnedPosition[i] = p0 * weight.x + p1 * weight.y + p2 * weight.z + p3 * weight.w;
		mSkinnedNormal[i] = n0 * weight.x + n1 * weight.y + n2 * weight.z + n3 * weight.w;
	}

	mPosAttrib->Set(mSkinnedPosition);
	mNormAttrib->Set(mSkinnedNormal);
}
glTF – loading meshes
primitives in glTF
参考:https://github.com/KhronosGroup/glTF/blob/main/specification/1.0/README.md
In glTF, meshes are defined as arrays of primitives. Primitives correspond to the data required for GL draw calls. Primitives specify one or more attributes, corresponding to the vertex attributes used in the draw calls. Indexed primitives also define an indices property. Attributes and indices are defined as accessors. Each primitive also specifies a material and a primitive type that corresponds to the GL primitive type (e.g., triangle set).
glTF文件里,Mesh其实就是promitives的数组,primitives它可以被认为是submesh,它等同于GL里的调用一次Draw Call需要的数据。比如下面这个文件:
    "primitives": [
        {
            "attributes": {
                "NORMAL": "accessor_25",
                "POSITION": "accessor_23",
                "TEXCOORD_0": "accessor_27"
            },
            "indices": "accessor_21",
            "material": "blinn3-fx",
            "mode": 4
        }
    ]
当primitive里定义了indices时,它等同于GL里的DrawElements函数,没有定义时,等同于GL的DrawArrays函数。
这里的可选的attributes类型有:
- POSITION
- NORMAL
- TEXCOORD
- COLOR
- JOINT
- WEIGHT
- [semantic]_[set_index],比如TEXCOORD_0、TEXCOORD_1
这个函数涉及到glTF文件的读取和解析,这里依然放在GLTFLoad的头文件和cpp文件,代码如下:
// ===== 头文件添加接口 =====
std::vector<Mesh> LoadMeshes(cgltf_data* data);// 一个全局函数

// ===== cpp文件添加定义 =====

// 输入data, 输出Mesh数组(glTF里的每个node都可以有一个Mesh)
std::vector<Mesh> LoadMeshes(cgltf_data* data)
{
	std::vector<Mesh> result;
	cgltf_node* nodes = data->nodes;
	unsigned int nodeCount = (unsigned int)data->nodes_count;

	// 遍历data里的每个node
	for (unsigned int i = 0; i < nodeCount; ++i)
	{
		cgltf_node* node = &nodes[i];

		// 查找既有mesh, 又有skin的节点, 这里一个node只有一个Mesh和Skin
		if (node->mesh == 0 || node->skin == 0)
			continue;

		// 这里的Mesh不是用顶点存储, 而是用的primitive来的, primitive可以理解为subMesh, 里面存了PrimitiveType
		unsigned int numPrims = (unsigned int)node->mesh->primitives_count;

		// 遍历node的Mesh上的每个subMesh, 实际上我看书里的例子里
		// 对于一个人物, 这里只有一个node既有mesh又有skin, 而且它只有一个primitive
		for (unsigned int j = 0; j < numPrims; ++j)
		{
			// 每个subMesh对应我这边的一个Mesh类对象
			result.push_back(Mesh());
			Mesh& mesh = result[result.size() - 1];

			cgltf_primitive* primitive = &node->mesh->primitives[j];

			// 遍历subMesh里的每个attribute
			unsigned int numAttributes = (unsigned int)primitive->attributes_count;
			for (unsigned int k = 0; k < numAttributes; ++k)
			{
				cgltf_attribute* attribute = &primitive->attributes[k];
				// 对attribute调用MeshFromAttribute函数
				GLTFHelpers::MeshFromAttribute(mesh, *attribute, node->skin, nodes, nodeCount);
			}

			// primitive里存了个index buffer
			if (primitive->indices != 0)
			{
				unsigned int indexCount = (unsigned int)primitive->indices->count;
				std::vector<unsigned int>& indices = mesh.GetIndices();
				indices.resize(indexCount);

				// 读取到Mesh的indices数组里
				for (unsigned int k = 0; k < indexCount; ++k)
					indices[k] = (unsigned int)cgltf_accessor_read_index(primitive->indices, k);
			}
			mesh.UpdateOpenGLBuffers();
		}
	}

	return result;
}

namespace GLTFHelpers
{
	// 针对glTF文件里的每个subMesh(primitive)的每个attribute, 调用此函数, 填充到Mesh对应的顶点属性的数组里
	// nodes是glTF里的所有Nodes的数组
	// attribute是一个node对应mesh上的其中一个primitive的attribute数组
	// skin是一个node对应的skin
	void MeshFromAttribute(Mesh& outMesh, cgltf_attribute& attribute, cgltf_skin* skin, cgltf_node* nodes, unsigned int nodeCount)
	{
		// 获取顶点属性对应的类型
		cgltf_attribute_type attribType = attribute.type;
		// 获取accessor
		cgltf_accessor& accessor = *attribute.data;

		// 判断attribute的数据由几个float组成
		unsigned int componentCount = 0;
		if (accessor.type == cgltf_type_vec2)
			componentCount = 2;
		else if (accessor.type == cgltf_type_vec3)
			componentCount = 3;
		else if (accessor.type == cgltf_type_vec4)
			componentCount = 4;

		// 转化为float数组
		std::vector<float> values;
		GetScalarValues(values, componentCount, accessor);

		// 虽然把这些属性都列出来了, 但每次调用这个函数时, 都只会用到下面的一种
		// 具体是哪种需要根据attribute.type决定
		std::vector<vec3>& positions = outMesh.GetPosition();
		std::vector<vec3>& normals = outMesh.GetNormal();
		std::vector<vec2>& texCoords = outMesh.GetTexCoord();
		std::vector<ivec4>& influences = outMesh.GetInfluences();
		std::vector<vec4>& weights = outMesh.GetWeights();

		// 遍历这个subMesh的每个accessor, 来处理每一部分的Vertex Attribute
		// 其实就是类似OpenGL里挖取每个顶点属性到VAO的对应槽位里
		for (unsigned int i = 0; i < (unsigned int)accessor.count; ++i)
		{
			int index = i * componentCount;// componentCount是从accessor.type里读取的
			// 根据类型挖出对应的数据
			switch (attribType)
			{
			case cgltf_attribute_type_position:
				positions.push_back(vec3(values[index + 0], values[index + 1], values[index + 2]));
				break;
			case cgltf_attribute_type_texcoord:
				texCoords.push_back(vec2(values[index + 0], values[index + 1]));
				break;
			case cgltf_attribute_type_weights:
				weights.push_back(vec4(values[index + 0], values[index + 1], values[index + 2], values[index + 3]));
				break;
			case cgltf_attribute_type_normal:
			{
				vec3 normal = vec3(values[index + 0], values[index + 1], values[index + 2]);
				if (lenSq(normal) < 0.000001f)
					normal = vec3(0, 1, 0);

				normals.push_back(normalized(normal));
			}
			break;
			case cgltf_attribute_type_joints:
			{
				// These indices are skin relative. This function has no information about the
				// skin that is being parsed. Add +0.5f to round, since we can't read ints
				ivec4 joints((int)(values[index + 0] + 0.5f),
					(int)(values[index + 1] + 0.5f),
					(int)(values[index + 2] + 0.5f),
					(int)(values[index + 3] + 0.5f)
				);

				joints.x = std::max(0, GetNodeIndex(skin->joints[joints.x], nodes, nodeCount));
				joints.y = std::max(0, GetNodeIndex(skin->joints[joints.y], nodes, nodeCount));
				joints.z = std::max(0, GetNodeIndex(skin->joints[joints.z], nodes, nodeCount));
				joints.w = std::max(0, GetNodeIndex(skin->joints[joints.w], nodes, nodeCount));

				influences.push_back(joints);
			}
			break;
			} // End switch statement
		}
	}
}
Implementing GPU skinning
GPU skinning其实就是把相关的矩阵信息,作为Uniform数组传给Vertex Shader了,这里创建一个skinned.vert:
#version 330 core
uniform mat4 model;
uniform mat4 view;
uniform mat4 projection;

in vec3 position;
in vec3 normal;
in vec2 texCoord;
in vec4 weights;// 额外的顶点属性1
in ivec4 joints;// 额外的顶点属性2

// 两个Uniform数组
uniform mat4 pose[120];	// 代表parent joint的world trans
uniform mat4 invBindPose[120];//代表转换到parent joint的local space的offset矩阵

// 这里是重点,对于Skinned Mesh,其ModelSpace下的顶点坐标和法向量都需要重新计算
// 因为这个Mesh变化了
out vec4 newModelPos;
out vec3 newNorm;
out vec2 uv;				// 注意,uv是不需要变化的(为啥?)

void main()
{
	mat m0 = pose[joints.x] * invBindPose[joints.x] * weights.x;
	mat m1 = pose[joints.y] * invBindPose[joints.y] * weights.y;
	mat m2 = pose[joints.z] * invBindPose[joints.z] * weights.z;
	mat m3 = pose[joints.w] * invBindPose[joints.w] * weights.w;
	mat4 pallete = m0 + m1 + m2 + m3;

	gl_Position = projection * view * model * pallete * position;// 算出屏幕上的样子

	// 计算真实的ModelSpace下的坐标,供后续进行着色和光照计算
	newModelPos =  (model * pallete * vec4(position, 1.0f)).xyz;
	newNorm = (model * pallete * vec4(normal, 0.0f)).xyz;
	// 注意,顶点即使进行了Deformation,但它对应贴图的TexCoord是不改变的
	uv =  texCoord;

}
总结
本章重点:
- Rest Pose与Bind Pose的区别,一个是默认的Pose,一个是绑骨时的Pose
- Skeleton类的本质:两个Pose,或者一个Pose(当Rest Pose与Bind Pose相同时)
- Rigid Skinning与Smooth Skinning
- GPU Skinning和CPU Skinning
- 使用glTF读取Mesh
- 这节课的GitHub上的Sample里展示了使用GPU和CPU蒙皮的例子
附录
关于Bind Pose的Transform是Local还是World的问题
关于Bind Pose,它是个正常又不正常的Pose,说它正常是因为它也是Pose类的对象,本质就是两个vector,一个存储int,代表joints的hierarchy,一个存储LocalTransform,代表各个Joints在这个Pose下的Transform数据;说它不正常是因为它是一个特殊的Pose,人物在这个Pose的状态下,对应的mesh跟static mesh一模一样,不会产生任何deformation
所以说,Pose怎么存,它就是怎么存,这里就是存的LocalTransform
Rest Pose和Bind Pose的区别
参考:https://download.autodesk.com/us/fbx/sdkdocs/fbx_sdk_help/files/fbxsdkref/class_k_fbx_pose.html
参考:https://knowledge.autodesk.com/support/maya/learn-explore/caas/CloudHelp/cloudhelp/2020/ENU/Maya-CharacterAnimation/files/GUID-36808BCC-ACF9-4A9E-B0D8-B8F509FEC0D5-htm.html
The only pose that does not cause deformations to the skin is the bind pose.
The Bind Pose gives you the transformation of the nodes at the moment of the binding operation when no deformation occurs. The Rest Pose is a snapshot of a node transformation. A Rest Pose can be used to store the position of every node of a character at a certain point in time.
Bind Pose强调的是绑定师在绑定Mesh到Joints时所用的Pose,模型static mesh上的每个点,会在这个过程中,加上各自的skin信息,也就是它受哪些骨骼和各自权重的影响,在这种下binding下的Pose称之为Bind Pose,而Rest Pose表示的是一个pose,它表示人物模型的初始状态,它一般是A Pose或者T Pose,表示Default Pose,它不一定是BInd Pose,比如一个模型的Bind Pose可以是T Pose,但是他的Rest Pose,也就是模型的默认Pose,可以是A Pose
The Bind Pose holds the transformation (translation, rotation and scaling) matrix of all the nodes implied in a link deformation. This includes the geometry being deformed, the links deforming the geometry, and recursively all the ancestors nodes of the link. The Bind Pose gives you the transformation of the nodes at the moment of the binding operation when no deformation occurs.
The Rest Pose is a snapshot of a node transformation. A Rest Pose can be used to store the position of every node of a character at a certain point in time. This pose can then be used as a reference position for animation tasks, like editing walk cycles.
One difference between the two modes is in the validation performed before adding an item and the kind of matrix stored.
In “Bind Pose” mode, the matrix is assumed to be defined in the global space, while in “Rest Pose” the type of the matrix may be specified by the caller. So local system matrices can be used.
关于glTF里的skin节点
如下图所示:

在这里面,node的hierarchy可以代表skeleton的hierarchy,每个node记录了mesh和skin俩对象的引用,skin用于基于skeleton pose来deform mesh,实现动画效果(The skin contains further information about how the mesh is deformed based on the current skeleton pose. )
如下所示,是一群nodes的数组:
"nodes": [
 {
 "name" :
 "Skinned mesh node",
 "mesh": 0
 "skin": 0,//skin这里存了个0
 },
 ...
 {
 "name": "Torso",
 "children":
 [ 2, 3, 4, 5, 6 ]
 "rotation": [...],
 "scale": [ ...],
 "translation": [...]
 },
 ...
 {
 "name": "LegL",
 "children": [ 7 ],
 ...
 },
 ...
 {
 "name": "FootL",
 ...
 },
 ...
],
这些Nodes组成下图所示的Hierarchy:

对应的Mesh在glTF里写作:
"meshes": [
 {
 "primitives": [
 {
 "attributes": {
 "POSITION": 0,
 "JOINTS_0": 1,
 "WEIGHTS_0": 2
 ...
 },
 ]
 }
],
然后是skins的数据,可以看到是一个元素为矩阵的数组,这个数组代表Joints的Hierarchy,还有与每个矩阵对应的Joint的id:
"skins": [
 {
 "inverseBindMatrices": 12,
 "joints": [ 1, 2, 3 ... ]
 }
],
这里的inverseBindMatrices是个对Accessor的引用,里面为每个Joint存了个矩阵
浮点数存int
glTF文件里的所有data都是用float存的,而Skin数据里,顶点会受Joint的影响,会用int记录Joint的id,这里仍然存为了浮点数,只是在返回的时候是这么处理的:
int output = (int)(intput + 0.5f);
glTF文件里的Mesh和primitives
参考:https://github.com/KhronosGroup/glTF-Tutorials/blob/master/gltfTutorial/gltfTutorial_009_Meshes.md
Simple Meshes
{
  "scene": 0,
  "scenes" : [
    {
      "nodes" : [ 0, 1]
    }
  ],
  // 场景里的俩节点都包含了mesh节点, 而且是相同的mesh节点
  "nodes" : [
    {
      "mesh" : 0
    },
    {
      "mesh" : 0,
      "translation" : [ 1.0, 0.0, 0.0 ]//无非这里加了个平移
    }
  ],

  "meshes" : [
    {
    	//
      "primitives" : [ {
        "attributes" : {
          "POSITION" : 1,
          "NORMAL" : 2
        },
        "indices" : 0
      } ]
    }
  ],

  "buffers" : [
    {
      "uri" : "data:application/octet-stream;base64,AAABAAIAAAAAAAAAAAAAAAAAAAAAAIA/AAAAAAAAAAAAAAAAAACAPwAAAAAAAAAAAAAAAAAAgD8AAAAAAAAAAAAAgD8AAAAAAAAAAAAAgD8=",
      "byteLength" : 80
    }
  ],
  "bufferViews" : [
    {
      "buffer" : 0,
      "byteOffset" : 0,
      "byteLength" : 6,
      "target" : 34963
    },
    {
      "buffer" : 0,
      "byteOffset" : 8,
      "byteLength" : 72,
      "target" : 34962
    }
  ],
  "accessors" : [
    {
    	// 要找的0号accessor在这里
      "bufferView" : 0,
      "byteOffset" : 0,
      "componentType" : 5123,
      "count" : 3,
      "type" : "SCALAR",
      "max" : [ 2 ],
      "min" : [ 0 ]
    },
    {
      "bufferView" : 1,
      "byteOffset" : 0,
      "componentType" : 5126,
      "count" : 3,
      "type" : "VEC3",
      "max" : [ 1.0, 1.0, 0.0 ],
      "min" : [ 0.0, 0.0, 0.0 ]
    },
    {
      "bufferView" : 1,
      "byteOffset" : 36,
      "componentType" : 5126,
      "count" : 3,
      "type" : "VEC3",
      "max" : [ 0.0, 0.0, 1.0 ],
      "min" : [ 0.0, 0.0, 1.0 ]
    }
  ],

  "asset" : {
    "version" : "2.0"
  }
}
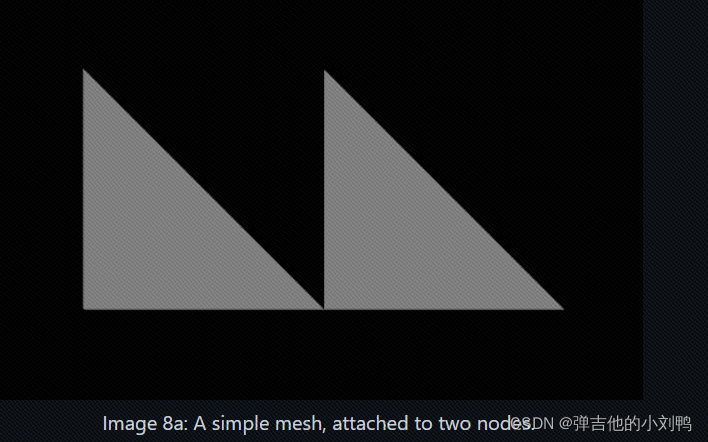
渲染出来如下图所示:

Mesh primitives
参考:https://github.com/KhronosGroup/glTF-Tutorials/blob/master/gltfTutorial/gltfTutorial_005_BuffersBufferViewsAccessors.md
前面提到的Mesh的primitives定义如下:
 "meshes" : [
    {
    	//
      "primitives" : [ {
        "attributes" : {
          "POSITION" : 1,
          "NORMAL" : 2
        },
        "indices" : 0  // 去找0号accessor对应的数组
      } ]
    }
  ]

  "accessors" : [
    {
    	// 要找的0号accessor在这里
      "bufferView" : 0,
      "byteOffset" : 0,
      "componentType" : 5123,// 5123对应的UNSIGNED_SHORT, 表示这是个短整型数组
      "count" : 3,
      "type" : "SCALAR",
      "max" : [ 2 ],	// 数组里的索引元素最大值为2
      "min" : [ 0 ]		// 数组里的索引元素最小值为0
    },
	...
}
Each mesh contains an array of mesh.primitive objects. These mesh primitive objects are smaller parts or building blocks of a larger object. A mesh primitive summarizes all information about how the respective part of the object will be rendered.
这里的Mesh里的Primitive对象里包含了attributes和indices数组,感觉显然不是我之前理解的OpenGL里的Primitive,我看了下,这里有个Mesh.Primitive.mode,里面有POINTS、TRIANGLES这些枚举,跟我理解的OpenGL的Primitive类型是一样的。
glTF里的每个mesh由mesh.primitive对象组成,它这里的primitive,我感觉理解为subMesh可能更合适一点,比如上面的JSON文件,其实是一个Mesh,它描述了顶点属性和对应的顶点数组,如下图所示,其实只有一个点:
accessors与attribute的关系
参考:https://blog.csdn.net/alexhu2010q/article/details/121012638
参考:https://stackoverflow.com/questions/64546908/properties-of-the-stride-in-a-gltf-file
参考:https://www.khronos.org/files/gltf20-reference-guide.pdf
This accessor references a buffer view and the buffer view references a buffer.The buffer view describes what is in a buffer. If a buffer contains the information for glBufferData, then a buffer view contains some of the parameters to call glVertexAttribPointer. An accessor stores higher-level information, it describes the type of data you are dealing with
accessors (in glTF) are like vertex attributes in OpenGL/WebGL, and are allowed to interleave.
accessors用于描述顶点Buffer里的Layout
比如说一个meshes信息:
"meshes": [
 {
 "primitives": [
 {
 "mode": 4,
 "indices": 0,
 "attributes": {
 "POSITION": 1,// 1是accessor的index
 "NORMAL": 2
 },
 "material": 2//2是materials数组里的Index
 }
 ]
 }
],
The meshes may contain multiple mesh primitives. These refer to the geometry data that is required for rendering the mesh. Each mesh primitive has a rendering mode, which is a constant indicating whether it should be rendered as POINTS, LINES, or TRIANGLES. The primitive also refers to indices and the attributes of the vertices, using the indices of the accessors for this data. The material that should be used for rendering is also given, by the index of the material.
Skinning的过程中,TexCoord需要改变吗
这里是没改的,也就是说,即使Vertex上的每个点的位置进行了Deformation,其对应贴图的TexCoord也是不改变的


