

Hazel引擎学习(二)
一. Precompiled Headers
为了避免头文件被反复编译,需要加上pch文件,主要有以下几点
- 需要在VS工程里添加hzpch.h和hzpch.cpp文件,前者放所有常用的库的头文件,对于后者,一般的pch是不需要cpp文件的,但是VS工程里需要这个东西,所以得加上,然后让他引用hzpch.h
- 然后在premake5.lua文件里进行修改,添加两个参数,pchheader “…” 和 pchsource “…” ,后者一般只是VS工程需要,其他平台会忽略这个,再次Build工程后,项目属性配置里会显示,使用pch
- 最后再把所有用到基本库的cpp(或者说所有cpp)里,都加上
#include "hzpch.h"
自己动手,出了两个错误,这两个问题,如果我项目属性中勾选不使用pch都不会报错。
第一个是报错:
Severity	Code	Description	Project	File	Line	Suppression State
Error	C1083	Cannot open precompiled header file: '..\bin-int\Debug-windows-x86_64\Hazel\Hazel.pch': No such file or directory	Hazel	c:\hazel\hazel\src\hazel\application.cpp	2
对比了一下视频,发现是自己的premake5.lua文件里的pchsource参数写的不对,我是这么写的:
  pchheader "hzpch.h"
  pchsource "hzpch.cpp"  -- 一般只有Visual Studio还要求pchsource,其他的IDE会自动忽略这一行
结果就报了上述问题的错误,实际上pchheader可以不顾当前路径随便写,但是cpp文件得明确指定路径,需要改成:
pchsource "%{prj.name}/Src/hzpch.cpp" -- 根目录基于premake5.lua文件
关键是我这么写也是报错,报错如下,如果我把project属性里的使用pch选项关掉,就不会发生下述报错:

经过仔细排查,发现由于粗心,导致头文件的包含顺序出错了,一定要记得把pch文件放到cpp的include的最上面,不然很可能出现编译错误,所以我的错误点如下图所示,顺序反了:

第二个问题是报错,
Severity	Code	Description	Project	File	Line	Suppression State
Error	C1010	unexpected end of file while looking for precompiled header. Did you forget to add '#include "hzpch.h"' to your source?	Hazel	c:\hazel\hazel\source.cpp	1
我发现任何项目中的cpp文件好像都要Include这个pch文件,即使这个cpp文件里什么内容也没有。
总结: 一定要记得,使用pch时,include的操作一定要在第一行,而且,如果勾选了使用pch文件,好像所有的cpp文件都必须include该文件
二. Add Glfw Library
glfw库就不多介绍了,学过OpenGL的都知道,可以实现跨平台窗口绘制,与之前的spdlog库一样,Hazel引擎使用glfw库作为submodule,额外的操作就是,需要使用glfw库的premake5.lua文件build工程,然后利用该工程创建的lib文件,这一节的重点就是如何实现premake5.lua的嵌套和相关工程的链接
大致思路如下:
- git submodule add url path
- 修改premake5.lua文件,需要include glfw库的premake5.lua文件,这个机制很像C++的头文件include机制,就是纯粹的copy and paste
- 还要使Hazel引擎Link glfw库生成的Lib文件
关于修改premake5.lua文件,首先介绍两个命令,include和includedirs,感觉就跟C++里的include和additional Include Directories两个功能很像,写法如下:
------- include ------
-- runs "src/MyApplication/premake5.lua"
include "src/MyApplication"

-- runs "my_script.lua" just once, lua的include应该自带pragma once的效果
include "my_script.lua"
include "my_script.lua"


------- includedirs ------
-- 会在以下目录里寻找premake5.lua文件
-- paths specifies a list of include file search directories.
-- Paths should be specified relative to the currently running script file.
includedirs { "paths" }

-- Define two include file search paths.
includedirs { "../lua/include", "../zlib" }

-- You can also use wildcards to match multiple directories. The * will match against a single directory,
-- ** will recurse into subdirectories as well.
includedirs { "../includes/**" }
顺便提一下,Cherno在premake5.lua里创建了一个类似于C++的Struct类型,具体代码如下:
IncludeDirs = {}
IncludeDirs["GLFW"] = "Hazel/vendor/GLFW/include"
实际使用的时候,就可以当作宏来使用,如下所示:
includedirs
{
	"%{IncludeDirs.GLFW}"
}
三. 基于GLFW库,创建Hazel引擎的Window类和Event类
在做这个事情之前,下面这些概念都得熟悉:Vsync、Observe Pattern、回调函数、函数指针、Event相关名词。
同时我也学到了很多小知识,一些不是很重要的东西都放在文章结尾,以免影响整体流程阅览
Event类
Window类与Event类是紧密结合的东西,先看看Hazel的Event基类是怎么设计的:
	#define BIT(x) 1 << x


	// 事件的详细类型
	enum class HAZEL_API EventType
	{
		None = 0,
		WindowClose, WindowResize, WindowFocus, WindowLostFocus, WindowMoved,
		AppTick, AppUpdate, AppRender,
		KeyPressed, KeyReleased,
		MouseButtonPressed, MouseButtonReleased, MouseMoved, MouseScrolled
	};

	// 事件的大体种类
	enum EventCategory
	{
		None = 0,
		EventCategoryApplication	= BIT(0),
		EventCategoryInput			= BIT(1),
		EventCategoryKeyboard		= BIT(2),
		EventCategoryMouse			= BIT(3),
		EventCategoryMouseButton	= BIT(4),
	};

	class HAZEL_API Event
	{
	public:
		virtual const char* GetName() const = 0;
		virtual const EventType GetEventType() const = 0;
		virtual int GetCategoryFlag() const = 0;
		virtual std::string ToString() const { return GetName(); }
		inline bool IsInCategory(EventCategory type)
		{
			return GetCategoryFlag() & type;
		}

	protected:
		bool m_Handled = false;//用来标记这个事件是否被处理了
	};
然后举一个具体的例子,比如实现按键盘的事件:
	class HAZEL_API KeyPressedEvent : public Event
	{
	public:
		KeyPressedEvent(int keycode, int keyRepeated)
			:m_Keycode(keycode), m_KeyRepeated(keyRepeated) {}
		inline int GetRepeated() const { return m_KeyRepeated; }

		std::string ToString()const override
		{
			std::stringstream ss;
			ss << "KeyPressedEvent:\n KeyCode : " << m_Keycode << " KeyRepeated: " << m_KeyRepeated;
			return ss.str();
		}
		static EventType GetStaticType() {return EventType::KeyPressed; } // 此类下的Event类型都是一样的,所以应该设为Static
		virtual EventType GetEventType() const override {return GetStaticType();} // 写这个是为了防止没有KeyEvent类型,只有Event类型
		virtual const char* GetName() const override { return "KeyPressed"; }

	protected:
		int m_KeyRepeated;
		int m_Keycode;
	};
Window类
Window类作为接口类,需要包含通用的窗口内容:
- 虚析构函数
- 一个Update函数,用于在loop里每帧循环
- 窗口的长和宽,以及相应的Get函数
- 设置窗口的Vsync和Get窗口的Vsync函数
- 窗口的回调函数,当窗口接受事件输入时,会调用这个回调函数
所以Windows接口类设计如下:
class HAZEL_API Window
	{
	public:
		// Window自带一个回调函数,用来处理从glfw库收到的callback
		using EventCallbackFn = std::function<void(Event&)>;
		virtual ~Window() {};
		virtual float const& GetWindowHeight() const = 0;
		virtual float const& GetWindowWidth() const = 0;
		virtual bool IsVSync() const = 0;
		virtual void SetVSync(bool) = 0;
		virtual void OnUpdate() = 0;
		virtual void SetEventCallback(const EventCallbackFn& callback) = 0;

		static Window* Create(const WindowProps& props = WindowProps());
	};
应该设计一个Application类,由Application创建window,同时Application给与window对应的回调函数,让window接受glfw的回调函数后,再来调用对应Application的回调函数,而window本身是不知道Application的存在的,设计代码如下
	class HAZEL_API Application
	{
	public:
		Application();
		virtual ~Application()
		{
		}

		void OnEvent(Event& e);
		void Run();
		bool OnWindowClose(WindowCloseEvent& e);
	private:
		std::unique_ptr<Window>m_Window;
		bool m_Running = true;
	};

	Application* CreateApplication();
具体实现代码如下:
Application::Application()
	{
		m_Window = std::unique_ptr<Window>(Window::Create());
		m_Window->SetEventCallback(std::bind(&Application::OnEvent, this, std::placeholders::_1));// 设置window的callback为此对象的OnEvent函数
		// 像下面这样直接写lambda也是可以的
		//m_Window->SetEventCallback([](Event& e)->void
		//{
		//	if (e.GetEventType() == EventType::MouseScrolled)
		//	{
		//		MouseScrolledEvent ee = (MouseScrolledEvent&)e;
		//		LOG( "xOffset:{0} and yOffset:{1}", ee.GetXOffset(), ee.GetYOffset());
		//	}
		//}
		//);
	}

	void Application::OnEvent(Event& e)
	{
		//CORE_LOG("{0}", e);
		CORE_LOG(e.ToString());
		EventDispatcher dispatcher(e);
		dispatcher.Dispatch<WindowCloseEvent>(std::bind(&Application::OnWindowClose, this, std::placeholders::_1));
	}


	void Application::Run()
	{
		std::cout << "Run Application" << std::endl;
		while (m_Running)
		{
			// Application并不应该知道调用的是哪个平台的window,Window的init操作放在Window::Create里面
			// 所以创建完window后,可以直接调用其loop开始渲染
			m_Window->OnUpdate();
		}

		//LOG(w.ToString());
	}

	bool Application::OnWindowClose(WindowCloseEvent &e)
	{
		m_Running = false;
		return true;
	}
其中,EventDispatcher用于根据事件类型的不同,调用不同的函数:
// 当收到Event时,创建对应的EventDispatcher
	class HAZEL_API EventDispatcher
	{
		template<typename T>
		using EventHandler = std::function<bool(T&)>;//EventHandler存储了一个输入为任意类型的引用,返回值为bool的函数指针
	public:
		EventDispatcher(Event& event):
			m_Event(event){}

		// T指的是事件类型, 如果输入的类型没有GetStaticType会报错
		template<typename T>
		void Dispatch(EventHandler<T> handler)
		{
			if (m_Event.m_Handled)
				return;

			if (m_Event.GetEventType() == T::GetStaticType())
			{
				m_Event.m_Handled = handler(*(T*)&m_Event); //使用(T*)把m_Event转换成输入事件的指针类型
			}
		}

	private:
		Event& m_Event;//必须是引用,不可以是Event的实例,因为Event带有纯虚函数
	};
四. 相关知识补充与总结
1. Vsync
垂直同步旨在解决画面的fps与显示器的帧率不同步的问题,当二者存在差距时,可能会出现Screen Tearing(屏幕撕扯)的情况,如下图所示:

下面的图示展示了GPU和显示器绘制帧率不同步导致屏幕撕扯的情况:

使用Vsync的好处:
- 降低GPU的帧率,使其跟显示器的帧率一样
- 对于一些老游戏,GPU帧率会特别高,这很消耗性能,而开启垂直同步能同步GPU帧率到显示器的帧率,从而减少GPU的计算量
使用Vsync的坏处:
- 可能会感受到Input输入,比如鼠标和键盘输入的Delay,如下图所示的区间输入键盘会延迟到下一帧

什么时候适合用Vsync:
当GPU帧率大于显示器的时候用Vsync会比较好,如果GPU帧率本来就比较低,垂直同步反而会起到反作用,具体的还有一些显卡里面的特定类型的Vsync,这里就不再详细介绍了。
相关的OpenGL函数如下所示:
// This function sets the swap interval for the current OpenGL or OpenGL ES context
// i.e. the number of screen updates to wait from the time glfwSwapBuffers was called
// before swapping the buffers and returning.
// This is sometimes called vertical synchronization,
// vertical retrace synchronization or just vsync.
// [in]	interval:The minimum number of screen updates to wait for until the buffers are swapped by glfwSwapBuffers.
void glfwSwapInterval(int interval)
也就是说,这个函数决定了调用glfwSwapBuffers函数的频率,interval代表帧数,所以设定是否开启垂直同步的函数应该这么写:
void SetVsync(bool enabled)
{
	if(enabled)
		glfwSwapInterval(1);
	else
		glfwSwapInterval(0);
}
2. 虚析构函数与纯虚析构函数
基类的析构函数必须是虚函数,否则子类的析构函数会去调用基类的析构函数而不是调用自身的析构函数。首先复习一下相关的内容,如果析构函数不为虚函数,下面这个情况还是正常的:
#include<iostream>

class Base
{
public:
	Base(){ std::cout << "Base Constructor" << std::endl; }
	~Base() { std::cout << "Base Destructor" << std::endl; }
};

class Derived : public Base
{
public:
    Derived(){ std::cout << "Derived Constructor" << std::endl; }
	~Derived() { std::cout << "Derived Destructor" << std::endl; }
};

int main() {
	Base *base = new Base();
	delete base;
	std::cout << "-------------\n";
	Derived *derived = new Derived();
	delete derived;

	std::cin.get();
}
结果是正常的,派生类会先调用基类的构造函数,后调用基类的析构函数,输出如下
Base Constructor
Base Destructor
-------------
Base Constructor
Derived Constructor
Derived Destructor
Base Destructor
但如果我们这么写,会发现派生类的析构函数没有调用:
int main() {
	Base *base = new Derived();
	delete base;

	std::cin.get();
}
输出如下:
Base Constructor
Derived Constructor
Base Destructor
这样就会出问题,比如在派生类的Constructor里new了内存,在其析构函数里进行delete,如果这里没有设置virtual析构函数,就会造成memory leak
那么问题来了,基类的析构函数需要声明为虚函数,但是有没有必要声明成纯虚函数呢?
首先,C++是支持纯虚析构函数的,两种写法都可以
virtual ~Example(){} // virtual destructor
virtual ~Example() = 0; // pure virtual destructor
纯虚函数也就是接口函数,如果类里声明了纯虚析构函数,那么该类还要负责定义这个函数,所以纯虚析构函数也一样,但值得注意的是,一般函数的纯虚函数不需要实现,但是纯虚析构函数一定要提供函数的实现。
(one of the most important things to remember is that if a class contains a pure virtual destructor, it must provide a function body for the pure virtual destructor.)
为什么要这么做呢?因为虚析构函数与普通的虚函数不同,虚析构函数并不是简单的override,就拿上面的例子来说,B继承A,当B消失时,会先调用B的析构函数,再调用A的析构函数,如果是一般的虚函数,则不会调用原来的函数,只会调用override之后的函数。所以需要这么写:
class Base
{
public:
	Base(){ std::cout << "Base Constructor" << std::endl; }
	virtual ~Base() = 0;
};
Base::~Base() { std::cout << "Base Destructor" << std::endl; } // 必须实现纯虚析构函数
这种写法就跟直接声明virtual的析构函数是一样
所以纯虚析构函数有什么用呢,想想纯虚函数有什么用就知道了,纯虚函数一般都是为了接口设计的,所以这么写,可以禁止直接创建Base基类的对象,当然如果基类里面本来就含有纯虚函数作为接口,那么纯虚析构函数意义也不大了。
3. 观察者模式(Observe Pattern)
这种模式常见于窗口系统的设计和游戏开发领域,举个例子,如下图所示,当主角移到周围的格子时,如何做出合适的反应:

我第一反应想的是,在主角的移动函数里做判断,大概是这么写:
class Agent
{
	if(agentMoved)
	{
		if(targetType == "袭击") ...
		 if(targetType == "加血") ...
		 if(targetType == "困住") ...
	}
}
这样写的缺点有两个:
- 角色类与加血、袭击和困住这些事件类的耦合太高
- 如果加一个新的事件,还要去修改Agent类的代码,这不适合拓展
还有一种方法,就是加血这些事件类,每隔一段时间就判断主角是否在其范围内,这样会造成CPU消耗,也不好。
所以Observe Pattern能很好的解决这个问题,当角色触发这个事件时,能第一时间让所有可能响应的事件收到这个消息,就好像一个主播,给所有的订阅者发送推送一样。
为了降低主角类与事件类的耦合性,设置一个规定,所有主角这种类(或者说类似于主播这种会发送通知的类),需要创建一个存放所有订阅者的数据结构(ObserverList),再规定几个统一的接口,用于添加订阅,取消订阅,发送订阅,就是以下内容:

而所有的observer类,需要定义一个接口,作为收到消息时的响应函数,这里就叫做Update函数好了,所以写出来两个接口代码是这样是:
//观察者
public interface Observer {
    public void update();
}

//被观察者
abstract public class Subject {

    private List<Observer> observerList = new ArrayList<Observer>();

    public void attachObserver(Observer observer) {
        observerList.add(observer);
    }

    public void detachObserver(Observer observer){
        observerList.remove(observer);
    }

    public void notifyObservers(){
        for (Observer observer: observerList){
            observer.update();
        }
    }
}
对于这些响应的类,只要确保实现了update函数就可以了:
//陷阱
public class Trap implements Observer {
    @Override
    public void update() {
        if(inRange()){
            System.out.println("陷阱 困住主角!");
        }
    }

    private boolean inRange(){
        //判断主角是否在自己的影响范围内,这里忽略细节,直接返回true
        return true;
    }
}
对于主角类,只需要在移动的时候,调用notifyAllObservers就行了:
public class Hero extends Subject{
    void move(){
        System.out.println("主角向前移动");
        notifyObservers();
    }
}
而创建主播类与用户类之间连接的代码则是在运行程序里进行执行的,代码如下:
public class Client {
	// 在游戏执行时建立这些连接
    public static void main(String[] args) {
        //初始化对象
        Hero hero = new Hero();
        Monster monster = new Monster();
        Trap trap = new Trap();
        Treasure treasure = new Treasure();
        //注册观察者
        hero.attachObserver(monster);
        hero.attachObserver(trap);
        hero.attachObserver(treasure);
        //移动事件
        hero.move();
    }
}
这样写代码又简洁,又容易拓展,对于设计Event系统来说非常好用。关于观察者模式的这些内容参考于Github精英社区公众号,写的很好。
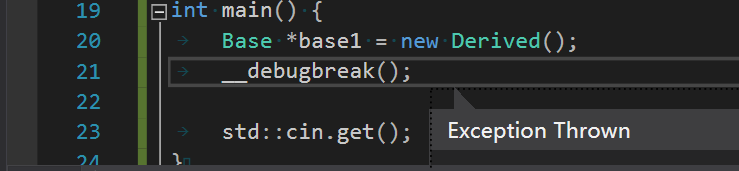
4.关于__debugbreak
方便使用引擎来判断数据类型是否为null,创建了一个Assert类型的宏,为了创建这个宏,需要知道两个宏的操作,一个是Variadic Arguments(可变的参数),这个之前也用到过了,对应宏的参数是__VA_ARGS__,第二个就是一个新的宏,叫做__debugbreak
The __debugbreak compiler intrinsic, similar to DebugBreak, is a portable Win32 way to cause a breakpoint.
相当于C#里调试的Debug.break(),调试的时候如果执行到这里会自动打断点,如下图所示:
所以这么写就可以了:
#ifdef HZ_ENABLE_ASSERTS
	#define HAZEL_ASSERT(x, ...) if(!x) {LOG_ERROR("Assertion Failed At: {0}", __VA_ARGS__);\
	__debugbreak();}
	#define HAZEL_CORE_ASSERT(x, ...) if(!x) {CORE_LOG_ERROR("Assertion Failed At: {0}", __VA_ARGS__);\
	__debugbreak();}
#else
	#define HAZEL_ASSERT(x, ...) // 非Debug状态下这行代码毫无作用
	#define HAZEL_CORE_ASSERT(x, ...)
#endif
5.关于Callback
- Callback function are nothing but a function pointer that are used to call particular functions on a software event.
- Simply pointing a function address to that function pointer is called as registering a callback function .
由上可知,C语言实现callback的本质就是函数指针。但是看完了这一段,我还是不太明白,到底这个callback是在哪callback
OK,下面举一个例子:
#include<iostream>

void funcA()
{
	std::cout << "funcA\n";
}

void funcB(void(*ptr)())
{
	ptr();
}

int main() {
	funcB(funcA);
	std::cin.get();
}
可以看到,funcA是作为一个函数指针传给了吗funcB,所以在funcB里,B函数接受了函数A作为参数,然后又在B里去调用A,
再进一步,可以把函数B做一个拓展:
void funcB(void(*ptr)())
{
	DoOtherStuff();
	ptr();
}
作为用户而言,使用函数B的时候,是输入了函数A,但是并不立马调用函数A,而是执行其他的操作,直到需要的时候再回来调用函数A,这里就是callback叫法的得来了,其中这里的funcA就叫做callback函数,而funcB就叫做对应callback函数的register函数
通过指针函数,或者说callback函数,还可以实现一下功能,如下所示,Compare函数是用户输入的函数,需要指定compare的方式:

function pointer、function handle和callback function
function pointer和function handle基本是同一个东西,可能用了typedef声明了对应的handle,而callback function是指的那些被用作为callback的函数,实际上就是输入的函数指针对应的函数,
function handles and function pointers are the same thing. They hold a reference to a function. A callback function is a fancy name for a function used as a callback. Often a callback function is specified as a handle or pointer to the actual function, depending on language.
6.如何设计Event System
经过上面的解释,callback到底是什么应该很清楚了,但是具体到怎么应用到Windows的Event里,我还是不太清楚。
首先明晰两个概念:Event和EventHandler,这两个术语取自.NET events
- event handler: A holder for an actual function that should be called when we raise the notification.
- event: A holder for a number of handlers. An event can be called for raising a notification (and call its handlers).
简单来说,event handler存储了一个函数,用来处理事件,而event存储了很多对应的handler,当对应event事件发生时会调用对应的eventhandler
EventListener
EvetnListener这个名词,相当于Observe Pattern里的Observer,对于一个事件,事件发生时,所有监听该事件的EventListenner就是观察者模式里的观察者,这个时候Observer会调用自己的Update函数,所以这里我们这么设计:
class Observer1 : public IEventListener //继承这个接口,因为必须实现Update函数
{
	void OnEvent(Event& receivedEvent) override // 名字就叫OnEvent函数
	...
}
EventHandler
感觉这个概念跟EventListener好像,前面提到了,其实跟EventListener用途是一样的,都是存放了用来处理事件的函数或函数指针。
二者的核心区别在这里:A listener watches for an event to be fired.The handler is responsible for dealing with the event.
EventListener在乎事件是否被触发,而EventHandler在乎的是事件触发后如何被处理。可以看一段代码:
setOnClickListener(object : View.OnClickListener { //1
    override fun onClick(v: View?) { // 2
        dismiss()
    }
})
- Anonymous class is here used as a listener
- Method onClick is here event handler
https://blog.kotlin-academy.com/programmer-dictionary-event-listener-vs-event-handler-305c667d0e3c
EventDispatcher
Event产生时,需要根据Event类型来决定进行什么操作,这一段内容显然不应该由Event类来执行,所以需要创建一个EventDispatcher类,来处理这个判断的问题,每当一个Event产生时,都会创建一个对应的EventDispatcher,负责将该Event传递给对应的EventHandler,所以说,EventDispatcher是用来连接EventHandler和Event的,大概代码如下:
class EventDispatcher {
	private Event event;
	public EventDispatcher(Event event){
		this.event = event;
	}
	public void dispatch(EventType type, EventHandler handler){
		if(event.isHandled)
			return;

		if(event.getType() == type)
		{
			event.isHandled = handler.OnEvent(event);
		}
		// 调用对应的EventHandler
	}
}
7. 基类里的static
在不考虑变量访问权限的情况下,基类里的static变量被所有的派生类共享,基类里的static函数同样也被所有的派生类共享,所以对于Window基类,创建了统一的创建window的函数:
class Window{
public:
	...
	static Window* Create(const WindowProps& props);	 // 所有的子类Window都共享函数,具体实现在子类里实现,适配不同平台
}
8. protected constructor
以前提到过两种方法,能够禁止一个类被实例化,一是private constructor,二是pure virtual function
但是最近看到了一种写法,就是protected constructor,具体有什么用呢?
该用法在于,对于抽象基类,如果把其constructor设置为protected,那么,该基类虽然不能被用户直接进行实例化,但声明为protected能让该基类的子类被实例化,举个代码的例子:
class Base1
{
public:
	virtual ~Base1() {}
protected:
	Base1() {}
};

class Base2
{
public:
	virtual ~Base2() {}
	Base2() {}
};

int main() {
	Base1 *base1 =  new Base1(); //编译错误,Base1的构造函数是protected,不可以访问
	Base2 *base2 =  new Base2(); //编译成功
}
所以声明protected constructor for base class,就是保证基类的构造函数,只能在其派生类中调用,这种基类一般是abstract类,但又不是接口类
9. static函数的定义,以及unique_ptr和make_unique
之前C#写多了,搞得C++的static函数定义不会写了,C++的static成员在声明时需要加上static关键字,但是在定义的时候就不要再加上这个了,可以看下面这个例子:
// 在WindowsWindow.cpp中,我本来是想实现基类Windows里声明的static 创建窗口的函数的
// 但是我是这么写的,以下是WindowsWindow里的函数实现
static Hazel::Window* Create(const WindowProps& props = WindowProps())
{
	return new WindowsWindow(props);
}
上面的代码,我犯了两个错误,这样就导致我直接创建了一个属于WindowsWindow类的static函数:
- 如果想要定义原本已经声明好的static函数,那么前面就不要再加static了
- 我的函数代码签名错了,Create函数应该是基类Window的,所以前面应该写Window::Create
下面才是正确的写法
	Hazel::Window* Window::Create(const WindowProps& props = WindowProps())
	{
		return new WindowsWindow(props);
	}
而引起上述的问题的,是下面一段代码
	Application::Application()
	{
		//m_Window = std::unique_ptr<Window>(Window::Create()); // 成功编译
		m_Window = std::make_unique<Window>(Window::Create()); // 编译错误
	}
make_unique的本意是不使用new关键字,主要是为了安全考虑
foo(make_unique<T>(), make_unique<U>()); // exception safe
foo(unique_ptr<T>(new T()), unique_ptr<U>(new U())); // unsafe*
所以我猜应该是因为我的Window::Create()是使用的new来创建的变量,这在make_unqiue里面应该是不允许的
10. 不要在头文件里Include该头文件本身用不到的其他头文件
比如说我的app程序引用了游戏引擎的dll,那么我其实只要知道其API的声明就可以了,并不需要知道其底层的结构,更不需要include <GLFW/glfw3.h>,所以这些头文件也不应该include具体实现的库是什么,比如说我的app引入了WindowsWindow.h,那么WindowsWindow.h包含了函数的声明,会被导到DLL中,但具体实现是在WindowsWindow.h中,所以include <GLFW/glfw3.h>应该放在WindowsWindow.cpp中,因为用户不应该需要知道glfw3.h的头文件定义,况且,glfw3.h内容也很大。
11. std::bind

也没什么难的,就是用std::bind把一个函数和它的参数绑定起来,形成一个wrapper,举几个简单例子:
// 参数为值传递的函数
void f1(int c){ cout << 1 << endl; }
void main()
{
	const auto f = std::bind(&f1, 4);
	f(); // print 4
}

// 参数为引用传递的函数
void f2(const int &c){ cout << c <<endl;}
void main()
{
	int c = 5;
	auto f = std::bind(&f2, std::ref(c));
	f(); // print 5
	c= 2;
	f(); // print 2
}

// std::bind还可以不考虑函数参数类型是否传入的是引用,直接利用std::ref绑定特定的参数
void f3(int c) { cout << c << endl; }
void main()
{
	int c = 2;
	const auto f = std::bind(&f3, std::ref(c));
	f(); // print 2
	c = 4;
	f(); // print 4
}

// 当参数有多个时,可能并不是所有的参数都想绑定起来,可以用std::placeholders
void f4(int c, const string &s) { cout << c << " " << s << endl; }
void main()
{
	int c = 5;
	auto f = std::bind(&f4, c, std::placeholders::_1);
	f("Hello"); // print "5 Hello"
}

// 基于std::placeholders,还可以调整参数的顺序
void f5(int c, const string &s) { cout << c << " " << s << endl; }
void main()
{
	int c = 5;
	auto f = std::bind(&f5, std::placeholders::_2, std::placeholders::_1);
	f("Hello", 3); // print "3 Hello"
	f("Hello", 3, 1, 4, 6); // 这样写也可以,跟上面结果一样,这种方式能够忽略其他不想要的参数
}

// std::bind如果用于模板函数,需要指定参数类型
template<typename T>
void f6(T t, const string &s) { cout << t << " " << s << endl; }
void main()
{
	int c = 5;
	auto f = std::bind(&f6<int>, std::placeholders::_2, std::placeholders::_1);
	f("Hello", 3); // print "3 Hello"
}
可以看到std::bind的返回类型是不可知的,所以上面的类型都用auto来表示,实际上std::bind一般是与std::function一起使用的,std::bind返回的是一个callable object,代码如下所示:
void f(int a, int c) { cout << c << endl; }
int main() {
	const auto f1 = std::bind(&f, std::placeholders::_2, std::placeholders::_1);
	std::function<void(int, int)>f2(f1);
	f2(4,3); // Print 4
	cin.get();
}
12. std::function
下面这几句有啥区别
using EventCallbackFn = std::function<void(Event&)>(Event&); //1
using EventCallbackFn = std::function<void(Event&)>; //2
using EventCallbackFn = std::function<void>(Event&); //3
上面的1和3的写法都是错的,主要还是不熟悉std::function的写法,比如说std::function<void(int)>s,s被称作callable object,可以是以下内容:
- 函数指针
- Lambda表达式
- std::bind返回的东西(std::bind一般都与std::function一起用)
- Functor: 仿函数,在我理解就是Object里实现了()符号的重载
- 类的成员函数
- 类的静态函数
具体举几个例子:
#include <functional>
#include <iostream>

struct Foo {
	Foo(int num) : num_(num) {}
	void print_add(int i) const { std::cout << num_ + i << '\n'; }
	int num_;
};

void print_num(int i)
{
	std::cout << i << '\n';
}

struct PrintNum {
	void operator()(int i) const
	{
		std::cout << i << '\n';
	}
};

int main()
{
	// store a free function
	std::function<void(int)> f_display = print_num;
	f_display(-9); // print -9

	// store a lambda, lambda的返回类型can be deduced, 而且没有参数, 所以类型为void()
	std::function<void()> f_display_42 = []() { print_num(42); };
	f_display_42(); // print 42

	// store the result of a call to std::bind, 将函数与特定参数绑定
	std::function<void()> f_display_31337 = std::bind(print_num, 31337);
	f_display_31337(); // print 31337

	// store a call to a member function
	std::function<void(const Foo&, int)> f_add_display = &Foo::print_add;
	const Foo foo(314159);
	f_add_display(foo, 1); // print 314160
	f_add_display(314159, 1); // print 314160

	// store a call to a data member accessor
	std::function<int(Foo const&)> f_num = &Foo::num_;
	std::cout << "num_: " << f_num(foo) << '\n';

	// store a call to a member function and object
	using std::placeholders::_1;
	std::function<void(int)> f_add_display2 = std::bind(&Foo::print_add, foo, _1);
	f_add_display2(2);

	// store a call to a member function and object ptr
	std::function<void(int)> f_add_display3 = std::bind(&Foo::print_add, &foo, _1);
	f_add_display3(3);

	// store a call to a function object
	std::function<void(int)> f_display_obj = PrintNum();
	f_display_obj(18);
}
还有更多的例子可以看下面这个
//代码出自链接:http://www.jellythink.com/archives/771
#include <functional>
#include <iostream>
using namespace std;

std::function< int(int)> Functional;

// 普通函数
int TestFunc(int a)
{
    return a;
}

// Lambda表达式
auto lambda = [](int a)->int{ return a; };

// 仿函数(functor)
class Functor
{
public:
    int operator()(int a)
    {
        return a;
    }
};

// 1.类成员函数
// 2.类静态函数
class TestClass
{
public:
    int ClassMember(int a) { return a; }
    static int StaticMember(int a) { return a; }
};

int main()
{
    // 普通函数
    Functional = TestFunc;
    int result = Functional(10);
    cout << "普通函数:"<< result << endl;

    // Lambda表达式
    Functional = lambda;
    result = Functional(20);
    cout << "Lambda表达式:"<< result << endl;

    // 仿函数
    Functor testFunctor;
    Functional = testFunctor;
    result = Functional(30);
    cout << "仿函数:"<< result << endl;

    // 类成员函数
    TestClass testObj;
    Functional = std::bind(&TestClass::ClassMember, testObj, std::placeholders::_1);
    result = Functional(40);
    cout << "类成员函数:"<< result << endl;

    // 类静态函数
    Functional = TestClass::StaticMember;
    result = Functional(50);
    cout << "类静态函数:"<< result << endl;

    return 0;
}
关于类的成员函数,还可以在类里面这么写,与this连用:
Application::Application()
{
	m_Window = std::unique_ptr<Window>(Window::Create());
	m_Window->SetEventCallback(std::bind(&Application::OnEvent, this, std::placeholders::_1)); // 绑定的是本成员的OnEvent函数,留了一个参数输入(Event& e)
}
