实现集中式的病毒扫描
一、概要
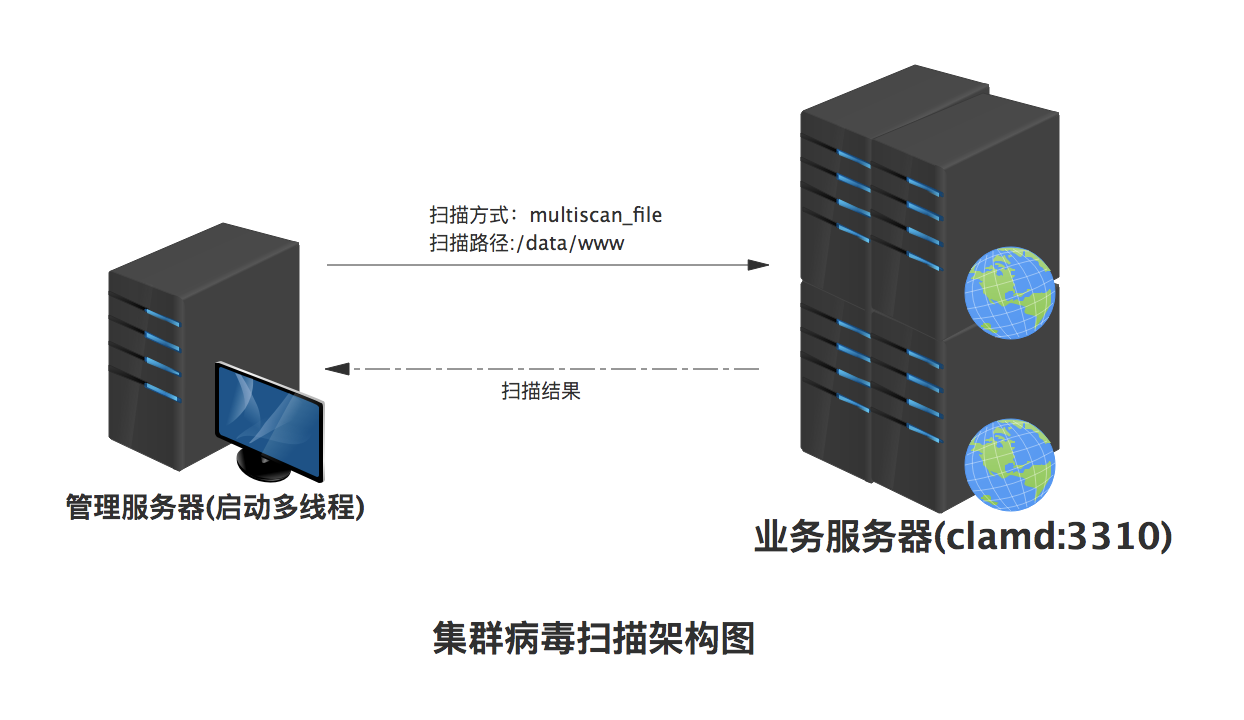
本次实践实现了一个集中式的病毒扫描管理,可以针对不同业务环境定制扫描策略,比如扫描对象、描述模式、扫描路径、调度频率等。示例实现的架构图见下图,首先业务服务器开启clamd服务(监听3310端口),管理服务器启用多线程对指定服务器集群进行扫描,扫描模式、扫描路径会传递到clamd,最后返回扫描结果给管理服务端。
二、代码实现
本次实践通过ClandNetworkSocket()方法实现业务服务器建立扫描socket连接,在通过启动不同扫描方式实施病毒扫描并返回结果。实现代码如下:
[root@localhost py_clamad]# cat simple1.py
#!/usr/bin/env python
# -*- coding: utf-8 *-


import time
import pyclamd
from threading import Thread


class Scan(Thread):
    def __init__(self,IP,scan_type,file):
        '''
        构造方法,参数初始化
        :param IP:
        :param scan_type:
        :param file:
        '''
        Thread.__init__(self)
        self.IP = IP
        self.scan_type = scan_type
        self.file = file
        self.connstr = ""
        self.scanresult = ""

    def run(self):
        '''
        多进程run方法
        :return:
        '''
        try:
            cd = pyclamd.ClamdNetworkSocket(self.IP,3310)       #创建网络套接字连接对象
            if cd.ping():                       #探测连通性
                self.connstr = self.IP+" connection [OK]"
                cd.reload()         #重载clamd病毒库特征,建立更新病毒库后做reload()操作
                if self.scan_type == "contscan_file":       #选择不同的扫描模式
                    self.scanresult="{0}\n".format(cd.contscan_file(self.file))
                elif self.scan_type == "multiscan_file":
                    self.scanresult="{0}\n".format(cd.multiscan_file(self.file))
                elif self.scan_type == "scan_file":
                    self.scanresult = "{0}\n".format(cd.scan_file(self.file))
                time.sleep(1)       #线程挂起1秒
            else:
                self.connstr = self.IP+ "ping error,exit"
                return
        except Exception as e:
            self.connstr=self.IP+" "+str(e)


IPs = ['192.168.12.224','192.168.12.225']         #扫描主机列表
scantype = "multiscan_file"     #指定扫描模式,支持multiscan_file、contscan_file、scan_file
scanfile = "/data/www"          #指定扫描路径
i=1

threadnum = 2    #指定启动的线程数
scanlist = []    #存储扫描scan类线程对象列表

for ip in IPs:
    currp = Scan(ip,scantype,scanfile)      #创建扫描Scan类对象,参数(IP,扫描模式,扫描路径)
    scanlist.append(currp)                  #追加对象到列表
    if i%threadnum == 0 or i == len(IPs):           #当达到指定的线程数或IP列表数后启动、退出线程
        for task in scanlist:
            task.start()            #启动线程

        for task in scanlist:
            task.join()             #等待所有子线程退出,并输出扫描结果
            print(task.connstr)     #打印服务器连接信息
            print(task.scanresult)      #打印扫描结果
        scanlist = []
    i +=1
通过EICAR()方法生成一个带有病毒特征的文件/tmp/EICAR,把生成的文件放到腰扫描的目录下(/data/www)代码如下
官方文档:https://xael.org/pages/pyclamd-en.html
https://xael.org/pages/pyclamd-en.html
https://xael.org/norman/python/pyclamd/


>>> import pyclamd
>>> cd = pyclamd.ClamdAgnostic()
>>> cd.ping()
True
>>> print(cd.version().split()[0])
ClamAV
>>> print(cd.reload())
RELOADING
>>> print(cd.stats().split()[0])
POOLS:
>>> void = open('/tmp/EICAR','w').write(cd.EICAR())     #磁盘代码有误,应该以wb模式打开
>>> void = open('/tmp/NO_EICAR','w').write('no virus in this file')
>>> cd.scan_file('/tmp/EICAR')
{'/tmp/EICAR': ('FOUND', 'Eicar-Test-Signature')}
>>> cd.scan_file('/tmp/NO_EICAR') is None
True
>>> cd.scan_stream(cd.EICAR())
{'stream': ('FOUND', 'Eicar-Test-Signature')}
亲测可用
>>> import pyclamd
>>> cd = pyclamd.ClamdAgnostic()
>>> void = open('/tmp/EICAR','wb').write(cd.EICAR())
>>> void = open('/tmp/NO_EICAR','w').write('no virus in this file')
>>> cd.scan_file('/tmp/EICAR')
{'/tmp/EICAR': ('FOUND', 'Eicar-Test-Signature')}
>>> cd.scan_file('/tmp/NO_EICAR') is None
True
>>> cd.scan_stream(cd.EICAR())
{'stream': ('FOUND', 'Eicar-Test-Signature')}
把生成的病毒特征文件拷贝至/dada/www扫描目录下
[root@localhost py_clamad]# cp /tmp/EICAR /tmp/NO_EICAR /data/www/
[root@localhost py_clamad]# ls /data/www/
EICAR  NO_EICAR
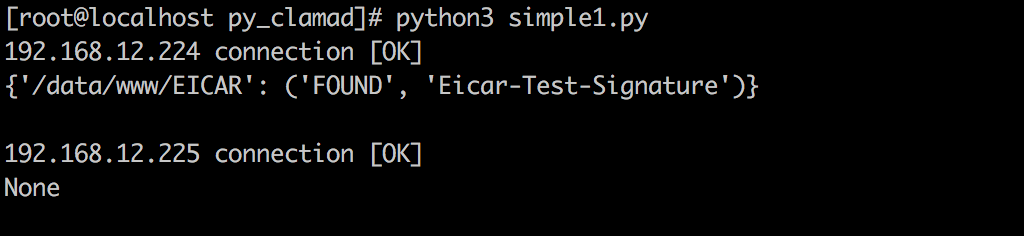
运行代码结果如下图所示

 浙公网安备 33010602011771号