
hyperledger caliper的使用(以Hyperledger Fabric为例)
hyperledger caliper的使用(以Hyperledger Fabric为例)
- hyperledger caliper的使用(以Hyperledger Fabric为例)
- 1. 准备好被测试的Fabric 网络
- 2. 使用caliper对被测试的网络进行性能测试
1. 准备好被测试的Fabric 网络
此网络(Fabric的GitHub上给的样例:fabric-samples)由两个组织和一个单独排序者组成,智能合约使用javascript,已建立好并且准备进行智能合约的性能测试
在预先存在的Fabric网络上使用Caliper对智能合约进行性能测试
fabric-sample的安装:
# 克隆Hyperledger Fabric samples repo的固定版本
git clone https://github.com/hyperledger/fabric-samples.git
cd fabric-samples
git checkout 22393b629bcac7f7807cc6998aa44e06ecc77426

# 安装Fabric工具并将其添加到PATH
curl -sSL https://bit.ly/2ysbOFE | bash -s -- 2.2.0 1.4.8 -s
export PATH=$PATH:$(pwd)/bin

# 创建并初始化网络
cd test-network
./network.sh up createChannel
./network.sh deployCC -ccn basic -ccl javascript
2. 使用caliper对被测试的网络进行性能测试
2.0 The Architecture of Caliper
2.0.1 Overview
Caliper是针对不同区块链平台执行基准测试的通用框架。Caliper的设计考虑到了可伸缩性和可扩展性,可以轻松地与当今流行的监控和基础设施解决方案集成。因此,Caliper的结构乍一看可能有点复杂。
这一页的目的是逐步让你进入错综复杂的Caliper的架构,采取一步在一个时间。在本页结束时,您应该熟悉Caliper的一般概念和API。随着阅读的深入,您会发现其他更技术性的参考资料
2.0.2 Bird’s eye view
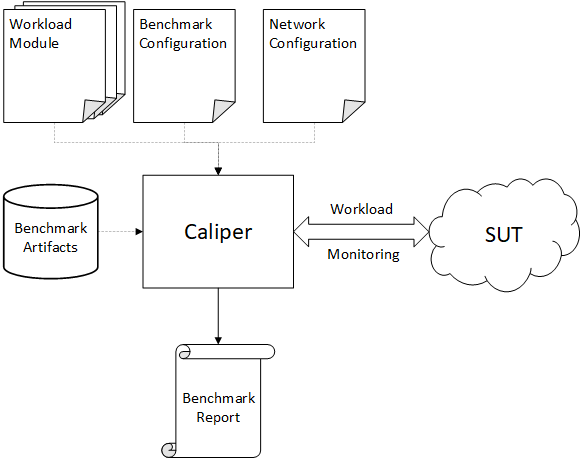
就其最简单的形式而言,Caliper 为被测试的系统产生工作负载,并持续监视这个SUT处理这个负载时的运行情况。负载处理完成后Caliper generates a report based on the observed SUT responses
下图描述了这个简单的视图:

报告:
为了运行benchmark,Caliper需要几个独立于被测试的系统SUT的输入
接下来将对这些 inputs做一个简单的描述:
1. Network configuration file
根据测试系统(需要被测试的区块链网络的情况进行填写)
网络配置文件(Network configuration file)的内容是SUT-specific(由被测试系统的不同而不同)。
该文件通常描述SUT的拓扑结构:
- SUT的节点在哪里(their endpoint addresses一般用域名表示)
- 网络中存在哪些 identities/clients(网络中存在哪些节点)
- Caliper应该部署或交互怎么样的smart contracts
要了解 Network configuration file 的确切结构,请参阅相应的SUT connector documentations(我们将在本页后面讨论连接器connector):
2. Workload modules
Caliper为SUT产生workload,然后这里有一个module(模块)叫做工作负载模块:Workload modules,你说这个模块是干什么用的?

工作负载模块(Workload modules)是基准测试( benchmark)的大脑。
因为Caliper是一个通用的基准测试框架,所以它不包括任何具体的基准测试实现。
也就是说可以根据你的需求对测试需求进行个性化设置
注:Caliper负责给SUT提供工作负载,与之相对应的自然会为为SUT提供一些相关信息,比如安排交易
当Caliper为一个给定的rounds安排TXs时,此round的workload module的任务是去产生这个交易的内容,并且去提交这些交易(Tx)
每个round可以有一个不同的与这一轮相关联的workload module(工作负载模块),so separating your workload implementation based on phases/behavior should be easy.
因此基于阶段或者行为设置你每一轮的工作负载模块是很方便的
因为每个round都可以设置与这个round相对应的Workload modules
Workload modules是一个简单的Node.JS模块,这个模块必须输出一个给定的 factory function。
除此之外,工作负载模块从逻辑上来说可以是任意的。实际上Workload modules可以是任何用Node.JS编写的代码。
Note: For a more technical introduction to workload modules, see the corresponding page.
3. Benchmark configuration file
benchmark configuration 文件描述了benchmark如何被执行。
benchmark:个人以为benchmark就是指的这次测试
benchmark configuration file告诉Caliper
- 它应当执行多少rounds
- 交易(TXs)应当以怎么样的rate被提交
- 并且哪一个 module将会产生交易(TX)的内容
- 它也包含监视monitoring SUT的一些设置
您可以将此文件视为benchmark的“flow orchestrator”【流动的指挥者】
Benchmark configuration file:就是这次测试的指挥者,从全局的角度进行指挥
在大多数情况下,这些 Benchmark configuration file的设置独立于SUT,因此你可以轻易的复用这个文件against different SUT types or versions.
Note: For a more technical introduction to the benchmark configuration file, see the corresponding page.
4. Benchmark artifacts
运行benchmark可能需要额外的 artifacts,这些 artifacts(构件)在不同的benchmark和runs之间可能有所不同。这些通常包括以下内容:
- Crypto materials necessary to interact with the SUT.
- Smart contract source code for Caliper to deploy (if the SUT connector supports such operation).
- Runtime configuration files.
- Pre-installed third party packages for your workload modules.
请参阅SUT connector configuration pages以获取其他 necessary artifacts.
Note:
From here on out, we will refer to the introduced Caliper inputs simply as benchmark artifacts and denote them with the database symbol seen in the first figure.注意:
从这里开始,我们将会把上面介绍的Caliper的输入作为benchmark artifacts
并且使用数据库的符号表示他们,就像之前鸟览图里的那样
2.0.3 Multi-platform support
在进一步深入Caliper的架构之前,让我们看看Caliper如何支持不同的SUT类型。
Caliper使用connector modules(连接器模块)来隐藏不同SUT类型的特性,并为Caliper模块(和外部)模块提供一个统一的接口。
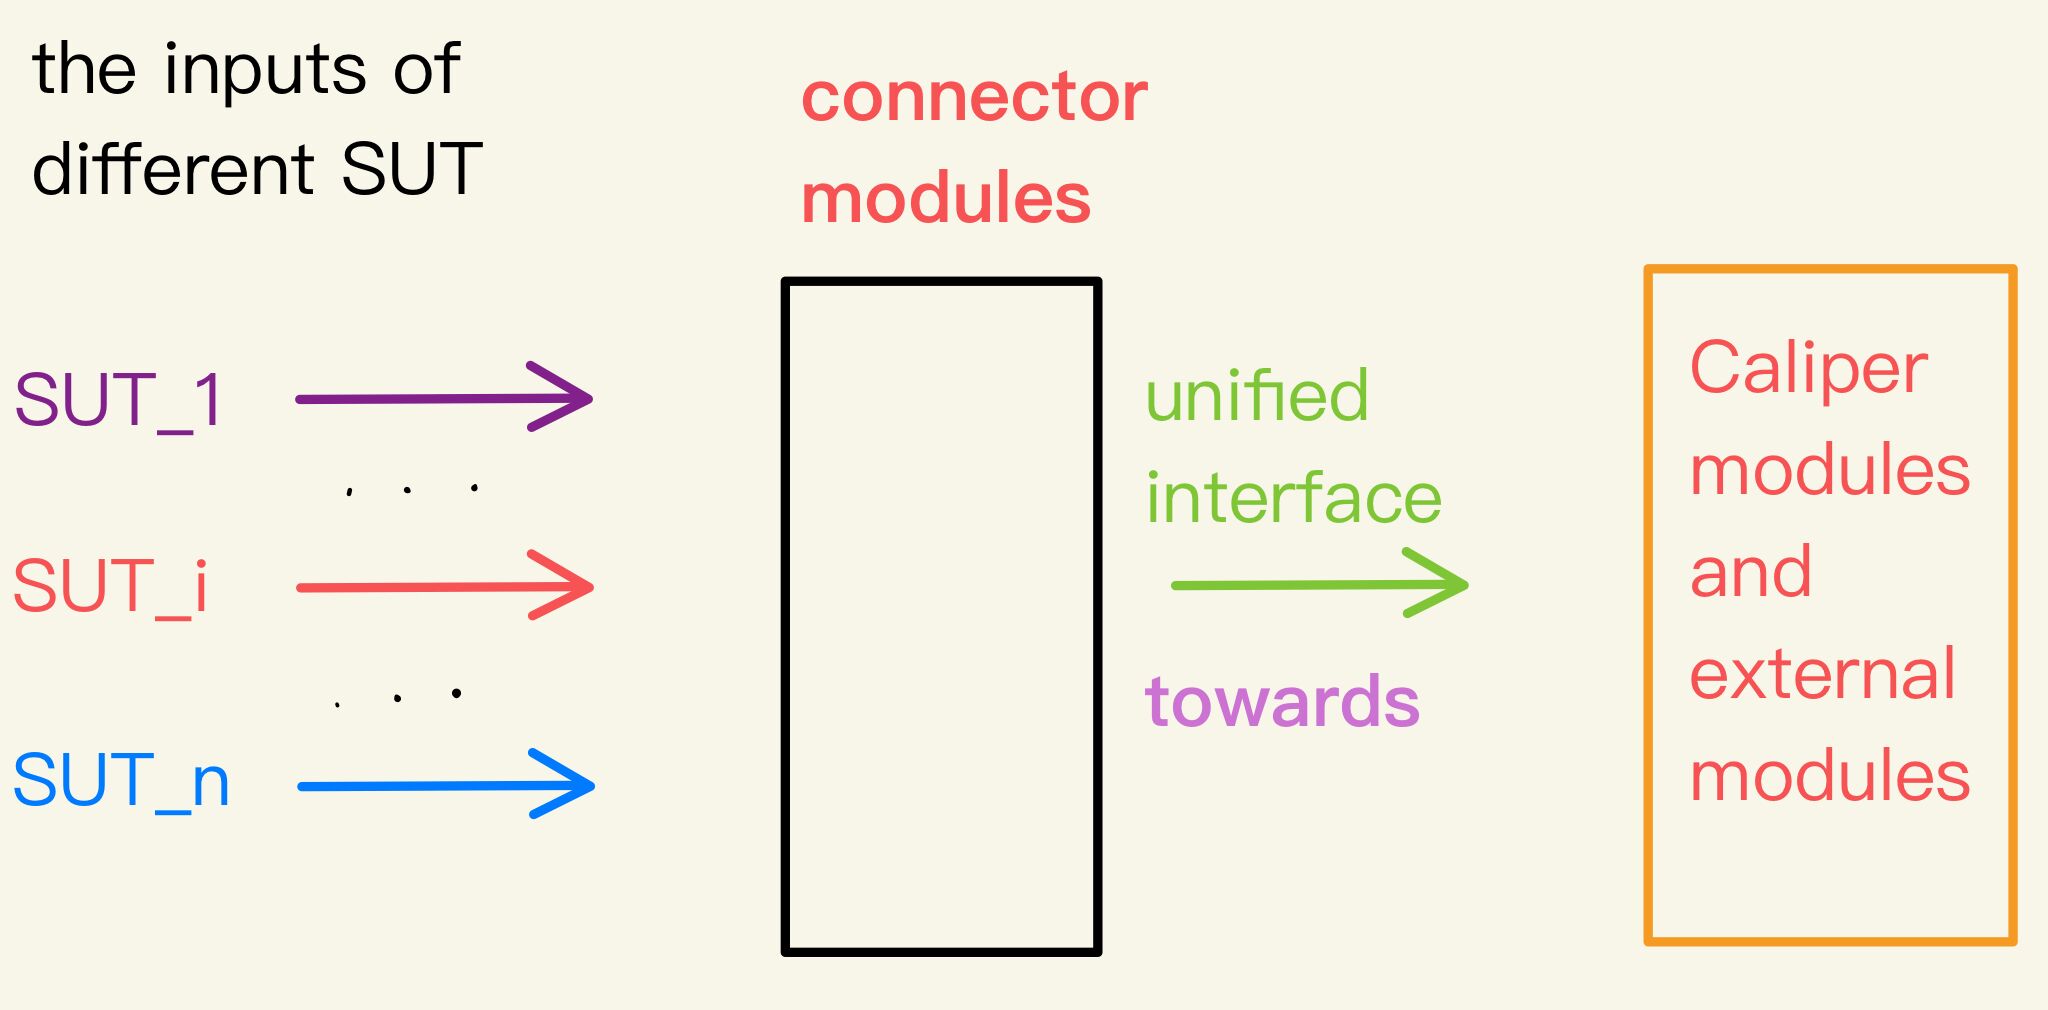
一个SUT连接器为内部 Caliper modules以及workload modules提供了一个简化的接口。
A SUT connector provides a simplified interface towards internal Caliper modules, as well as towards the workload modules.
因此,Caliper可以请求执行一些简单的事情,比如“初始化connector/SUT”,而connector implementation将处理其余的事情。
在初始化期间要执行的具体任务通常由network configuration file的内容(以及SUT支持的远程管理操作)决定。
Note: For the technical details of how to implement a connector, refer to the corresponding page.
2.0.4 Caliper processes
Caliper 的进程
Caliper认为可扩展性scalability 是它最重要的目标之一(除了扩展性/灵活性extensibility/flexibility)。
从单个机器生成的工作负载可能会很快达到该机器的资源限制。
如果我们希望workload rate与被评估的SUT的scalability and performance characteristics匹配,那么我们需要一种分布式方法!
因此,Caliper(作为一个框架)由两种不同的services/processes组成:
- 一个manager process
- 许多 worker processes
-
manager process
-
初始化:初始化SUT(如果支持的话),协调benchmark的运行(例如,schedules the configured rounds)
benchmark:个人以为benchmark就是指的这次测试
-
监视:handles the performance report generation based on the observed TX statistics.
基于交易的数据生成报告
-
协调:协调worker process
-
-
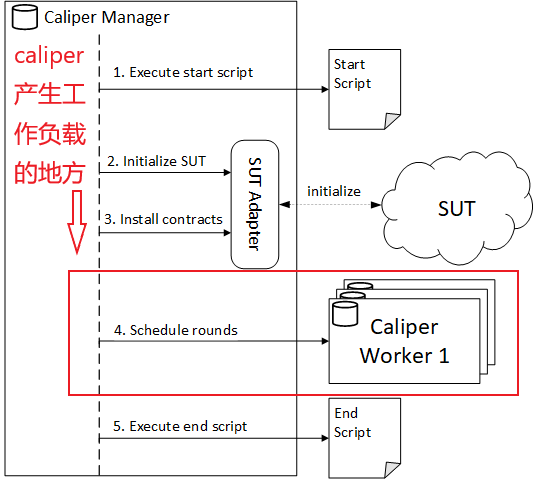
worker processes彼此独立地为被测试的SUT产生workload(工作负载)
即使一个worker process达到了其host machine的极限,使用更多的more worker processes(on multiple machines)也可以进一步增加Caliper的工作负载 rate
增加Caliper的工作负载 rate:使得Caliper可以为被测试的SUT产生更多的工作负载,从而可以测试到相关SUT的性能数据
因此,worker processes是Caliper可伸缩性的支柱。
因为workload是由worker processes产生的
The described setup is illustrated in the next figure.
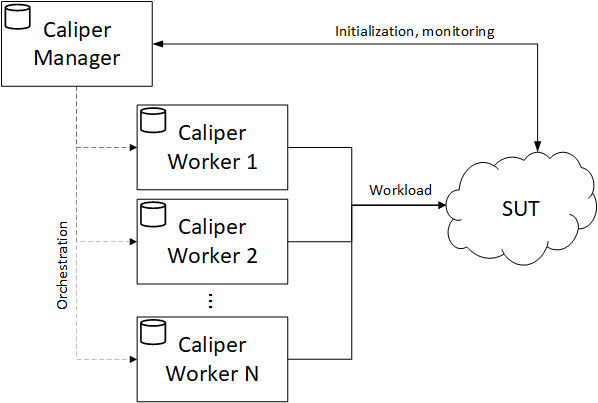
对上图的解释:
Manager process:
- 初始化SUT
- 监视SUT
- 全局协调各个Worker processes
Worker process:
为SUT产生Workload(工作负载)
注意:目前,我们将忽略分布式体系结构的技术细节,比如在不同进程之间的消息传递。我们将在后面的一节中讨论这个问题。
Note: For the time being, we will ignore the technical details of the distributed architecture, like the messaging between the processes. We will come back to it in a later section.
1. The manager process
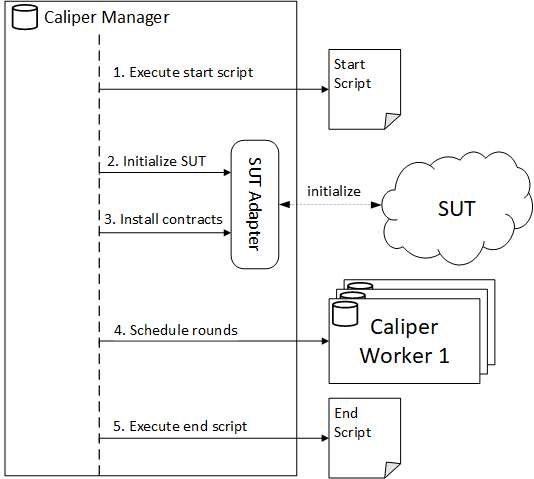
Caliper的 manager process 流程是整个benchmark 的指挥者。它经历如下图所示的几个预定义阶段。
benchmark:个人以为benchmark就是指的这次测试
-
在第一阶段,Caliper从network configuration file中执行startup script启动脚本(如果存在的话)。
这个步骤主要用于本地Caliper和SUT部署,因为它提供了一种一步到位的方式启动区块链network and Caliper
Note:SUT的部署不是Caliper的责任。
从技术上讲,Caliper只连接到一个已经运行的SUT,即使它是通过启动脚本启动的。
Caliper本身不启动或者部署网络,网络的启动和部署是由脚本做到的。Caliper只负责和一个已经运行的网络进行连接
-
在第二阶段,Calipe初始化SUT。
这里执行的任务高度依赖于SUT和SUT connector的capabilities。
例如,he Hyperledger Fabric connector使用这个阶段来create/join channels and register/enroll new users.
-
在第三阶段,如果SUT和SUT connector支持这种操作((like with the Hyperledger Fabric connector【Fabric 的connector支持这种操作】),Caliper将smart contracts部署到SUT上。
认为connector就是图中的Adapter
-
In the fourth stage Caliper schedules and executes the configured rounds through the worker processes.
This is the stage where the workload generation happens (through the workers!)
正如同之前所说Caliper的工作负载是 由worker processes产生的
configured rounds:事先配置好的rounds
-
In the last stage, after executing the rounds and generating the report, Caliper executes the cleanup script (if present) from the network configuration file.
This step is mainly useful for local Caliper and SUT deployments as it provides a convenient way to tear down the network and any temporary artifacts.
If your SUT is already deployed an initialized, then you only need Caliper to execute the rounds and nothing else.
已经部署初始化好的网络只需要执行第四步
you only need Caliper to execute the rounds
幸运的是,您可以一个一个地配置每个阶段,无论它是否应该执行。See the flow control settings for details.
The above figure(图片) only shows the high-level steps of executing a benchmark.
high-level steps :比较宏观的步骤
为了简单起见,省略了一些组件,比如monitor和worker progress observer组件。要了解有关这些components的用途和配置的更多信息,请参阅监视器和观察者文档页面。
2. The worker process
有趣的事情(从用户的角度来看)发生在 worker processes内部。
A worker process starts its noteworthy tasks when the manager process sends a message to it about executing the next round (the 4th step in the previous section).
worker process 的important components如下图所示
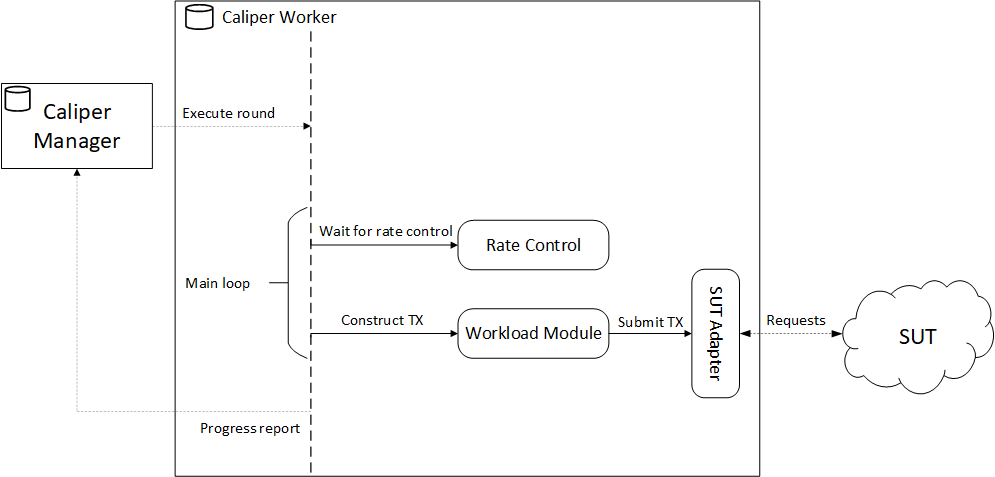
Caliper Workers的机制解析:
- 等待rate controller允许下一个Tx的提交
- 当rate controller允许后 worker process 将会把控制权交给 workload module
- workload module 收集产生Tx所需要的参数
- 收集完成后调用SUT connector的简单API从而将 TX request 发送给 SUT
- Main loop结束后Work Process向Manager Process发送Process report
worker process的大部分时间都花在workload generation loop
workload generation loop:一个用来生成工作负载的循环
循环包含两个重要步骤:
-
等待rate controller去允许下一个Tx的提交
把rate controller(速率控制器)看作一个delay circuit延迟电路。
Based on what kind of rate controller is used, it delays/halts the execution of the worker process (in an asynchronous manner) before enabling the next TX.
基于你所选择使用的的rate controller,在允许下一个交易之前,这个速率控制器将会以异步的方式延迟或者暂停work process
For example, if a fixed 50 TXs per second (TPS) rate is configured, the rate controller will halt for 20ms between each TX.
比如,如果你设置了一个固定的交易提交速率(每秒50个交易),那么rate controller将在每个TX之间暂停20ms
每一轮的rate controllers可以在benchmark configuration file里面设置
对于你能够区选的rate controllers,看 see the Rate Controllers page.
Note: The rate controllers of each round can be configured in the benchmark configuration file. For the available rate controllers, see the Rate Controllers page.
-
Once the rate controller enables the next TX, the worker process gives control to the workload module.
The workload module assembles the parameters of the TX (specific to the SUT and smart contract API) and calls the simple API of the SUT connector that will, in turn, send the TX request to the SUT (probably using the SDK of the SUT).
workload module
- assembles(收集) TX的参数(这些参数取决于相应的SUT和SUT的智能合约的API),
- 调用SUT connector的简单API,该API将依次向SUT发送TX请求(probably using the SDK of the SUT)
Caliper Workers的机制解析:
- 等待rate controller允许下一个Tx的提交
- 当rate controller允许后 worker process 将会把控制权交给 workload module
- workload module 收集产生Tx所需要的参数
- 收集完成后调用SUT connector的简单API从而将 TX request 发送给 SUT
之前提到的round指的就是worker process的一次loop(循环)
每一个循环所使用的workload modules可以在benchmark configuration file里进行设置
Note: The workload modules of each round can be configured in the benchmark configuration file. For the technical details of workload modules, see the Workload Modules page.
During the workload loop,the worker process向manager process发送progress report。
注:Progress reporting在Manager Process端是可以设置的
Progress reporting on the manager side can be enabled and configured with the
caliper-progress-reporting-enabledcaliper-progress-reporting-interval
setting keys.
For details, see the Basic Runtime Settings.
2.0.5 Process distribution models
进程的分布式模型
The last part of the architecture discussion is demystifying the worker process management.
阐明如何对 worker process 进行管理
基于
-
worker processes的 产生 方式
-
manager process和worker processes之间使用的消息传递方法(messaging method)
我们可以区分以下distribution/deployment 模型:
-
- 自动产生 worker processes在同一台主机上
- worker processes和manager process使用进程间通信(IPC)
-
- 自动产生 worker processes在同一台主机上
- worker processes和manager process使用远程消息传递机制(remote messaging mechanism)
-
- 手动启动 worker processes在任意数量的主机上
- worker processes和manager process使用远程消息传递机制(remote messaging mechanism)
尽管第三种方法适用于更复杂的情况,但前两种方法可以帮助你熟悉Caliper,并逐渐帮助你过渡到第三种方法。
1. Modular message transport
模块间的信息传递
The different deployment approaches are made possible by how Caliper handles messaging internally
Caliper处理 internal Moudles 之间的消息传递的不同方式将导致不同的部署方式
如下图所示:
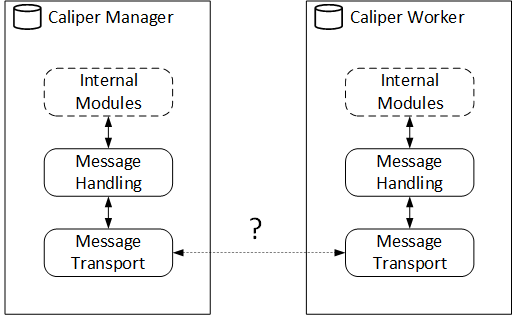
Caliper中的internal modules只处理预定义的消息,这个预定义的消息的内容与消息的发送方式无关。
The internal Caliper modules only deal with predefined messages whose content is independent of how the messages are sent.
在进程之间通信的模块是可替换的,因此支持不同的通信方法。
部署模型可以通过以下两个设置键进行配置:
-
caliper-worker-remote:如果设置为
false(the default)那么 manager process 将会产生 the required number of worker processes locally, resulting in the models 1 or 2.
也就是上面的方法1,2的情况
总结一下:
caliper-worker-remote为false(the default),则自动产生 worker processes在同一台主机上caliper-worker-remote为true,则手动启动 worker processes在任意数量的主机上
-
caliper-worker-communication-method:can take the values
process(the default) ormqttand determines the message transport implementation to use.总结一下:
caliper-worker-communication-method为process(the default),则worker processes和manager process使用进程间通信(IPC)caliper-worker-communication-method为mqtt,则worker processes和manager process使用远程消息传递机制(remote messaging mechanism)
The
processcommunication corresponds to the first model, whilemqttdenotes models 2 and 3.
下表总结了不同的模型以及如何选择:
remote value |
method value |
Corresponding deployment model |
|---|---|---|
false |
process |
1.worker processes和manager process在同一台主机上使用进程间通信 |
false |
mqtt |
2. Remote messaging-based communication with local workers |
true |
mqtt |
3. Remote messaging-based communication with remote workers |
true |
process |
Invalid, since IPC does not apply to remote communication |
Note: For the technical details on configuration the messaging transport, see the Messengers page.
2. 进程间通信Interprocess communication
Install & Usage page 上的示例都使用IPC方法,因为 it is the default behavior。
该设置如下图所示。
- The
caliper launch manager命令启动manager process - manager process将自动生成configured number of worker processe (using the
caliper launch workerCLI command).
caliper launch workerCLI command没使用过
The communication between the processes is IPC, utilizing the built-in Node.JS method available for the parent-children process relationships.
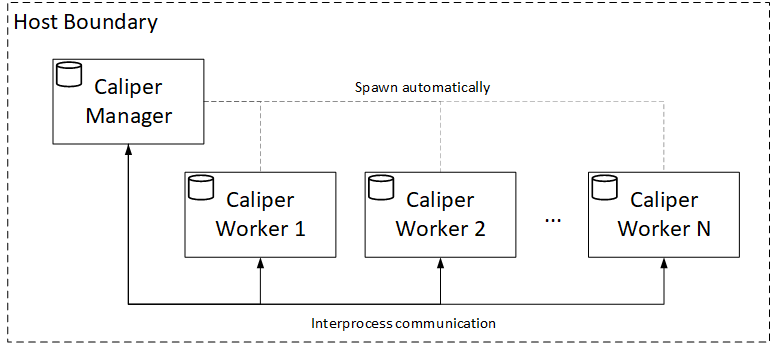
这是Caliper最简单的部署模型,不需要additional configuration和 third party messaging components
因此这是非常理想的:当您第一次开始使用Caliper时,或者当您仍然在为您的项目assembling the benchmark artifacts ,并且只是快速地想要测试它们时
Unfortunately, this model is constrained(受限于) to a single host, 由于在这个场景中存在 scalability issues只有vertical scalability of the host 是可行的
3. Local message broker communication
本地消息代理通信
作为实现完全分布式设置的跳板,第二个部署模型用third party messaging solution取代IPC,同时仍然向用户隐藏worker process management。
该设置如下图所示:
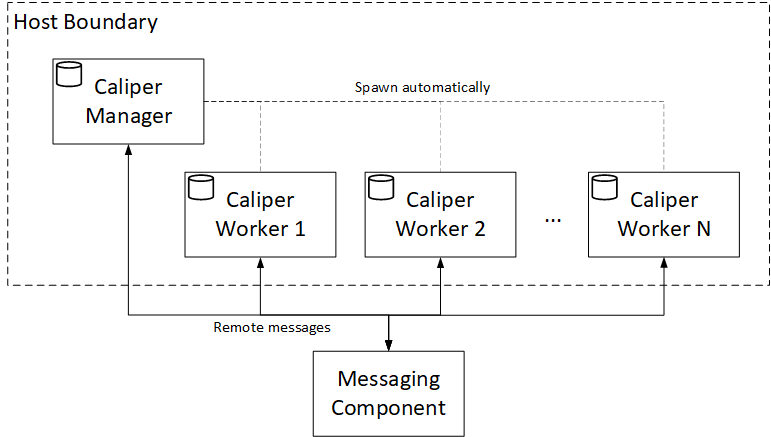
Like before, the caliper launch manager CLI command starts the manager process, which in turn will automatically spawn the configured number of worker processes (using the caliper launch worker CLI command).
However, the messaging(信息传递) happens through a separate component(分开的组件), which could be deployed anywhere as long as its endpoint is reachable by the Caliper processes.
只要Caliper进程可以达到这个component,这个component可以部署到任何一个地方。
不幸的是,从Caliper进程的角度来看,这个模型也被限制在 a single host。
然而,一旦benchmark artifacts就绪,它是一个useful模型,taking your deployment to the next level 。
一旦您成功地集成了messaging component,您就可以准备转移到完全分布式的Caliper设置了。
4. Distributed message broker communication
分布式消息代理通信
当你将worker processes的management掌握在自己手中时,Caliper的全部潜力就被释放出来了
此时,您可以使用 caliper launch worker CLI 命令在尽可能多的host上启动尽可能多的worker process
该设置如下图所示:
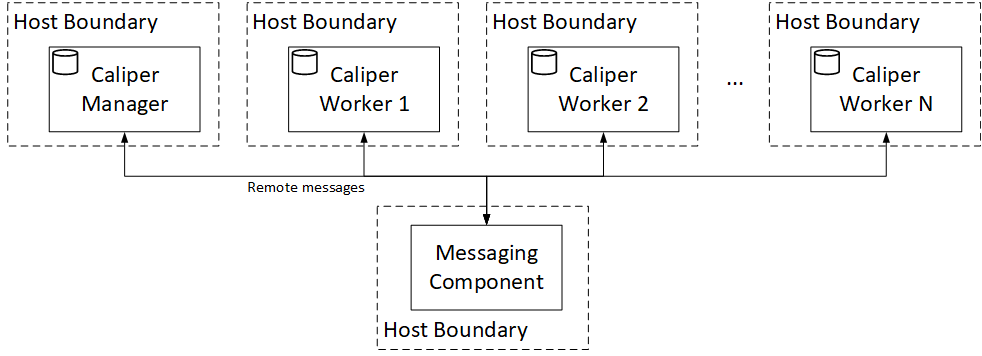
完全分布式部署支持worker processes的水平扩展,极大地提高了可实现的workload rate
为了简化对Caliper 中的 process的管理,您可能会使用一些自动 部署/管理(deployment/management) 解决方案,如Docker Swarm或Kubernetes。幸运的是Caliper已存在相关的Docker镜像
Luckily, the flexibility of the Caliper Docker image makes such integration painless.
然而,有一些注意事项你必须记住:
-
将必要的benchmark artifacts分发给Caliper processes是您的责任。
不同的infrastructure solutions(基础设施解决方案:比如Fabric)对此提供了不同的方法,所以请查看您喜欢的供应商的文档。
-
在分布式系统中建立适当的网络一直是一个挑战。确保Caliper流程可以访问configured messaging component和SUT组件。
-
单个主机可以运行多个Caliper worker processes。
A single host may run multiple Caliper worker processes. When planning the worker distribution (or setting resource requirements for container management solutions) make sure that enough resources are allocated for workers to keep the configured TX scheduling precision.
2.1 创建Caliper工作区
2.1.1文件夹的创建
在fabric-samples目录的同一级别创建一个名为caliper-workspace的文件夹,然后在caliper-workspace文件夹中
分别创建三个名为networks、benchmarks和workload的文件夹
2.1.2 caliper CLI的安装
Caliper的安装和使用将基于当地的npm安装
(也可以使用Docker进行安装,推荐使用Docker,因为无需配置相关环境)
在caliper-workspace目录中,使用以下终端命令安装caliper CLI:
npm install --only=prod @hyperledger/caliper-cli@0.4.0
2.1.3 绑定相关网络的SDK
注:当前caliper支持的各平台的SDK如下,caliper目前只支持四种区块链的解决方案
The following SUT name and SDK version combinations are supported:
- besu:
1.3.2,1.3,1.4,latest - ethereum:
1.2.1,latest - fabric:
1.1.0 [1.1],1.4.11 [1.4, latest],2.1.0 [2.1, latest-v2] - fisco-bcos:
2.0.0,latest
Caliper需要两个配置文件:
- 网络配置文件,它描述被测网络并提供要使用的测试标识。
- 基准文件,它定义了要通过一组有序的测试循环来完成的性能测试,每个测试轮都指定了一个工作负载模块和一系列选项,以在一个时间间隔内驱动工作负载。
现在我们将用Caliper所需的资源填充这些文件夹。
由最终命令格式易知
此例中:
网络配置文件:networkConfig.json
基准文件:myAssetBenchmark.yaml
npx caliper launch manager
--caliper-workspace ./   # 工作目录
--caliper-networkconfig networks/networkConfig.json   # 网络配置文件位置
--caliper-benchconfig benchmarks/myAssetBenchmark.yaml   # 基准配置文件位置
--caliper-flow-only-test # 智能合约已经安装和实例化,Caliper只需要执行测试阶段
--caliper-fabric-gateway-enabled # 使用Hyperledger Fabric网关
--caliper-fabric-gateway-discovery # 使用Hyperledger Fabric网关
2.2 构建网络配置文件(networks文件夹下)
网络配置文件是Caliper工作人员创建到现有Fabric网络的连接所需的文件,以便他们可以提交交易。
它类似于Fabric公共连接配置文件,并添加了其他必需字段。文件可以是YAML或JSON格式,本教程显示JSON格式。
2.2.1 创建模板网络配置文件
在“networks”文件夹下创建一个名为networkConfig.json包括以下内容:
{
    "version" : "1.0",
    "name": "Caliper test",
    "caliper" : {
        "blockchain": "fabric"
    },
    "clients" : {
    },
    "channels" : {
    },
    "organizations" : {
    },
    "peers" : {
    }
}
1. 版本:正在使用的配置文件的版本。只接受“1.0”。
2. 名称:配置的名称,在本例中为“Caliper测试”。
3. Caliper:指示对目标的SUT进行Caliper,可能包含本教程中不需要的其他开始/结束命令。在本教程中,我们以Fabric网络为目标。SUT: 被测试系统specific system under test
4. 客户端:列出要在性能测试中使用的标识
以下是Fabric的相关概念:
5. 通道channel:描述可用的Hyperledger Fabric通道、它们的状态以及在这些通道上部署的智能合约
6. 组织:要在基准测试中使用的超级账本Fabric组织
7. peer节点:要在基准测试中使用的Hyperledger Fabric节点
2.2.2 对模板文件networkConfig.json进行填充
在安装fabric-samples网络的时候将生成一个公共连接配置文件(CCP)
使用CCP对networkConfig.json进行填写
在本例中我们使用的ccp的位置:
qwe@ubuntu:~/fabric-samples/test-network/organizations/peerOrganizations/org1.example.com$内容如下:
{
    "name": "test-network-org1",
    "version": "1.0.0",
    "client": {
        "organization": "Org1",
        "connection": {
            "timeout": {
                "peer": {
                    "endorser": "300"
                }
            }
        }
    },
    "organizations": {
        "Org1": {
            "mspid": "Org1MSP",
            "peers": [
                "peer0.org1.example.com"
            ],
            "certificateAuthorities": [
                "ca.org1.example.com"
            ]
        }
    },
    "peers": {
        "peer0.org1.example.com": {
            "url": "grpcs://localhost:7051",
            "tlsCACerts": {
                "pem": "-----BEGIN CERTIFICATE-----\nMIICWTCCAf6gAwIBAgIRAPX6VzjvtPTMgsWXzlqKQ5gwCgYIKoZIzj0EAwIwdjEL\nMAkGA1UEBhMCVVMxEzARBgNVBAgTCkNhbGlmb3JuaWExFjAUBgNVBAcTDVNhbiBG\ncmFuY2lzY28xGTAXBgNVBAoTEG9yZzEuZXhhbXBsZS5jb20xHzAdBgNVBAMTFnRs\nc2NhLm9yZzEuZXhhbXBsZS5jb20wHhcNMjAxMjI3MTAyMzAwWhcNMzAxMjI1MTAy\nMzAwWjB2MQswCQYDVQQGEwJVUzETMBEGA1UECBMKQ2FsaWZvcm5pYTEWMBQGA1UE\nBxMNU2FuIEZyYW5jaXNjbzEZMBcGA1UEChMQb3JnMS5leGFtcGxlLmNvbTEfMB0G\nA1UEAxMWdGxzY2Eub3JnMS5leGFtcGxlLmNvbTBZMBMGByqGSM49AgEGCCqGSM49\nAwEHA0IABDFSvd28DmJAD2L8m6JAGcao3sMhFfjzKrbPehq2K/F0teSrRrhx2hjX\njXAJuZG9fqIu4KB0m839J9smFGLxoOajbTBrMA4GA1UdDwEB/wQEAwIBpjAdBgNV\nHSUEFjAUBggrBgEFBQcDAgYIKwYBBQUHAwEwDwYDVR0TAQH/BAUwAwEB/zApBgNV\nHQ4EIgQg2JBB5jaFMz0b0MIZLcsJcrOh8UjuwL3fo3cLtUoaE+QwCgYIKoZIzj0E\nAwIDSQAwRgIhANmb0iDSUr+he19S+prj6ZcqTcZTqqsjA+aKMCXv4vaAAiEAxPC+\nfGyCS6jGDEyQ/uugsS/laoYbkYs32FwRwcm+rwk=\n-----END CERTIFICATE-----\n"
            },
            "grpcOptions": {
                "ssl-target-name-override": "peer0.org1.example.com",
                "hostnameOverride": "peer0.org1.example.com"
            }
        }
    },
    "certificateAuthorities": {
        "ca.org1.example.com": {
            "url": "https://localhost:7054",
            "caName": "ca-org1",
            "tlsCACerts": {
                "pem": ["-----BEGIN CERTIFICATE-----\nMIICUTCCAfigAwIBAgIRAPUo4wcnf0pvyuWrhe/wyPQwCgYIKoZIzj0EAwIwczEL\nMAkGA1UEBhMCVVMxEzARBgNVBAgTCkNhbGlmb3JuaWExFjAUBgNVBAcTDVNhbiBG\ncmFuY2lzY28xGTAXBgNVBAoTEG9yZzEuZXhhbXBsZS5jb20xHDAaBgNVBAMTE2Nh\nLm9yZzEuZXhhbXBsZS5jb20wHhcNMjAxMjI3MTAyMzAwWhcNMzAxMjI1MTAyMzAw\nWjBzMQswCQYDVQQGEwJVUzETMBEGA1UECBMKQ2FsaWZvcm5pYTEWMBQGA1UEBxMN\nU2FuIEZyYW5jaXNjbzEZMBcGA1UEChMQb3JnMS5leGFtcGxlLmNvbTEcMBoGA1UE\nAxMTY2Eub3JnMS5leGFtcGxlLmNvbTBZMBMGByqGSM49AgEGCCqGSM49AwEHA0IA\nBH/MCEqdRGllC8o2KCqumfjMROO6yRErGirWIiwEpB45xghpEcHLfM2KQqXLilET\ngQQRDdmHotGk5Fhg/IT8gPyjbTBrMA4GA1UdDwEB/wQEAwIBpjAdBgNVHSUEFjAU\nBggrBgEFBQcDAgYIKwYBBQUHAwEwDwYDVR0TAQH/BAUwAwEB/zApBgNVHQ4EIgQg\nsX/bzajXzmyXmKlqHGt77gfEMc1gkedXKsOKkSvulOgwCgYIKoZIzj0EAwIDRwAw\nRAIgXc/u9KP5brJ3w+p7pSCNwKRIbzQ1DOc4cxp+W8Cai6gCIFJdEvDhlo6WPB93\nGdQDQWpNTaPuGl3iVa59TJXlyVxQ\n-----END CERTIFICATE-----\n"]
            },
            "httpOptions": {
                "verify": false
            }
        }
    }
}
1. peers和Org部分填写
使用CCP的内容进行填充:
将CCP的organizations和peers元素复制到Caliper网络配置文件中。
在
organizations.Org1对象,删除certificateAuthorities列表。这样做有两个原因:i) 我们不会使用证书颁发机构注册或注册
ii)向CCP提交的变更与配置文件中的验证Caliper不兼容。
填写结果如下:
{
    "version" : "1.0",
    "name": "Caliper test",
    "caliper" : {
        "blockchain": "fabric"
    },
    "clients" : {
    },
    "channels" : {
    },
    "organizations": {
        "Org1": {
            "mspid": "Org1MSP",
            "peers": [
                "peer0.org1.example.com"
            ]
        }
    },
    "peers": {
        "peer0.org1.example.com": {
            "url": "grpcs://localhost:7051",
            "tlsCACerts": {
                "pem": "-----BEGIN CERTIFICATE-----<UNIQUE CONTENT>-----END CERTIFICATE-----\n"
            },
            "grpcOptions": {
                "ssl-target-name-override": "peer0.org1.example.com",
                "hostnameOverride": "peer0.org1.example.com"
            }
        }
    }
}
2.客户端clients部分填写
指定执行基准测试时Caliper要使用的标识。
身份必须有效,这意味着它们必须为Fabric网络所知,并且具有相应的加密材料以供使用。
标识在clients节中列出。这里我们使用单一身份Admin@org1.example.com,我们在其中嵌套来自CCP的client对象,以指示标识所属的组织,并提供基本的连接超时信息。
"clients": {
    "Admin@org1.example.com": {
        "client": {
            "organization": "Org1",
            "connection": {
                "timeout": {
                    "peer": {
                        "endorser": "300"
                    }
                }
            }
        }
    }
}
在client对象下,添加一个名为credentialStore的属性,在该属性下添加一个名为path的属性,该属性具有一个字符串变量,该变量指向工作区中名为/tmp/org1的临时文件。另外,在credentialStore属性下添加一个名为cryptoStore的属性,并在该属性下添加另一个指向上面相同临时文件/tmp/org1的路径属性。
以下是应该添加到client的内容:
"credentialStore": {
    "path": "/tmp/org1",
    "cryptoStore": {
        "path": "/tmp/org1"
    }
}
在client对象下添加一个名为clientPrivateKey的属性,在此属性下添加一个名为path的属性,该属性具有一个字符串变量,该变量指向标识的私钥。请注意,提供的路径是相对于工作区的。在本例中,私钥位于fabric-samples -> test-network -> organizations -> peerOrganizations -> org1.example.com -> users -> Admin@org1.example.com -> msp -> keystore -> priv_sk。
client应添加到的对象是:
"clientPrivateKey": {
    "path": "../fabric-samples/test-network/organizations/peerOrganizations/org1.example.com/users/Admin@org1.example.com/msp/keystore/priv_sk"
}
另外,在client对象下添加另一个名为clientSignedCert的属性,并在该属性下添加一个名为path的属性,该属性具有一个字符串变量,该变量指向标识的签名证书。再次注意,提供的路径是相对于工作区的。在本例中,它位于fabric-samples -> test-network -> organizations -> peerOrganizations -> org1.example.com -> users -> Admin@org1.example.com -> msp -> signedcerts -> admin@org1.example.com-cert.pem
client应添加到的对象是:
"clientSignedCert": {
    "path": "../fabric-samples/test-network/organizations/peerOrganizations/org1.example.com/users/Admin@org1.example.com/msp/signcerts/Admin@org1.example.com-cert.pem"
}
clients对象现在应该如下所示:
	"clients": {
	    "Admin@org1.example.com": {
	        "client": {
	            "organization": "Org1",
	            "connection": {
	                "timeout": {
	                    "peer": {
	                        "endorser": "300"
	                    }
	                }
	            },
	            "credentialStore": {
	                "path": "tmp/hfc-kvs/org1",
	                "cryptoStore": {
	                    "path": "tmp/hfc-kvs/org1"
	                }
	            },
	            "clientPrivateKey": {
	                "path": "../fabric-samples/test-network/organizations/peerOrganizations/org1.example.com/users/Admin@org1.example.com/msp/keystore/priv_sk"
	            },
	            "clientSignedCert": {
	                "path": "../fabric-samples/test-network/organizations/peerOrganizations/org1.example.com/users/Admin@org1.example.com/msp/signcerts/Admin@org1.example.com-cert.pem"
	            }
	        }
	    }
	}
3. channel部分填写
在创建与Fabric网络的连接时,Caliper的fabric连接器需要帮助。必须提供一个channels对象,该对象列出可能与之交互的智能合约。
将由test-network创建的已知通道mychannel添加到Caliper网络配置文件的channels部分,并赋予它一个布尔值true创建的属性。我们必须将此通道上可用的智能合约列为名为contracts的数组中的对象。每个智能合约对象都有两个属性,id和version。id指定合同ID;在本例中,它是basic。版本是特定的合同版本;在本例中是1.0.0。将其作为数组中的一个对象添加,以使Caliper网络配置文件中的结果通道对象变为:
    "channels": {
        "mychannel": {
            "created" : true,
            "contracts": [
                {
                    "id":"basic",
                    "version":"1.0.0"
                }
            ]
        }
    }
4. 完整的网络配置文件
Caliper网络配置文件现在应该完全填充。花点时间检查并确保证书和密钥的路径是正确的,这是很有用的。
{
    "version" : "1.0",
    "name": "Caliper test",
    "caliper" : {
        "blockchain": "fabric"
    },
    "clients": {
        "Admin@org1.example.com": {
            "client": {
                "credentialStore": {
                    "path": "/tmp/org1",
                    "cryptoStore": {
                        "path": "/tmp/org1"
                    }
                },
                "organization": "Org1",
                "clientPrivateKey": {
                    "path": "../fabric-samples/test-network/organizations/peerOrganizations/org1.example.com/users/Admin@org1.example.com/msp/keystore/priv_sk"
                },
                "clientSignedCert": {
                    "path": "../fabric-samples/test-network/organizations/peerOrganizations/org1.example.com/users/Admin@org1.example.com/msp/signcerts/Admin@org1.example.com-cert.pem"
                },
                "connection": {
                    "timeout": {
                        "peer": {
                            "endorser": "300"
                        }
                    }
                }

            }
        }
    },
    "channels": {
        "mychannel": {
            "created" : true,
            "contracts": [
                {
                    "id":"basic",
                    "version":"1.0.0"
                }
            ]
        }
    },
    "organizations":{
        "Org1": {
            "mspid": "Org1MSP",
            "peers": [
                "peer0.org1.example.com"
            ]
        }
    },
    "peers": {
        "peer0.org1.example.com": {
            "url": "grpcs://localhost:7051",
            "tlsCACerts": {
                "pem": "-----BEGIN CERTIFICATE-----\n<UNIQUE CONTENT>\n-----END CERTIFICATE-----\n"
            },
            "grpcOptions": {
                "ssl-target-name-override": "peer0.org1.example.com",
                "hostnameOverride": "peer0.org1.example.com"
            }
        }
    }
}
2.3 构建工作负载文件(workload文件夹下)
在基准测试期间,工作负载模块与部署的智能合约进行交互。workload模块从Caliper-core扩展了Caliper类WorkloadModuleBase。工作负载模块提供三个覆盖:
initializeWorkloadModule-用于初始化基准测试所需的任何项submitTransaction-用于在基准的监视阶段与智能合约方法交互cleanupWorkloadModule—用于在完成基准测试后进行清理
我们将推动的工作负载旨在对世界状态数据库中现有资产的查询进行基准测试。因此,我们将使用workload模块中提供的所有三个阶段:
initializeWorkloadModule-创建可在submitTransaction阶段查询的资产submitTransaction-查询在initializeWorkloadModule阶段创建的资产cleanuWorkloadModule-用于移除在initializeWorkloadModule阶段创建的资产,以便可以重复基准测试
2.3.1 创建模板工作负载模块
在workload文件夹中,创建一个名为readAsset.js的文件,其中包含以下内容:
'use strict';

const { WorkloadModuleBase } = require('@hyperledger/caliper-core');

class MyWorkload extends WorkloadModuleBase {
    constructor() {
        super();
    }

    async initializeWorkloadModule(workerIndex, totalWorkers, roundIndex, roundArguments, sutAdapter, sutContext) {
        await super.initializeWorkloadModule(workerIndex, totalWorkers, roundIndex, roundArguments, sutAdapter, sutContext);
    }

    async submitTransaction() {
        // NOOP
    }

    async cleanupWorkloadModule() {
        // NOOP
    }
}

function createWorkloadModule() {
    return new MyWorkload();
}

module.exports.createWorkloadModule = createWorkloadModule;
2.3.2 对模板文件readAsset.js进行填充
填充此文件时,我们引用已部署智能合约中的可用方法资产转让可在以下位置找到的文件:fabric-samples -> asset-transfer-basic -> chaincode-javascript -> lib -> assetTransfer.js
/*
 * Copyright IBM Corp. All Rights Reserved.
 *
 * SPDX-License-Identifier: Apache-2.0
 */

'use strict';

const { Contract } = require('fabric-contract-api');

class AssetTransfer extends Contract {

    async InitLedger(ctx) {
        const assets = [
            {
                ID: 'asset1',
                Color: 'blue',
                Size: 5,
                Owner: 'Tomoko',
                AppraisedValue: 300,
            },
            {
                ID: 'asset2',
                Color: 'red',
                Size: 5,
                Owner: 'Brad',
                AppraisedValue: 400,
            },
            {
                ID: 'asset3',
                Color: 'green',
                Size: 10,
                Owner: 'Jin Soo',
                AppraisedValue: 500,
            },
            {
                ID: 'asset4',
                Color: 'yellow',
                Size: 10,
                Owner: 'Max',
                AppraisedValue: 600,
            },
            {
                ID: 'asset5',
                Color: 'black',
                Size: 15,
                Owner: 'Adriana',
                AppraisedValue: 700,
            },
            {
                ID: 'asset6',
                Color: 'white',
                Size: 15,
                Owner: 'Michel',
                AppraisedValue: 800,
            },
        ];

        for (const asset of assets) {
            asset.docType = 'asset';
            await ctx.stub.putState(asset.ID, Buffer.from(JSON.stringify(asset)));
            console.info(`Asset ${asset.ID} initialized`);
        }
    }

    // CreateAsset issues a new asset to the world state with given details.
    async CreateAsset(ctx, id, color, size, owner, appraisedValue) {
        const asset = {
            ID: id,
            Color: color,
            Size: size,
            Owner: owner,
            AppraisedValue: appraisedValue,
        };
        return ctx.stub.putState(id, Buffer.from(JSON.stringify(asset)));
    }

    // ReadAsset returns the asset stored in the world state with given id.
    async ReadAsset(ctx, id) {
        const assetJSON = await ctx.stub.getState(id); // get the asset from chaincode state
        if (!assetJSON || assetJSON.length === 0) {
            throw new Error(`The asset ${id} does not exist`);
        }
        return assetJSON.toString();
    }

    // UpdateAsset updates an existing asset in the world state with provided parameters.
    async UpdateAsset(ctx, id, color, size, owner, appraisedValue) {
        const exists = await this.AssetExists(ctx, id);
        if (!exists) {
            throw new Error(`The asset ${id} does not exist`);
        }

        // overwriting original asset with new asset
        const updatedAsset = {
            ID: id,
            Color: color,
            Size: size,
            Owner: owner,
            AppraisedValue: appraisedValue,
        };
        return ctx.stub.putState(id, Buffer.from(JSON.stringify(updatedAsset)));
    }

    // DeleteAsset deletes an given asset from the world state.
    async DeleteAsset(ctx, id) {
        const exists = await this.AssetExists(ctx, id);
        if (!exists) {
            throw new Error(`The asset ${id} does not exist`);
        }
        return ctx.stub.deleteState(id);
    }

    // AssetExists returns true when asset with given ID exists in world state.
    async AssetExists(ctx, id) {
        const assetJSON = await ctx.stub.getState(id);
        return assetJSON && assetJSON.length > 0;
    }

    // TransferAsset updates the owner field of asset with given id in the world state.
    async TransferAsset(ctx, id, newOwner) {
        const assetString = await this.ReadAsset(ctx, id);
        const asset = JSON.parse(assetString);
        asset.Owner = newOwner;
        return ctx.stub.putState(id, Buffer.from(JSON.stringify(asset)));
    }

    // GetAllAssets returns all assets found in the world state.
    async GetAllAssets(ctx) {
        const allResults = [];
        // range query with empty string for startKey and endKey does an open-ended query of all assets in the chaincode namespace.
        const iterator = await ctx.stub.getStateByRange('', '');
        let result = await iterator.next();
        while (!result.done) {
            const strValue = Buffer.from(result.value.value.toString()).toString('utf8');
            let record;
            try {
                record = JSON.parse(strValue);
            } catch (err) {
                console.log(err);
                record = strValue;
            }
            allResults.push({ Key: result.value.key, Record: record });
            result = await iterator.next();
        }
        return JSON.stringify(allResults);
    }


}

module.exports = AssetTransfer;
1. 填充initializeWorkloadModule
此方法用于在基准完成时准备主submitTransaction方法所需的任何项。
要创建的资产数量将给出如下roundArguments.assets。我们通过填充arguments对象(定义交易体)和使用Caliper API sendRequests(需要了解以下知识)来创建资产:
- contractId,要使用的智能合约的名称,它存在于Caliper网络配置文件中
- contractFunction,智能合约中要调用的特定函数
- contractArguments,传递给智能合约函数的参数
- invokerIdentity,Caliper网络配置文件中存在的要使用的标识
- readOnly,如果是否执行查询操作
方法应该如下所示:
    async initializeWorkloadModule(workerIndex, totalWorkers, roundIndex, roundArguments, sutAdapter, sutContext) {
        await super.initializeWorkloadModule(workerIndex, totalWorkers, roundIndex, roundArguments, sutAdapter, sutContext);

        for (let i=0; i<this.roundArguments.assets; i++) {
            const assetID = `${this.workerIndex}_${i}`;
            console.log(`Worker ${this.workerIndex}: Creating asset ${assetID}`);
            const request = {
                contractId: this.roundArguments.contractId,
                contractFunction: 'CreateAsset',
                invokerIdentity: 'Admin@org1.example.com',
                contractArguments: [assetID,'blue','20','penguin','500'],
                readOnly: false
            };

            await this.sutAdapter.sendRequests(request);
        }
    }
在上面的示例中,将创建具有相同参数的不同资产(blue,20,penguin,500)。将上述内容与智能合约方法本身相比较,可以明显看出,契约参数与方法参数之间存在1:1的映射关系。
2. 填充submitTransaction
此方法在基准测试阶段重复运行。我们将通过查询在initializeWorkloadModule方法中创建的资产来评估ReadAsset智能合约方法。
首先,为要查询的资产创建一个字符串标识,该标识由worker索引和一个介于0和已创建资产数量之间的随机整数串联而成。
然后等待对sendRequests的调用,传递一个对象,该对象包含:从round参数传入的contractId集;设置为ReadAsset的contractFunction;设置为invokerIdentity的admin@org1.example.com;和chaincodeArguments设置为一个数组,其中包含要在此运行中查询的资产。
方法应该如下所示:
    async submitTransaction() {
        const randomId = Math.floor(Math.random()*this.roundArguments.assets);
        const myArgs = {
            contractId: this.roundArguments.contractId,
            contractFunction: 'ReadAsset',
            invokerIdentity: 'Admin@org1.example.com',
            contractArguments: [`${this.workerIndex}_${randomId}`],
            readOnly: true
        };

        await this.sutAdapter.sendRequests(myArgs);
    }
3. 填充cleanupWorkloadModule
此函数用于在测试后进行清理,因为它通过使用智能合约函数DeleteAsset删除在initializeWorkloadModule函数中创建的资产。该实现类似于initializeWorkloadModule中的实现。注意可以重构initializeWorkloadModule和cleanupWorkloadModule,以使用执行创建/删除操作的通用方法,这将留给感兴趣的读者。
   async cleanupWorkloadModule() {
        for (let i=0; i<this.roundArguments.assets; i++) {
            const assetID = `${this.workerIndex}_${i}`;
            console.log(`Worker ${this.workerIndex}: Deleting asset ${assetID}`);
            const request = {
                contractId: this.roundArguments.contractId,
                contractFunction: 'DeleteAsset',
                invokerIdentity: 'Admin@org1.example.com',
                contractArguments: [assetID],
                readOnly: false
            };

            await this.sutAdapter.sendRequests(request);
        }
    }
4. 完整的工作负载模块
'use strict';

const { WorkloadModuleBase } = require('@hyperledger/caliper-core');

class MyWorkload extends WorkloadModuleBase {
    constructor() {
        super();
    }

    async initializeWorkloadModule(workerIndex, totalWorkers, roundIndex, roundArguments, sutAdapter, sutContext) {
        await super.initializeWorkloadModule(workerIndex, totalWorkers, roundIndex, roundArguments, sutAdapter, sutContext);

        for (let i=0; i<this.roundArguments.assets; i++) {
            const assetID = `${this.workerIndex}_${i}`;
            console.log(`Worker ${this.workerIndex}: Creating asset ${assetID}`);
            const request = {
                contractId: this.roundArguments.contractId,
                contractFunction: 'CreateAsset',
                invokerIdentity: 'Admin@org1.example.com',
                contractArguments: [assetID,'blue','20','penguin','500'],
                readOnly: false
            };

            await this.sutAdapter.sendRequests(request);
        }
    }

    async submitTransaction() {
        const randomId = Math.floor(Math.random()*this.roundArguments.assets);
        const myArgs = {
            contractId: this.roundArguments.contractId,
            contractFunction: 'ReadAsset',
            invokerIdentity: 'Admin@org1.example.com',
            contractArguments: [`${this.workerIndex}_${randomId}`],
            readOnly: true
        };

        await this.sutAdapter.sendRequests(myArgs);
    }

    async cleanupWorkloadModule() {
        for (let i=0; i<this.roundArguments.assets; i++) {
            const assetID = `${this.workerIndex}_${i}`;
            console.log(`Worker ${this.workerIndex}: Deleting asset ${assetID}`);
            const request = {
                contractId: this.roundArguments.contractId,
                contractFunction: 'DeleteAsset',
                invokerIdentity: 'Admin@org1.example.com',
                contractArguments: [assetID],
                readOnly: false
            };

            await this.sutAdapter.sendRequests(request);
        }
    }
}

function createWorkloadModule() {
    return new MyWorkload();
}

module.exports.createWorkloadModule = createWorkloadModule;
2.4 构建基准配置文件(benchmarks文件夹下)
基准配置文件定义基准轮次并引用定义的工作负载模块。
它将指定在生成负载时
-
要使用的测试工作者的数量
the number of test workers to use when generating the load
-
测试轮的数量
the number of test rounds
-
每轮的持续时间
the duration of each round,
-
在每轮期间应用于交易负载的速率控制
the rate control applied to the transaction load during each round
-
与监视器相关的选项
options relating to monitors
基准配置文件可能以yaml或json格式提供:这里我们将使用yaml格式。请注意,yaml文件区分大小写,所有标签都是小写。
基准配置文件有一个必需的节:
test:
2.4.1 创建模板基准配置文件
在benchmarks文件夹下创建一个名为myAssetBenchmark.yaml包括以下内容:
test:
    name: basic-contract-benchmark
    description: A test benchmark
    workers:
    rounds:
test:包含基准测试信息的根级块。
The root level block that contains the benchmark test information
name:测试的名称,在本例中为“基本合同基准”。
The name of the test, in this case “basic-contract-benchmark”.
description:对基准的描述,在本例中为“测试基准”。
A description for the benchmark, in this case “A test benchmark”.
workers:一组键,用于定义后续基准中使用的worker(独立的worker客户端实例)的数量。
A set of keys used to define the number of workers (separate worker client instances) used in the subsequent benchmark.
rounds:将按顺序进行的不同测试回合的数组。轮次可用于对不同的智能合约方法进行基准测试,或以不同的方式对同一方法进行基准测试。
An array of distinct test rounds that will be progressed sequentially. Rounds may be used to benchmark different smart contract methods, or the same method in a different manner.
2.4.2 对模板文件myAssetBenchmark.yaml进行填充
我们现在将填充模板文件从而确定worker的数目和测试的轮数
测试轮数使用的是2.3结创建的workload module文件
1. Populate Workers
填充workers部分
We will be using two separate workers, this is accomplished through the workers specification:
  type: local
  number: 2
2. Populate Rounds
填充round部分
每个round块包含以下内容:
-
label- 用于回合的唯一标题标签。the unique header label to use for the round
-
description- 正在运行的round的描述。a description of the round being run.
-
txDuration- 定义测试持续的时间,以秒为单位the specification of the test duration, in seconds
-
rateControl- 一种速率控制类型,带有选项。a rate control type, with options.
-
workload- 要使用的工作负载模块(workload module),带有要传递给模块的参数。传递的所有参数都可以作为
roundArguments(工作负载workload的一个参数)在workload模块中使用。the workload module to use, with arguments to pass to the module. All arguments passed are available as
roundArgumentswithin the workload module.我们将指定一个被标记为
readAsset的 benchmark round (测试轮)执行30s这个测试轮被描述为Query asset benchmark
这个benchmark round使用一个
fixed-load速率控制器来保持值为2的恒定交易压力。此外,我们将提供一个workload通过明确我们的
readAsset.js工作负载文件的位置,我们将传递参数{assets:10,compactId:asset-transfer-basic}以上是通过对round的规范来实现的:
    - label: readAsset
      description: Read asset benchmark
      txDuration: 30
      rateControl:
        type: fixed-load
        opts:
          transactionLoad: 2
      workload:
        module: workload/readAsset.js
        arguments:
          assets: 10
          contractId: basic
3. The Complete Benchmark Configuration File
完整的基准测试文件如下:
test:
    name: basic-contract-benchmark
    description: test benchmark
    workers:
      type: local
      number: 2
    rounds:
      - label: readAsset
        description: Read asset benchmark
        txDuration: 30
        rateControl:
          type: fixed-load
          opts:
            transactionLoad: 2
        workload:
          module: workload/readAsset.js
          arguments:
            assets: 10
            contractId: basic
2.5 运行caliper进行基准测试
2.5.1 命令介绍
我们现在可以使用上面的配置文件和测试模块来运行性能基准测试了。性能基准测试将使用Caliper CLI运行,需要提供一个指向工作区的路径,以及指向网络配置文件和基准配置文件的工作区相对路径。
这些信息分别与标记
--caliper workspace 工作区的路径
--caliper-networkconfig 向网络配置文件的工作区相对路径
--caliper benchconfig 基准配置文件的工作区相对路径
一起提供
-
由于智能合约已经安装和实例化,Caliper只需要执行测试阶段。这是通过使用
--caliper-flow-only-test标志来指定的。 -
由于目标网络已启用发现功能,我们可以通过使用标志
--capiler Fabric gateway enabled和--capiler Fabric gateway discovery来使用Hyperledger Fabric网关。
2.5.2 命令的运行与结果的解释
1. 运行
在terminal中运行以下命令:
npx caliper launch manager
--caliper-workspace ./   # 工作目录
--caliper-networkconfig networks/networkConfig.json   # 网络配置文件位置
--caliper-benchconfig benchmarks/myAssetBenchmark.yaml   # 基准配置文件位置
--caliper-flow-only-test # 智能合约已经安装和实例化,Caliper只需要执行测试阶段
--caliper-fabric-gateway-enabled # 使用Hyperledger Fabric网关
--caliper-fabric-gateway-discovery # 使用Hyperledger Fabric网关
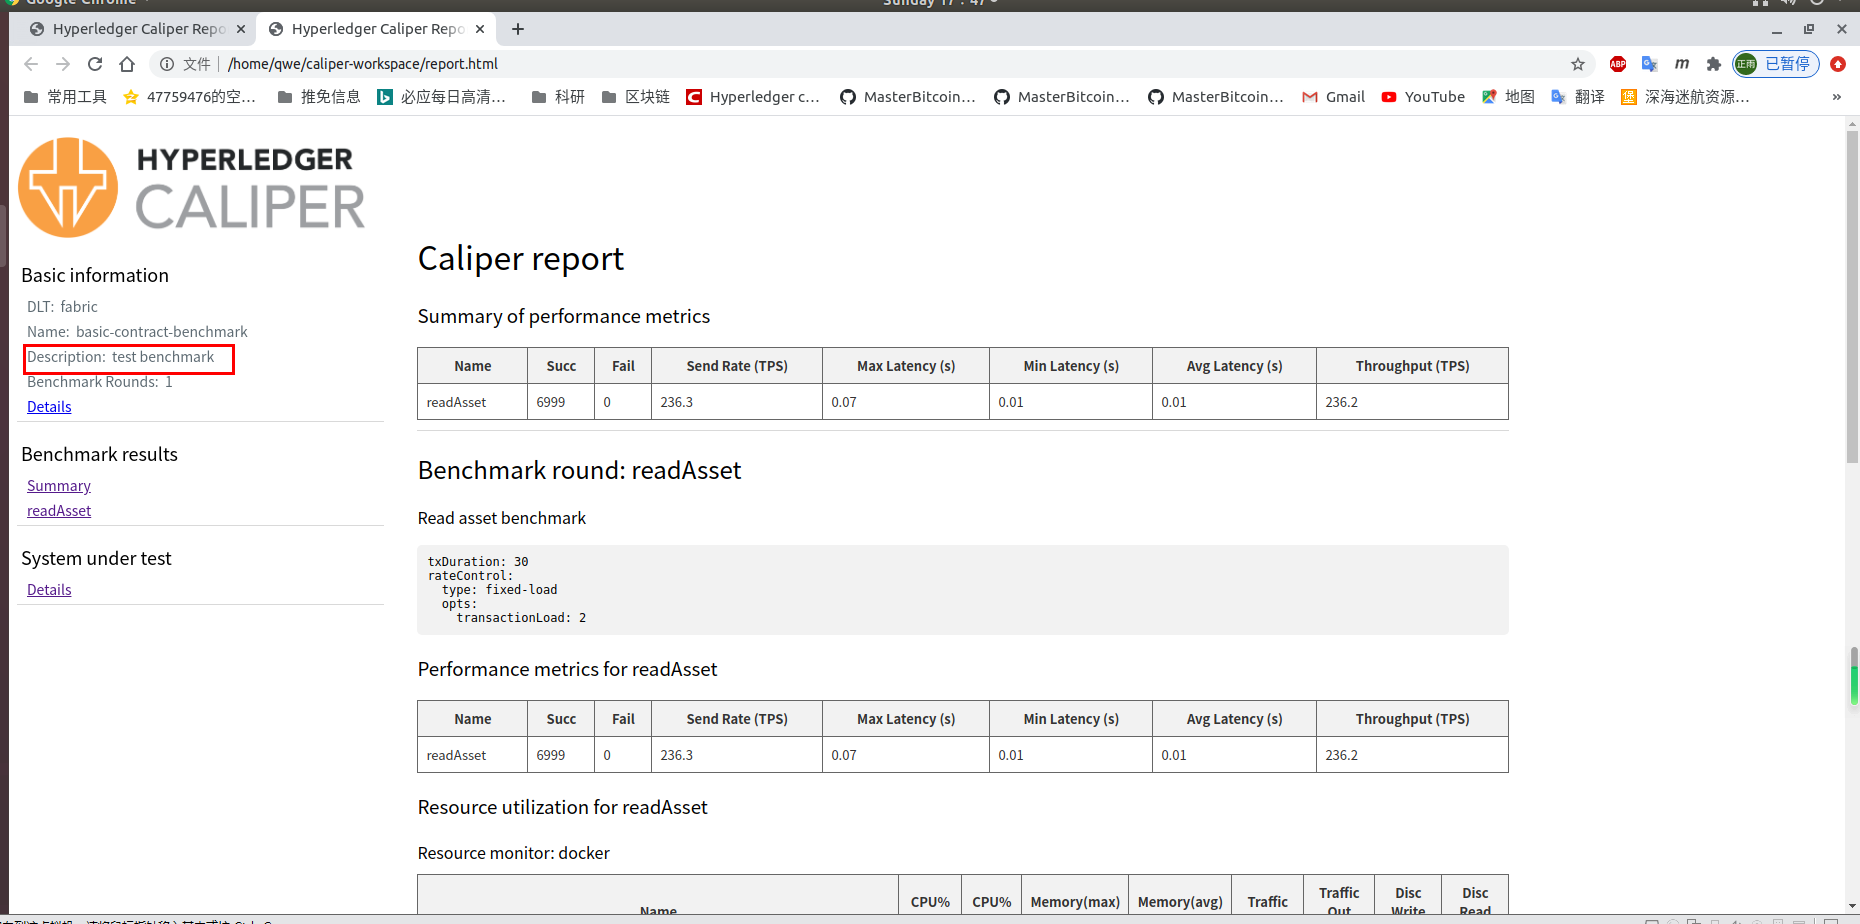
2. 结果的解释
结果报告将详细说明每轮基准测试的以下项目:
- Name—基准配置文件中的圆形名称
- Succ/Fail-成功/失败的交易数
- Send Rate-Caliper发出交易的速率
- Latency(max/min/avg)- 与发出交易和接收响应之间的时间(以秒为单位)有关的统计信息
- Throughput—每秒处理的平均交易数
可以通过改变基准测试参数来重复测试,以及添加资源监视器。
有关全套选项,请参阅Caliper文档。

