

Spring学习笔记之Spring HelloWorld
自建博客地址:https://www.bytelife.net,欢迎访问! 本文为博客自动同步文章,为了更好的阅读体验,建议您移步至我的博客👇
本文作者: Jeffrey
本文链接: https://www.bytelife.net/articles/1737.html
版权声明: 本博客所有文章除特别声明外,均采用 BY-NC-SA 许可协议。转载请注明出处!
一、下载Spring
官方网站:http://projects.spring.io/spring-framework/ 下载方式:Maven、Gradle Maven依赖描述:
<dependencies>
    <dependency>
        <groupId>org.springframework</groupId>
        <artifactId>spring-context</artifactId>
        <version>4.3.2.RELEASE</version>
    </dependency>
</dependencies>
二、Spring概述
Spring是一个开元框架,为简化企业级应用开发而生。使用Spring可以使简单的JavaBean实现以前只有EJB才能实现的功能。Spring是一个IOC反转控制(DI依赖注入)和AOP(面向切面编程)容器框架。
- 轻量级:Spring是非侵入性的-基于Spring开发的应用中对象可以不依赖Spring的 API;
- 依赖注入(DI, Dependency Injection、IOC);
- 面向切面编程(AOP, Aspect Oriented Programming);
- 容器:Spring是一个容器,因为它包含并且管理应用对象的生命周期;
- 框架:Spring实现了使用简单的组件配置组合成一个复杂的应用。在Spring中可以使用XML和Java注解组合这些对象;
- 一站式:在IOC和AOP的基础上可以整合各种企业应用的开源框架和优秀的第三方类库(实际上Spring自身也提供了表现层的Spring MVC和持久层的Spring JDBC)。
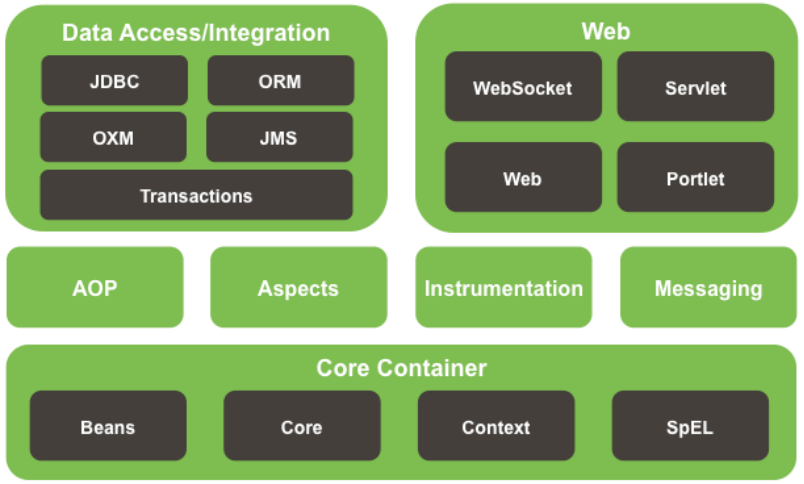
三、Spring模块
四、安装Spring Tool Suite
- SPRING TOOL SUITE 是一个 Eclipse 插件,利用该插件可以更方便的在 Eclipse 平台上开发基于 Spring 的应用。
安装方法说明(springsource-tool-suite-3.4.0.RELEASE-e4.3.1-updatesite.zip):
- Help --> Install New Software...
- Click Add...
- In dialog Add Site dialog, click Archive...
- Navigate to springsource-tool-suite-3.4.0.RELEASE-e4.3.1-updatesite.zip and click Open
- Clicking OK in the Add Site dialog will bring you back to the dialog 'Install'
- Select the xxx/Spring IDE that has appeared
- Click Next and then Finish
- Approve the license
- Restart eclipse when that is asked
五、搭建Spring开发环境
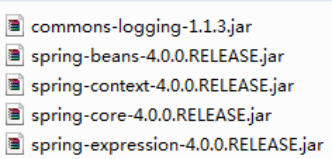
- 将以下jar包加入到工程的classpath下:
- Spring的配置文件:一个典型的Spring项目需要创建一个或多个Bean配置文件,这些配置文件用于在Spring IOC容器中配置Bean。Bean的配置文件可以放在classpath下,也可以放在其它目录下。
六、创建Spring项目
- cn.javacodes.spring.beans.HelloWorld
package cn.javacodes.spring.beans;
public class HelloWorld {
    private String name;
    public void setName(String name){
        this.name = name;
    }
    public void hello(){
        System.out.println("hello: " + name);
    }
}
- cn.javacodes.spring.beans.Main
package cn.javacodes.spring.beans;
import org.springframework.context.ApplicationContext;
import org.springframework.context.support.ClassPathXmlApplicationContext;
public class Main {
    public static void main(String[] args) {
        // 1\. 创建Spring的IOC容器对象
        ApplicationContext ctx = new ClassPathXmlApplicationContext("applicationContext.xml");
        // 2\. 从IOC中获取Bean实例
        HelloWorld helloWorld = (HelloWorld) ctx.getBean("helloWorld");
        // 3.调用hello方法
        helloWorld.hello();
    }
}
- applicationContext.xml
<?xml version="1.0" encoding="UTF-8"?>
<beans xmlns="http://www.springframework.org/schema/beans"
       xmlns:xsi="http://www.w3.org/2001/XMLSchema-instance"
       xsi:schemaLocation="http://www.springframework.org/schema/beans http://www.springframework.org/schema/beans/spring-beans.xsd">
    <!\-\- 配置Bean -->
    <bean id="helloWorld" class="cn.javacodes.spring.beans.HelloWorld">
        <property name="name" value="Spring"></property>
    </bean>
</beans>

