
Linux九阴真经之大伏魔拳残卷5 nginx
编译安装 nginx

[root@localhost ~]# yum install pcre-devel openssl-devel zlib-devel -y     #安装前提控件
[root@localhost ~]# useradd -r -s /sbin/nologin nginx                      #创建 nginx用户 并设置为不可登录
[root@localhost ~]# http://nginx.org/download/nginx-1.12.2.tar.gz          #官网下载新版nginx安装包
[root@localhost ~]# tar -xvf nginx-1.12.2.tar.gz
[root@localhost ~]# cd nginx-1.12.2                                        #解压后进入nginx文件夹

开始编译安装
[root@localhost ~]# ./configure --prefix=/app/nginx \ #在根下创建一个app目录用来存放 nginx
> --conf-path=/etc/nginx/nginx.conf \
> --error-log-path=/var/log/nginx/error.log \
> --http-log-path=/var/log/nginx/access.log \
> --pid-path=/var/run/nginx.pid \
> --lock-path=/var/run/nginx.lock \
> --user=nginx --group=nginx \
> --with-http_ssl_module \
> --with-http_v2_module \
> --with-http_dav_module \
> --with-http_stub_status_module \
> --with-threads --with-file-aio
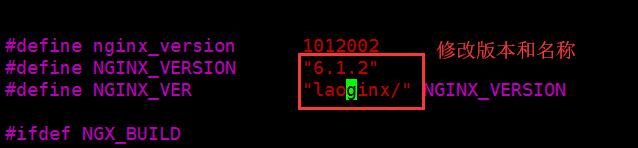
假如你要修改一些配置
[root@localhost nginx-1.12.2]# vim src/http/ngx_http_header_filter_module.c

[root@localhost nginx-1.12.2]# vim src/core/nginx.h
[root@localhost nginx-1.12.2]# make -j 4 && make install
[root@localhost app]# ls
nginx
[root@localhost app]# cd nginx/
[root@localhost nginx]# ls
html  sbin
[root@localhost nginx]# cd sbin
[root@localhost sbin]# ls
nginx
[root@localhost sbin]# ./nginx
[root@localhost sbin]# ss -ntl
State       Recv-Q Send-Q Local Address:Port               Peer Address:Port
LISTEN      0      128               *:80                            *:*
LISTEN      0      128               *:22                            *:*
LISTEN      0      100       127.0.0.1:25                            *:*
LISTEN      0      128              :::22                           :::*
LISTEN      0      100             ::1:25                           :::*

此时80端口已经打开 ,我们在浏览器上访问以下本机测试一下

成功

【推荐】编程新体验,更懂你的AI,立即体验豆包MarsCode编程助手
【推荐】凌霞软件回馈社区,博客园 & 1Panel & Halo 联合会员上线
【推荐】抖音旗下AI助手豆包,你的智能百科全书,全免费不限次数
【推荐】博客园社区专享云产品让利特惠,阿里云新客6.5折上折
【推荐】轻量又高性能的 SSH 工具 IShell:AI 加持,快人一步