SpringMVC(一)
学习安排
1、SpringMVC介绍
2、入门程序
3、SpringMVC架构讲解
a) 框架结构
b) 组件说明
4、SpringMVC整合MyBatis
5、参数绑定
a) SpringMVC默认支持的类型
b) 简单数据类型
c) Pojo类型
d) Pojo包装类型
e) 自定义参数绑定
6、SpringMVC和Struts2的区别
1. SpringMVC介绍
1.1. Springmvc是什么
Spring web mvc和Struts2都属于表现层的框架,它是Spring框架的一部分,我们可以从Spring的整体结构中看得出来,如下图:

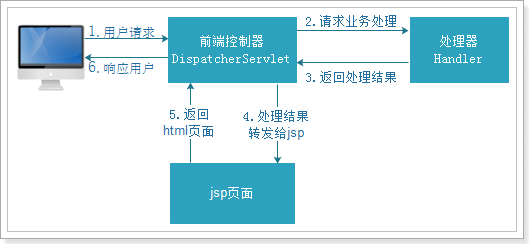
1.2. Springmvc处理流程
如下图所示:
2. 入门程序
需求:使用浏览器显示商品列表
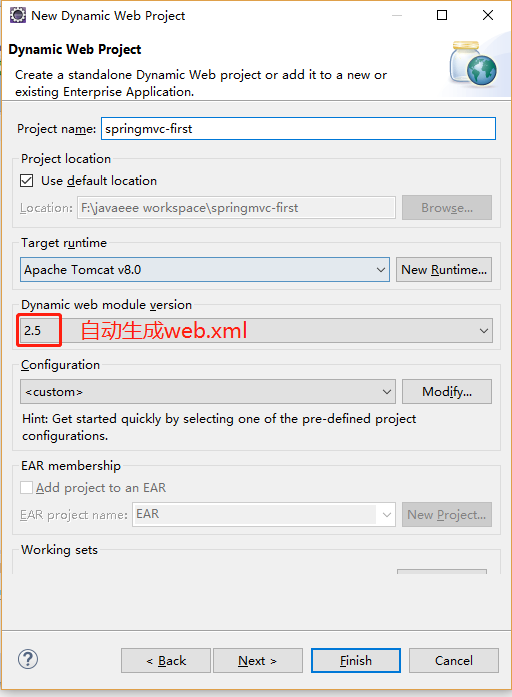
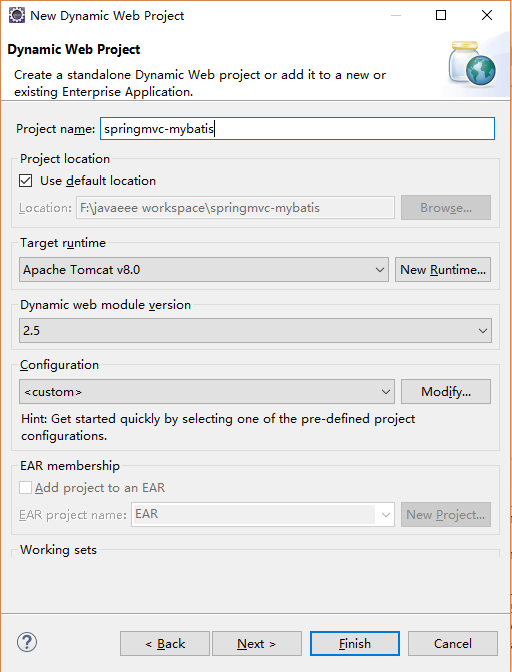
2.1. 创建web工程
springMVC是表现层框架,需要搭建web工程开发。
如下图创建动态web工程:
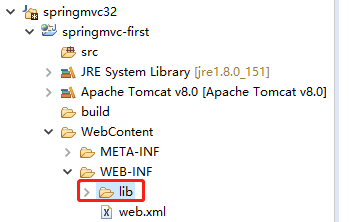
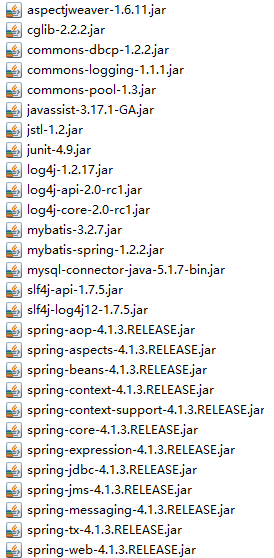
2.2. 导入jar包
从课前资料中导入springMVC的jar包,位置如下图:
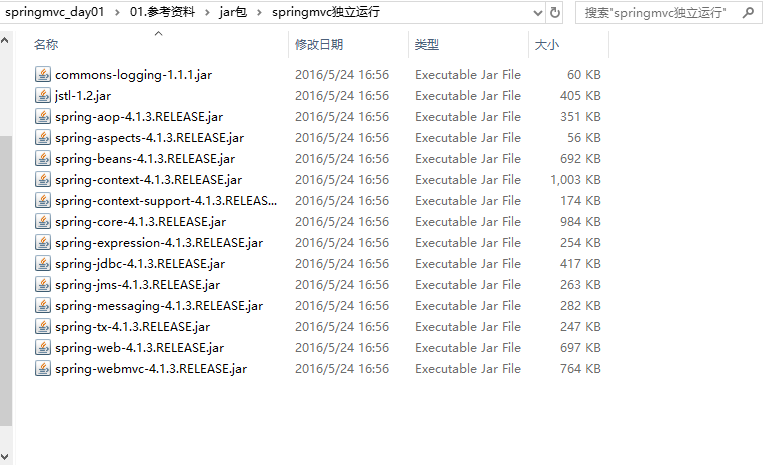
把包导入到lib中
2.3. 创建springmvc.xml文件
<?xml version="1.0" encoding="UTF-8"?>
<beans xmlns="http://www.springframework.org/schema/beans"
    xmlns:xsi="http://www.w3.org/2001/XMLSchema-instance" xmlns:p="http://www.springframework.org/schema/p"
    xmlns:context="http://www.springframework.org/schema/context"
    xmlns:mvc="http://www.springframework.org/schema/mvc"
    xsi:schemaLocation="http://www.springframework.org/schema/beans http://www.springframework.org/schema/beans/spring-beans-4.0.xsd
        http://www.springframework.org/schema/mvc http://www.springframework.org/schema/mvc/spring-mvc-4.0.xsd
        http://www.springframework.org/schema/context http://www.springframework.org/schema/context/spring-context-4.0.xsd">

    <!-- 配置controller扫描包 -->
    <context:component-scan base-package="cn.linwei.springmvc.controller"></context:component-scan>
</beans>
创建包cn.linwei.springmvc.controller

2.4. 配置web.xml文件
  <!-- 配置SpringMVC前端控制器 -->
    <servlet>
        <servlet-name>springmvc-first</servlet-name>
        <servlet-class>org.springframework.web.servlet.DispatcherServlet</servlet-class>
        <!-- 指定SpringMVC配置文件 -->
        <!-- SpringMVC的配置文件的默认路径是/WEB-INF/${servlet-name}-servlet.xml -->
        <init-param>
            <param-name>contextConfigLocation</param-name>
            <param-value>classpath:springmvc.xml</param-value>
        </init-param>
    </servlet>

    <servlet-mapping>
        <servlet-name>springmvc-first</servlet-name>
        <!-- 设置所有以action结尾的请求进入SpringMVC -->
        <url-pattern>*.action</url-pattern>
    </servlet-mapping>
2.5. 导入jsp页面

2.6. 创建pojo
package cn.linwei.pojo;

import java.util.Date;

public class Item {
    // 商品id
    private int id;
    // 商品名称
    private String name;
    // 商品价格
    private double price;
    // 商品创建时间
    private Date createtime;
    // 商品描述
    private String detail;
    public int getId() {
        return id;
    }
    public void setId(int id) {
        this.id = id;
    }
    public String getName() {
        return name;
    }
    public void setName(String name) {
        this.name = name;
    }
    public double getPrice() {
        return price;
    }
    public void setPrice(double price) {
        this.price = price;
    }
    public Date getCreatetime() {
        return createtime;
    }
    public void setCreatetime(Date createtime) {
        this.createtime = createtime;
    }
    public String getDetail() {
        return detail;
    }
    public void setDetail(String detail) {
        this.detail = detail;
    }
    @Override
    public String toString() {
        return "Item [id=" + id + ", name=" + name + ", price=" + price + ", detail=" + detail + "]";
    }

}
2.7. 创建ItemController
package cn.linwei.springmvc.controller;

import java.util.ArrayList;
import java.util.Date;
import java.util.List;

import org.springframework.stereotype.Controller;
import org.springframework.web.bind.annotation.RequestMapping;
import org.springframework.web.servlet.ModelAndView;

import cn.linwei.pojo.Item;

@Controller
public class ItemController {
    // @RequestMapping:里面放的是请求的url,和用户请求的url进行匹配
    // action可以写也可以不写
    @RequestMapping("/itemList.action")
    public ModelAndView queryItemList(){
        List<Item> list=new ArrayList<>();
        list.add(new Item(1, "1华为 荣耀8", 2399, new Date(), "质量好!1"));
        list.add(new Item(2, "2华为 荣耀8", 2399, new Date(), "质量好!2"));
        list.add(new Item(3, "3华为 荣耀8", 2399, new Date(), "质量好!3"));
        list.add(new Item(4, "4华为 荣耀8", 2399, new Date(), "质量好!4"));
        list.add(new Item(5, "5华为 荣耀8", 2399, new Date(), "质量好!5"));
        list.add(new Item(6, "6华为 荣耀8", 2399, new Date(), "质量好!6"));
        // 创建ModelAndView,用来存放数据和视图
        ModelAndView modelAndView = new ModelAndView();
        // 设置数据到模型中
        modelAndView.addObject("itemList",list);
        // 设置视图jsp,需要设置视图的物理地址
        modelAndView.setViewName("/WEB-INF/jsp/itemList.jsp");
        return modelAndView;
    }
}
2.8. 进行项目测试
启动tomcat,在浏览器输入地址:http://localhost:8080/springmvc-first/itemList.action
效果如下图:

3. Springmvc架构
3.1. 框架结构
框架结构如下图:
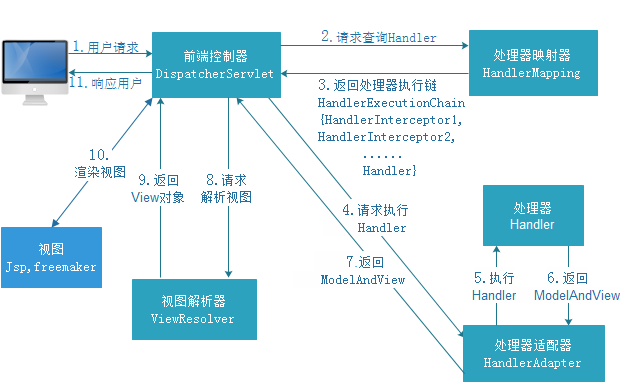
3.2. 架构流程
1、 用户发送请求至前端控制器DispatcherServlet
2、 DispatcherServlet收到请求调用HandlerMapping处理器映射器。
3、 处理器映射器根据请求url找到具体的处理器,生成处理器对象及处理器拦截器(如果有则生成)一并返回给DispatcherServlet。
4、 DispatcherServlet通过HandlerAdapter处理器适配器调用处理器
5、 执行处理器(Controller,也叫后端控制器)。
6、 Controller执行完成返回ModelAndView
7、 HandlerAdapter将controller执行结果ModelAndView返回给DispatcherServlet
8、 DispatcherServlet将ModelAndView传给ViewReslover视图解析器
9、 ViewReslover解析后返回具体View
10、 DispatcherServlet对View进行渲染视图(即将模型数据填充至视图中)。
11、 DispatcherServlet响应用户
3.3. 组件说明
以下组件通常使用框架提供实现:
DispatcherServlet:前端控制器
用户请求到达前端控制器,它就相当于mvc模式中的c,dispatcherServlet是整个流程控制的中心,由它调用其它组件处理用户的请求,dispatcherServlet的存在降低了组件之间的耦合性。
HandlerMapping:处理器映射器
HandlerMapping负责根据用户请求url找到Handler即处理器,springmvc提供了不同的映射器实现不同的映射方式,例如:配置文件方式,实现接口方式,注解方式等。
Handler:处理器
Handler 是继DispatcherServlet前端控制器的后端控制器,在DispatcherServlet的控制下Handler对具体的用户请求进行处理。
由于Handler涉及到具体的用户业务请求,所以一般情况需要程序员根据业务需求开发Handler。
HandlAdapter:处理器适配器
通过HandlerAdapter对处理器进行执行,这是适配器模式的应用,通过扩展适配器可以对更多类型的处理器进行执行。
ViewResolver:视图解析器
View Resolver负责将处理结果生成View视图,View Resolver首先根据逻辑视图名解析成物理视图名即具体的页面地址,再生成View视图对象,最后对View进行渲染将处理结果通过页面展示给用户。
View:视图
springmvc框架提供了很多的View视图类型的支持,包括:jstlView、freemarkerView、pdfView等。我们最常用的视图就是jsp。
一般情况下需要通过页面标签或页面模版技术将模型数据通过页面展示给用户,需要由程序员根据业务需求开发具体的页面。
说明:在springmvc的各个组件中,处理器映射器、处理器适配器、视图解析器称为springmvc的三大组件。
需要用户开发的组件有handler、view
3.4. 组件扫描器
使用组件扫描器省去在spring容器配置每个Controller类的繁琐。
使用<context:component-scan>自动扫描标记@Controller的控制器类,
在springmvc.xml配置文件中配置如下:
<!-- 配置controller扫描包,多个包之间用,分隔 -->
<context:component-scan base-package="cn.itcast.springmvc.controller" />
3.5. 注解驱动
直接配置处理器映射器和处理器适配器比较麻烦,可以使用注解驱动来加载。
SpringMVC使用<mvc:annotation-driven>自动加载RequestMappingHandlerMapping和RequestMappingHandlerAdapter
可以在springmvc.xml配置文件中使用<mvc:annotation-driven>替代注解处理器和适配器的配置。
<!-- 注解驱动 -->
<mvc:annotation-driven />
3.6. 视图解析器(可不写)
视图解析器使用SpringMVC框架默认的InternalResourceViewResolver,这个视图解析器支持JSP视图解析
在springmvc.xml配置文件中配置如下:
    <!-- Example: prefix="/WEB-INF/jsp/", suffix=".jsp", viewname="test" ->
        "/WEB-INF/jsp/test.jsp" -->
    <!-- 配置视图解析器 -->
    <bean
        class="org.springframework.web.servlet.view.InternalResourceViewResolver">
        <!-- 配置逻辑视图的前缀 -->
        <property name="prefix" value="/WEB-INF/jsp/" />
        <!-- 配置逻辑视图的后缀 -->
        <property name="suffix" value=".jsp" />
    </bean>
逻辑视图名需要在controller中返回ModelAndView指定,比如逻辑视图名为itemList,则最终返回的jsp视图地址:
“WEB-INF/jsp/itemList.jsp”
最终jsp物理地址:前缀+逻辑视图名+后缀

加了视图解析器可写为:

4. SpringMvc整合mybatis
为了更好的学习 springmvc和mybatis整合开发的方法,需要将springmvc和mybatis进行整合。
整合目标:控制层采用springmvc、持久层使用mybatis实现。
4.1. 整合思路
Dao层:
1、SqlMapConfig.xml,空文件即可,但是需要文件头。
2、applicationContext-dao.xml
a) 数据库连接池
b) SqlSessionFactory对象,需要spring和mybatis整合包下的。
c) 配置mapper文件扫描器。
Service层:
1、applicationContext-service.xml包扫描器,扫描@service注解的类。
2、applicationContext.xml配置事务。
Controller层:
1、Springmvc.xml
a) 包扫描器,扫描@Controller注解的类。
b) 配置注解驱动
c) 配置视图解析器
2、Web.xml文件:
a)配置spring及监听器
b)配置前端控制器。
4.2. 创建工程
4.3. 导包
4.4. 加入配置文件
4.4.1. sqlMapConfig.xml
<?xml version="1.0" encoding="UTF-8" ?>
<!DOCTYPE configuration
PUBLIC "-//mybatis.org//DTD Config 3.0//EN"
"http://mybatis.org/dtd/mybatis-3-config.dtd">
<configuration>

</configuration>
4.4.2. applicationContext.xml
加载配置文件、配置数据源、配置SqlSessionFactory、mapper扫描器。
<?xml version="1.0" encoding="UTF-8"?>
<beans xmlns="http://www.springframework.org/schema/beans"
    xmlns:context="http://www.springframework.org/schema/context" xmlns:p="http://www.springframework.org/schema/p"
    xmlns:aop="http://www.springframework.org/schema/aop" xmlns:tx="http://www.springframework.org/schema/tx"
    xmlns:xsi="http://www.w3.org/2001/XMLSchema-instance"
    xsi:schemaLocation="http://www.springframework.org/schema/beans http://www.springframework.org/schema/beans/spring-beans-4.0.xsd
    http://www.springframework.org/schema/context http://www.springframework.org/schema/context/spring-context-4.0.xsd
    http://www.springframework.org/schema/aop http://www.springframework.org/schema/aop/spring-aop-4.0.xsd http://www.springframework.org/schema/tx http://www.springframework.org/schema/tx/spring-tx-4.0.xsd
    http://www.springframework.org/schema/util http://www.springframework.org/schema/util/spring-util-4.0.xsd">
    <!-- 加载配置文件 -->
    <context:property-placeholder location="classpath:db.properties"/>
    <!-- 配置数据源 -->
    <bean id="dataSource" class="org.apache.commons.dbcp.BasicDataSource" destroy-method="close">
        <property name="driverClassName" value="${jdbc.driver}" />
        <property name="url" value="${jdbc.url}" />
        <property name="username" value="${jdbc.username}" />
        <property name="password" value="${jdbc.password}" />
        <property name="maxActive" value="10" />
        <property name="maxIdle" value="5" />
    </bean>
    <!-- 配置SqlSessionFactory -->
    <bean id="sqlSessionFactory" class="org.mybatis.spring.SqlSessionFactoryBean">
        <!-- 数据库连接池 -->
        <property name="dataSource" ref="dataSource" />
        <!-- 加载mybatis的全局配置文件 -->
        <property name="configLocation" value="classpath:SqlMapConfig.xml" />
    </bean>
    <!-- mapper扫描器 -->
    <bean class="org.mybatis.spring.mapper.MapperScannerConfigurer">
        <!-- 配置Mapper扫描包 -->
        <property name="basePackage" value="cn.itcast.ssm.mapper"></property>
    </bean>
</beans>
4.4.3. db.properties
jdbc.driver=com.mysql.jdbc.Driver
jdbc.url=jdbc:mysql://localhost:3306/springmvc?characterEncoding=utf-8
jdbc.username=root
jdbc.password=123
4.4.4. log4j.properties
# Global logging configuration
log4j.rootLogger=DEBUG, stdout
# Console output...
log4j.appender.stdout=org.apache.log4j.ConsoleAppender
log4j.appender.stdout.layout=org.apache.log4j.PatternLayout
log4j.appender.stdout.layout.ConversionPattern=%5p [%t] - %m%n
4.4.5. springmvc.xml
<?xml version="1.0" encoding="UTF-8"?>
<beans xmlns="http://www.springframework.org/schema/beans"
    xmlns:xsi="http://www.w3.org/2001/XMLSchema-instance" xmlns:p="http://www.springframework.org/schema/p"
    xmlns:context="http://www.springframework.org/schema/context"
    xmlns:mvc="http://www.springframework.org/schema/mvc"
    xsi:schemaLocation="http://www.springframework.org/schema/beans http://www.springframework.org/schema/beans/spring-beans-4.0.xsd
        http://www.springframework.org/schema/mvc http://www.springframework.org/schema/mvc/spring-mvc-4.0.xsd
        http://www.springframework.org/schema/context http://www.springframework.org/schema/context/spring-context-4.0.xsd">

     <!-- 配置controller扫描包 -->
    <context:component-scan base-package="cn.itcast.ssm" />

    <!-- 注解驱动 -->
    <mvc:annotation-driven />

    <!-- 配置视图解析器 -->
    <bean
    class="org.springframework.web.servlet.view.InternalResourceViewResolver">
        <!-- 配置逻辑视图的前缀 -->
        <property name="prefix" value="/WEB-INF/jsp/" />
        <!-- 配置逻辑视图的后缀 -->
        <property name="suffix" value=".jsp" />
    </bean>
</beans>
4.4.6. web.xml
<?xml version="1.0" encoding="UTF-8"?>
<web-app xmlns:xsi="http://www.w3.org/2001/XMLSchema-instance" xmlns="http://java.sun.com/xml/ns/javaee" xsi:schemaLocation="http://java.sun.com/xml/ns/javaee http://java.sun.com/xml/ns/javaee/web-app_2_5.xsd" id="WebApp_ID" version="2.5">
  <display-name>springmvc-mybatis</display-name>
  <welcome-file-list>
    <welcome-file>index.html</welcome-file>
    <welcome-file>index.htm</welcome-file>
    <welcome-file>index.jsp</welcome-file>
    <welcome-file>default.html</welcome-file>
    <welcome-file>default.htm</welcome-file>
    <welcome-file>default.jsp</welcome-file>
  </welcome-file-list>
  <!-- 配置spring -->
  <context-param>
      <param-name>contextConfigLocation</param-name>
      <param-value>classpath:applicationContext.xml</param-value>
  </context-param>
  <!-- 使用监听器加载Spring配置文件 -->
  <listener>
      <listener-class>org.springframework.web.context.ContextLoaderListener</listener-class>
  </listener>
  <!-- 配置SpringMVC前端控制器 -->
   <!-- 配置SpringMVC前端控制器 -->
    <servlet>
        <servlet-name>springmvc-mybatis</servlet-name>
        <servlet-class>org.springframework.web.servlet.DispatcherServlet</servlet-class>
        <!-- 指定SpringMVC配置文件 -->
        <!-- SpringMVC的配置文件的默认路径是/WEB-INF/${servlet-name}-servlet.xml -->
        <init-param>
            <param-name>contextConfigLocation</param-name>
            <param-value>classpath:springmvc.xml</param-value>
        </init-param>
    </servlet>
  <servlet-mapping>
      <servlet-name>springmvc-mybatis</servlet-name>
      <url-pattern>*.action</url-pattern>
  </servlet-mapping>
</web-app>
4.4.7. 导入jsp页面
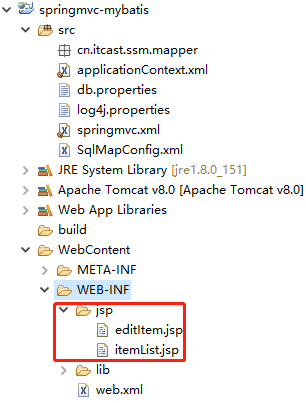
4.4.8. 实现商品列表显示
需求:实现商品查询列表,从mysql数据库查询商品信息。
a.在applicationContext.xml插入一下代码
    <!-- 注解事务 -->
    <bean id="transactionManager" class="org.springframework.jdbc.datasource.DataSourceTransactionManager">
        <property name="dataSource" ref="dataSource"></property>
    </bean>

    <!--开启注解  -->
    <tx:annotation-driven transaction-manager="transactionManager" />
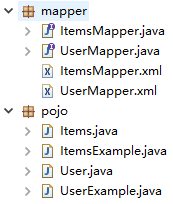
b.使用逆向工程生成pojo和mapper代码
c.新建ItemController.java
package cn.itcast.ssm.controller;

import java.util.List;

import org.springframework.beans.factory.annotation.Autowired;
import org.springframework.stereotype.Controller;
import org.springframework.web.bind.annotation.RequestMapping;
import org.springframework.web.servlet.ModelAndView;

import cn.itcast.ssm.pojo.Items;
import cn.itcast.ssm.service.ItemService;

@Controller
public class ItemController {

    @Autowired
    private ItemService service;
    @RequestMapping("/itemList.action")
    public ModelAndView queryItemList(){
        List<Items> list=service.queryItemList();
        ModelAndView modelAndView = new ModelAndView();
        modelAndView.addObject("itemList",list);
        modelAndView.setViewName("itemList");
        return modelAndView;
    }
}
d.新建ItemService.java
package cn.itcast.ssm.service;

import java.util.List;

import cn.itcast.ssm.pojo.Items;

public interface ItemService {
    public List<Items> queryItemList();
}
e.新建ItemServiceImpl.java
package cn.itcast.ssm.service;

import java.util.List;

import org.springframework.beans.factory.annotation.Autowired;
import org.springframework.stereotype.Service;

import cn.itcast.ssm.mapper.ItemsMapper;
import cn.itcast.ssm.pojo.Items;

@Service
public class ItemServiceImpl implements ItemService {

    @Autowired
    private ItemsMapper mapper;
    @Override
    public List<Items> queryItemList() {
        return mapper.selectByExampleWithBLOBs(null);
    }

}
f.在浏览器中访问http://localhost:8080/springmvc-mybatis/itemList.action

5. 参数绑定
5.1. 默认支持的参数类型
5.1.1. 需求
打开商品编辑页面,展示商品信息。
5.1.2. 需求分析
编辑商品信息,首先要显示商品详情
需要根据商品id查询商品信息,然后展示到页面。
请求的url:/itemEdit.action
参数:id(商品id)
响应结果:商品编辑页面,展示商品详细信息。
5.1.3. ItemController.java
默认支持的参数类型
处理器形参中添加如下类型的参数处理适配器会默认识别并进行赋值。
HttpServletRequest
通过request对象获取请求信息
HttpServletResponse
通过response处理响应信息
HttpSession
通过session对象得到session中存放的对象
    @RequestMapping("/itemEdit.action")
    public ModelAndView queryItemById(HttpServletRequest request,HttpServletResponse response,HttpSession session){
        String sid=request.getParameter("id");
        int id=Integer.valueOf(sid);
        Items item=service.queryItemById(id);
        ModelAndView modelAndView = new ModelAndView();
        modelAndView.addObject("item",item);
        // 设置逻辑视图,转发到jsp页面
        modelAndView.setViewName("editItem");
        return modelAndView;

    }
5.1.4. ItemService.java
public Items queryItemById(int id);
5.1.5. ItemServiceImpl.java
 public Items queryItemById(int id) {
        return mapper.selectByPrimaryKey(id);
    }
5.2. 简单数据类型
当请求的参数名称和处理器形参名称一致时会将请求参数与形参进行绑定。
这样,从Request取参数的方法就可以进一步简化。
5.2.1. ItemController.java

5.2.2. 支持的数据类型
参数类型推荐使用包装数据类型,因为基础数据类型不可以为null
整形:Integer、int
字符串:String
单精度:Float、float
双精度:Double、double
布尔型:Boolean、boolean
说明:对于布尔类型的参数,请求的参数值为true或false。或者1或0
请求url:
http://localhost:8080/xxx.action?id=2&status=false
处理器方法:
public String editItem(Model model,Integer id,Boolean status)
5.3. 绑定pojo类型
5.3.1. 需求
将页面修改后的商品信息保存到数据库中。
5.3.2. 需求分析
请求的url:/updateItem.action
参数:表单中的数据。
响应内容:更新成功页面
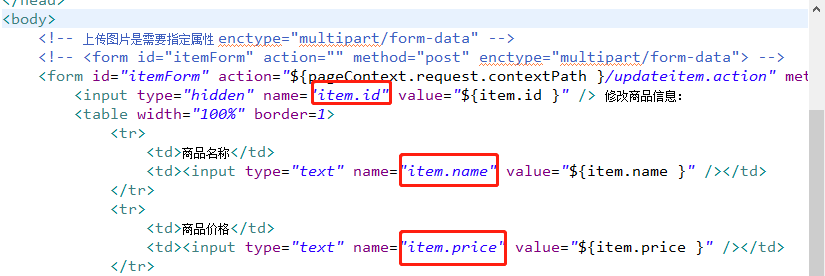
5.3.3. 使用pojo接收表单数据
如果提交的参数很多,或者提交的表单中的内容很多的时候,可以使用简单类型接受数据,也可以使用pojo接收数据。
要求:pojo对象中的属性名和表单中input的name属性一致。


5.3.4. ItemController.java
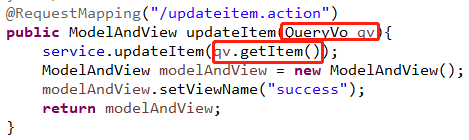
@RequestMapping("/updateitem.action")
    public ModelAndView updateItem(Items item){
        service.updateItem(item);
        ModelAndView modelAndView = new ModelAndView();
        modelAndView.setViewName("success");
        return modelAndView;
    }
5.3.5. 创建跳转页面success.jsp
<%@ page language="java" contentType="text/html; charset=UTF-8"
    pageEncoding="UTF-8"%>
<!DOCTYPE html PUBLIC "-//W3C//DTD HTML 4.01 Transitional//EN" "http://www.w3.org/TR/html4/loose.dtd">
<html>
<head>
<meta http-equiv="Content-Type" content="text/html; charset=UTF-8">
<title>Insert title here</title>
</head>
<body>
    更新成功!<a href="http://localhost:8080/springmvc-mybatis/itemList.action">点击返回页面</a>
</body>
</html>
5.3.6. ItemService接口

5.3.7. ItemServiceImpl实现类

5.3.8. 配置web.xml解决post提交中文乱码问题
      <!-- 解决post乱码问题 -->
    <filter>
        <filter-name>encoding</filter-name>
        <filter-class>org.springframework.web.filter.CharacterEncodingFilter</filter-class>
        <!-- 设置编码参是UTF8 -->
        <init-param>
            <param-name>encoding</param-name>
            <param-value>UTF-8</param-value>
        </init-param>
    </filter>
    <filter-mapping>
        <filter-name>encoding</filter-name>
        <url-pattern>/*</url-pattern>
    </filter-mapping>
5.4. 绑定包装pojo
5.4.1. 需求
使用包装的pojo接收商品信息的查询条件。
5.4.2. 需求分析
包装对象定义如下:
public class QueryVo {
    private Items item;

    public Items getItem() {
        return item;
    }

    public void setItem(Items item) {
        this.item = item;
    }
}
5.4.3. ItemController.java
5.4.4. 修改editItem.jsp
5.5. 自定义参数绑定
5.5.1. 需求
在商品修改页面可以修改商品的生产日期,并且根据业务需求自定义日期格式。
5.5.2. 需求分析
由于日期数据有很多种格式,springmvc没办法把字符串转换成日期类型。所以需要自定义参数绑定。
前端控制器接收到请求后,找到注解形式的处理器适配器,对RequestMapping标记的方法进行适配,并对方法中的形参进行参数绑定。可以在springmvc处理器适配器上自定义转换器Converter进行参数绑定。
一般使用<mvc:annotation-driven/>注解驱动加载处理器适配器,可以在此标签上进行配置。
5.5.3. 修改editItem.jsp
释放以下代码,去掉注释。

5.5.4.新建 DateConverter.java
package cn.itcast.ssm.converter;

import java.text.ParseException;
import java.text.SimpleDateFormat;
import java.util.Date;

import org.springframework.core.convert.converter.Converter;

//Converter<S, T>
//S:source,需要转换的源的类型
//T:target,需要转换的目标类型
public class DateConverter implements Converter<String,Date> {
    @Override
    public Date convert(String source) {
        SimpleDateFormat simpleDateFormat = new SimpleDateFormat("yyyy.MM.dd HH:mm:ss");
        try {
            Date date=simpleDateFormat.parse(source);
            return date;
        } catch (ParseException e) {
            // TODO Auto-generated catch block
            e.printStackTrace();
        }
        return null;
    }
}
5.5.5.配置springmvc.xml
    <!-- 注解驱动 -->
    <mvc:annotation-driven conversion-service="conversionService"/>

    <!-- 转换器配置 -->
    <bean id="conversionService" class="org.springframework.format.support.FormattingConversionServiceFactoryBean">
        <property name="converters">
            <set>
                <bean class="cn.itcast.ssm.converter.DateConverter"></bean>
            </set>
        </property>
    </bean>
6. springmvc与struts2不同
1、 springmvc的入口是一个servlet即前端控制器,而struts2入口是一个filter过滤器。
2、 springmvc是基于方法开发(一个url对应一个方法),请求参数传递到方法的形参,可以设计为单例或多例(建议单例),struts2是基于类开发,传递参数是通过类的属性,只能设计为多例。
3、 Struts采用值栈存储请求和响应的数据,通过OGNL存取数据, springmvc通过参数解析器是将request请求内容解析,并给方法形参赋值,将数据和视图封装成ModelAndView对象,最后又将ModelAndView中的模型数据通过request域传输到页面。Jsp视图解析器默认使用jstl。
