
第五章 SpringBoot WEB开发
1. SpringMVC自动配置概览
Spring Boot provides auto-configuration for Spring MVC that works well with most applications.(大多场景我们都无需自定义配置)
The auto-configuration adds the following features on top of Spring’s defaults:
-
Inclusion of
ContentNegotiatingViewResolverandBeanNameViewResolverbeans.- 内容协商视图解析器和BeanName视图解析器
-
Support for serving static resources, including support for WebJars (covered later in this document)).
- 静态资源(包括webjars)
-
Automatic registration of
Converter,GenericConverter, andFormatterbeans.- 自动注册
Converter,GenericConverter,Formatter
- 自动注册
-
Support for
HttpMessageConverters(covered later in this document).- 支持
HttpMessageConverters(后续我们配合内容协商理解原理)
- 支持
-
Automatic registration of
MessageCodesResolver(covered later in this document).- 自动注册
MessageCodesResolver(国际化用)
- 自动注册
-
Static
index.htmlsupport.- 静态index.html 页支持
-
Custom
Faviconsupport (covered later in this document).- 自定义
Favicon
- 自定义
-
Automatic use of a
ConfigurableWebBindingInitializerbean (covered later in this document).- 自动使用
ConfigurableWebBindingInitializer,(DataBinder负责将请求数据绑定到JavaBean上)
- 自动使用
If you want to keep those Spring Boot MVC customizations and make more MVC customizations (interceptors, formatters, view controllers, and other features), you can add your own
@Configurationclass of typeWebMvcConfigurerbut without@EnableWebMvc.不用@EnableWebMvc注解。使用
**@Configuration**+**WebMvcConfigurer**自定义规则
If you want to provide custom instances of
RequestMappingHandlerMapping,RequestMappingHandlerAdapter, orExceptionHandlerExceptionResolver, and still keep the Spring Boot MVC customizations, you can declare a bean of typeWebMvcRegistrationsand use it to provide custom instances of those components.声明
**WebMvcRegistrations**改变默认底层组件
f you want to take complete control of Spring MVC, you can add your own
@Configurationannotated with@EnableWebMvc, or alternatively add your own@Configuration-annotatedDelegatingWebMvcConfigurationas described in the Javadoc of@EnableWebMvc.使用
**@EnableWebMvc+@Configuration+DelegatingWebMvcConfiguration 全面接管SpringMVC**
2. 简单功能分析
2.1 静态资源访问
1、静态资源目录
只要静态资源放在类路径下: called /static or /public or /resources or /META-INF/resources。
访问 : 当前项目根路径/ + 静态资源名 。
原理: 静态映射/**。
请求进来,先去找Controller看能不能处理。不能处理的所有请求又都交给静态资源处理器。静态资源也找不到则响应404页面。
改变默认的静态资源路径:
spring:
  mvc:
    static-path-pattern: /res/**

  resources:
    static-locations: [classpath:/newpath/]
2、静态资源访问前缀
默认无前缀
spring:
  mvc:
    static-path-pattern: /res/**
当前项目 + static-path-pattern + 静态资源名 = 静态资源文件夹下找。
3、webjar
自动映射 /webjars/**
https://www.webjars.org/
<dependency>
    <groupId>org.webjars</groupId>
    <artifactId>jquery</artifactId>
    <version>3.5.1</version>
</dependency>
访问地址:http://localhost:8080/webjars/jquery/3.5.1/jquery.js 后面地址要按照依赖里面的包路径。
2.2 欢迎页支持
-
静态资源路径下 index.html
- 可以配置静态资源路径
- 但是不可以配置静态资源的访问前缀。否则导致 index.html不能被默认访问
spring: # mvc: # static-path-pattern: /res/** 这个会导致welcome page功能失效 resources: static-locations: [classpath:/haha/] -
controller能处理/index
2.3 自定义Favicon
favicon.ico 放在静态资源目录下即可。
spring:
#  mvc:
#    static-path-pattern: /res/**   这个会导致 Favicon 功能失效
2.4 静态资源配置原理
-
SpringBoot启动默认加载 xxxAutoConfiguration 类(自动配置类)
-
SpringMVC功能的自动配置类 WebMvcAutoConfiguration 生效
@Configuration(proxyBeanMethods = false) @ConditionalOnWebApplication(type = Type.SERVLET) @ConditionalOnClass({ Servlet.class, DispatcherServlet.class, WebMvcConfigurer.class }) @ConditionalOnMissingBean(WebMvcConfigurationSupport.class) @AutoConfigureOrder(Ordered.HIGHEST_PRECEDENCE + 10) @AutoConfigureAfter({ DispatcherServletAutoConfiguration.class, TaskExecutionAutoConfiguration.class, ValidationAutoConfiguration.class }) public class WebMvcAutoConfiguration {} -
给容器中添加配置类
@Configuration(proxyBeanMethods = false) @Import(EnableWebMvcConfiguration.class) @EnableConfigurationProperties({ WebMvcProperties.class, ResourceProperties.class }) @Order(0) public static class WebMvcAutoConfigurationAdapter implements WebMvcConfigurer {} -
配置文件的相关属性和xxx进行了绑定。WebMvcProperties-->spring.mvc、ResourceProperties-->spring.resources
2.4.1 配置类只有一个有参构造器
如果类只提供了一个带参数的构造方法,则不需要对对其内部的属性写 @Autowired 注解,Spring 会自动为你注入属性。
//有参构造器所有参数的值都会从容器中确定
//ResourceProperties resourceProperties;获取和spring.resources绑定的所有的值的对象
//WebMvcProperties mvcProperties 获取和spring.mvc绑定的所有的值的对象
//ListableBeanFactory beanFactory Spring的beanFactory
//HttpMessageConverters 找到所有的HttpMessageConverters
//ResourceHandlerRegistrationCustomizer 找到资源处理器的自定义器
//DispatcherServletPath
//ServletRegistrationBean   给应用注册Servlet、Filter....
public WebMvcAutoConfigurationAdapter(ResourceProperties resourceProperties, WebMvcProperties mvcProperties,
			ListableBeanFactory beanFactory, ObjectProvider<HttpMessageConverters> messageConvertersProvider,
			ObjectProvider<ResourceHandlerRegistrationCustomizer> resourceHandlerRegistrationCustomizerProvider,
			ObjectProvider<DispatcherServletPath> dispatcherServletPath,
			ObjectProvider<ServletRegistrationBean<?>> servletRegistrations) {
		this.resourceProperties = resourceProperties;
		this.mvcProperties = mvcProperties;
		this.beanFactory = beanFactory;
		this.messageConvertersProvider = messageConvertersProvider;
		this.resourceHandlerRegistrationCustomizer = resourceHandlerRegistrationCustomizerProvider.getIfAvailable();
		this.dispatcherServletPath = dispatcherServletPath;
		this.servletRegistrations = servletRegistrations;
}
2.4.2 资源处理的默认规则
@Override
public void addResourceHandlers(ResourceHandlerRegistry registry) {
    if (!this.resourceProperties.isAddMappings()) {
        logger.debug("Default resource handling disabled");
        return;
    }
    Duration cachePeriod = this.resourceProperties.getCache().getPeriod();
    CacheControl cacheControl = this.resourceProperties.getCache().getCachecontrol().toHttpCacheControl();
    //webjars的规则
    if (!registry.hasMappingForPattern("/webjars/**")) {
        customizeResourceHandlerRegistration(registry.addResourceHandler("/webjars/**")
                                             .addResourceLocations("classpath:/META-INF/resources/webjars/")
                                             .setCachePeriod(getSeconds(cachePeriod)).setCacheControl(cacheControl));
    }

    //
    String staticPathPattern = this.mvcProperties.getStaticPathPattern();
    if (!registry.hasMappingForPattern(staticPathPattern)) {
        customizeResourceHandlerRegistration(registry.addResourceHandler(staticPathPattern)
                                             .addResourceLocations(getResourceLocations(this.resourceProperties.getStaticLocations()))
                                             .setCachePeriod(getSeconds(cachePeriod)).setCacheControl(cacheControl));
    }
}
spring:
#  mvc:
#    static-path-pattern: /res/**

  resources:
    add-mappings: false   禁用所有静态资源规则
@ConfigurationProperties(prefix = "spring.resources", ignoreUnknownFields = false)
public class ResourceProperties {

	private static final String[] CLASSPATH_RESOURCE_LOCATIONS = { "classpath:/META-INF/resources/",
			"classpath:/resources/", "classpath:/static/", "classpath:/public/" };

	/**
	 * Locations of static resources. Defaults to classpath:[/META-INF/resources/,
	 * /resources/, /static/, /public/].
	 */
	private String[] staticLocations = CLASSPATH_RESOURCE_LOCATIONS;
2.4.2 欢迎页的处理规则
HandlerMapping:处理器映射。保存了每一个Handler能处理哪些请求。

@Bean
	public WelcomePageHandlerMapping welcomePageHandlerMapping(ApplicationContext applicationContext,
			FormattingConversionService mvcConversionService, ResourceUrlProvider mvcResourceUrlProvider) {
		WelcomePageHandlerMapping welcomePageHandlerMapping = new WelcomePageHandlerMapping(
				new TemplateAvailabilityProviders(applicationContext), applicationContext, getWelcomePage(),
				this.mvcProperties.getStaticPathPattern());
		welcomePageHandlerMapping.setInterceptors(getInterceptors(mvcConversionService, mvcResourceUrlProvider));
		welcomePageHandlerMapping.setCorsConfigurations(getCorsConfigurations());
		return welcomePageHandlerMapping;
	}

WelcomePageHandlerMapping(TemplateAvailabilityProviders templateAvailabilityProviders,
		ApplicationContext applicationContext, Optional<Resource> welcomePage, String staticPathPattern) {
	if (welcomePage.isPresent() && "/**".equals(staticPathPattern)) {
		//要用欢迎页功能,必须是/**
		logger.info("Adding welcome page: " + welcomePage.get());
		setRootViewName("forward:index.html");
	}
	else if (welcomeTemplateExists(templateAvailabilityProviders, applicationContext)) {
		// 调用Controller  /index
		logger.info("Adding welcome page template: index");
		setRootViewName("index");
	}
}
2.4.3 favicon
favicon.ico图标是由浏览器自动发送请求/favicon.ico获取并保存在session域中的。因此,如果我们在配置文件中设置了静态资源访问前缀,那么浏览器发送的/favicon.ico由于不符合访问前缀要求,就会获取不到相对应的图标了(图标也是静态资源的一种)。
3. 请求参数映射处理
3.1 请求映射
3.1.1 REST使用与原理
-
@GetMapping();@PostMapping();@PutMapping();@DeleteMapping();@PatchMapping;(它是对Put的补充,区别是Patch是部分更新,Put是全部更新)
-
REST风格支持(使用HTTP请求动词方式来表示对资源的操作)
-
核心Filter:HiddenHttpMethodFilter---->OrderedHiddenHttpMethodFilter
-
用法:表单只能发送get或post请求,如果想要发送put请求,需要在隐藏域中携带参数_method=put,兼容put/delete/patch,实际发送到后端的仍然是post请求,需要开启HiddenHttpMethodFilter拦截请求,将method转为put/delete/patch。
-
原理:原生request(post),包装模式requestWrapper重写了getMethod方法,返回的是传入的值,过滤器链放行的时候用wrapper,以后的方法调用getMethod是调用requestWrapper的。
-
SpringBoot中手动开启
spring:
  mvc:
    hiddenmethod:
      filter:
        enabled: true # 开启页面表单的REST
-
-
如果用postman等客户端工具则直接发送put、delete请求即可。
-
扩展:如果自定义_method
//自定义filter
@Bean
public HiddenHttpMethodFilter hiddenHttpMethodFilter(){
    HiddenHttpMethodFilter methodFilter = new HiddenHttpMethodFilter();
    methodFilter.setMethodParam("_m");
    return methodFilter;
}
-
3.1.2 请求映射原理
SpringMVC功能分析都从org.springframework.web.servlet.DispatcherServlet-》doDispatch()开始。
protected void doDispatch(HttpServletRequest request, HttpServletResponse response) throws Exception {
		HttpServletRequest processedRequest = request;
		HandlerExecutionChain mappedHandler = null;
		boolean multipartRequestParsed = false;

		WebAsyncManager asyncManager = WebAsyncUtils.getAsyncManager(request);

		try {
			ModelAndView mv = null;
			Exception dispatchException = null;

			try {
				processedRequest = checkMultipart(request);
				multipartRequestParsed = (processedRequest != request);

				// 找到当前请求使用哪个Handler(Controller的方法)处理
				mappedHandler = getHandler(processedRequest);

                //HandlerMapping:处理器映射。/xxx->>xxxx
RequestMappingHandlerMapping:保存了所有@RequestMapping和handler的映射规则。
所有的请求映射都在HandlerMapping中,把一个URL指定到一个Controller上。
-
SpringBoot自动配置欢迎页的 WelcomePageHandlerMapping 。访问 /能访问到index.html
-
SpringBoot自动配置了默认 的 RequestMappingHandlerMapping
-
请求进来,挨个尝试所有的HandlerMapping看是否有请求信息
- 如果有就找到这个请求对应的handler
- 如果没有就是下一个 HandlerMapping
-
我们需要一些自定义的映射处理,我们也可以自己给容器中放HandlerMapping,自定义 HandlerMapping
protected HandlerExecutionChain getHandler(HttpServletRequest request) throws Exception {
    if (this.handlerMappings != null) {
        for (HandlerMapping mapping : this.handlerMappings) {
            HandlerExecutionChain handler = mapping.getHandler(request);
            if (handler != null) {
                return handler;
            }
        }
    }
    return null;
}
3.2 普通参数与基本注解
3.2.1 注解使用
@PathVariable 路径变量
@RequestHeader 获取请求头
@RequestParam 获取请求参数, key-value键值对
@CookieValue 获取cookie值
@RequestAttribute 获取request域属性
@RequestBody 获取请求体
@MatrixVariable 矩阵变量
@ModelAttribute 获取Model域属性
@RequestPart 处理content-type为 multipart/form-data 或 multipart/mixed stream 发起的请求,可以获取请求中的参数,包括普通文本、文件或复杂对象比如json、xml等
@RestController
public class ParameterTestController {
    //  car/2/owner/zhangsan
    @GetMapping("/car/{id}/owner/{username}")
    public Map<String,Object> getCar(@PathVariable("id") Integer id,
                                     @PathVariable("username") String name,
                                     @PathVariable Map<String,String> pv,
                                     @RequestHeader("User-Agent") String userAgent,
                                     @RequestHeader Map<String,String> header,
                                     @RequestParam("age") Integer age,
                                     @RequestParam("inters") List<String> inters,
                                     @RequestParam Map<String,String> params,
                                     @CookieValue("_ga") String _ga,
                                     @CookieValue("_ga") Cookie cookie){


        Map<String,Object> map = new HashMap<>();

//        map.put("id",id);
//        map.put("name",name);
//        map.put("pv",pv);
//        map.put("userAgent",userAgent);
//        map.put("headers",header);

        map.put("age",age);
        map.put("inters",inters);
        map.put("params",params);
        map.put("_ga",_ga);

        System.out.println(cookie.getName()+"===>"+cookie.getValue());

        return map;
    }


    @PostMapping("/save")
    public Map postMethod(@RequestBody String content){
        Map<String,Object> map = new HashMap<>();
        map.put("content",content);
        return map;
    }


    //1、语法: 请求路径:/cars/sell;low=34;brand=byd,audi,yd
    //2、SpringBoot默认是禁用了矩阵变量的功能
    //      手动开启:原理。对于路径的处理。UrlPathHelper进行解析。
    //              removeSemicolonContent(移除分号内容)支持矩阵变量的
    //3、矩阵变量必须有url路径变量才能被解析
    @GetMapping("/cars/{path}")
    public Map carsSell(@MatrixVariable("low") Integer low,
                        @MatrixVariable("brand") List<String> brand,
                        @PathVariable("path") String path){
        Map<String,Object> map = new HashMap<>();

        map.put("low",low);
        map.put("brand",brand);
        map.put("path",path);

        return map;
    }

    // /boss/1;age=20/2;age=10
    @GetMapping("/boss/{bossId}/{empId}")
    public Map boss(@MatrixVariable(value = "age",pathVar = "bossId") Integer bossAge,
                    @MatrixVariable(value = "age",pathVar = "empId") Integer empAge){
        Map<String,Object> map = new HashMap<>();

        map.put("bossAge",bossAge);
        map.put("empAge",empAge);
        return map;
    }
}
-
查询风格
-
/cars/{path} REST风格
-
/cars/{path}?xxx=xxx&aaa=ccc 查询字符串
-
/cars/{path;low=34;brand=byd,audi,yd} 矩阵变量
-
3.2.2 Servlet API
WebRequest、ServletRequest、MultipartRequest、 HttpSession、javax.servlet.http.PushBuilder、Principal、InputStream、Reader、HttpMethod、Locale、TimeZone、ZoneId
ServletRequestMethodArgumentResolver
@Override
public boolean supportsParameter(MethodParameter parameter) {
    Class<?> paramType = parameter.getParameterType();
    return (WebRequest.class.isAssignableFrom(paramType) ||
            ServletRequest.class.isAssignableFrom(paramType) ||
            MultipartRequest.class.isAssignableFrom(paramType) ||
            HttpSession.class.isAssignableFrom(paramType) ||
            (pushBuilder != null && pushBuilder.isAssignableFrom(paramType)) ||
            Principal.class.isAssignableFrom(paramType) ||
            InputStream.class.isAssignableFrom(paramType) ||
            Reader.class.isAssignableFrom(paramType) ||
            HttpMethod.class == paramType ||
            Locale.class == paramType ||
            TimeZone.class == paramType ||
            ZoneId.class == paramType);
}
3.2.3 复杂参数
Map、Model(map、model里面的数据会被放在request的请求域 request.setAttribute)、Errors/BindingResult、RedirectAttributes( 重定向携带数据)、ServletResponse(response)、SessionStatus、UriComponentsBuilder、ServletUriComponentsBuilder
Map<String,Object> map,  Model model, HttpServletRequest request 都是可以给request域中放数据,
request.getAttribute();
Map、Model类型的参数,会返回 mavContainer.getModel();---> BindingAwareModelMap 是Model 也是Map
mavContainer.getModel(); 获取到值的
Map和Model的底层都是同一个对象
3.2.4 自定义对象参数
可以自动类型转换与格式化,可以级联封装。
3.3 POJO封装过程
ServletModelAttributeMethodProcessor
3.4 参数处理原理
- HandlerMapping中找到能处理请求的Handler(Controller.method())
- 为当前Handler 找一个适配器 HandlerAdapter;例如 RequestMappingHandlerAdapter
- 适配器执行目标方法并确定方法参数的每一个值
3.4.1 HandlerAdapter

RequestMappingHandlerAdapter支持方法上标注@RequestMapping
3.4.2 执行目标方法
3.4.3 参数解析器
确定将要执行的目标方法的每一个参数的值是什么
SpringMVC目标方法能写多少种参数类型。取决于参数解析器
- 当前解析器是否支持解析这种参数
- 支持就调用 resolveArgument
3.4.4 返回值处理器
3.4.5 如何确定目标方法每一个参数的值
-
挨个判断所有参数解析器那个支持解析这个参数
-
解析这个参数的值
调用各自 HandlerMethodArgumentResolver 的 resolveArgument 方法即可 -
自定义类型参数 封装POJO
-
目标方法执行完成
将所有的数据都放在 ModelAndViewContainer;包含要去的页面地址View。还包含Model数据。
-
处理派发结果
processDispatchResult(processedRequest, response, mappedHandler, mv, dispatchException);

renderMergedOutputModel(mergedModel, getRequestToExpose(request), response);
4 数据响应与内容协商
待完善...
4.1 响应JSON
4.2 内容协商
5 视图解析与模板引擎
待完善...
5.1 视图解析
5.2 模板引擎-Thymeleaf
5.3 thymeleaf使用
5.4 构建后台管理系统
6 拦截器
6.1 实现HandlerInterceptor 接口
/**
 * 登录检查
 * 1、配置好拦截器要拦截哪些请求
 * 2、把这些配置注入到容器中
 */
@Slf4j
public class LoginInterceptor implements HandlerInterceptor {

    /**
     * 目标方法执行之前
     * @param request
     * @param response
     * @param handler
     * @return
     * @throws Exception
     */
    @Override
    public boolean preHandle(HttpServletRequest request, HttpServletResponse response, Object handler) throws Exception {

        String requestURI = request.getRequestURI();
        log.info("preHandle拦截的请求路径是{}",requestURI);

        //登录检查逻辑
        HttpSession session = request.getSession();

        Object loginUser = session.getAttribute("loginUser");

        if(loginUser != null){
            //放行
            return true;
        }

        //拦截住未登录的请求,跳转到登录页
        request.setAttribute("msg","请先登录");
		//re.sendRedirect("/");
        request.getRequestDispatcher("/").forward(request,response);
        return false;
    }

    /**
     * 目标方法执行完成以后
     * @param request
     * @param response
     * @param handler
     * @param modelAndView
     * @throws Exception
     */
    @Override
    public void postHandle(HttpServletRequest request, HttpServletResponse response, Object handler, ModelAndView modelAndView) throws Exception {
        log.info("postHandle执行{}",modelAndView);
    }

    /**
     * 页面渲染以后
     * @param request
     * @param response
     * @param handler
     * @param ex
     * @throws Exception
     */
    @Override
    public void afterCompletion(HttpServletRequest request, HttpServletResponse response, Object handler, Exception ex) throws Exception {
        log.info("afterCompletion执行异常{}",ex);
    }
}
6.2 配置拦截器
/**
 * 1、编写一个拦截器实现HandlerInterceptor接口
 * 2、拦截器注册到容器中(实现WebMvcConfigurer的addInterceptors)
 * 3、指定拦截规则【如果是拦截所有,静态资源也会被拦截】
 */
@Configuration
public class AdminWebConfig implements WebMvcConfigurer {

    @Override
    public void addInterceptors(InterceptorRegistry registry) {
        registry.addInterceptor(new LoginInterceptor())
                .addPathPatterns("/**")  //所有请求都被拦截包括静态资源
                .excludePathPatterns("/","/login","/css/**","/fonts/**","/images/**","/js/**"); //放行的请求
    }
}
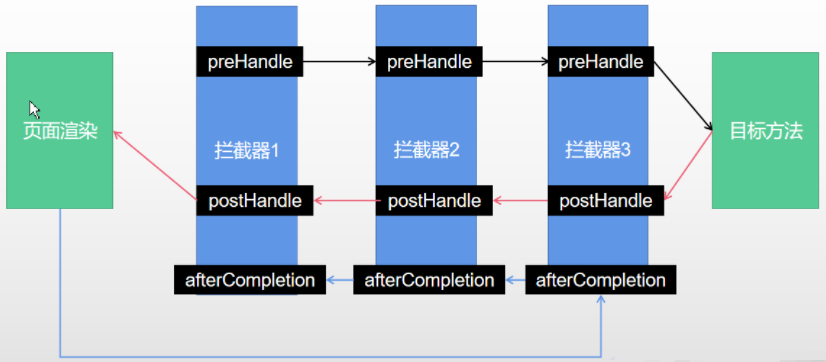
6.3 拦截器原理
1、根据当前请求,找到HandlerExecutionChain【可以处理请求的handler以及handler的所有拦截器】
2、先来顺序执行所有拦截器的 preHandle方法
1、如果当前拦截器prehandler返回为true。则执行下一个拦截器的preHandle
2、如果当前拦截器返回为false。直接倒序执行所有已经执行了的拦截器的afterCompletion
3、如果任何一个拦截器返回false。直接跳出不执行目标方法
4、所有拦截器都返回True。执行目标方法
5、倒序执行所有拦截器的postHandle方法
6、前面的步骤有任何异常都会直接倒序触发afterCompletion
7、页面成功渲染完成以后,也会倒序触发afterCompletion
7 文件上传
7.1 页面表单
<form method="post" action="/upload" enctype="multipart/form-data">
    <input type="file" name="file"><br>
    <input type="submit" value="提交">
</form>
7.2 文件上传代码
/**
 * MultipartFile 自动封装上传过来的文件
 * @param email
 * @param username
 * @param headerImg
 * @param photos
 * @return
 */
@PostMapping("/upload")
public String upload(@RequestParam("email") String email,
					 @RequestParam("username") String username,
					 @RequestPart("headerImg") MultipartFile headerImg,
					 @RequestPart("photos") MultipartFile[] photos) throws IOException {

	log.info("上传的信息:email={},username={},headerImg={},photos={}",
			email,username,headerImg.getSize(),photos.length);

	if(!headerImg.isEmpty()){
		//保存到文件服务器,OSS服务器
		String originalFilename = headerImg.getOriginalFilename();
		headerImg.transferTo(new File("H:\\cache\\"+originalFilename));
	}

	if(photos.length > 0){
		for (MultipartFile photo : photos) {
			if(!photo.isEmpty()){
				String originalFilename = photo.getOriginalFilename();
				photo.transferTo(new File("H:\\cache\\"+originalFilename));
			}
		}
	}

	return "main";
}
7.3 自动配置原理
文件上传自动配置类-MultipartAutoConfiguration-MultipartProperties
自动配置好了 StandardServletMultipartResolver 【文件上传解析器】
原理步骤
-
1、请求进来使用文件上传解析器判断(isMultipart)并封装(resolveMultipart,返回MultipartHttpServletRequest)文件上传请求
-
2、参数解析器来解析请求中的文件内容封装成MultipartFile
-
3、将request中文件信息封装为一个Map;MultiValueMap<String, MultipartFile>
FileCopyUtils:实现文件流的拷贝
@PostMapping("/upload")
public String upload(@RequestParam("email") String email,
                     @RequestParam("username") String username,
                     @RequestPart("headerImg") MultipartFile headerImg,
                     @RequestPart("photos") MultipartFile[] photos)
8 异常处理
8.1 默认规则
- 默认情况下,Spring Boot提供/error处理所有错误的映射
- 对于机器客户端,它将生成JSON响应,其中包含错误,HTTP状态和异常消息的详细信息。对于浏览器客户端,响应一个“ whitelabel”错误视图,以HTML格式呈现相同的数据
- 要对其进行自定义,添加View解析error
- 要完全替换默认行为,可以实现 ErrorController 并注册该类型的Bean定义,或添加ErrorAttributes类型的组件以使用现有机制但替换其内容
- public或template下的error/下的4xx,5xx页面会被自动解析
8.2 定制错误处理逻辑
-
自定义错误页
error/404.html error/5xx.html;有精确的错误状态码页面就匹配精确,没有就找 4xx.html;如果都没有就触发白页
-
@ControllerAdvice+@ExceptionHandler处理全局异常;底层是ExceptionHandlerExceptionResolver支持的
-
@ResponseStatus+自定义异常 ;底层是 ResponseStatusExceptionResolver ,把responsestatus注解的信息底层调用 response.sendError(statusCode, resolvedReason);tomcat发送的/error
-
Spring底层的异常,如 参数类型转换异常;DefaultHandlerExceptionResolver 处理框架底层的异常
response.sendError(HttpServletResponse.SC_BAD_REQUEST, ex.getMessage())
-
自定义实现 HandlerExceptionResolver 处理异常;可以作为默认的全局异常处理规则
-
ErrorViewResolver 实现自定义处理异常
- response.sendError,error请求就会转给controller
- 你的异常没有任何人能处理,tomcat底层 response.sendError,error请求就会转给controller
- basicErrorController要去的页面地址是ErrorViewResolver
8.3 异常处理自动配置原理
ErrorMvcAutoConfiguration 自动配置异常处理规则
8.4 异常处理步骤
1、执行目标方法,目标方法运行期间有任何异常都会被catch、标志当前请求结束,并且用dispatchException
2、进入视图解析流程
processDispatchResult(processedRequest, response, mappedHandler, mv, dispatchException);
3、mv = processHandlerException;处理handler发生的异常,处理完成返回ModelAndView
1、遍历所有的 handlerExceptionResolvers,看谁能处理当前异常(HandlerExceptionResolver处理器异常解析器)
2、系统默认的异常解析器DefaultErrorAttributes,把异常信息保存到rrequest域,并且返回null
3、默认没有任何人能处理异常,所以异常会被抛出
4、如果没有任何人能处理最终底层就会发送 /error 请求。会被底层的BasicErrorController处理
5、解析错误视图,遍历所有的  ErrorViewResolver  看谁能解析
6、默认的 DefaultErrorViewResolver ,作用是把响应状态码作为错误页的地址,error/500.html
7、模板引擎最终响应这个页面 error/500.html
9 Web原生组件注入(Servlet、Filter、Listener)
9.1 使用Servlet API
推荐这种方式。
@ServletComponentScan(basePackages = "com") :指定原生Servlet组件都放在那里
@WebServlet(urlPatterns = "/my"):效果:直接响应,没有经过Spring的拦截器
@WebFilter(urlPatterns={"/css/*","/images/*"})
@WebListener
扩展:DispatchServlet 如何注册进来
- 容器中自动配置了 DispatcherServlet 属性绑定到 WebMvcProperties;对应的配置文件配置项是 spring.mvc
- 通过ServletRegistrationBean
把DispatcherServlet 配置进来。 - 默认映射的是 / 路径。
Tomcat-Servlet
多个Servlet都能处理到同一层路径时,精确匹配优先原则
9.2 使用RegistrationBean
ServletRegistrationBean, FilterRegistrationBean, and ServletListenerRegistrationBean
@Configuration
public class MyRegistConfig {

    @Bean
    public ServletRegistrationBean myServlet(){
        MyServlet myServlet = new MyServlet();

        return new ServletRegistrationBean(myServlet,"/my","/my02");
    }


    @Bean
    public FilterRegistrationBean myFilter(){

        MyFilter myFilter = new MyFilter();
        // return new FilterRegistrationBean(myFilter,myServlet());
        FilterRegistrationBean filterRegistrationBean = new FilterRegistrationBean(myFilter);
        filterRegistrationBean.setUrlPatterns(Arrays.asList("/my","/css/*"));
        return filterRegistrationBean;
    }

    @Bean
    public ServletListenerRegistrationBean myListener(){
        MySwervletContextListener mySwervletContextListener = new MySwervletContextListener();
        return new ServletListenerRegistrationBean(mySwervletContextListener);
    }
}
10 嵌入式Servlet容器
10.1 切换嵌入式Servlet容器
-
默认支持的webServer
Tomcat,Jetty, orUndertowServletWebServerApplicationContext 容器启动寻找ServletWebServerFactory 并引导创建服务器
-
切换服务器
<dependency>
    <groupId>org.springframework.boot</groupId>
    <artifactId>spring-boot-starter-web</artifactId>
    <exclusions>
        <exclusion>
            <groupId>org.springframework.boot</groupId>
            <artifactId>spring-boot-starter-tomcat</artifactId>
        </exclusion>
    </exclusions>
</dependency>
-
原理
-
SpringBoot应用启动发现当前是Web应用。web场景包-导入tomcat
-
web应用会创建一个web版的ioc容器
ServletWebServerApplicationContext -
ServletWebServerApplicationContext启动的时候寻找**ServletWebServerFactory**``(Servlet 的web服务器工厂---> Servlet 的web服务器) -
SpringBoot底层默认有很多的WebServer工厂;
TomcatServletWebServerFactory,JettyServletWebServerFactory, orUndertowServletWebServerFactory -
底层直接会有一个自动配置类。ServletWebServerFactoryAutoConfiguration -
ServletWebServerFactoryAutoConfiguration导入了ServletWebServerFactoryConfiguration(配置类) -
ServletWebServerFactoryConfiguration 配置类 根据动态判断系统中到底导入了那个Web服务器的包。(默认是web-starter导入tomcat包),容器中就有 TomcatServletWebServerFactory -
TomcatServletWebServerFactory 创建出Tomcat服务器并启动;TomcatWebServer 的构造器拥有初始化方法initialize---this.tomcat.start(); -
内嵌服务器,就是手动把启动服务器的代码调用(tomcat核心jar包存在)
-
10.2 定制Servlet容器
-
实现 WebServerFactoryCustomizer
- 把配置文件的值和
ServletWebServerFactory进行绑定
- 把配置文件的值和
-
修改配置文件 server.xx
-
直接自定义 ConfigurableServletWebServerFactory
xxxxCustomizer:定制化器,可以改变xxxx的默认规则
import org.springframework.boot.web.server.WebServerFactoryCustomizer;
import org.springframework.boot.web.servlet.server.ConfigurableServletWebServerFactory;
import org.springframework.stereotype.Component;

@Component
public class CustomizationBean implements WebServerFactoryCustomizer<ConfigurableServletWebServerFactory> {

    @Override
    public void customize(ConfigurableServletWebServerFactory server) {
        server.setPort(9000);
    }

}
11 定制化原理
11.1 定制化的常见方式
- 修改配置文件
- xxxxxCustomizer
- 编写自定义的配置类xxxConfiguration + @Bean替换、增加容器中默认组件
- Web应用编写一个配置类实现 WebMvcConfigurer即可定制化web功能 + @Bean给容器中再扩展一些组件
@Configuration
public class AdminWebConfig implements WebMvcConfigurer
-
@EnableWebMvc + WebMvcConfigurer @Bean 可以全面接管SpringMVC,所有规则全部自己重新配置; 实现定制和扩展功能
原理如下:
-
1、WebMvcAutoConfiguration 默认的SpringMVC的自动配置功能类,静态资源、欢迎页.....
-
2、一旦使用 @EnableWebMvc,会 @Import(DelegatingWebMvcConfiguration.class)
-
3、DelegatingWebMvcConfiguration的作用,只保证SpringMVC最基本的使用
-
把所有系统中的 WebMvcConfigurer 拿过来。所有功能的定制都是这些WebMvcConfigurer合起来一起生效
-
自动配置了一些非常底层的组件。RequestMappingHandlerMapping,这些依赖的组件都是从容器中获取
-
public class DelegatingWebMvcConfiguration extends WebMvcConfigurationSupport
-
-
4、WebMvcAutoConfiguration 里面的配置要能生效必须@ConditionalOnMissingBean(WebMvcConfigurationSupport.class)
-
5、@EnableWebMvc 导致了WebMvcAutoConfiguration没有生效**
-
11.2 原理分析套路
场景starter - xxxxAutoConfiguration - 导入xxx组件 - 绑定xxxProperties - 绑定配置文件项


【推荐】国内首个AI IDE,深度理解中文开发场景,立即下载体验Trae
【推荐】编程新体验,更懂你的AI,立即体验豆包MarsCode编程助手
【推荐】抖音旗下AI助手豆包,你的智能百科全书,全免费不限次数
【推荐】轻量又高性能的 SSH 工具 IShell:AI 加持,快人一步
· Ollama——大语言模型本地部署的极速利器
· 使用C#创建一个MCP客户端
· 分享一个免费、快速、无限量使用的满血 DeepSeek R1 模型,支持深度思考和联网搜索!
· ollama系列1:轻松3步本地部署deepseek,普通电脑可用
· 按钮权限的设计及实现