XFire发布Webservice
xfire已经过时,了解一下就OK了,无需过于深究哦
XFire是一种基于Servlet技术的SOA应用开发框架,需要Servlet容器的支持。XFire支持在多种Servlet容器中运行,包括Websphere、Weblogic、TOMCAT等
XFire需要xalan项目的支持,然而1.2.6版本中并没有带有相应的jar文件,因此请访问xml.apache.org,下载xalan项目的二进制包
创建并发布服务器端
1.新建WEB SERVICES PORJECT(创建web服务)

此时查看services.xml内容如下:
创建并发布服务器端
1.新建WEB SERVICES PORJECT(创建web服务)

此时查看services.xml内容如下:
<?xml version="1.0" encoding="UTF-8"?>
<beans xmlns="http://xfire.codehaus.org/config/1.0">
</beans>
<beans xmlns="http://xfire.codehaus.org/config/1.0">
</beans>
2.编写服务器端代码(xfire需要一接口,一实现,而jax-ws只需要一个实现)(实现web服务)
AdderImpL.java代码如下:
package net;
public class AdderImpL implements IAdder {
public double add(double a, double b) {
return a+b;
}
}
public class AdderImpL implements IAdder {
public double add(double a, double b) {
return a+b;
}
}
IAdder.java代码如下:
package net;
public interface IAdder {
public double add(double a ,double b);
}
public interface IAdder {
public double add(double a ,double b);
}
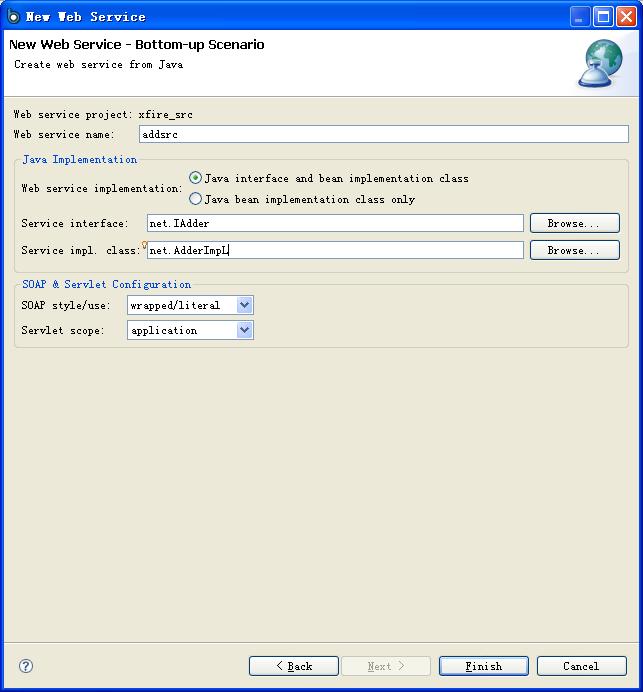
3.点击工具栏的new web services按钮,设置如下。(发布web服务)
点finish后services.xml内容如下:
<?xml version="1.0" encoding="UTF-8"?>
<beans xmlns="http://xfire.codehaus.org/config/1.0">
<service>
<name>addin</name> //服务名称
<serviceClass>net.IAdder</serviceClass>//接口名称
<implementationClass>net.AdderImpL</implementationClass>//实现类名称
<style>wrapped</style>
<use>literal</use>
<scope>application</scope>
</service></beans>
<beans xmlns="http://xfire.codehaus.org/config/1.0">
<service>
<name>addin</name> //服务名称
<serviceClass>net.IAdder</serviceClass>//接口名称
<implementationClass>net.AdderImpL</implementationClass>//实现类名称
<style>wrapped</style>
<use>literal</use>
<scope>application</scope>
</service></beans>
4.启动TOMCAT,测试服务器端(测试web服务)
在浏览启动输入http://localhost:8080/xfire_src/services/addin?wsdl(注意:这个路径和jax-ws的区别)如果xml能正确显示,证明一切OK!
编写客户器端
1.新建WEB SERVICES PORJECT(必须使xfire的工程)
2.new-other-myeclipse-web services-web services client.
3.编写测试类
package net;
public class mrun {
public static void main(String[] args) {
addinClient client=new addinClient();
addinPortType port= client.getaddinHttpPort();
System.out.println(port.add(15, 36));
}
}
public class mrun {
public static void main(String[] args) {
addinClient client=new addinClient();
addinPortType port= client.getaddinHttpPort();
System.out.println(port.add(15, 36));
}
}
ps:无论在服务器端还是客户端,建立的都是xfire的web services project工程,所以在设置的第一个页面都选择xfire,而第二个页面则可以根据需求制定services.xml的名称和路径,还有何以配置插入到web.xml的内容(一般按照默认设置),最后一个页面可以根据需求选择引入不同的包。


