C#控件重绘学习(一)
由于要做一个工控软件,传统的控件显然已经不能满足实际的要求了,所以控件的重绘迫在眉睫。由于考研耽误了很多时间,C#的学习也搁浅了很长一段时间了,所以趁这个机会,我打算把控件的重绘认真的学习透彻。
好了,控件的重绘,让我们从普通按钮开始吧!
先刨一下Button的老底:
命名空间: System.Windows.Forms
程序集: System.Windows.Forms(在 System.Windows.Forms.dll 中)
Button的属性就太多了:比如BackColor、Font等等。我们要做的就是修改他的这些属性。
我们先自定义一个类,继承自System.Windows.Forms.Button
1: using System.Drawing;
2:
3: namespace WindowsFormsApplication1
4: {
5: class MyButton:System.Windows.Forms.Button
6: {
7: public MyButton()
8: {
9: BackColor = Color.Blue;
10: ForeColor = Color.White;
11: FlatStyle = System.Windows.Forms.FlatStyle.Flat;
12: Font = System.Windows.Forms.Control.DefaultFont;
13: UseWaitCursor = true;
14: }
15: }
16: }
然后呢:在窗体中随便拖入一个Button,并且改写窗体源文件Form1.Designer.cs,将源文件中的System.Windows.Forms.Button();改为MyButton();
1: namespace WindowsFormsApplication1
2: {
3: partial class Form1
4: {
5: /// <summary>
6: /// 必需的设计器变量。
7: /// </summary>
8: private System.ComponentModel.IContainer components = null;
9:
10: /// <summary>
11: /// 清理所有正在使用的资源。
12: /// </summary>
13: /// <param name="disposing">如果应释放托管资源,为 true;否则为 false。</param>
14: protected override void Dispose(bool disposing)
15: {
16: if (disposing && (components != null))
17: {
18: components.Dispose();
19: }
20: base.Dispose(disposing);
21: }
22:
23: #region Windows 窗体设计器生成的代码
24:
25: /// <summary>
26: /// 设计器支持所需的方法 - 不要
27: /// 使用代码编辑器修改此方法的内容。
28: /// </summary>
29: private void InitializeComponent()
30: {
31: this.button1 = new MyButton();
32: this.SuspendLayout();
33: //
34: // button1
35: //
36: this.button1.Location = new System.Drawing.Point(12, 12);
37: this.button1.Name = "button1";
38: this.button1.Size = new System.Drawing.Size(75, 23);
39: this.button1.TabIndex = 0;
40: this.button1.Text = "button1";
41: this.button1.UseVisualStyleBackColor = true;
42: //
43: // Form1
44: //
45: this.AutoScaleDimensions = new System.Drawing.SizeF(6F, 12F);
46: this.AutoScaleMode = System.Windows.Forms.AutoScaleMode.Font;
47: this.ClientSize = new System.Drawing.Size(284, 261);
48: this.Controls.Add(this.button1);
49: this.Name = "Form1";
50: this.Text = "Form1";
51: this.ResumeLayout(false);
52:
53: }
54:
55: #endregion
56:
57: private MyButton button1;
58: }
59: }
60:
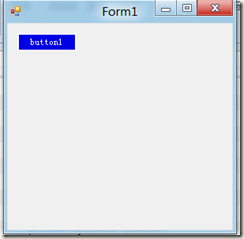
运行之后效果如下:
来源于http://www.cnblogs.com/humaoxiao,转载请注明出处。


