MongoDB笔记03——分片集群
MongoDB分片集群配置
目录
一、MongoDB分片简述
MongoDB分片是使用多个服务器存储数据的方法,以支持巨大的数据存储和对数据进行操作。分片技术可以满足MongoDB数据量大量增长的需求,当MongoDB单点数据库服务器存储成为瓶颈、单点数据库服务器的性能成为瓶颈或需要部署大型应用以充分利用内存时,可以使用分片技术。
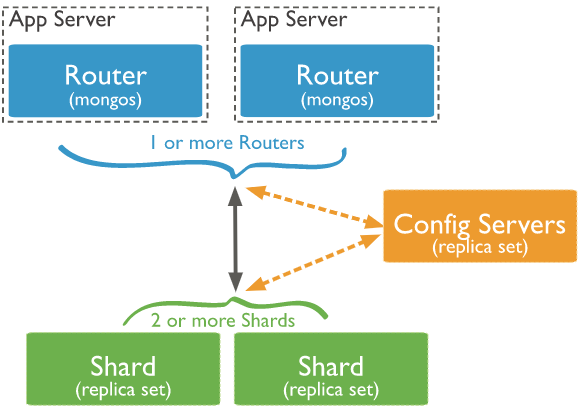
二、分片集群架构
| 组件 | 说明 |
|---|---|
| Config Server | 存储集群所有节点、分片数据路由信息。默认需要配置3个Config Server节点。 |
| Mongos | 提供对外应用访问,路由功能,所有操作均通过mongos执行。一般有多个mongos节点。Mongos本身并不持久化数据。 |
| Mongod | shard,存储应用数据记录。一般有多个Mongod节点,达到数据分片目的。 |

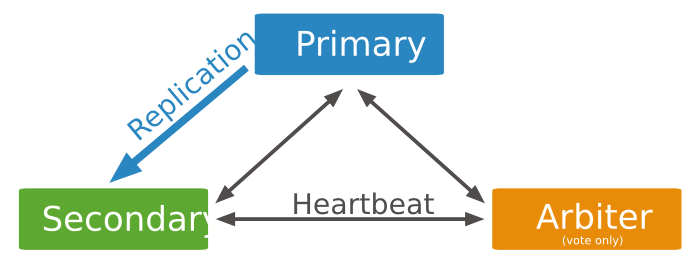
shard的副本集架构

config servers的副本集架构:

二、部署环境准备
CentOS7.6, MongoDB4.2.0
| IP:192.168.1.100 | IP:192.168.1.101 | IP:192.168.1.102 |
|---|---|---|
| mongos(27017) | mongos(27017) | mongos(27017) |
| config(27027) | config(27027) | config(27027) |
| shard1主节点(27037) | shard1副节点(27037) | shard1仲裁节点(27037) |
| shard2主节点(27047) | shard2副节点(27047) | shard2仲裁节点(27047) |
| shard3主节点(27057) | shard3副节点(27057) | shard3仲裁节点(27057) |
测试时,为了测试方便,100、101、102分别都是shard1,shard2,shard3的主节点、副节点、仲裁节点,实际部署应该均匀分配
三、shard集群配置
3.1、shard配置文件
# shard1.conf

systemLog:
  destination: file
  path: /usr/local/mongodb/logs/shard1.log
  logAppend: true
storage:
  dbPath: /usr/local/mongodb/data/shard1
  journal:
     enabled: true
  wiredTiger:
     engineConfig:
       cacheSizeGB: 1
replication:
  replSetName: shard1
sharding:
   clusterRole: shardsvr
net:
  bindIp: 192.168.1.100
  port: 27037
processManagement:
  fork: true
  pidFilePath: /usr/local/mongodb/pid/shard1.pid
security:
  authorization: enabled
  clusterAuthMode: "keyFile"
  keyFile: /usr/local/mongodb/keyfile
shard1.conf在另外两台101,102机器上配置文件基本一致,仅bindIp不同。
shard2.conf,shard3.conf 相比shard1.conf, 主要是replSetName,port,path,dbPath,pidFilePath 配置不同。
副本集认证配置,在上一篇博文已讲过,这里不再重复 MongoDB笔记02——副本集https://www.cnblogs.com/huligong1234/p/12727691.html
3.2、shard副本集初始化
./bin/mongod -f /usr/local/mongodb/shard1.conf

./bin/mongo --host 192.168.1.100 --port 27037 admin

#认证用户配置这里省略,参考副本集认证配置博文

#shard1副本集初始化
rs.initiate(
  {
    _id: "shard1",
    members: [
      {_id:0, host:"192.168.1.100:27037"}
    ]
  }
)
rs.add("192.168.1.101:27037");
rs.addArb("192.168.1.102:27037");
#这里需要注意:shard1,shard2,shard3 的_id和端口号都不相同

#查看状态
rs.isMaster()或rs.status()

#关闭命令
shard1:PRIMARY> db.shutdownServer() 或
./bin/mongod --shutdown -f /usr/local/mongodb/shard1.conf
四、config集群配置
4.1、配置文件
# configServer.conf

systemLog:
  destination: file
  path: /usr/local/mongodb/logs/configServer.log
  logAppend: true
storage:
  dbPath: /usr/local/mongodb/data/configServer
  journal:
     enabled: true
  wiredTiger:
     engineConfig:
       cacheSizeGB: 1
replication:
  replSetName: csReplSet
sharding:
   clusterRole: configsvr
net:
  bindIp: 192.168.1.100
  port: 27027
processManagement:
  fork: true
  pidFilePath: /usr/local/mongodb/pid/configServer.pid
security:
  authorization: enabled
  clusterAuthMode: "keyFile"
  keyFile: /usr/local/mongodb/keyfile
另外两台机器101,102上configServer.conf仅bindIp不同
4.2、config集群初始化
./bin/mongod -f /usr/local/mongodb/configServer.conf

./bin/mongo --host 192.168.1.100 --port 27027 admin

#认证用户配置这里省略,参考副本集认证配置博文

#config集群初始化
rs.initiate(
  {
    _id: "csReplSet",
    configsvr: true,
    members: [
      {_id:0, host:"192.168.1.100:27027"}
    ]
  }
)

rs.add("192.168.1.101:27027");
rs.add("192.168.1.102:27027");
configServer不需要仲裁节点
五、mongos节点配置
5.1、配置文件
systemLog:
  destination: file
  path: /usr/local/mongodb/logs/mongos.log
  logAppend: true
sharding:
   configDB: csReplSet/192.168.1.100:27027,192.168.1.101:27027,192.168.1.102:27027
net:
  bindIp: 0.0.0.0
  port: 27017
processManagement:
  fork: true
  pidFilePath: /usr/local/mongodb/pid/mongos.pid
security:
  clusterAuthMode: "keyFile"a
  keyFile: /usr/local/mongodb/keyfile
这里需要注意是的configDB配置中的,csReplSet指的是config集群的replSetName
5.2、mongos初始化
./bin/mongos -f /usr/local/mongodb/mongos.conf


./bin/mongo 192.168.1.100:27017/admin
(这里本机执行且端口号为默认的27017,可以简为./bin/mongo)

mongos> use admin
mongos> db.auth('root','123456')

mongos> sh.addShard("shard1/192.168.1.100:27037")
mongos> sh.addShard("shard2/192.168.1.100:27047")

mongos> sh.status()
--- Sharding Status ---
  sharding version: {
  	"_id" : 1,
  	"minCompatibleVersion" : 5,
  	"currentVersion" : 6,
  	"clusterId" : ObjectId("5e9b3a25822e43f82ba9888c")
  }
  shards:
        {  "_id" : "shard1",  "host" : "shard1/192.168.1.100:27037,192.168.1.101:27037",  "state" : 1 }
        {  "_id" : "shard2",  "host" : "shard2/192.168.1.100:27047,192.168.1.101:27047",  "state" : 1 }
  active mongoses:
        "4.2.0" : 1
  autosplit:
        Currently enabled: yes
  balancer:
        Currently enabled:  yes
        Currently running:  no
        Failed balancer rounds in last 5 attempts:  0
        Migration Results for the last 24 hours:
                No recent migrations
  databases:
        {  "_id" : "config",  "primary" : "config",  "partitioned" : true }
六、数据库分片配置
6.1、设置分片chunk大小
mongos> use config
switched to db config
mongos> db.settings.save({"_id":"chunksize","value":1})   //设置块大小为1M是方便实验,不然就需要插入海量数据
WriteResult({ "nMatched" : 0, "nUpserted" : 1, "nModified" : 0, "_id" : "chunksize" })
6.2、模拟写入数据
mongos> use proj_data
switched to db proj_data
mongos> show collections
mongos> for(i=1;i<=50000;i++){db.proj_data.insert({"id":i,"name":"proj"+i})}
WriteResult({ "nInserted" : 1 })
6.3、启用数据库分片
#可以自定义需要分片的库或者表
mongos> sh.enableSharding("proj_data")

#为表创建的索引
mongos> db.proj_data.createIndex({"id":1})

#启用表分片
mongos> sh.shardCollection("testdb.proj_data",{"id":1})

# 查看分片情况
mongos> sh.status()
--- Sharding Status ---
  sharding version: {
  	"_id" : 1,
  	"minCompatibleVersion" : 5,
  	"currentVersion" : 6,
  	"clusterId" : ObjectId("5e9b3a25822e43f82ba9888c")
  }
  shards:
        {  "_id" : "shard1",  "host" : "shard1/192.168.1.100:27037,192.168.1.101:27037",  "state" : 1 }
        {  "_id" : "shard2",  "host" : "shard2/192.168.1.100:27047,192.168.1.101:27047",  "state" : 1 }
  active mongoses:
        "4.2.0" : 1
  autosplit:
        Currently enabled: yes
  balancer:
        Currently enabled:  yes
        Currently running:  no
        Failed balancer rounds in last 5 attempts:  0
        Migration Results for the last 24 hours:
                3 : Success
  databases:
        {  "_id" : "config",  "primary" : "config",  "partitioned" : true }
                config.system.sessions
                        shard key: { "_id" : 1 }
                        unique: false
                        balancing: true
                        chunks:
                                shard1	1
                        { "_id" : { "$minKey" : 1 } } -->> { "_id" : { "$maxKey" : 1 } } on : shard1 Timestamp(1, 0)
        {  "_id" : "testdb",  "primary" : "shard2",  "partitioned" : true,  "version" : {  "uuid" : UUID("e5cfac24-8e27-4fe4-8492-424be9374d72"),  "lastMod" : 1 } }
                testdb.proj_data
                        shard key: { "id" : 1 }
                        unique: false
                        balancing: true
                        chunks:
                                shard1	3
                                shard2	3
                        { "id" : { "$minKey" : 1 } } -->> { "id" : 8739 } on : shard1 Timestamp(2, 0)
                        { "id" : 8739 } -->> { "id" : 17478 } on : shard1 Timestamp(3, 0)
                        { "id" : 17478 } -->> { "id" : 26217 } on : shard1 Timestamp(4, 0)
                        { "id" : 26217 } -->> { "id" : 34956 } on : shard2 Timestamp(4, 1)
                        { "id" : 34956 } -->> { "id" : 43695 } on : shard2 Timestamp(1, 4)
                        { "id" : 43695 } -->> { "id" : { "$maxKey" : 1 } } on : shard2 Timestamp(1, 5)
6.4 手动添加分片服务器,查看分片情况是否发生变化
mongos> sh.addShard("shard3/192.168.1.100:27057")
{
	"shardAdded" : "shard3",
	"ok" : 1,
	"operationTime" : Timestamp(1587266361, 5),
	"$clusterTime" : {
		"clusterTime" : Timestamp(1587266361, 5),
		"signature" : {
			"hash" : BinData(0,"JUmSwBOhyduU0wf8hIQ98B34ucY="),
			"keyId" : NumberLong("6817106391543578630")
		}
	}
}

mongos> sh.status()
--- Sharding Status ---
  sharding version: {
  	"_id" : 1,
  	"minCompatibleVersion" : 5,
  	"currentVersion" : 6,
  	"clusterId" : ObjectId("5e9b3a25822e43f82ba9888c")
  }
  shards:
        {  "_id" : "shard1",  "host" : "shard1/192.168.1.100:27037,192.168.1.101:27037",  "state" : 1 }
        {  "_id" : "shard2",  "host" : "shard2/192.168.1.100:27047,192.168.1.101:27047",  "state" : 1 }
        {  "_id" : "shard3",  "host" : "shard3/192.168.1.100:27057,192.168.1.101:27057",  "state" : 1 }
  active mongoses:
        "4.2.0" : 1
  autosplit:
        Currently enabled: yes
  balancer:
        Currently enabled:  yes
        Currently running:  no
        Failed balancer rounds in last 5 attempts:  0
        Migration Results for the last 24 hours:
                5 : Success
  databases:
        {  "_id" : "config",  "primary" : "config",  "partitioned" : true }
                config.system.sessions
                        shard key: { "_id" : 1 }
                        unique: false
                        balancing: true
                        chunks:
                                shard1	1
                        { "_id" : { "$minKey" : 1 } } -->> { "_id" : { "$maxKey" : 1 } } on : shard1 Timestamp(1, 0)
        {  "_id" : "testdb",  "primary" : "shard2",  "partitioned" : true,  "version" : {  "uuid" : UUID("e5cfac24-8e27-4fe4-8492-424be9374d72"),  "lastMod" : 1 } }
                testdb.proj_data
                        shard key: { "id" : 1 }
                        unique: false
                        balancing: true
                        chunks:
                                shard1	2
                                shard2	2
                                shard3	2
                        { "id" : { "$minKey" : 1 } } -->> { "id" : 8739 } on : shard3 Timestamp(5, 0)
                        { "id" : 8739 } -->> { "id" : 17478 } on : shard1 Timestamp(5, 1)
                        { "id" : 17478 } -->> { "id" : 26217 } on : shard1 Timestamp(4, 0)
                        { "id" : 26217 } -->> { "id" : 34956 } on : shard3 Timestamp(6, 0)
                        { "id" : 34956 } -->> { "id" : 43695 } on : shard2 Timestamp(6, 1)
                        { "id" : 43695 } -->> { "id" : { "$maxKey" : 1 } } on : shard2 Timestamp(1, 5)
6.5 验证关闭Balance
#查看Balance状态
mongos> sh.getBalancerState()

#列出所有分片信息
mongos> db.runCommand({listshards:1})

#删除分片节点
mongos> db.runCommand({removeshard:"shard3"})
这里需要注意:需要多执行几次removeshard,直到state为completed状态

#登录到shard3,移除分片数据库
shard3:PRIMARY> use testdb
shard3:PRIMARY> db.dropDatabase()
因为shard3上已有分片数据库,故如果想重新添加,需要把分片数库据删掉,否则会报如下错误信息
"errmsg" : "can't add shard 'shard3/192.168.1.100:27057' because a local database 'testdb' exists in another shard2",


#关闭Balance
mongos> sh.stopBalancer()
mongos> sh.getBalancerState()

mongos> sh.addShard("shard3/192.168.1.100:27057")
mongos> sh.status()

此时发现数据没有自动分片到shard3,再启动Balance后发现数据又会自动分片到shard3

mongos> sh.startBalancer()
mongos> sh.status()
七、相关参考
- MongoDB官方分片文档 https://docs.mongodb.com/manual/sharding/
- MongoDB 分片集群技术 https://www.cnblogs.com/clsn/p/8214345.html
- MongoDB 分片的原理、搭建、应用 https://www.cnblogs.com/zhoujinyi/p/4635444.html
- MongoDB的集群模式--Sharding(分片) https://www.cnblogs.com/sz-wenbin/p/11022563.html
- MongoDB(4.0)分片——大数据的处理之道 https://blog.51cto.com/13643643/2148825


