[ Python ] 模块详解
1. time 模块
Functions:
time() -- return current time in seconds since the Epoch as a float
	返回当前时间,以秒为单位,从1870年开始就算,为浮点数
clock() -- return CPU time since process start as a float
	以浮点数计算的秒数返回当前 CPU 的时间
sleep() -- delay for a number of seconds given as a float
	表示线程挂起的时间
gmtime() -- convert seconds since Epoch to UTC tuple
	将一个时间戳转换为 UTC 时间的 struct_time
localtime() -- convert seconds since Epoch to local time tuple
	格式化时间戳为本地时间 struct_time
asctime() -- convert time tuple to string
	接收时间元组并返回一个可读形式的时间
ctime() -- convert time in seconds to string
	把时间戳转换为 asctime() 的形式
mktime() -- convert local time tuple to seconds since Epoch
	接收 struct_time 对象作为参数,返回用秒数来表示时间的浮点数
strftime() -- convert time tuple to string according to format specification
	函数接收以时间元组,并返回可读字符串表示当地时间,格式由参数format决定
strptime() -- parse string to time tuple according to format specification
	函数根据指定的格式把一个时间字符串解析为时间元组
tzset() -- change the local timezone
	根据环境变量TZ重新初始化时间相关设置
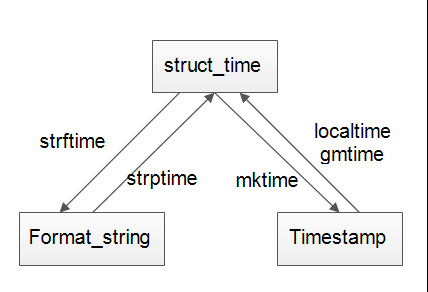
三种时间类型之间的转换:
time_stamp: 时间戳,表现形式: 1531433179.1281905 秒作为单位的浮点数
struct_time:  结构化时间,表示形式:time.struct_time(tm_year=2018, tm_mon=7, tm_mday=13, tm_hour=6, tm_min=6, tm_sec=19, tm_wday=4, tm_yday=194, tm_isdst=0)
format_string: 格式化时间,表示形式:2018-07-13 06:11:02
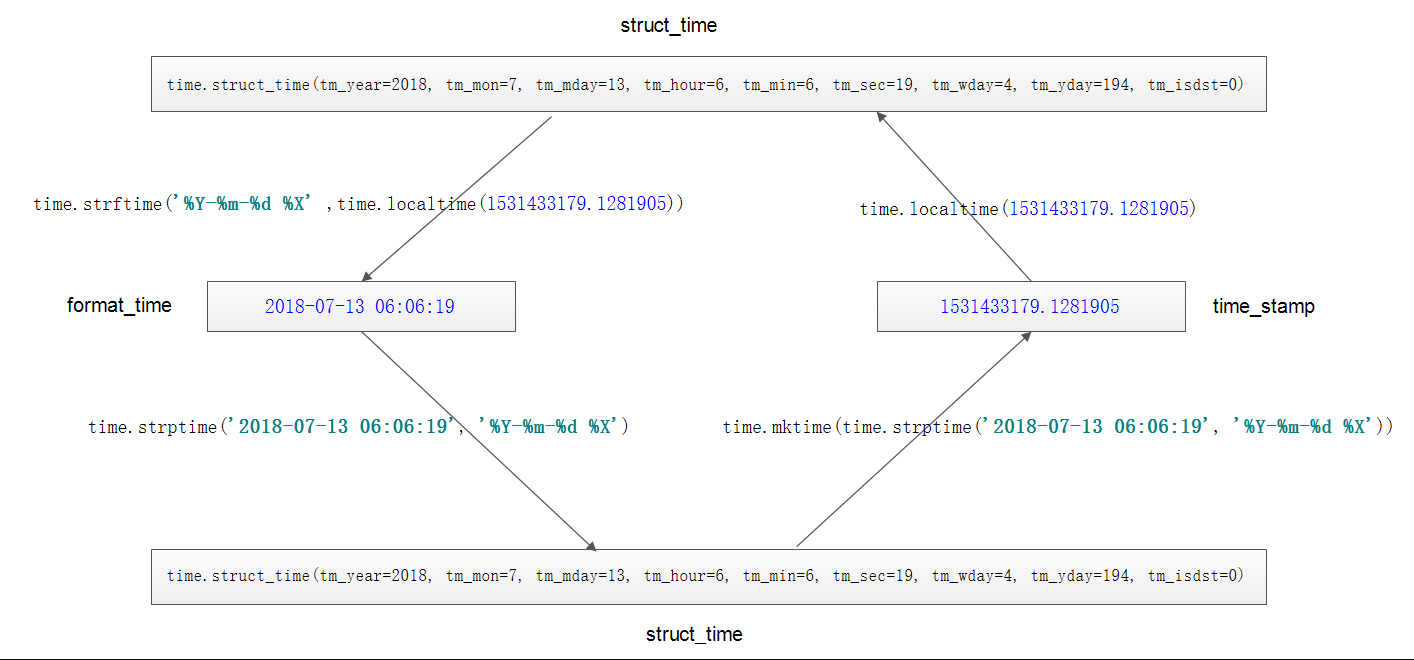
时间转换的详细示意图:
除了上面时间转换的相关方法,还有几个需要注意的方法:
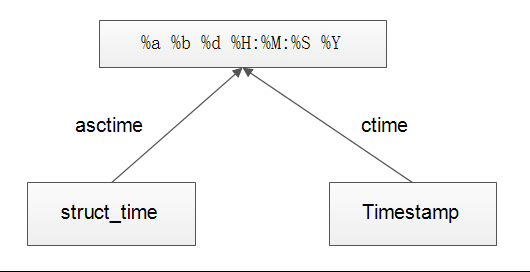
(1)time.asctime
打印 '%a %b %d %H:%M:%S %Y' 可读的时间格式
>>> print(time.asctime())
Fri Jul 13 06:31:32 2018
(2)time.ctime
将时间戳转换格式为 '%a %b %d %H:%M:%S %Y' 可读时间
>>> time.ctime(time.time())
'Fri Jul 13 06:33:56 2018'
(3)time.sleep
进程挂起的时间,参数单位为秒
>>> time.sleep(2)
2. random 模块
用于生成随机数的模块
常用方法:
(1)random.random
随机生成 0-1 之间的随机数
>>> random.random()
0.34573032308214957
(2)random.randint
传入参数必须是整数,随机选取参数范围内的整数,首尾都可以取
>>> random.randint(0, 100)
30
(3)random.randrange
传入参数必须是整数,随机选取参数范围内的整数,首取尾不取
只会在1,2之间随机
>>> random.randrange(1, 3)
1
(4)random.sample
参数的第一个参数是可迭代对象,第二个参数是随机获取元素的个数,返回列表类型
>>> random.sample((1, '23', [4,5]), 2)
[[4, 5], 1]
>>> str1 = random.sample((1, '23', [4,5]), 2)
>>> type(str1)
<class 'list'>
(5)random.choice
参数为可迭代对象,随机返回其中的一个元素
>>> random.choice(['a', 'b', 'c', 'xyz'])
'xyz'
(6)random.uniform
取任意整数范围的浮点数
>>> random.uniform(1, 10)
8.77739630139806
(7)random.shuffle
打印列表或元组的顺序,如洗牌
>>> item = [2,4,6,8,10]
>>> random.shuffle(item)
>>> item
[2, 8, 10, 6, 4]
实例:随机验证码
import random

def v_code():
        '''随机生成 4 位的验证码'''
        ran_code = ''
        for i in range(4):
                ran_int = random.randint(0, 9)  # 随机获取 0-9 之间任意一个整数
                ran_alf = chr(random.randint(65, 90))   # 随机获取 65-90之间一个随机数,通过 chr 返回整数对应的 ASCII字符
                s = str(random.choice([ran_int, ran_alf]))  # 通过随机 choice 选取其中一个
                ran_code += s   # 叠加字符串
3. OS模块
OS模块是与操作系统交互的一个接口
常用方法:
(1)os.getcwd()
获取当前工作目录
>>> os.getcwd()
'C:\\Users\\hkey'
(2)os.chdir()
改变当前脚本工作目录,相当于 shell 'cd '命令
>>> os.chdir('..')
>>> os.getcwd()
'C:\\Users'
(3)os.curdir
返回当前目录
>>> os.curdir
'.'
(4)os.pardir
返回当前目录的父目录字符串名
>>> os.pardir
'..'
(5)os.makedirs('dirname1/dirname2')
可生成多层递归目录
>>> os.makedirs('abc/hkey')
(6)os.removedirs('dirname1')
若目录为空,则删除,并递归到上一级目录,如若也为空,则删除,以此类推
>>> os.removedirs('abc\hkey')
# 如果 hkey 目录为空则删除,如 abc 目录也空则删除
(7)os.mkdir('dirname')
生成单级目录;相当于shell中 mkdir dirname
>>> os.mkdir('hkey')
(8)os.rmdir('filename')
删除单级空目录,若目录不为空则无法删除。
>>> os.rmdir('hkey')
(9)os.listdir('dirname')
列出指定目录下的所有文件和子目录,包括隐藏文件,并以列表方式打印
>>> os.listdir(r'c:/python35')
['DLLs', 'Doc', 'include', 'Lib', 'libs', 'LICENSE.txt', 'NEWS.txt', 'python.exe', 'python3.dll', 'python35.dll', 'pythonw.exe', 'README.txt', 'Scripts', 'tcl', 'Tools', 'vcruntime140.dll']
(10)os.remove()
删除一个文件
>>> os.remove('abc.txt')
(11)os.rename('oldname', 'newname')
重命名文件、目录
>>> os.rename('abc.txt', 'hkey.txt')
(12)os.stat('path/filename')
获取文件/目录信息
>>> os.stat('hkey.txt')
os.stat_result(st_mode=33206, st_ino=562949953433293, st_dev=2283361558, st_nlink=1, st_uid=0, st_gid=0, st_size=0, st_atime=1531447766, st_mtime=1531447766, st_ctime=1531447766)
(13)os.sep
输出操作系统特定的路径分隔符,win下为 '\\', Linux下为 '/'
>>> os.sep
'\\'
(14)os.linesep
输出当前平台使用的行终止符, win 下为 '\r\n' Linux下为'\n'
>>> os.linesep
'\r\n'
(15)os.pathsep
输出环境变量 'path' 用于分割文件路径的字符串 win下为 ; Linux下为 :
>>> os.pathsep
';'
(16)os.name
输出字符串指定当前使用平台, win --> 'nt' , Linux --> 'posix'
>>> os.name
'nt'
(17)os.system('bash command')
输入shell命令,直接显示不能保存变量
>>> os.system('dir C:\\')
  驱动器 C 中的卷没有标签。
  卷的序列号是 9483-7444

  C:\ 的目录

2018/07/09  11:16    <DIR>          AMD
2018/07/09  11:23    <DIR>          DRIVERS
2018/07/09  11:15    <DIR>          Intel
2018/07/09  19:08    <DIR>          PerfLogs
2018/07/09  15:04    <DIR>          Program Files
2018/07/09  15:50    <DIR>          Program Files (x86)
2018/07/09  14:47    <DIR>          Python35
2018/07/09  14:12    <DIR>          Users
2018/07/11  11:19    <DIR>          Windows
                              0 个文件              0 字节
                              9 个目录 68,863,184,896
(18)os.environ
获取系统环境变量
>>> os.environ
environ({'LOCALAPPDATA': 'C:\\Users\\hkey\\AppData\\Local'......})
(19)os.path.abspath(path)
返回 path 绝对路径
>>> os.path.abspath('etc')
'C:\\Program Files\\Git\\etc'
(20)os.path.split(path)
将 path 分割为 目录 和 文件 2元素 元组
>>> os.path.split(r'C:\Program Files\Git\etc\host')
('C:\\Program Files\\Git\\etc', 'host')
(21)os.path.dirname(path)
返回path的目录。其实就是 os.path.split(path)的第一个元素
>>> os.path.dirname('C:\Program Files\Git\etc')
'C:\\Program Files\\Git'
(22)os.path.basename(path)
返回 path 最后的文件名。如何 path 以 / 或 \\ 结尾,那么就会返回空值。即 os.path.split(path) 的第二个元素
>>> os.path.basename('C:\Program Files\Git\etc\\')
''
>>> os.path.basename('C:\Program Files\Git\etc/')
''
>>> os.path.basename('C:\Program Files\Git\etc')
'etc'
(23)os.path.exists(path)
如果 path 存在, 返回 True;如果 path 不存在, 返回 False
>>> os.path.exists('C:\Program Files\Git\etc')
True
>>> os.path.exists('C:\Program Files\Git\etcc')
False
(24)os.path.isabs(path)
如果 path 是绝对路径,返回 True
>>> os.path.isabs('etc')
False
>>> os.path.isabs('C:\Program Files\Git\etc')
True
(25)os.path.isfile(path)
如果 path 是一个存在的文件,返回 True、否则返回 False
>>> os.path.isfile('C:\Program Files\Git\etc')
False
>>> os.path.isfile('C:\Program Files\Git\etc\hosts')
True
(26)os.path.isdir(path)
如果 path 是一个存在的目录,则返回 True,否则返回 False
>>> os.path.isdir('C:\Program Files\Git\etc')
True
>>> os.path.isdir('C:\Program Files\Git\etc\hosts')
False
(27)os.path.join(path1[, path2[, …]])
将多个路径组合后返回,第一个绝对路径之前的参数将被忽略
>>> os.path.join('\tmp\abc', 'C:\Program Files\Git\etc', r'conf\vhost')
'C:\\Program Files\\Git\\etc\\conf\\vhost'
(28)os.path.getatime(path)
返回 path 所指向的文件或者目录的最后存取时间
>>> os.path.getatime('C:\Program Files\Git\etc')
1531118531.7878392
>>> os.path.getatime('C:\Program Files\Git\etc\hosts')
1468669537.155324
(29)os.path.getmtime(path)
返回 path 所指向的文件或者目录的最后修改时间
>>> os.path.getmtime('C:\Program Files\Git\etc')
1531118531.7878392
>>> os.path.getmtime('C:\Program Files\Git\etc\hosts')
1468669537.155324
4. sys模块
(1) sys.argv
命令行参数 List, 第一个元素是程序本身路径
>python sys_test.py hello world
['sys_test.py', 'hello', 'world']
(2)sys.version
获取 python 解释程序的版本信息
>>sys.version
'3.5.3 (v3.5.3:1880cb95a742, Jan 16 2017, 16:02:32) [MSC v.1900 64 bit (AMD64)]'
(3)sys.path
返回模块的搜索路径,初始化时使用 python path 环境变量的值
sys.path
['D:\\Program Files (x86)\\JetBrains\\PyCharm 2017.3.3\\helpers\\pydev ......]
(4)sys.platform
返回操作系统平台名称
>>> sys.platform
'win32'
实例:进度条程序
import sys, time

for i in range(100):
        sys.stdout.write('#')
        sys.stdout.flush()
        time.sleep(0.2)
5. json & pickle
什么是序列化:
我们把对象(变量)从内存中变成可存储或传输的过程称之为序列化,在 python 中叫 picking
序列化之后,就可以把虚拟化后的内容写入磁盘,或者通过网络传输到别的机器上;
反过来,把变量内容从序列化的对象重新读到内存里称之为反序列化,即 unpicking
json
如果我们要在不同的编程语言之间传递对象,就必须把对象序列化为标准格式,比如 xml, 但更好的方法是虚拟化为 JSON,因为JSON表示出来就是一个字符串,
可以被所有语言读取,也可以方便的存储到磁盘或者通过网络传输。JSON不仅是标准格式,并且比xml更快,而且可以直接在web页面中读取,非常方便。
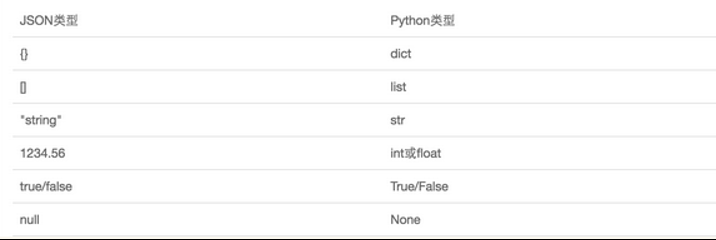
JSON表示的对象就是标准的Javascript语言对象,JSON和Python内置的数据类型对应如下:
常用方法:
(1)json.dumps 序列化
(2)json.loads 反序列化
import json

# 序列化 -------------------------------
dic = {'name': 'hkey', 'age': 22}

j = json.dumps(dic)
print(j, type(j))

# 执行结果:
# {"age": 22, "name": "hkey"} <class 'str'>

# 反序列化 --------------------------------

i = json.loads(j)
print(i, type(i))

# 执行结果:
# {'age': 22, 'name': 'hkey'} <class 'dict'>
(3)json.dump
序列化后写入文件
(4)json.load
读取文件中json格式数据后,反序列化
import json
dic = {'name': 'hkey', 'age': 22}

# ----------- 序列化 -----------
with open('json.txt', 'w', encoding='utf-8') as f:
        # 序列化后,直接存储 json.txt 文件
        json.dump(dic, f)

# ----------- 反序列化 -----------

with open('json.txt', 'r') as f:
        # 读取文件中json类型数据并做反序列化
        data = json.load(f)
print(data, type(data))

# 执行结果:
# {'age':22,'name':'hkey'} <class'dict'>
pickle 模块
作为 python 特有的类型和 python 的数据类型间进行转换
(1)pickle.dumps
以字节对象形式返回封装的对象,不需要写入文件中;
(2)pickle.loads
从字节对象中读取被封装的对象,并返回;
import pickle
dic = {'name': 'hkey', 'age': 22}

#------------序列化------------
j = pickle.dumps(dic)
print(j)

# 执行结果:
# b'\x80\x03}q\x00(X\x03\x00\x00\x00ageq\x01K\x16X\x04\x00\x00\x00nameq\x02X\x04\x00\x00\x00hkeyq\x03u.'

#------------反序列化------------
data = pickle.loads(j)
print(data, type(data))

# 执行结果:
# {'name': 'hkey', 'age': 22} <class 'dict'>
(3)pickle.dump
必填参数 file 表示 obj 要写入的文件对象,file必须以二进制可写模式打开,即 'wb'
(4)pickle.load
必填参数 file 必须以二进制可读模式打开,即 'rb', 其他都可选参数
import pickle
dic = {'name': 'hkey', 'age': 22}
#------------序列化------------
with open('pickel.txt', 'wb') as f:
        # 序列化后,以字节格式存入 pickel.txt 文件
        pickle.dump(dic, f)
#------------反序列化------------
with open('pickel.txt', 'rb') as f:
        # 读取文件中字节,并做反序列化
        data = pickle.load(f)

print(data)

# 执行结果:
#{'name':'hkey','age':22}
6. shelve 模块
shelve 是一组简单的数据存储方案,他只有一个函数就是 open(), 这个函数接收一个参数就是文件名,并且文件名必须是 .dat类型的。
然后返回一个对象,可以把这个对象当作一个字典,当你存储完毕的时候,就调用 close 函数来关闭
写入:
import shelve

f = shelve.open('shelve.txt')
f['key1'] = {'name': 'xiaofei', 'age': 20}
f.close()
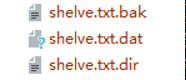
执行完毕会生成如下三个文件:
读取:
import shelve

with shelve.open('shelve.txt') as f:
        name = f['key1']['name']
print(name)

# 执行结果:
# xiaofei
7. configparser模块
该模块的作用就是使用模块中的 ConfigParser(),创建一个对象使用对象的方法对指定的配置文件做 增删改查 操作
(1 ) 写入
import configparser

config = configparser.ConfigParser()
config['DEFAULT'] = {'ServerAliveInterval': '45',
                                            'Compression': 'yes',
                                          'CompressionLevel': '9'}

config['bitbucket.org'] = {}
config['bitbucket.org']['User'] = 'hg'
config['topsecret.server.com'] = {}
topsecret = config['topsecret.server.com']
topsecret['Host Port'] = '50022'
topsecret['ForwardX11'] = 'no'
config['DEFAULT']['ForwardX11'] = 'yes'

with open('exmaple.ini', 'w') as configfile:
        config.write(configfile)
(2)读取
import configparser
config = configparser.ConfigParser()
config.read('example.ini')
print(config.sections())    # ['bitbucket.org', 'topsecret.server.com']
print('bytebong.com' in config)     # False
print(config['bitbucket.org']['User'])  # hg
print(config['DEFAULT']['Compression'])     # yes
print(config['topsecret.server.com']['ForwardX11'])     # no

for key in config['bitbucket.org']:
        print(key)

# user
# serveraliveinterval
# compression
# compressionlevel
# forwardx11
(3)增加
import configparser

config = configparser.ConfigParser()
config.read('example.ini')
config.add_section('xiaofei')
config['xiaofei'] = {
        'name': 'xiaofei',
        'age': 20
}

config.write(open('example.ini', 'w'))
(4)修改、删除
import configparser

config = configparser.ConfigParser()
config.read('example.ini')
config.remove_section('bitbucket.org')      # 删除 [bitbucket.org] 下所有内容
config.remove_option('xiaofei', 'name')     # 删除 [xiaofei] 下 name项
config.set('xiaofei', 'age', '18')          # 修改 [xiaofei] age = 18 必须为str类型
config.write(open('i.ini', 'w'))            # 保存修改内容
8. hashlib模块
用于加密相关操作。主要用 md5 进行加密
import hashlib

m = hashlib.md5()
m.update('hello'.encode('utf-8'))
print(m.hexdigest())    # 5d41402abc4b2a76b9719d911017c592
m.update('world'.encode('utf-8'))
print(m.hexdigest())    # fc5e038d38a57032085441e7fe7010b0

m2 = hashlib.md5()
m2.update('helloworld'.encode('utf-8'))
print(m2.hexdigest())   # fc5e038d38a57032085441e7fe7010b0
以上加密存在缺陷,可以通过撞库来反解,所以有必要对加密算法中添加自定义 key 再来做加密
import hashlib

hash = hashlib.sha256('888'.encode('utf-8'))
hash.update('aliyun'.encode('utf-8'))
print(hash.hexdigest()) #da7ecd435e6e0930532c115e7fe48c38d0405aa79586b0275717a0ab0a85acd1
9. logging模块
用于记录日志的模块
import logging

logging.debug('debug message')
logging.info('info message')
logging.warning('warning message')
logging.error('error message')
logging.critical('critical message')

# 执行结果:
# WARNING:root:warning message
# ERROR:root:error message
# CRITICAL:root:critical message
默认情况下 python 的 logging 模块将日志打印到了标准输出中,且只显示了大于 WARING级别的日志,这说明默认的日志级别设置为 WARING
日志级别等级排序(CRITICAL > ERROR > WARING > INFO > DEBUG > NOTSET)默认的日志格式为日志级别: Logger名称:用户输出消息
(1)灵活配置日志级别,日志格式,输出位置
import logging

logging.basicConfig(
        level=logging.DEBUG,
        format='%(asctime)s %(filename)s %(message)s',
        # filename='logg.txt',
        # filemode='w'
)

logging.debug('debug message')
logging.info('info message')
logging.warning('warning message')
logging.error('error message')
logging.critical('critical message')

# 执行结果:
# 2018-07-14 08:51:56,441 logging_test.py debug message
# 2018-07-14 08:51:56,441 logging_test.py info message
# 2018-07-14 08:51:56,441 logging_test.py warning message
# 2018-07-14 08:51:56,441 logging_test.py error message
# 2018-07-14 08:51:56,441 logging_test.py critical message
可以在 logging.basicConfig() 函数中通过具体的参数来更改 logging 模块默认行为,可用参数如下:
filename:用指定的文件名创建FiledHandler(后边会具体讲解handler的概念),这样日志会被存储在指定的文件中。
filemode:文件打开方式,在指定了filename时使用这个参数,默认值为“a”还可指定为“w”。
format:指定handler使用的日志显示格式。
datefmt:指定日期时间格式。
level:设置rootlogger(后边会讲解具体概念)的日志级别
stream:用指定的stream创建StreamHandler。可以指定输出到sys.stderr,sys.stdout或者文件(f=open('test.log','w')),默认为sys.stderr。若同时列出了filename和stream两个参数,则stream参数会被忽略。

format参数中可能用到的格式化串:
%(name)s Logger的名字
%(levelno)s 数字形式的日志级别
%(levelname)s 文本形式的日志级别
%(pathname)s 调用日志输出函数的模块的完整路径名,可能没有
%(filename)s 调用日志输出函数的模块的文件名
%(module)s 调用日志输出函数的模块名
%(funcName)s 调用日志输出函数的函数名
%(lineno)d 调用日志输出函数的语句所在的代码行
%(created)f 当前时间,用UNIX标准的表示时间的浮 点数表示
%(relativeCreated)d 输出日志信息时的,自Logger创建以 来的毫秒数
%(asctime)s 字符串形式的当前时间。默认格式是 “2003-07-08 16:49:45,896”。逗号后面的是毫秒
%(thread)d 线程ID。可能没有
%(threadName)s 线程名。可能没有
%(process)d 进程ID。可能没有
%(message)s用户输出的消息
(2)logger 对象
import logging

logger = logging.getLogger()

fh = logging.FileHandler('test.log')

ch = logging.StreamHandler()

formatter = logging.Formatter('%(asctime)s - %(levelname)s - %(message)s')

fh.setFormatter(formatter)
ch.setFormatter(formatter)

logger.addHandler(fh)
logger.addHandler(ch)

logger.debug('logger debug message')
logger.info('logger info message')
logger.warning('logger warning message')
logger.error('logger error message')
logger.critical('logger critical message')

# 执行结果:
# 2018-07-14 09:08:54,983 - WARNING - logger warning message
# 2018-07-14 09:08:54,983 - ERROR - logger error message
# 2018-07-14 09:08:54,983 - CRITICAL - logger critical message
代码结构:

logging库提供了多个组件:
Logger: 对象提供应用程序可直接使用的接口
Handler:发送日志到适当的目的地
Filter: 提供了过滤日志信息的方法
Formatter: 指定日志显示的格式
logger = logging.getLogger() 返回一个默认的 Logger 也是 root Logger,并应用默认的日志级别、Handler 和 Formatter 设置
可以通过指定最低的日志级别来显示日志信息:
Logger.DEBUG
Logger.INFO
Logger.WARING
Logger.ERROR
Logger.CRITICAL
# 执行结果:
# 2018-07-14 09:08:54,983 - WARNING - logger warning message
# 2018-07-14 09:08:54,983 - ERROR - logger error message
# 2018-07-14 09:08:54,983 - CRITICAL - logger critical message
从这个输出可以看出 logger = logging.getLogger() 返回 Logger名为 root. 这里没有用 logger.setLevel(logging.Debug) 显示的为 logger 设置日志级别,所以使用默认的日志级别
WARING,故结果只输出了大于等于 WARING 级别的信息
如果创建两个 logger 对象


import logging

logger = logging.getLogger()
# 创建一个handler,用于写入日志文件
fh = logging.FileHandler('test.log')

# 再创建一个handler,用于输出到控制台
ch = logging.StreamHandler()

formatter = logging.Formatter('%(asctime)s - %(name)s - %(levelname)s - %(message)s')

fh.setFormatter(formatter)
ch.setFormatter(formatter)

logger.addHandler(fh) #logger对象可以添加多个fh和ch对象
logger.addHandler(ch)

logger.debug('logger debug message')
logger.info('logger info message')
logger.warning('logger warning message')
logger.error('logger error message')
logger.critical('logger critical message')

##################################################
logger1 = logging.getLogger('mylogger')
logger1.setLevel(logging.DEBUG)

logger2 = logging.getLogger('mylogger')
logger2.setLevel(logging.INFO)

logger1.addHandler(fh)
logger1.addHandler(ch)

logger2.addHandler(fh)
logger2.addHandler(ch)

logger1.debug('logger1 debug message')
logger1.info('logger1 info message')
logger1.warning('logger1 warning message')
logger1.error('logger1 error message')
logger1.critical('logger1 critical message')

logger2.debug('logger2 debug message')
logger2.info('logger2 info message')
logger2.warning('logger2 warning message')
logger2.error('logger2 error message')
logger2.critical('logger2 critical message')

# 执行结果:
# 2018-07-14 09:30:39,054 - root - WARNING - logger warning message
# 2018-07-14 09:30:39,054 - root - ERROR - logger error message
# 2018-07-14 09:30:39,054 - root - CRITICAL - logger critical message
# 2018-07-14 09:30:39,054 - mylogger - INFO - logger1 info message
# 2018-07-14 09:30:39,054 - mylogger - INFO - logger1 info message
# 2018-07-14 09:30:39,055 - mylogger - WARNING - logger1 warning message
# 2018-07-14 09:30:39,055 - mylogger - WARNING - logger1 warning message
# 2018-07-14 09:30:39,055 - mylogger - ERROR - logger1 error message
# 2018-07-14 09:30:39,055 - mylogger - ERROR - logger1 error message
# 2018-07-14 09:30:39,055 - mylogger - CRITICAL - logger1 critical message
# 2018-07-14 09:30:39,055 - mylogger - CRITICAL - logger1 critical message
# 2018-07-14 09:30:39,055 - mylogger - INFO - logger2 info message
# 2018-07-14 09:30:39,055 - mylogger - INFO - logger2 info message
# 2018-07-14 09:30:39,055 - mylogger - WARNING - logger2 warning message
# 2018-07-14 09:30:39,055 - mylogger - WARNING - logger2 warning message
# 2018-07-14 09:30:39,055 - mylogger - ERROR - logger2 error message
# 2018-07-14 09:30:39,055 - mylogger - ERROR - logger2 error message
# 2018-07-14 09:30:39,055 - mylogger - CRITICAL - logger2 critical message
这里有两个问题:
明明通过 logger1.setLevel(logging.DEBUG) 将 logger1的日志级别设置为 DEBUG,为何显示的时候没有显示出 DEBUG 级别的日志信息?
因为 logger1 和 logger2 对应的是同一个 Logger 实例,只要 logging.getLogger( name ) 中名称参数 name 相同则返回的 Logger实例就是同一个,且仅有一个
在 logger2实例中通过 logger2.setLevel(logging.INFO)设置mylogger的日志级别为 logging.INFO,所以最后 logger1 的输出遵从了后来设置的日志级别。
为什么 logger1、logger2 对应的每个输出分别显示两次?
这是因为我们通过 logger=logging.getLogger() 显示的创建了 root Logger , 而 logger1 = logging.getLogger('mylogger') 创建了 root logger的孩子,logger2同样
那么孩子就会将消息分发给他的 handler 进行处理也会传递给所有的祖先 Logger 处理
注释掉 root 的 handler 处理:
import logging

logger = logging.getLogger()
# 创建一个handler,用于写入日志文件
fh = logging.FileHandler('test.log')

# 再创建一个handler,用于输出到控制台
ch = logging.StreamHandler()

formatter = logging.Formatter('%(asctime)s - %(name)s - %(levelname)s - %(message)s')

fh.setFormatter(formatter)
ch.setFormatter(formatter)

# logger.addHandler(fh) #logger对象可以添加多个fh和ch对象
# logger.addHandler(ch)

logger.debug('logger debug message')
logger.info('logger info message')
logger.warning('logger warning message')
logger.error('logger error message')
logger.critical('logger critical message')

##################################################
logger1 = logging.getLogger('mylogger')
logger1.setLevel(logging.DEBUG)

logger2 = logging.getLogger('mylogger')
logger2.setLevel(logging.INFO)

logger1.addHandler(fh)
logger1.addHandler(ch)

logger2.addHandler(fh)
logger2.addHandler(ch)

logger1.debug('logger1 debug message')
logger1.info('logger1 info message')
logger1.warning('logger1 warning message')
logger1.error('logger1 error message')
logger1.critical('logger1 critical message')

logger2.debug('logger2 debug message')
logger2.info('logger2 info message')
logger2.warning('logger2 warning message')
logger2.error('logger2 error message')
logger2.critical('logger2 critical message')

# 执行结果:
# logger warning message
# logger error message
# logger critical message
# 2018-07-14 09:41:03,604 - mylogger - INFO - logger1 info message
# 2018-07-14 09:41:03,604 - mylogger - WARNING - logger1 warning message
# 2018-07-14 09:41:03,604 - mylogger - ERROR - logger1 error message
# 2018-07-14 09:41:03,604 - mylogger - CRITICAL - logger1 critical message
# 2018-07-14 09:41:03,604 - mylogger - INFO - logger2 info message
# 2018-07-14 09:41:03,604 - mylogger - WARNING - logger2 warning message
# 2018-07-14 09:41:03,604 - mylogger - ERROR - logger2 error message
10. re模块
请参考:
-------------re模块链接-------------

 浙公网安备 33010602011771号