kubernetes(二)--k8s的资源清单及pod生命周期
一、K8S资源
k8s中所有内容对抽象为资源,资源实例化之后叫做对象
1.1、名称空间级别资源
工作负载型资源(workload):Pod,ReplicaSet,Deployment,StatefulSet,DaemonSet,Job,CronJob(ReplicationController 在v1.11中废弃)
服务发现及负载均衡型资源(ServiceDiscovery & LoadBalance):Service,Ingress,..
配置与存储型资源:Volume(存储卷),CSI(容器存储接口,可以扩展各种各样的第三方存储卷)
特殊类型的存储卷:Configmap(当配置中心来使用的资源类型),Secret(保存敏感的数据),DownwardAPI(把外部环境中的信息输出给容器)
1.2、集群级别资源
集群级资源:Namespace,Node,Role,ClusterRole,RoleBinding,ClusterRoleBinding
1.3、元数据级别资源
元数据级资源:HPA,PodTemplate,LimitRange
二、资源清单
在k8s中,一般使用yaml格式的文件来创建符合我们预期期望的pod,这样的yaml文件称之为资源清单。
2.1、yaml语法
略
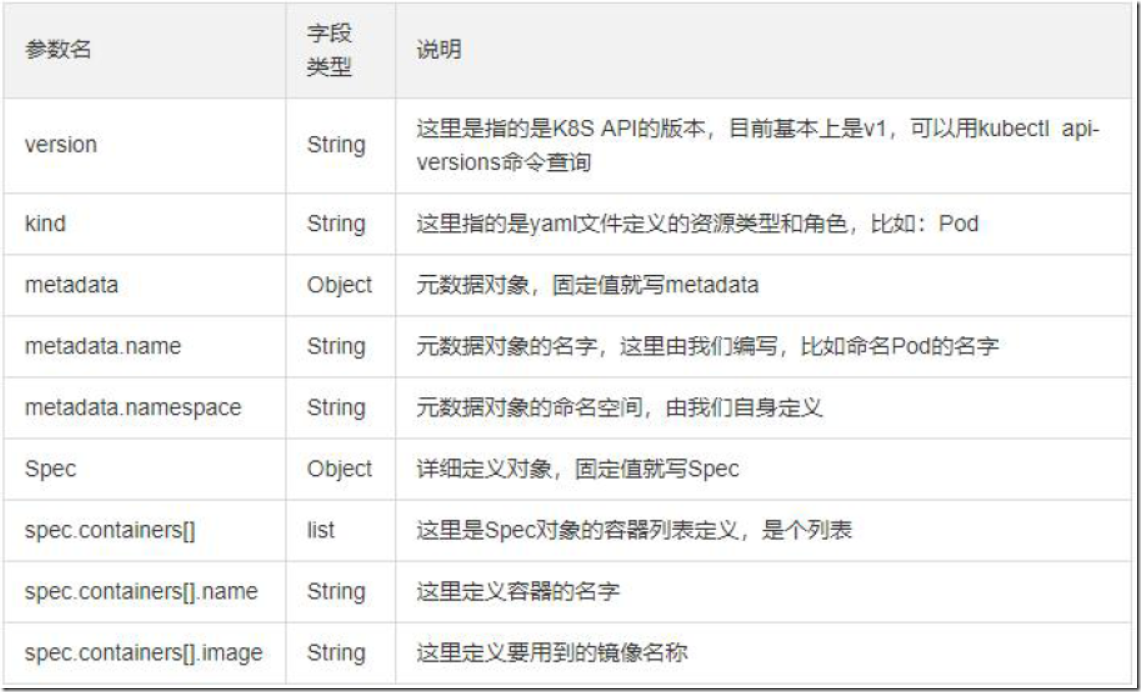
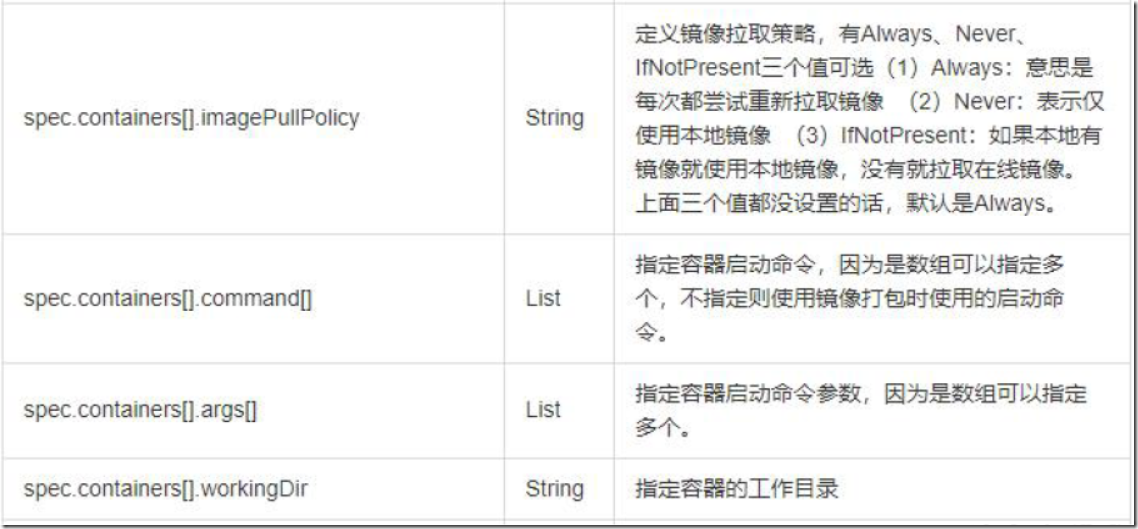
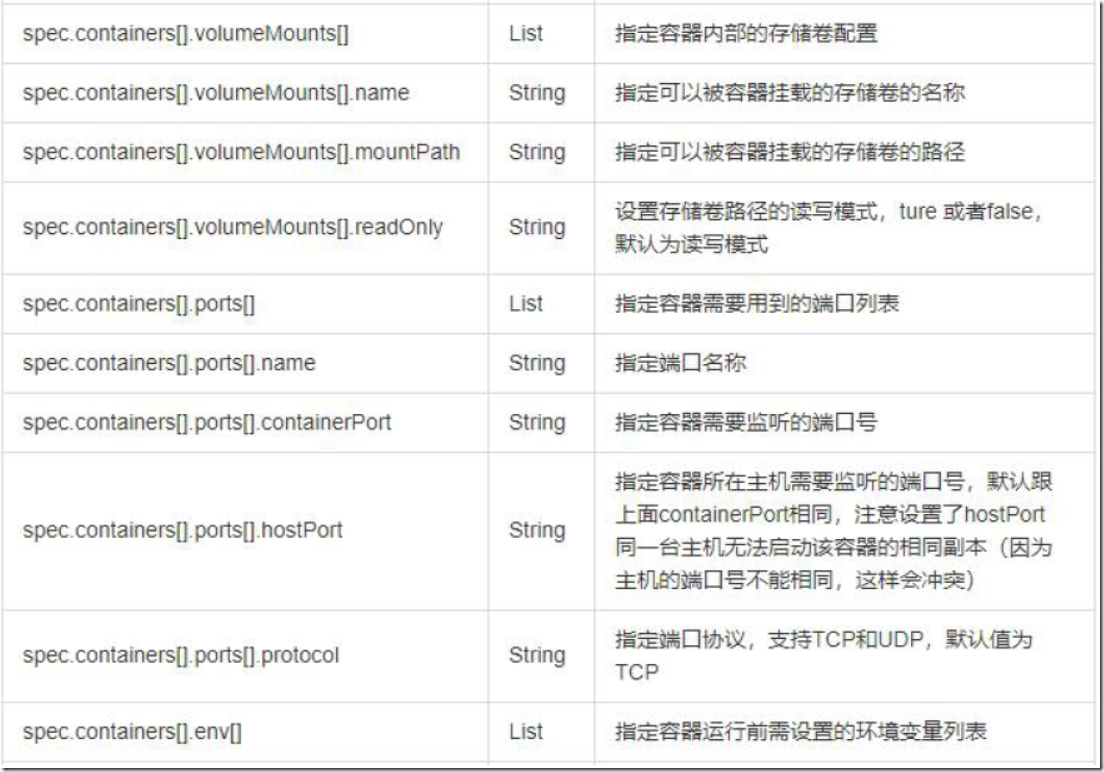
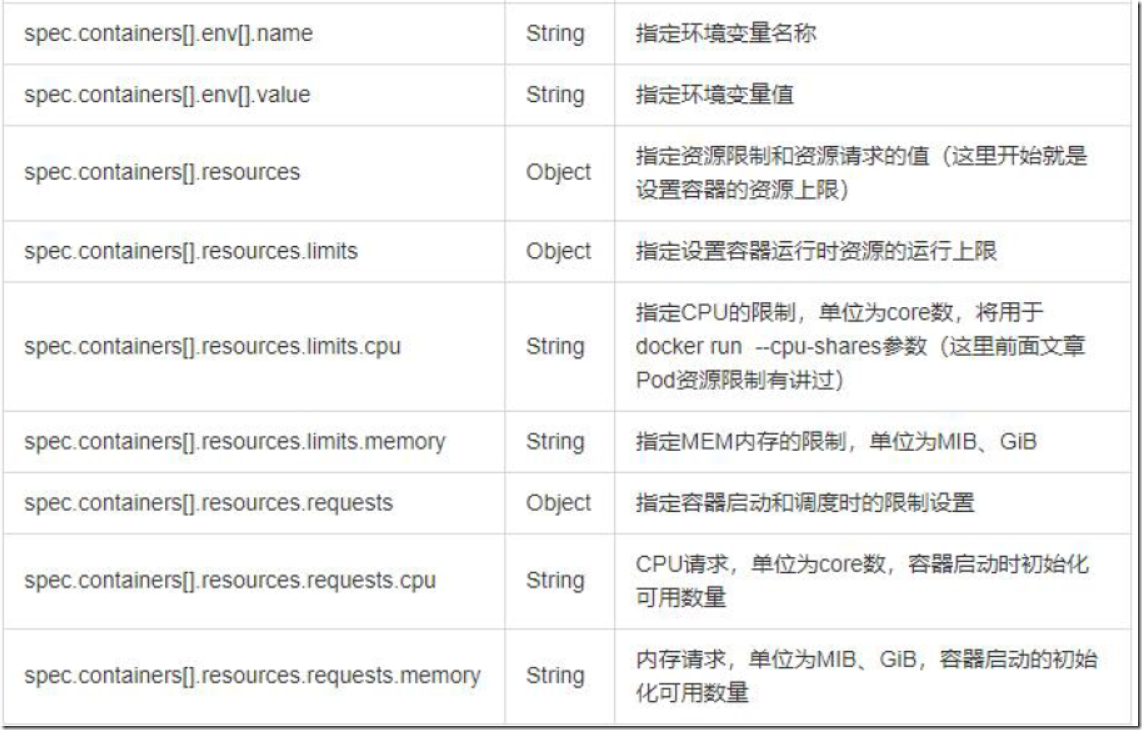
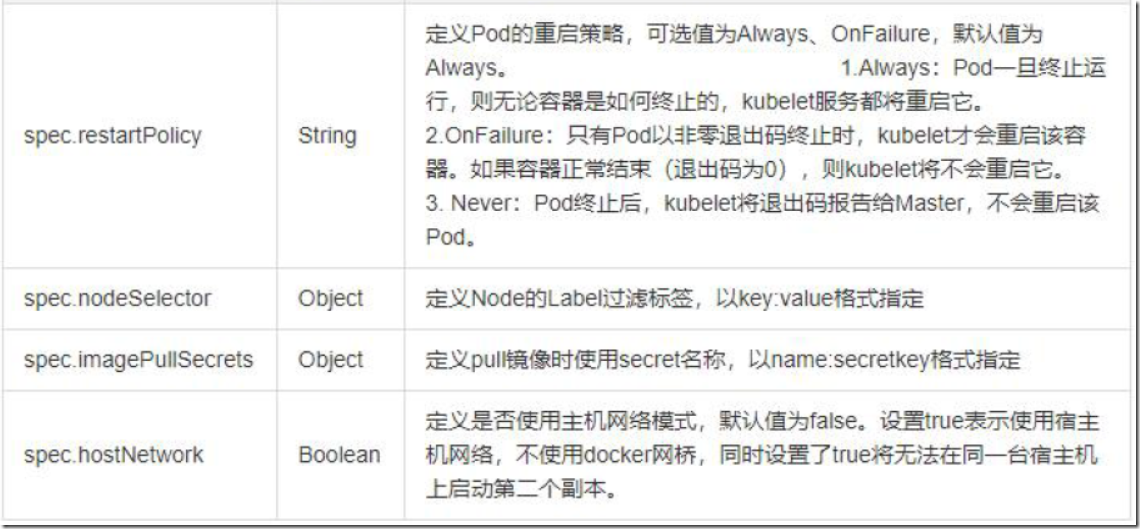
2.2、资源清单常用字段解释
2.3、资源清单格式
apiVersion: group/apiversion   #如果没有给定group名称,默认为core,可以使用kubectl  api-versions获取当前k8s版本所有的apiVersion版本信息
kind:                    #资源类型
metadata:                #资源元数据
   name
   namespace
   labels
   annotations             #注解:方便用户阅读查找
spec:                     #期望的状态(disired state)
status:                                        #当前的状态,本字段有k8s自身维护,用户不能去定义
2.4、资源清单常用命令
1)获取apiversion版本信息
[root@k8s-master01 ~]# kubectl api-versions
admissionregistration.k8s.io/v1beta1
apiextensions.k8s.io/v1beta1
apiregistration.k8s.io/v1
apiregistration.k8s.io/v1beta1
apps/v1
apps/v1beta1
apps/v1beta2
authentication.k8s.io/v1
authentication.k8s.io/v1beta1
authorization.k8s.io/v1
authorization.k8s.io/v1beta1
autoscaling/v1
autoscaling/v2beta1
autoscaling/v2beta2
batch/v1
batch/v1beta1
certificates.k8s.io/v1beta1
coordination.k8s.io/v1
coordination.k8s.io/v1beta1
events.k8s.io/v1beta1
extensions/v1beta1
networking.k8s.io/v1
networking.k8s.io/v1beta1
node.k8s.io/v1beta1
policy/v1beta1
rbac.authorization.k8s.io/v1
rbac.authorization.k8s.io/v1beta1
scheduling.k8s.io/v1
scheduling.k8s.io/v1beta1
storage.k8s.io/v1
storage.k8s.io/v1beta1
v1
2)获取资源字段解释说明
[root@k8s-master01 ~]# kubectl explain pod
[root@k8s-master01 ~]# kubectl explain Ingress
[root@k8s-master01 ~]# kubectl explain pod.spec
3)字段配置格式
2.5、通过定义资源清单创建pod
#创建资源清单
[root@k8s-master01 yaml]# vim pod-test.yaml
apiVersion: v1
kind: Pod
metadata:
  name: myapp-pod
  labels:
    app: myapp
    version: v1
spec:
  containers:
  - name: app
    image: hub.dianchou.com/library/myapp:v1

#启动pod
[root@k8s-master01 yaml]# kubectl create -f pod-test.yaml
pod/myapp-pod created
[root@k8s-master01 yaml]# kubectl get pod
NAME                                READY   STATUS    RESTARTS   AGE
myapp-pod                           1/1     Running   0          11s
nginx-deployment-6596568468-kbz7g   1/1     Running   0          4h27m
nginx-deployment-6596568468-lbtsb   1/1     Running   0          4h27m
nginx-deployment-6596568468-lgk9r   1/1     Running   0          4h28m
[root@k8s-master01 yaml]# kubectl get pod -o wide
NAME                                READY   STATUS    RESTARTS   AGE     IP           NODE         NOMINATED NODE   READINESS GATES
myapp-pod                           1/1     Running   0          15s     10.244.1.3   k8s-node01   <none>           <none>
nginx-deployment-6596568468-kbz7g   1/1     Running   0          4h27m   10.244.2.4   k8s-node02   <none>           <none>
nginx-deployment-6596568468-lbtsb   1/1     Running   0          4h27m   10.244.2.3   k8s-node02   <none>           <none>
nginx-deployment-6596568468-lgk9r   1/1     Running   0          4h28m   10.244.1.2   k8s-node01   <none>           <none>
[root@k8s-master01 yaml]# curl 10.244.1.3
Hello MyApp | Version: v1 | <a href="hostname.html">Pod Name</a>
三、容器生命周期
3.1、init 容器
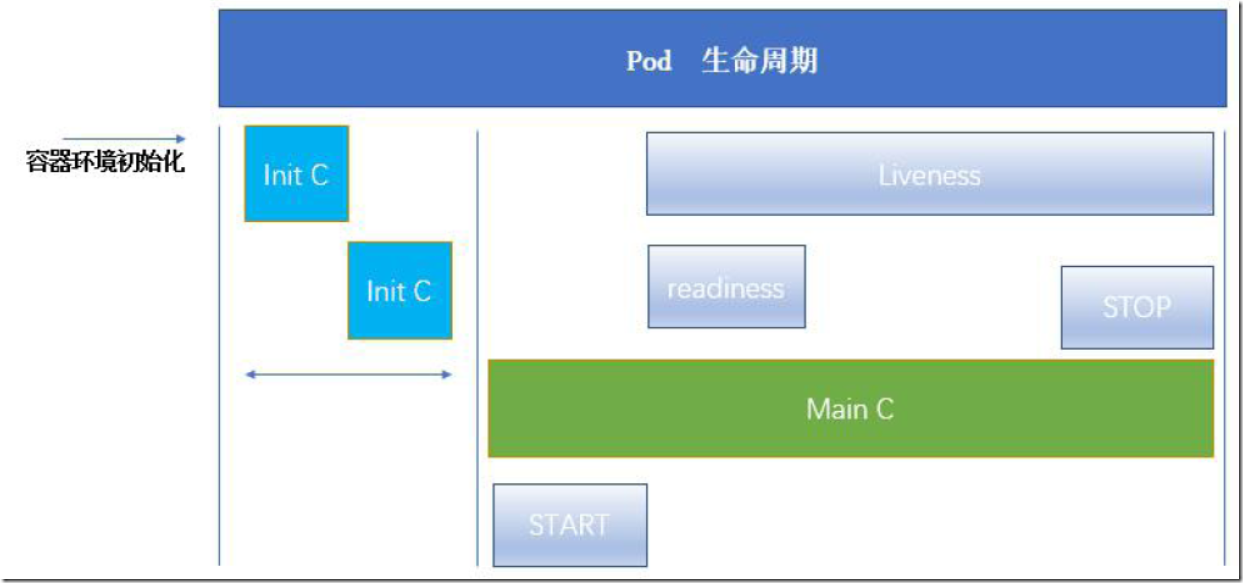
Pod能够具有多个容器,应用运行在容器中,但他也有可能有一个或多个先于容器启动的init容器
init容器与普通的容器非常像,除了以下两点:
- init容器总是运行到成功完成为止
- 每一个init容器都必须在下一个init容器启动之前成功完成
如果Pod的init容器失败,kubernetes会不断重启该Pod,init容器成功为止,然而如果Pod对应的restartPolicy为Never,她就不会重新启动
init容器作用:
因为Init容器具有与应用程序容器分离的单独镜像,所以它们的启动相关代码具有如下优势:
1)它们可以包含并运行实用工具,但是出于安全考虑,是不建议在应用程序容器镜像中包含这些实用工具的
2)它们可以包含使用工具和定制化代码来安装,但是不能出现在应用程序镜像中。例如,创建镜像没必要FROM另一个镜像,只需要在安装过程中使用类似sed、awk、python或dig这样的工具。
3)应用程序镜像可以分离出创建和部署的角色,而没有必要联合它们构建一个单独的镜像。
4)Init容器使用LinuxNamespace,所以相对应用程序容器来说具有不同的文件系统视图。因此,它们能够具有访问Secret的权限,而应用程序容器则不能。
5)它们必须在应用程序容器启动之前运行完成,而应用程序容器是并行运行的,所以Init容器能够提供了一种简单的阻塞或延迟应用容器的启动的方法,直到满足了一组先决条件。
init容器示例:
#创建pod,pod中包含一个主容器,2个init容器
[root@k8s-master01 yaml]# cat init-pod.yaml
apiVersion: v1
kind: Pod
metadata:
  name: myapp-pod
  labels:
    app: myapp
spec:
  containers:
  - name: myapp-container
    image: busybox
    command: ['sh','-c','echo The app is running! && sleep 3600']
  initContainers:
  - name: init-myservice
    image: busybox
    command: ['sh','-c','until nslookup myservice; do echo waiting for myservice; sleep 2;done;']
  - name: init-mydb
    image: busybox
    command: ['sh','-c','until nslookup mydb; do echo waiting for mydb; sleep 2; done;']

[root@k8s-master01 yaml]# kubectl create -f init-pod.yaml
pod/myapp-pod created
[root@k8s-master01 yaml]# kubectl get pod
NAME        READY   STATUS     RESTARTS   AGE
myapp-pod   0/1     Init:0/2   0          6s
[root@k8s-master01 yaml]# kubectl get pod
NAME        READY   STATUS     RESTARTS   AGE
myapp-pod   0/1     Init:0/2   0          8s
[root@k8s-master01 yaml]# kubectl get pod
NAME        READY   STATUS     RESTARTS   AGE
myapp-pod   0/1     Init:0/2   0          10s
[root@k8s-master01 yaml]# kubectl get pod
NAME        READY   STATUS     RESTARTS   AGE
myapp-pod   0/1     Init:0/2   0          12s  #注意该状态

#原因分析
[root@k8s-master01 yaml]# kubectl describe pod myapp-pod
Name:         myapp-pod
Namespace:    default
Priority:     0
Node:         k8s-node02/10.0.0.21
Start Time:   Sun, 02 Feb 2020 22:22:24 +0800
Labels:       app=myapp
Annotations:  <none>
Status:       Pending
IP:           10.244.2.5
Init Containers:
  init-myservice:
    Container ID:  docker://22073bb5ec0f4afe44f9d995fa5560abf42d8a67839e4fdaf798a262a72b65aa
    Image:         busybox
    Image ID:      docker-pullable://busybox@sha256:6915be4043561d64e0ab0f8f098dc2ac48e077fe23f488ac24b665166898115a
    Port:          <none>
    Host Port:     <none>
    Command:
      sh
      -c
      until nslookup myservice; do echo waiting for myservice; sleep 2;done;
    State:          Running
      Started:      Sun, 02 Feb 2020 22:24:14 +0800
    Ready:          False
    Restart Count:  0
    Environment:    <none>
    Mounts:
      /var/run/secrets/kubernetes.io/serviceaccount from default-token-q9x9d (ro)
  init-mydb:
    Container ID:
    Image:         busybox
    Image ID:
    Port:          <none>
    Host Port:     <none>
    Command:
      sh
      -c
      until nslookup mydb; do echo waiting for mydb; sleep 2; done;
    State:          Waiting
      Reason:       PodInitializing
    Ready:          False
    Restart Count:  0
    Environment:    <none>
    Mounts:
      /var/run/secrets/kubernetes.io/serviceaccount from default-token-q9x9d (ro)
Containers:
  myapp-container:
    Container ID:
    Image:         busybox
    Image ID:
    Port:          <none>
    Host Port:     <none>
    Command:
      sh
      -c
      echo The app is running! && sleep 3600
    State:          Waiting
      Reason:       PodInitializing
    Ready:          False
    Restart Count:  0
    Environment:    <none>
    Mounts:
      /var/run/secrets/kubernetes.io/serviceaccount from default-token-q9x9d (ro)
Conditions:
  Type              Status
  Initialized       False
  Ready             False
  ContainersReady   False
  PodScheduled      True
Volumes:
  default-token-q9x9d:
    Type:        Secret (a volume populated by a Secret)
    SecretName:  default-token-q9x9d
    Optional:    false
QoS Class:       BestEffort
Node-Selectors:  <none>
Tolerations:     node.kubernetes.io/not-ready:NoExecute for 300s
                 node.kubernetes.io/unreachable:NoExecute for 300s
Events:
  Type     Reason     Age                    From                 Message
  ----     ------     ----                   ----                 -------
  Normal   Scheduled  9m1s                   default-scheduler    Successfully assigned default/myapp-pod to k8s-node02
  Warning  Failed     7m50s                  kubelet, k8s-node02  Failed to pull image "busybox": rpc error: code = Unknown desc = context canceled
  Warning  Failed     7m50s                  kubelet, k8s-node02  Error: ErrImagePull
  Normal   BackOff    7m50s                  kubelet, k8s-node02  Back-off pulling image "busybox"
  Warning  Failed     7m50s                  kubelet, k8s-node02  Error: ImagePullBackOff
  Normal   Pulling    7m37s (x2 over 8m59s)  kubelet, k8s-node02  Pulling image "busybox"
  Normal   Pulled     7m11s                  kubelet, k8s-node02  Successfully pulled image "busybox"
  Normal   Created    7m11s                  kubelet, k8s-node02  Created container init-myservice
  Normal   Started    7m11s                  kubelet, k8s-node02  Started container init-myservice  #启第一个init容器

[root@k8s-master01 yaml]# kubectl log myapp-pod -c init-myservice   #当pod中有多个容器时,-c指定容器
...
waiting for myservice
Server:		10.96.0.10
Address:	10.96.0.10:53

** server can't find myservice.default.svc.cluster.local: NXDOMAIN

*** Can't find myservice.svc.cluster.local: No answer
*** Can't find myservice.cluster.local: No answer
*** Can't find myservice.default.svc.cluster.local: No answer
*** Can't find myservice.svc.cluster.local: No answer
*** Can't find myservice.cluster.local: No answer
....

#创建service
[root@k8s-master01 yaml]# cat myservice.yaml
kind: Service
apiVersion: v1
metadata:
  name: myservice
spec:
  ports:
    - protocol: TCP
      port: 80
      targetPort: 9376
[root@k8s-master01 yaml]# kubectl create -f myservice.yaml
service/myservice created
[root@k8s-master01 yaml]# kubectl get pod
NAME        READY   STATUS     RESTARTS   AGE
myapp-pod   0/1     Init:1/2   0          20m  #已经成功初始化第一个init容器,但pod还未就绪

#创建service
[root@k8s-master01 yaml]# cat mydb.yaml
kind: Service
apiVersion: v1
metadata:
  name: mydb
spec:
  ports:
    - protocol: TCP
      port: 80
      targetPort: 9377
[root@k8s-master01 yaml]# kubectl create -f mydb.yaml
service/mydb created
[root@k8s-master01 yaml]# kubectl get pod -w
NAME        READY   STATUS     RESTARTS   AGE
myapp-pod   0/1     Init:1/2   0          25m
myapp-pod   0/1     PodInitializing   0          26m
myapp-pod 1/1 Running 0 26m #初始化完成,pod就绪特殊说明:
1)在Pod启动过程中,Init容器会按顺序在网络和数据卷初始化之后启动。每个容器必须在下一个容器启动之前成功退出(网络和数据卷初始化是在pause)
2)如果由于运行时或失败退出,将导致容器启动失败,它会根据Pod的restartPolicy指定的策略进行重试。然而,如果Pod的restartPolicy设置为Always,Init容器失败时会使用RestartPolicy策略
3)在所有的Init容器没有成功之前,Pod将不会变成Ready状态。Init容器的端口将不会在Service中进行聚集。正在初始化中的Pod处于Pending状态,但应该会将Initializing状态设置为true
4)如果Pod重启,所有Init容器必须重新执行
5)对Init容器spec的修改被限制在容器image字段,修改其他字段都不会生效。更改Init容器的image字段,等价于重启该Pod
6)Init容器具有应用容器的所有字段。除了readinessProbe(就绪检测),因为Init容器无法定义不同于完成(completion)的就绪(readiness)之外的其他状态。这会在验证过程中强制执行
7)在Pod中的每个app和Init容器的名称必须唯一;与任何其它容器共享同一个名称,会在验证时抛出错误
3.2、容器探针
探针是由kubelet对容器执行的定期诊断。要执行诊断,kubelet调用由容器实现的Handler。有三种类型的处理程序:
- ExecAction:在容器内执行指定命令。如果命令退出时返回码为0则认为诊断成功。
- TCPSocketAction:对指定端口上的容器的IP地址进行TCP检查。如果端口打开,则诊断被认为是成功的。
- HTTPGetAction:对指定的端口和路径上的容器的IP地址执行HTTPGet请求。如果响应的状态码大于等于200且小于400,则诊断被认为是成功的
每次探测都将获得以下三种结果之一:
- 成功:容器通过了诊断。
- 失败:容器未通过诊断。
- 未知:诊断失败,因此不会采取任何行动
探测方式:
1)livenessProbe:指示容器是否正在运行。如果存活探测失败,则kubelet会杀死容器,并且容器将受到其重启策略的影响。如果容器不提供存活探针,则默认状态为Success(会随着容器的生命周期一直存在)
2)readinessProbe:指示容器是否准备好服务请求。如果就绪探测失败,端点控制器将从与Pod匹配的所有Service的端点中删除该Pod的IP地址。初始延迟之前的就绪状态默认为Failure。如果容器不提供就绪探针,则默认状态为Success
检测探针--就绪检测:
#创建pod
[root@k8s-master01 k8s]# cat readinessProbe-httpget.yaml
apiVersion: v1
kind: Pod
metadata:
  name: readiness-httpget-pod
  namespace: default
spec:
  containers:
  - name: readiness-httpget-container
    image: hub.dianchou.com/library/myapp:v1
    imagePullPolicy: IfNotPresent
    readinessProbe:
      httpGet:
        port: 80
        path: /index1.html
      initialDelaySeconds: 1
      periodSeconds: 3
[root@k8s-master01 k8s]# kubectl create -f readinessProbe-httpget.yaml
pod/readiness-httpget-pod created
[root@k8s-master01 k8s]# kubectl get pod
NAME                    READY   STATUS    RESTARTS   AGE
readiness-httpget-pod   0/1     Running   0          6s   #虽然状态为running,但还未就绪

#查看原因:由于没有index1.html文件,所有就绪检测不成功
[root@k8s-master01 k8s]# kubectl describe pod readiness-httpget-pod
...
  Warning  Unhealthy  4m13s (x100 over 9m10s)  kubelet, k8s-node01  Readiness probe failed: HTTP probe failed with statuscode: 404

#进入容器,创建文件测试
[root@k8s-master01 k8s]# kubectl exec readiness-httpget-pod -it -- /bin/sh
/ # cd /usr/share/nginx/html/
/usr/share/nginx/html # ls
50x.html    index.html
/usr/share/nginx/html # echo "123" >> index1.html
/usr/share/nginx/html # exit

#再次查看状态
[root@k8s-master01 k8s]# kubectl get pod
NAME                    READY   STATUS    RESTARTS   AGE
readiness-httpget-pod 1/1 Running 0 11m #已经就绪了检测探针--存活检测:
1)exec方式
#创建pod
[root@k8s-master01 k8s]# vim livenessProbe-exec.yaml
apiVersion: v1
kind: Pod
metadata:
  name: liveness-exec-pod
  namespace: default
spec:
  containers:
  - name: liveness-exec-container
    image: hub.dianchou.com/library/myapp:v1
    imagePullPolicy: IfNotPresent
    command: ["/bin/sh","-c","touch /tmp/live; sleep 20; rm -fr /tmp/live; sleep 3600"]
    livenessProbe:
      exec:
        command: ["test","-e","/tmp/live"]
      initialDelaySeconds: 1
      periodSeconds: 3
[root@k8s-master01 k8s]# kubectl get pod -w  #会不断重启pod
NAME                READY   STATUS    RESTARTS   AGE
liveness-exec-pod   1/1     Running   0          10s
liveness-exec-pod   1/1     Running   1          59s
liveness-exec-pod   1/1     Running   2          117s
2)httpget方式
[root@k8s-master01 k8s]# vim livenessProbe-httpget.yaml
apiVersion: v1
kind: Pod
metadata:
  name: liveness-httpget-pod
  namespace: default
spec:
  containers:
  - name: liveness-httpget-container
    image: hub.dianchou.com/library/myapp:v1
    imagePullPolicy: IfNotPresent
    ports:
    - name: http
      containerPort: 80
    livenessProbe:
      httpGet:
        port: http
        path: /index.html
      initialDelaySeconds: 1
      periodSeconds: 3
      timeoutSeconds: 10
[root@k8s-master01 k8s]# kubectl create -f livenessProbe-httpget.yaml
pod/liveness-httpget-pod created
[root@k8s-master01 k8s]# kubectl get pod
NAME                   READY   STATUS    RESTARTS   AGE
liveness-httpget-pod   1/1     Running   0          5s
[root@k8s-master01 k8s]# kubectl get pod -o wide
NAME                   READY   STATUS    RESTARTS   AGE   IP           NODE         NOMINATED NODE   READINESS GATES
liveness-httpget-pod   1/1     Running   0          12s   10.244.2.6   k8s-node02   <none>           <none>
[root@k8s-master01 k8s]# curl 10.244.2.6
Hello MyApp | Version: v1 | <a href="hostname.html">Pod Name</a>

#删除index.html
[root@k8s-master01 k8s]# kubectl exec liveness-httpget-pod -it -- rm -fr /usr/share/nginx/html/index.html
[root@k8s-master01 k8s]# kubectl get pod -w
NAME                   READY   STATUS    RESTARTS   AGE
liveness-httpget-pod   1/1     Running   0          71s
liveness-httpget-pod   1/1     Running   1          2m25s       #容器在重启
3)tcp方式
[root@k8s-master01 k8s]# cat livenessProbe-tcp.yaml
apiVersion: v1
kind: Pod
metadata:
  name: liveness-tcp-pod
  namespace: default
spec:
  containers:
  - name: liveness-tcp-container
    image: hub.dianchou.com/library/myapp:v1
    imagePullPolicy: IfNotPresent
    livenessProbe:
      initialDelaySeconds: 5
      timeoutSeconds: 1
      periodSeconds: 3
      tcpSocket:
        port: 8080   #端口不存在
[root@k8s-master01 k8s]# kubectl create -f livenessProbe-tcp.yaml
pod/liveness-exec-pod created
[root@k8s-master01 k8s]# kubectl get pod -w
NAME                READY   STATUS    RESTARTS   AGE
liveness-tcp-pod   1/1     Running   0          6s
liveness-tcp-pod   1/1     Running   1          15s
liveness-tcp-pod   1/1     Running   2          27s
liveness-tcp-pod   1/1     Running   3          39s
liveness-tcp-pod   0/1     CrashLoopBackOff   3          50s
3.3、Pod hook
Podhook(钩子)是由Kubernetes管理的kubelet发起的,当容器中的进程启动前或者容器中的进程终止之前运行,这是包含在容器的生命周期之中。可以同时为Pod中的所有容器都配置hook
Hook的类型包括两种:
- exec:执行一段命令
- HTTP:发送HTTP请求
[root@k8s-master01 k8s]# cat start-stop.yaml
apiVersion: v1
kind: Pod
metadata:
  name: lifecycle-demo
  namespace: default
spec:
  containers:
  - name: lifecycle-demo-container
    image: hub.dianchou.com/library/myapp:v1
    imagePullPolicy: IfNotPresent
    lifecycle:
      postStart:
        exec:
          command: ["/bin/sh","-c","echo hello from the postStart handler >> /usr/share/message"]
      preStop:
        exec:
          command: ["/bin/sh","-c","echo hello from the preStop handler >> /usr/share/message"]
[root@k8s-master01 k8s]# kubectl create -f start-stop.yaml
pod/lifecycle-demo created
[root@k8s-master01 k8s]# kubectl get pod
NAME             READY   STATUS    RESTARTS   AGE
lifecycle-demo   1/1     Running   0          4s
[root@k8s-master01 k8s]# kubectl exec lifecycle-demo -it -- cat /usr/share/message
hello from the postStart handler
3.4、pod 重启策略
PodSpec中有一个restartPolicy字段,可能的值为Always、OnFailure和Never。默认为Always。restartPolicy适用于Pod中的所有容器。restartPolicy仅指通过同一节点上的kubelet重新启动容器。失败的容器由kubelet以五分钟为上限的指数退避延迟(10秒,20秒,40秒...)重新启动,并在成功执行十分钟后重置。如Pod文档中所述,一旦绑定到一个节点,Pod将永远不会重新绑定到另一个节点。
3.5、pod phase(pod相位)
1)挂起(Pending):Pod已被Kubernetes系统接受,但有一个或者多个容器镜像尚未创建。等待时间包括调度Pod的时间和通过网络下载镜像的时间,这可能需要花点时间
2)运行中(Running):该Pod已经绑定到了一个节点上,Pod中所有的容器都已被创建。至少有一个容器正在运行,或者正处于启动或重启状态,可能并不能提供访问
3)成功(Succeeded):Pod中的所有容器都被成功终止,并且不会再重启
4)失败(Failed):Pod中的所有容器都已终止了,并且至少有一个容器是因为失败终止。也就是说,容器以非0状态退出或者被系统终止
5)未知(Unknown):因为某些原因无法取得Pod的状态,通常是因为与Pod所在主机通信失败
-------------------------------------------
个性签名:独学而无友,则孤陋而寡闻。做一个灵魂有趣的人!


