qiankun微前端项目实践方案(基础框架篇)
一、前言
相信大家对于微前端的概念和思想都有了解过,在此我不再赘述。在我们的业务项目中,由于项目比较大,在日常的开发过程中也暴露出来了问题:项目启动慢,打包部署上线慢。这给我们开发和运维人员带来了很大的不便,有时候有紧急任务需要上线,也得打包半个钟才能交付到运维处。因此,我们打算使用微前端的方案,来解决我们目前的困境。下面我以一个简化版本的 demo,进行我们实践的介绍。 demo 源码放在 github 上:https://github.com/xiaohuiguo/qiankun-vue-ts-demo 。
二、项目简介
项目划分为几个模块系统:
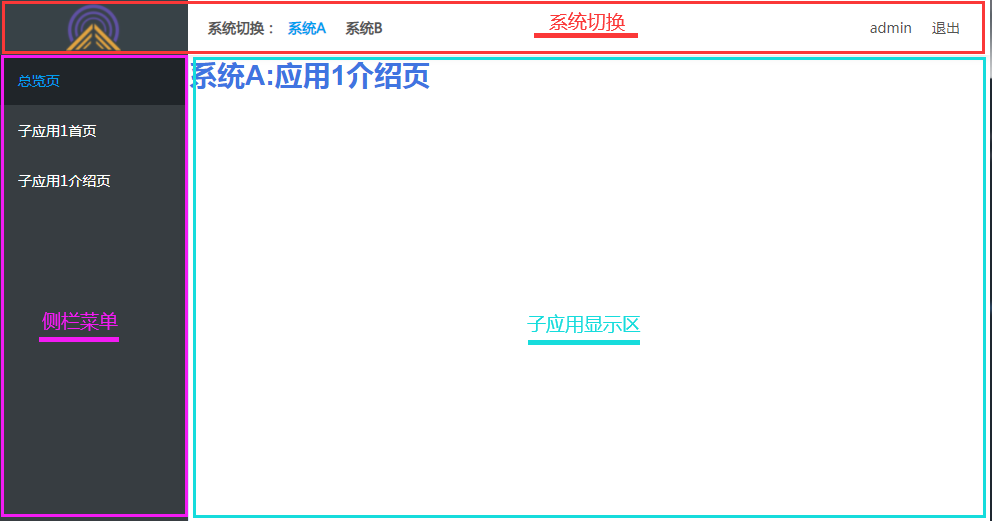
主应用:【头部+侧栏+总览页+登录页】
系统A:应用1【首页+介绍页】
系统B : 应用2【首页+介绍页】
项目页面视图:

结构介绍:
我们根据业务情况划分了,主应用、子应用;
主应用主要是主框架结构,包含头部侧栏以及控制页面显示区域,另外对于一些常规页(登录/总览入口/注册)这类的页面直接放在主应用即可。
子应用则按业务情况,进行划分,这里我分成了 应用1 和 应用2。
系统操作演示:

三、技术选型
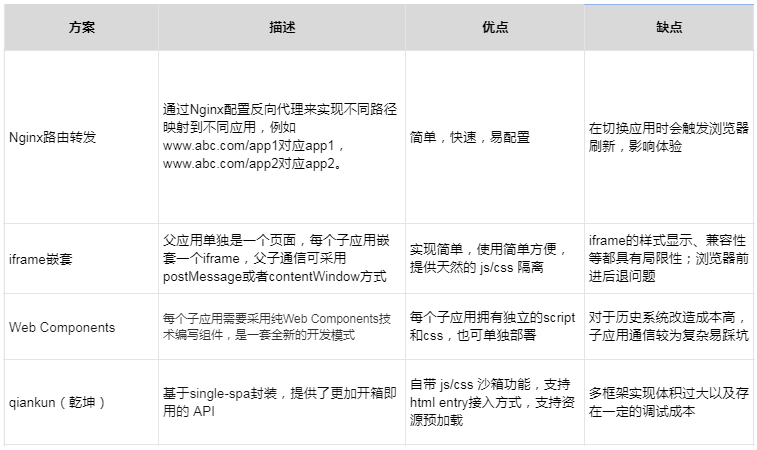
以下是目前比较流行的几种方案对比(参考了网上一些总结的不错的资料):

框架思考:考虑到业务以及团队技术水平情况,我们选择了qiankun(乾坤)作为我们的微服务接入框架,vue+ts作为项目主开发框架。主要是qiankun的接口封装的比较好,也比较容易上手,对于我们目前团队的能力,是可以接受的。
四、qiankun 框架构建
1.主框架应用
1.1 路由及视图设计
首先,一般项目都是有一个登录页的,在登录页不加载子应用,只有通过登录成功后,跳到控制台子应用的页面时,才进行加载子应用的。在本项目中,如果是打开主应用的页面都是不会去加载子应用的;
主应用的页面有登录页,总览页(属于控制台),路由如下:
/login
/gernal
在本项目中,子应用都是在控制台展示的,当打开子应用的路由时,就会触发子应用资源的加载,子应用路由如下:
/subone/**
/subtwo/**
针对以上情况,我们的视图区要做3种类型的视图区兼容
- 非控制台的页面显示区(如登录页),使用
router-view - 控制台主应用页面的显示,使用
router-view - 控制台子应用页面的显示,使用
<div id="subapp-viewport"></div>
当路由切换时,这里使用一个变量viewType来进行判断,切换视图区;另外,系统切换时我们头部系统显示以及侧栏也需要进行变化,这里使用一个变量menuType来进行判断:
// App.vue
<template>
  <div class="home-container">
    <!--主应用非控制台页面展示区:比如登录-->
    <router-view v-if="status.viewType === 'full'"></router-view>
    <!--控制台页面展示区-->
    <div style="width: 100%;height: 100%;" v-show="status.viewType !== 'full'">
      <div class="home-header box">
        <header-nav :menuType=status.menuType></header-nav>
      </div>
      <div class="home-content box">
        <div class="home-nav">
          <ul class="nav-menu-admin">
            <li class="nav-menu-item" v-for="(item, i) in navActive" @click="skip(item.path)">
              <span slot="title">{{item.name}}</span>
            </li>
          </ul>
        </div>
        <!--主应用页面展示区-->
        <router-view v-show="status.viewType === 'control_main'"></router-view>
        <!--子应用页面展示区-->
        <div id="subapp-viewport" class="flex" v-show="status.viewType === 'control_sub'"></div>
      </div>
    </div>
  </div>
</template>
// App.vue
private status: any = {
            viewType: 'control_main', // 页面视图类型 {String} --full:非控制台部分| control_main:控制台主应用|control_sub:控制台子应用;用于控制视图展示区切换
            menuType: 'sysA' // 导航类型 {String} -- sysA:系统A| sysB:系统B;用于控制左侧菜单切换
        }
private getPageStatus(index: any) {
          console.log(index)
            if (['login'].indexOf(index) > -1) {
                this.status.viewType = "full";
            } else if ([ 'gernal'].indexOf(index) > -1) {
                this.status.viewType = "control_main"
            } else {
                this.status.viewType = "control_sub"
            }
            this.$forceUpdate();
        }
private filterMenu(route: any) {
            let menuType = route.path.split('/')[1];
            switch (menuType) {
                case 'subtwo':
                    this.status.menuType = 'sysB';
                    break;
                default:
                    this.status.menuType = 'sysA';
                    break;
            }
            this.navActive = this.nav[this.status.menuType];
        }
@Watch('$route') changeRoute(to: any, from: any) {
            this.navActive = this.nav[this.status.menuType];
            console.log(to, from)
            let menuType = to.path.split('/')[1];
            this.filterMenu(to);
            this.getPageStatus(menuType);
        }
1.2 子应用注册
子应用信息配置包括路由触发值,端口,以及视图区的容器
// main.ts
// 子应用端口
const MicroAppsPort: any = {
    VUE_APP_SUB_ONE: 8081,
    VUE_APP_SUB_TWO: 8082
}
function getEntry(name: any) {
    const entryUrl = '//' + environment['host'] + ':';
    return entryUrl + MicroAppsPort[name] + '/'
}
// 构建子应用, #subapp-viewport为子应用容器
const appsRouter: any = [
    {
        name: 'subone',
        entry: getEntry('VUE_APP_SUB_ONE'),
        activeRule: '/subone',
    },
    {
        name: 'subtwo',
        entry: getEntry('VUE_APP_SUB_TWO'),
        activeRule: '/subtwo',
    }
]
const microApps: any = appsRouter.map((item: any) => {
    return {
        ...item,
        container: '#subapp-viewport', // 子应用挂载的div
        props: {
            routerBase: item.activeRule, // 下发基础路由
            window: window // 保持父子公用同一个window
        }
    }
});
使用qiankun提供的api进行子应用的注册及微服务启动
// main.ts
// 注册子应用
registerMicroApps(microApps);
// 启动微服务
start();
1.3 mait.ts和App.vue完整代码
// mait.ts完整代码
import Vue from 'vue'
import App from './App.vue'
import router from './router'
import { registerMicroApps, start } from 'qiankun'

import {environment} from "@/environment/environment";

// 组件总的样式
import '@/assets/sass/index.scss';

// 渲染主应用, #app为主应用根元素
new Vue({
  router,
  render: h => h(App)
}).$mount('#app')
// 子应用端口
const MicroAppsPort: any = {
    VUE_APP_SUB_ONE: 8081,
    VUE_APP_SUB_TWO: 8082
}
function getEntry(name: any) {
    const entryUrl = '//' + environment['host'] + ':';
    return entryUrl + MicroAppsPort[name] + '/'
}
// 构建子应用, #subapp-viewport为子应用容器
const appsRouter: any = [
    {
        name: 'subone',
        entry: getEntry('VUE_APP_SUB_ONE'),
        activeRule: '/subone',
    },
    {
        name: 'subtwo',
        entry: getEntry('VUE_APP_SUB_TWO'),
        activeRule: '/subtwo',
    }
]
const microApps: any = appsRouter.map((item: any) => {
    return {
        ...item,
        container: '#subapp-viewport', // 子应用挂载的div
        props: {
            routerBase: item.activeRule, // 下发基础路由
            window: window // 保持父子公用同一个window
        }
    }
});
// 注册子应用
registerMicroApps(microApps);
// 启动微服务
start();
// App.vue完整代码
<template>
  <div class="home-container">
    <!--主应用非控制台页面展示区:比如登录-->
    <router-view v-if="status.viewType === 'full'"></router-view>
    <!--控制台页面展示区-->
    <div style="width: 100%;height: 100%;" v-show="status.viewType !== 'full'">
      <div class="home-header box">
        <header-nav :menuType=status.menuType></header-nav>
      </div>
      <div class="home-content box">
        <div class="home-nav">
          <ul class="nav-menu-admin">
            <li class="nav-menu-item" v-for="(item, i) in navActive" @click="skip(item.path)">
              <span slot="title">{{item.name}}</span>
            </li>
          </ul>
        </div>
        <!--主应用页面展示区-->
        <router-view v-show="status.viewType === 'control_main'"></router-view>
        <!--子应用页面展示区-->
        <div id="subapp-viewport" class="flex" v-show="status.viewType === 'control_sub'"></div>
      </div>
    </div>
  </div>
</template>
<script lang="ts">
    import {
        Component,
        Vue,
        Watch
    } from 'vue-property-decorator';
    import HeaderNav from "@/components/header-nav/header-nav.vue";

    @Component({
        components: {
            HeaderNav
        }
    })
    export default class App extends Vue {
        $router: any;
        private $route: any;
        private isLoading: boolean = true;
        private $window: any;
        private user: any = {
            email: 'admin'
        };

        private status: any = {
            viewType: 'control_main', // 页面视图类型 {String} --full:非控制台部分| control_main:控制台主应用|control_sub:控制台子应用;用于控制试图展示区切换
            menuType: 'sysA' // 导航类型 {String} -- sysA:系统A| sysB:系统B;用于控制左侧菜单切换
        }

        private nav: any = {
            sysA: [
              {
                name:'总览页',
                path:'/gernal'
              },
              {
                name:'子应用1首页',
                path:'/subone/home'
              },
              {
                name:'子应用1介绍页',
                path:'/subone/about'
              },
            ],
            sysB: [
              {
                name:'子应用2首页',
                path:'/subtwo/home'
              },
              {
                name:'子应用2介绍页',
                path:'/subtwo/about'
              }
            ]
        };
        private navActive:any = [];

        @Watch('$route') changeRoute(to: any, from: any) {
            this.navActive = this.nav[this.status.menuType];
            console.log(to, from)
            let menuType = to.path.split('/')[1];
            this.filterMenu(to);
            this.getPageStatus(menuType);
        }

        /**重置头部导航/侧栏菜单显示 */
        private filterMenu(route: any) {
            let menuType = route.path.split('/')[1];
            switch (menuType) {
                case 'subtwo':
                    this.status.menuType = 'sysB';
                    break;
                default:
                    this.status.menuType = 'sysA';
                    break;
            }
            this.navActive = this.nav[this.status.menuType];
        }
        /*重置容器显示情况*/
        private getPageStatus(index: any) {
          console.log(index)
            if (['login'].indexOf(index) > -1) {
                this.status.viewType = "full";
            } else if ([ 'gernal'].indexOf(index) > -1) {
                this.status.viewType = "control_main"
            } else {
                this.status.viewType = "control_sub"
            }
            this.$forceUpdate();
        }

        private skip(url:any) {
          this.$router.push(url);
        }

        private mounted() {
            /**整理页面 */
            let menuType = this.$route.path.split('/')[1];
            this.getPageStatus(menuType);
            /**整理导航 */
            this.filterMenu(this.$route);
        }
    }
</script>
<style lang="scss">
....
</style>
2. 系统A:子应用1(系统B同理)
2.1 main.ts修改
由于用的是history路由模式,子应用需要兼容qiankun框架嵌入时的应用base路径
// main.ts完整代码

import './public-path.ts'
import Vue from 'vue'
import VueRouter, { NavigationGuardNext, Route } from 'vue-router'
import App from './App.vue'
import routes from './router'

Vue.config.productionTip = false

let router = null
let instance: any = null
const _window: any = window

function render ({props, routerBase}: any = {}) {
  router = new VueRouter({
    // 子模块是history路由时,处理basi url
    base: _window.__POWERED_BY_QIANKUN__ ? routerBase : '/',
    mode: 'history',
    routes
  })
  instance = new Vue({
    router,
    render: h => h(App)
  }).$mount(props ? props.querySelector('#app') : '#app')
}

// 本地调试
if (!_window.__POWERED_BY_QIANKUN__) {
  render()
}

// 导出生命周期
export async function bootstrap () {
  console.log('应用1启动')
}

export async function mount (props: any) {
  console.log('应用1挂载', props)
  render(props)
}

export async function unmount () {
  instance.$destroy()
  instance.$el.innerHTML = ''
  instance = null
  router = null
}
2.2 path_public.ts修改,兼容qiankun加载情况下应用的端口,并且需要在上面main.ts中引入
const _window: any = window
if (_window.__POWERED_BY_QIANKUN__) {
  if (process.env.NODE_ENV === 'development') {
      // eslint-disable-next-line
      __webpack_public_path__ = `//localhost:${process.env.VUE_APP_PORT}${process.env.BASE_URL}`;
    } else {
      // eslint-disable-next-line
      __webpack_public_path__ = _window.__INJECTED_PUBLIC_PATH_BY_QIANKUN__;
    }
}
2.3 添加vue.webpack.js和端口配置
devServer的端口改为与主应用配置的一致,且加上跨域headers和output配置
// vue.webpack.js
const { name } = require('./package.json')
const webpack = require('webpack');
module.exports = {
  transpileDependencies: ['common'],
  chainWebpack: config => config.resolve.symlinks(false),
  configureWebpack: {
    output: {
      // 把子应用打包成 umd 库格式
      library: `${name}-[name]`,
      libraryTarget: 'umd',
      jsonpFunction: `webpackJsonp_${name}`
    },
    plugins: []
  },
  devServer: {
    port: process.env.VUE_APP_PORT, // 端口配置
    headers: {
      'Access-Control-Allow-Origin': '*'
    }
  }
}
// .env
VUE_APP_PORT=8081
五、部署
5.1 应用打包【以https://github.com/xiaohuiguo/qiankun-vue-ts-demo为例子】
主应用打包
cd  main
npm install
npm run bulid
子应用1打包
cd  subone
npm install
npm run build
子应用2打包
cd  subtwo
npm install
npm run bulid
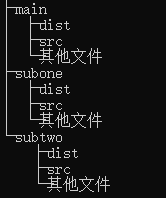
目录结构如下:

5.2 修改nginx配置文件
以项目代码放在/var/www/html目录下为例,所有应用部署在同一台机器上:
http {
    include       mime.types;
    default_type  application/octet-stream;
    sendfile        on;
    keepalive_timeout  65;

    gzip on;
    gzip_buffers 32 8K;
    gzip_comp_level 6;
    gzip_min_length 2k;
    gzip_types application/json application/text application/javascript text/css text/xml;
    gzip_vary on;

    client_max_body_size   20m;
    # 主应用代理
    server {
        listen       80;
        server_name  127.0.0.1;
        location / {
            root   /var/www/html/main/dist;
            index  index.html index.htm;
            try_files $uri $uri/ /index.html;
            add_header 'Cache-Control'  'private, no-store, no-cache, must-revalidate, proxy-revalidate';
        }
        #对于子应用subone第三方库的图片路径处理:例如layer等等;如果没有使用到可以忽略这一部分
        location /subone/img {
            proxy_set_header  Host  $http_host;
            proxy_set_header  X-Real-IP  $remote_addr;
            proxy_set_header  X-Forwarded-For $proxy_add_x_forwarded_for;
            proxy_pass http://127.0.0.1:8081/img;
            proxy_redirect default;
        }
        location /subtwo/img {
            proxy_set_header  Host  $http_host;
            proxy_set_header  X-Real-IP  $remote_addr;
            proxy_set_header  X-Forwarded-For $proxy_add_x_forwarded_for;
            proxy_pass http://127.0.0.1:8082/img;
            proxy_redirect default;
        }
        #-------
        location @router {
            rewrite ^.*$ /index.html last;
        }
        error_page   500 502 503 504  /50x.html;
        location = /50x.html {
            root   html;
        }
    }
    #子应用subone代理
    server {
        listen       8081;
        server_name  127.0.0.1;
        location / {
            root   /var/www/html/subone/dist;
            index  index.html index.htm;
            try_files $uri $uri/ /index.html;
            add_header 'Access-Control-Allow-Origin' '*';
            add_header 'Access-Control-Allow-Credentials' 'true';
            add_header 'Access-Control-Allow-Headers' 'reqid, nid, host, x-real-ip, x-forwarded-ip, event-type, event-id, accept, content-type';
        }
        location @router {
            rewrite ^.*$ /index.html last;
        }
        error_page   500 502 503 504  /50x.html;
        location = /50x.html {
            root   html;
        }
    }
    #子应用subtwo代理
    server {
        listen       8082;
        server_name  127.0.0.1;
        location / {
            root   /var/www/html/subtwo/dist;
            index  index.html index.htm;
            try_files $uri $uri/ /index.html;
            add_header 'Access-Control-Allow-Origin' '*';
            add_header 'Access-Control-Allow-Credentials' 'true';
            add_header 'Access-Control-Allow-Headers' 'reqid, nid, host, x-real-ip, x-forwarded-ip, event-type, event-id, accept, content-type';
        }
        location @router {
            rewrite ^.*$ /index.html last;
        }
        error_page   500 502 503 504  /50x.html;
        location = /50x.html {
            root   html;
        }
    }
}
5.3 注意事项
5.3.1 跨域问题
如果主应用加载子应用属于fetch方式,会存在跨域问题;需要加上cors配置:
add_header 'Access-Control-Allow-Origin' '*';
add_header 'Access-Control-Allow-Credentials' 'true';
add_header 'Access-Control-Allow-Headers' 'reqid, nid, host, x-real-ip, x-forwarded-ip, event-type, event-id, accept, content-type';
5.3.2 js第三方插件/库的静态资源重定向问题
如果子应用中使用了第三方的插件库,比如layer.js,需要设置layer的图片资源路径:
location /subone/img {
      proxy_set_header  Host  $http_host;
      proxy_set_header  X-Real-IP  $remote_addr;
      proxy_set_header  X-Forwarded-For $proxy_add_x_forwarded_for;
      proxy_pass http://127.0.0.1:8081/img;
      proxy_redirect default;
}
六、小结
由此一个简单的微前端框架便完成了,需要注意的点是:
- 主应用如何注册子应用
- 系统切换时侧栏和可视区同步变化兼容
- 子应用的加载兼容


